wheel size SKODA ROOMSTER 2011 1.G Owner's Manual
[x] Cancel search | Manufacturer: SKODA, Model Year: 2011, Model line: ROOMSTER, Model: SKODA ROOMSTER 2011 1.GPages: 212, PDF Size: 3.3 MB
Page 52 of 212
Seats and Stowage
Front seats
Basic information The front seats have a wide range of different settings and can thus be matched
to the physical characteristics of the driver and front passenger.
Correct adjustment of the seats is particularly important for:
● safely and quickly reaching the controls;
● a relaxed, fatigue-free body position;
● achieving the maximum protection offered by the seat belts and the airbag
system.
The chapters which follow describe the procedure which you should adopt for ad-
justing the seats. WARNING
● Never transport more occupants than the maximum seating in the vehicle.
● Each occupant must correctly fasten the seat belt belonging to the seat.
Children must be fastened ⇒
page 118, Transporting children safely with a
suitable restraint system.
● The front seats and the head restraints must always be adjusted to match
the body size of the seat occupant as well as the seat belts must always be
correctly fastened in order to provide an optimal protection for you and your
occupants.
● Always keep your feet in the footwell when the car is being driven - never
place your feet on the instrument panel, out of the window or on the surfaces
of the seats. This is particularly important for the front seat passenger. You
will be exposed to increased risk of injury if it becomes necessary to apply the
brake or in the event of an accident. If an airbag is deployed, you may suffer
fatal injuries when adopting an incorrect seated position! WARNING (Continued)
● It is important for the driver and front passenger to maintain a distance of
at least 25 cm from the steering wheel or dash panel. Not maintaining this
minimum distance will mean that the airbag system will not be able to proper-
ly protect you - hazard! The front seats and the head restraints must always
also be correctly adjusted to match the body size of the occupant.
● Ensure that there are no objects in the footwell as any objects may get be-
hind the pedals during a driving or braking manoeuvre. You would then no
longer be able to operate the clutch, to brake or accelerate.
● Do not transport any objects on the front passenger seat except objects
(e.g. child safety seat) provided for this purpose - risk of accident!
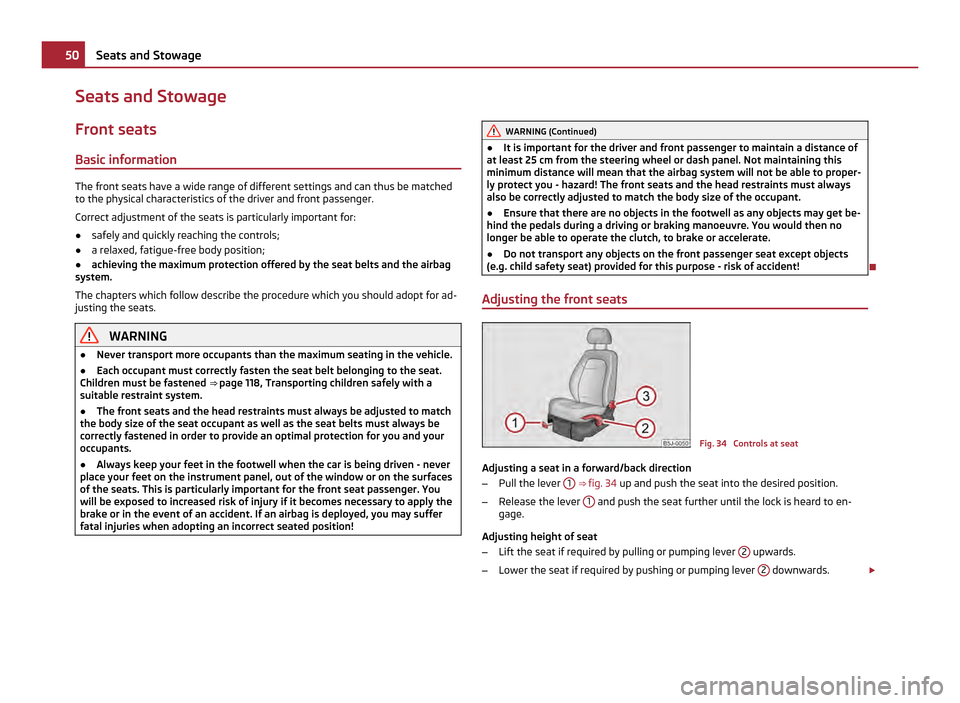
Adjusting the front seats Fig. 34 Controls at seat
Adjusting a seat in a forward/back direction
– Pull the lever 1
⇒
fig. 34 up and push the seat into the desired position.
– Release the lever 1 and push the seat further until the lock is heard to en-
gage.
Adjusting height of seat
– Lift the seat if required by pulling or pumping lever 2 upwards.
– Lower the seat if required by pushing or pumping lever 2 downwards.
£50
Seats and Stowage
Page 53 of 212
Adjust the angle of the seat backrest
–
Relieve any pressure on the seat backrest (do not lean on it) and turn the
handwheel 3 to adjust the angle of the backrest.
The driver's seat should be adjusted in such a way that the pedals can be fully
pressed to the floor with slightly bent legs.
The seat backrest on the driver's seat should be adjusted in such a way that the
upper point of the steering wheel can be easily reached with slightly bent arms. WARNING
● Only adjust the driver seat when the vehicle is stationary - risk of injury!
● Take care when adjusting the seat! Adjusting the seat without care can
lead to bruises or injuries.
● The seat backrests must not be angled too far back when driving other-
wise this will affect proper operation of the seat belts and of the airbag sys-
tem - risk of injury!
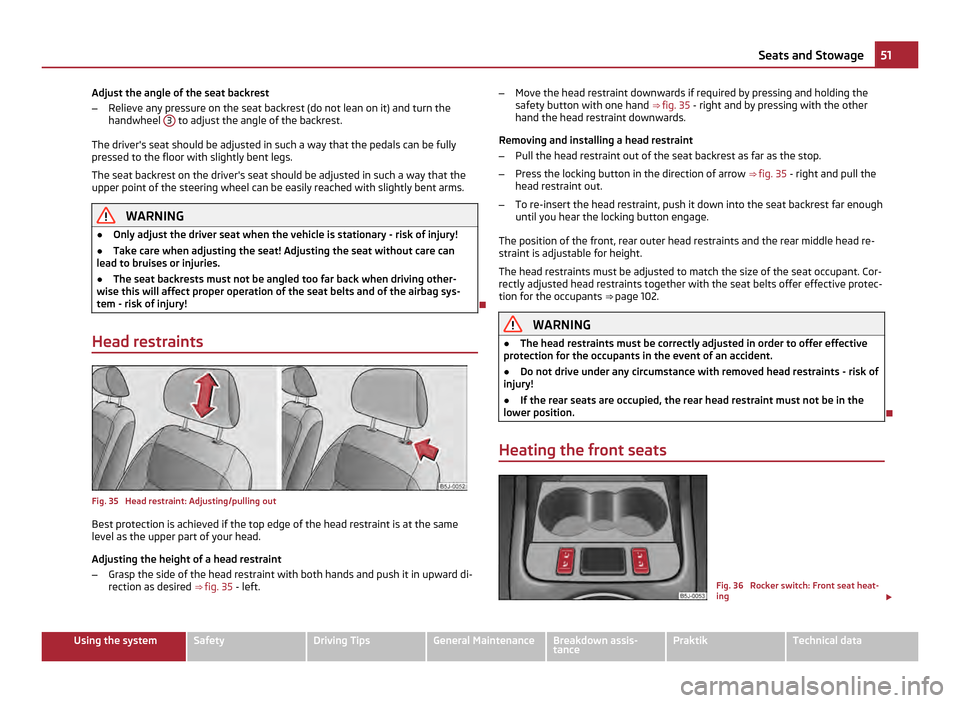
Head restraints Fig. 35 Head restraint: Adjusting/pulling out
Best protection is achieved if the top edge of the head restraint is at the same
level as the upper part of your head.
Adjusting the height of a head restraint
–
Grasp the side of the head restraint with both hands and push it in upward di-
rection as desired ⇒ fig. 35 - left. –
Move the head restraint downwards if required by pressing and holding the
safety button with one hand ⇒ fig. 35 - right and by pressing with the other
hand the head restraint downwards.
Removing and installing a head restraint
– Pull the head restraint out of the seat backrest as far as the stop.
– Press the locking button in the direction of arrow ⇒ fig. 35 - right and pull the
head restraint out.
– To re-insert the head restraint, push it down into the seat backrest far enough
until you hear the locking button engage.
The position of the front, rear outer head restraints and the rear middle head re-
straint is adjustable for height.
The head restraints must be adjusted to match the size of the seat occupant. Cor-
rectly adjusted head restraints together with the seat belts offer effective protec-
tion for the occupants ⇒ page 102. WARNING
● The head restraints must be correctly adjusted in order to offer effective
protection for the occupants in the event of an accident.
● Do not drive under any circumstance with removed head restraints - risk of
injury!
● If the rear seats are occupied, the rear head restraint must not be in the
lower position.
Heating the front seats Fig. 36 Rocker switch: Front seat heat-
ing
£ 51
Seats and Stowage Using the system Safety Driving Tips General Maintenance Breakdown assis-
tance Praktik Technical data
Page 104 of 212
●
Ensure that no objects can obstruct the pedal.
● Adjust the mirror, the front seat and the head restraint to match your body
size.
● Point out to your occupants that the head restraints must be adjusted to
match their body size.
● Protect the children in suitable child seats with correctly fastened seat belts
⇒ page 118, Transporting children safely .
● Adopt the correct seated position ⇒
page 102. Also inform your occupants to
adopt the correct seated position.
● Fasten the seat belt correctly. Also inform your occupants to properly fasten
the seat belts ⇒
page 107, How are seat belts correctly fastened?.
What influences the driving safety? The driving safety is primarily determined by the style of driving
and the personal behaviour of all the occupants.
The driver is fully responsible for himself and his occupants. If your driving safety
is effected, you place yourself and the oncoming traffic at risk.
Please refer to the following guidelines.
● Do not get distracted from concentrating on the traffic situation, e.g. by your
occupants or mobile phone calls.
● Never drive when your driving ability is impaired, e.g. through medication, alco-
hol, drugs.
● Keep to the traffic regulations and the permissible speed limit.
● Adjust the driving speed at all times to the road condition as well as to the
traffic and weather conditions.
● Take regular breaks on long journeys - at the latest every two hours. Correct seated position
Correct seated position for the driver Correct seated position for the driver is important for safe and re-
laxed driving.
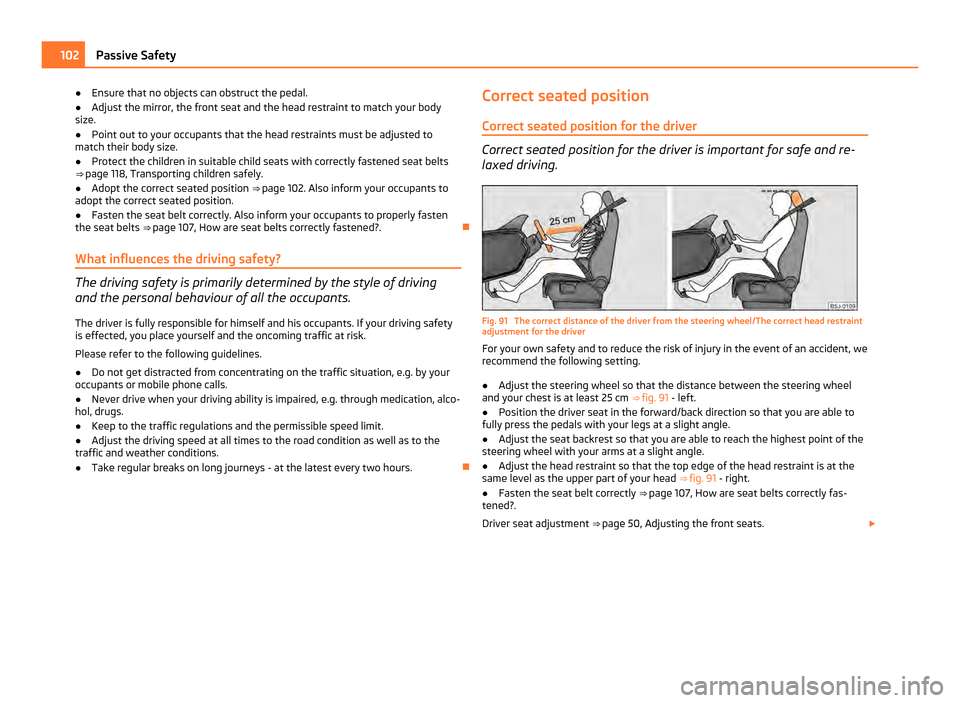
Fig. 91 The correct distance of the driver from the steering wheel/The correct head restraint
adjustment for the driver
For your own safety and to reduce the risk of injury in the event of an accident, we
recommend the following setting.
● Adjust the steering wheel so that the distance between the steering wheel
and your chest is at least 25 cm ⇒ fig. 91 - left.
● Position the driver seat in the forward/back direction so that you are able to
fully press the pedals with your legs at a slight angle.
● Adjust the seat backrest so that you are able to reach the highest point of the
steering wheel with your arms at a slight angle.
● Adjust the head restraint so that the top edge of the head restraint is at the
same level as the upper part of your head ⇒
fig. 91 - right.
● Fasten the seat belt correctly ⇒
page 107, How are seat belts correctly fas-
tened?.
Driver seat adjustment ⇒ page 50, Adjusting the front seats. £102
Passive Safety
Page 105 of 212
WARNING
● The front seats and the head restraints must always be adjusted to match
the body size of the seat occupant as well as the seat belts must always be
correctly fastened in order to provide an optimal protection for you and your
occupants.
● The driver must maintain a distance of at least 25 cm to the steering wheel
⇒ fig. 91. Not maintaining this minimum distance will mean that the airbag
system will not be able to properly protect you - hazard!
● When driving, hold the steering wheel with both hands firmly on the outer
edge in the 9 o'clock and 3 o'clock position. Never hold the steering wheel
firmly in the 12 o'clock position or in another way (e.g. in the middle of the
steering wheel or at the inner steering wheel edge). In such cases, injuries to
the arms, the hands and the head can occur when the driver airbag is de-
ployed.
● The seat backrests must not be angled too far back when driving other-
wise this will affect proper operation of the seat belts and of the airbag sys-
tem - risk of injury!
● Ensure that there are no objects in the footwell as any objects may get be-
hind the pedals during a driving or braking manoeuvre. You would then no
longer be able to operate the clutch, to brake or accelerate.
Correct seated position for the front passenger The front passenger must maintain a distance of at least 25 cm
from the dash panel so that the airbag offers him the greatest pos-
sible safety it is deployed.
For the safety of the front passenger and to reduce the risk of injury in the event
of an accident, we recommend the following setting.
● Adjust the front passenger seat as far as possible to the rear.
● Adjust the head restraint so that the top edge of the head restraint is at the
same level as the upper part of your head ⇒
fig. 91 - right.
● Fasten the seat belt correctly ⇒
page 107, How are seat belts correctly fas-
tened?.
In exceptional cases the front passenger airbag can be deactivated ⇒ page 116,
Deactivating airbags.
Adjusting the passenger seat ⇒ page 50, Adjusting the front seats. WARNING
● The front seats and the head restraints must always be adjusted to match
the body size of the seat occupant as well as the seat belts must always be
correctly fastened in order to provide an optimal protection for you and your
occupants.
● The front passenger must maintain a distance of at least 25 cm to the dash
panel. Not maintaining this minimum distance will mean that the airbag sys-
tem will not be able to properly protect you - hazard!
● Always keep your feet in the footwell when the car is being driven - never
place your feet on the instrument panel, out of the window or on the surfaces
of the seats. You will be exposed to increased risk of injury if it becomes nec-
essary to apply the brake or in the event of an accident. If an airbag is de-
ployed, you may suffer fatal injuries when adopting an incorrect seated posi-
tion!
● The seat backrests must not be angled too far back when driving other-
wise this will affect proper operation of the seat belts and of the airbag sys-
tem - risk of injury!
Correct seated position for the occupants on the rear seats Occupants on the rear seats must sit upright, keep the feet in the
footwell and must have their seat belts correctly fastened.
To reduce the risk of injury in the event of a sudden braking manoeuvre or an acci-
dent, the occupants on the rear seats must observe the following.
● Adjust the head restraints so that the top edge of the head restraints is at the
same level as the upper part of your head ⇒ fig. 91
- on the right.
● Fasten the seat belt correctly
⇒ page 107, How are seat belts correctly fas-
tened?.
● If you are transporting
⇒ page 118
, Transporting children safely children in the
vehicle, please use a suitable child restraint system. £ 103
Passive Safety Using the system Safety Driving Tips General Maintenance Breakdown assis-
tance Praktik Technical data
Page 114 of 212
CAUTION
The dash panel must be replaced after the front passenger airbag has been de-
ployed.
Function of the front airbags Risk of injury to the head and chest area is reduced by fully inflated
airbags.
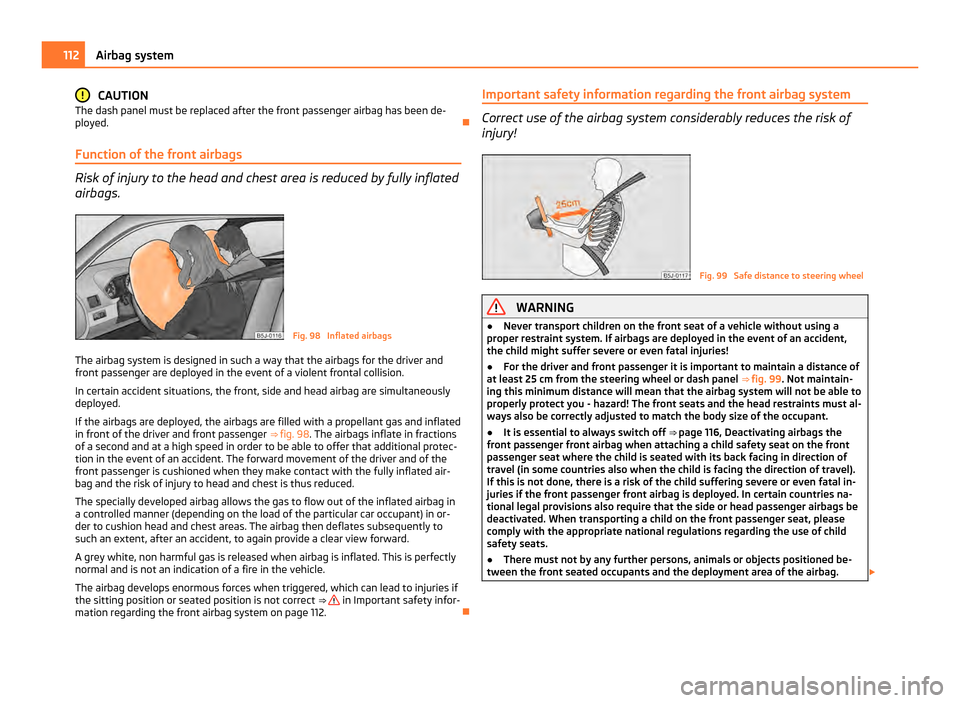
Fig. 98 Inflated airbags
The airbag system is designed in such a way that the airbags for the driver and
front passenger are deployed in the event of a violent frontal collision.
In certain accident situations, the front, side and head airbag are simultaneously
deployed.
If the airbags are deployed, the airbags are filled with a propellant gas and inflated
in front of the driver and front passenger ⇒ fig. 98 . The airbags inflate in fractions
of a second and at a high speed in order to be able to offer that additional protec-
tion in the event of an accident. The forward movement of the driver and of the
front passenger is cushioned when they make contact with the fully inflated air-
bag and the risk of injury to head and chest is thus reduced.
The specially developed airbag allows the gas to flow out of the inflated airbag in
a controlled manner (depending on the load of the particular car occupant) in or-
der to cushion head and chest areas. The airbag then deflates subsequently to
such an extent, after an accident, to again provide a clear view forward.
A grey white, non harmful gas is released when airbag is inflated. This is perfectly
normal and is not an indication of a fire in the vehicle.
The airbag develops enormous forces when triggered, which can lead to injuries if
the sitting position or seated position is not correct ⇒ in Important safety infor-
mation regarding the front airbag system
on page 112. Important safety information regarding the front airbag system Correct use of the airbag system considerably reduces the risk of
injury! Fig. 99 Safe distance to steering wheel
WARNING
● Never transport children on the front seat of a vehicle without using a
proper restraint system. If airbags are deployed in the event of an accident,
the child might suffer severe or even fatal injuries!
● For the driver and front passenger it is important to maintain a distance of
at least 25
cm from the steering wheel or dash panel ⇒ fig. 99. Not maintain-
ing this minimum distance will mean that the airbag system will not be able to
properly protect you - hazard! The front seats and the head restraints must al-
ways also be correctly adjusted to match the body size of the occupant.
● It is essential to always switch off ⇒ page 116, Deactivating airbags
the
front passenger front airbag when attaching a child safety seat on the front
passenger seat where the child is seated with its back facing in direction of
travel (in some countries also when the child is facing the direction of travel).
If this is not done, there is a risk of the child suffering severe or even fatal in-
juries if the front passenger front airbag is deployed. In certain countries na-
tional legal provisions also require that the side or head passenger airbags be
deactivated. When transporting a child on the front passenger seat, please
comply with the appropriate national regulations regarding the use of child
safety seats.
● There must not by any further persons, animals or objects positioned be-
tween the front seated occupants and the deployment area of the airbag. £112
Airbag system
Page 163 of 212
Wheels and Tyres
Wheels
General information ●
New tyres do not offer optimal grip at first. They should therefore be run in for
about 500 km at a moderate speed and an appropriately cautious style of driving.
You will also profit from longer tyre life.
● The tread depth of new tyres may differ because of design features and the
configuration of the tread (depending on the type of tyre and the manufacturer).
● Drive over curbs on the side of the road and other such obstacles slowly and,
where possible, at a right angle in order to avoid damage to tyres and wheel trims.
● We recommend you Inspect your tyres and rims from time to time for damage
(punctures, cuts, splits and bulges). Remove foreign bodies from the tyre profile.
● Damage to tyres is frequently not visible. Unusual vibrations or pulling of the
vehicle to one side could be a sign of tyre damage. Please reduce your speed im-
mediately and stop if you suspect that a wheel is damaged. Inspect the tyres for
signs of damage (bulges, splits, etc.) If no visible damage is present, please drive
at an appropriately slow speed and carefully to the nearest specialist garage in or-
der to have your vehicle inspected.
● Also protect your tyres from contact with oil, grease and fuel.
● Immediately replace any dust caps of the valves which have got lost.
● Mark wheels before removing them so that their previous direction of running
can be maintained when mounted them again.
● Always store wheels or tyres which been removed in a cool, dry and, where
possible, dark place. Tyres which are not fixed to a wheel trim should be stored
upright.
Unidirectional tyres
The direction of rotation of the tyres is marked by arrows on the wall of the tyre.
This indicates the direction of rotation of the tyre, and it is essential that the tyres
are fitted on to run in this direction. Only then are the tyres able to provide the
optimal properties in terms of grip, low noise, wear-and-tear and aquaplaning.
Further information concerning the use of unidirectional tyres ⇒
page 165. WARNING
● New tyres during the first 500 km do not offer optimal grip and should
therefore be run appropriately - risk of accident!
● Never drive with damaged tyres - risk of accident! Note
Please observe the various differing legal requirements regarding tyres.
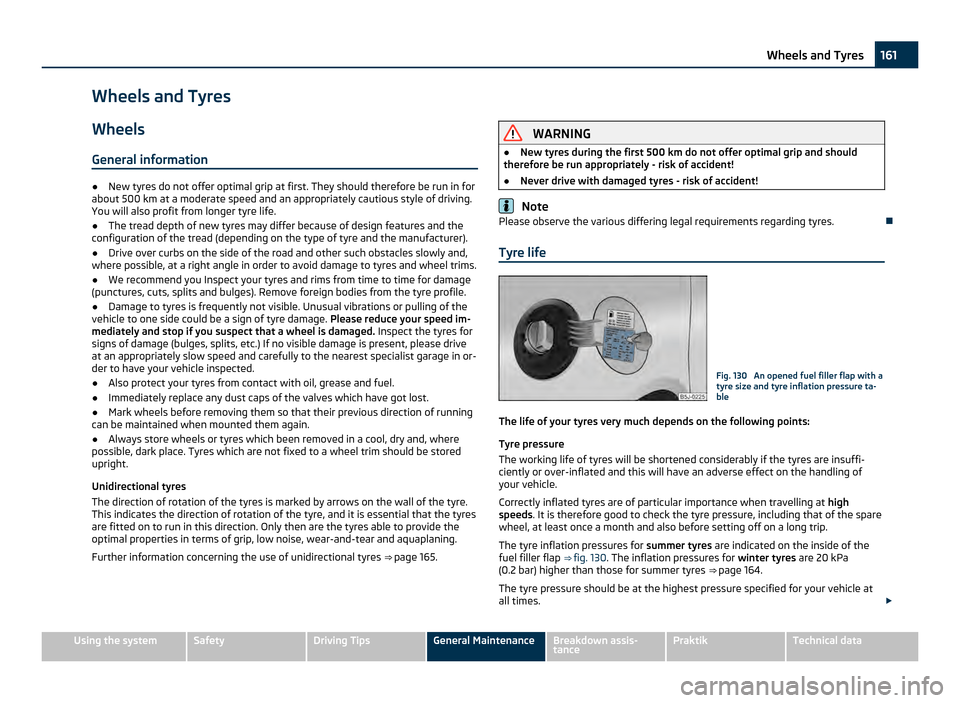
Tyre life Fig. 130 An opened fuel filler flap with a
tyre size and tyre inflation pressure ta-
ble
The life of your tyres very much depends on the following points:
Tyre pressure
The working life of tyres will be shortened considerably if the tyres are insuffi-
ciently or over-inflated and this will have an adverse effect on the handling of
your vehicle.
Correctly inflated tyres are of particular importance when travelling at high
speeds . It is therefore good to check the tyre pressure, including that of the spare
wheel, at least once a month and also before setting off on a long trip.
The tyre inflation pressures for summer tyres are indicated on the inside of the
fuel filler flap ⇒ fig. 130 . The inflation pressures for winter tyres are 20 kPa
(0.2
bar) higher than those for summer tyres ⇒ page 164.
The tyre pressure should be at the highest pressure specified for your vehicle at
all times. £ 161
Wheels and Tyres Using the system Safety Driving Tips General Maintenance Breakdown assis-
tance Praktik Technical data
Page 164 of 212
Always check the inflation pressure of tyres when cold. Do not reduce the higher
pressure of warm tyres. Adapt the inflation pressure of the tyres accordingly if
your vehicle is carrying a significantly higher payload.
Tyre inflation pressure - Tyre size 185/55
R15
The same inflation pressure values apply to tyres of the tyre size 195/55 R15 as to
tyres of the tyre size 185/55 R15 which are intended to be used with snow chains,
see the inside of the fuel filler flap.
The tyres of the tyre size 185/55 R15, which are intended to be used with snow
chains and are fitted on models Roomster Scout, have the following inflation
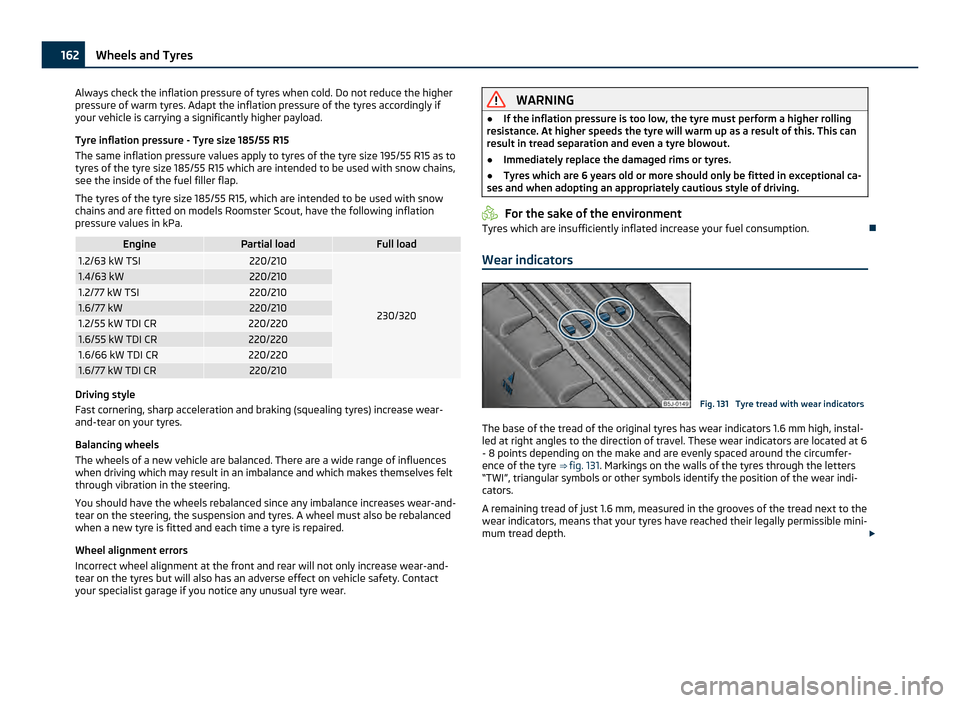
pressure values in kPa. Engine Partial load Full load
1.2/63 kW TSI 220/210
230/3201.4/63 kW 220/210
1.2/77 kW TSI 220/210
1.6/77 kW 220/210
1.2/55 kW TDI CR 220/220
1.6/55 kW TDI CR 220/220
1.6/66 kW TDI CR 220/220
1.6/77 kW TDI CR 220/210
Driving style
Fast cornering, sharp acceleration and braking (squealing tyres) increase wear-
and-tear on your tyres.
Balancing wheels
The wheels of a new vehicle are balanced. There are a wide range of influences
when driving which may result in an imbalance and which makes themselves felt
through vibration in the steering.
You should have the wheels rebalanced since any imbalance increases wear-and-
tear on the steering, the suspension and tyres. A wheel must also be rebalanced
when a new tyre is fitted and each time a tyre is repaired.
Wheel alignment errors
Incorrect wheel alignment at the front and rear will not only increase wear-and-
tear on the tyres but will also has an adverse effect on vehicle safety. Contact
your specialist garage if you notice any unusual tyre wear. WARNING
● If the inflation pressure is too low, the tyre must perform a higher rolling
resistance. At higher speeds the tyre will warm up as a result of this. This can
result in tread separation and even a tyre blowout.
● Immediately replace the damaged rims or tyres.
● Tyres which are 6 years old or more should only be fitted in exceptional ca-
ses and when adopting an appropriately cautious style of driving. For the sake of the environment
Tyres which are insufficiently inflated increase your fuel consumption.
Wear indicators Fig. 131 Tyre tread with wear indicators
The base of the tread of the original tyres has wear indicators 1.6 mm high, instal-
led at right angles to the direction of travel. These wear indicators are located at 6
- 8 points depending on the make and are evenly spaced around the circumfer-
ence of the tyre ⇒ fig. 131. Markings on the walls of the tyres through the letters
“TWI”, triangular symbols or other symbols identify the position of the wear indi-
cators.
A remaining tread of just 1.6 mm, measured in the grooves of the tread next to the
wear indicators, means that your tyres have reached their legally permissible mini-
mum tread depth. £162
Wheels and Tyres
Page 165 of 212
WARNING
● You must have your tyres replaced with new ones at the latest when the
wear indicators have been worn down. The legally permissible minimum tread
depth should be observed.
● Worn tyres do not provide the necessary adhesion to the road surface at
high speeds on wet roads. One could experience “ aquaplaning” (uncontrolled
movements of the vehicle - “swimming” on a wet road surface).
Changing wheels around If significantly greater wear is present on the front tyres, we recommend changing
the front wheels around with the rear wheels. You will then obtain approximately
the same life for all the tyres.
It may be advantageous to swap the tyres over
“crosswise” when uneven wear
characteristic arise on the running surfaces of the tyres (but not in the case of uni-
directional tyres). We recommend that you contact an authorised ŠKODA Service
Partner. They have extensive knowledge about the possible combinations.
We recommend that you change the wheels around every 10 000 km in order to
achieve even wear on all wheels and to obtain optimal tyre life.
New tyres and wheels Tyres and wheel rims are important design elements. One should therefore use
the tyres and wheel rims which have been released for use by
ŠKODA. They are
exactly matched to the vehicle type and therefore contribute significantly to good
road holding and safe driving characteristics ⇒ .
Only fit radial tyres of the same type on all 4 wheels, size (rolling circumference)
and, if possible, the same tread pattern on one axle.
Authorised
ŠKODA Service Partners have access to the most current information
about which tyres we have released for use on your vehicle.
We recommend that you have any work relating to tyres or wheels carried out by
an authorised ŠKODA Service Partner. Authorised ŠKODA Service Partners have all
of the necessary special tools and replacement parts available plus the required
specialist knowledge and are also in a position to properly dispose of the old tyres.
A large number of authorised ŠKODA Service Partners also have an attractive
range of tyres and wheels available. The tyre/wheel combinations which are approved for your vehicle are indicated in
your vehicle documents. Approval and licensing may differ according to the legis-
lation prevailing in individual countries.
Proper knowledge of the tyre data makes it easier for you to select the correct
type of tyre. Tyres do, for example, have the following inscription on their walls:
185/65 R 14 86 T
What this means is: 185 Tyre width in mm
65 Height/width ratio in %
R Code letter for the type of tyre -
Radial 14 Diameter of wheel in inches
86 Load index
T Speed symbol
The following speed restrictions apply to tyres.
Speed symbol Permissible maximum speed
Q 160 km/h
R 170 km/h
S 180 km/h
T 190 km/h
U 200 km/h
H 210 km/h
V 240 km/h
W 270 km/h
The date of manufacture
is also stated on the tyre wall (possibly only on the in-
side of wheel).
DOT ... 20 11...
means, for example, that the tyre was manufactured in the 20th week of the year
20011.
Any spare wheel which differs from the tyres fitted to the vehicle (e.g. winter
tyres or low-profile tyres) should only be used only for a short time in the event of
a puncture and when adopting an appropriately cautious style of driving. It should
be replaced as quickly as possible by a normal wheel. £ 163
Wheels and Tyres Using the system Safety Driving Tips General Maintenance Breakdown assis-
tance Praktik Technical data
Page 166 of 212
WARNING
● Only use those tyres or wheel rims which have been approved for your
model of ŠKODA vehicle. Failure to observe this instruction will adversely af-
fect the road safety of your vehicle - risk of accident! Approval and licensing of
your vehicle on public roads may also become void as a result.
● You must on no account drive at a higher speed than is permissible for
your tyres - risk of an accident resulting from tyre damage and loss of control
over your vehicle.
● Tyres which are 6 years old or more should only be fitted in exceptional ca-
ses and when adopting an appropriately cautious style of driving.
● Never fit tyres which have already been used without having adequate
knowledge of their previous history. Tyres age even if they have not been
used at all or only very little. A spare tyre must only be used in exceptional ca-
ses and only then when adopting an appropriately cautious style of driving.
● Do not, where possible, replace individual tyres but at least replace them
on both wheels of a given axle at the same time. Always fit the tyres with the
deeper tread depth to the front wheels. For the sake of the environment
Old tyres must be disposed of in conformity with the appropriate regulations. Note
It is not normally possible to fit wheels from other models of cars for technical
reasons. This may also apply in certain circumstances to the wheels of the same
type of vehicle.
Wheel bolts Wheels and
wheel bolts are matched to each other in terms of design. Each time
you fit other wheels - e.g. light alloy wheels or wheels with winter tyres - you
must therefore also use the matching wheel bolts of the correct length and shape
of spherical cap. This is essential to ensure that the wheels are tightly fitted and
that the brake system operates properly.
If you retrofit wheel trims (or have this done), please also ensure that an ade-
quate flow of air remains assured for cooling the brake system.
Authorised
ŠKODA Service Partners are instructed in the technical possibilities
which exist regarding converting or retrofitting tyres, wheels and wheel trims. WARNING
● In case of incorrect treatment of the wheel bolts, the wheel can loosen
when the car is moving - risk of accident!
● The wheel bolts must be clean and must turn easily. However, they must
never be treated with grease or oil.
● If the wheel bolts are tightened to a too low tightening torque, the rim can
come loose when the car is moving - risk of accident! A tightening torque
which is too high can damage the bolts and threads and this can result in per-
manent deformation of the contact surfaces on the rim. CAUTION
The prescribed tightening torque of the wheel bolts for steel and light alloy
wheels is 120 Nm.
Winter tyres The handling of your vehicle will be significantly improved when driving on wintry
roads if you fit winter tyres. Summer tyres do not offer the same grip on ice, snow
and at temperatures below 7 °C because of their construction (width, rubber
blend, tread pattern). This applies in particular to vehicles which are equipped
with low-profile tyres
or high-speed tyres (code index H, V or W on wall of tyre).
Winter tyres must be mounted on all four wheels to obtain the best handling
characteristics.
You must only fit those types of winter tyre which are approved for your vehicle.
The permissible sizes of winter tyres are stated in your vehicle documents. Ap-
provals may differ because of national legislation.
Please remember that the tyres should be inflated to 20
kPa (0.2 bar) more than is
the case for summer tyres ⇒ page 161.
Winter tyres no longer offer the same winter performance once the tyre tread has
worn down to a depth of about 4 mm.
Ageing also causes winter tyres to lose most of their winter performance proper-
ties - even in cases where the remaining tread depth is still clearly more than 4
mm.
Speed restrictions apply to winter tyres as well as to summer tyres ⇒ page 163,
⇒ .
£164
Wheels and Tyres
Page 167 of 212
You can fit winter tyres of a lower speed category to your vehicle provided that
you also do not drive faster than the permissible maximum speed for such tyres,
even if the possible maximum speed of your vehicle is higher. The corresponding
tyre category can damage the tyres when exceeding the permissible maximum
speed.
Please pay attention to the notes if you decide to fit winter tyres
⇒
page 161.
You can also fit so-called “all-year tyres” instead of winter tyres.
Please contact your specialist garage if there are any points which are not clear
who will be able to provide you with information regarding the maximum speed
for your tyres. WARNING
You must on no account drive your car at more than the permissible maximum
speed for your winter tyres - risk of an accident resulting from tyre damage
and loss of control over your car. For the sake of the environment
Fit your summer tyres on again in good time since summer tyres offer you better
grip and handling on roads which are free of snow and ice as well as ar tempera-
tures below 7 °C - the braking distance is shorter, there is less tyre noise, tyre
wear is reduced and fuel consumption is reduced. Note
Please observe the various differing legal requirements regarding tyres.
Unidirectional tyres The direction of rotation of the tyres is marked by arrows on the wall of the tyre
.
This indicates the direction of rotation of the tyre, and it is essential that the tyres
are fitted on to run in this direction. Only then are the tyres able to provide the
optimal properties in terms of grip, low noise, wear-and-tear and aquaplaning.
Should it be necessary to fit on a spare wheel in exceptional cases with a tyre not
dedicated to the running direction or in opposite running direction, please adopt a
cautious style of driving as the tyre is no longer able to provide optimal grip and
handling in such a situation. This particularly important on wet roads. Please refer
to the additional instructions ⇒ page 168
, Spare wheel.
You should have the defective tyre replaced as soon as possible and restore the
correct direction of rotation on all tyres Snow chains Snow chains must only be mounted on the front wheels.
When driving on wintry roads, snow chains improve not only traction, but also the
braking performance.
For technical reasons, it is only permissible to fit snow chains with the following
wheel/tyre combinations. Wheel size Depth (D) Tyre size
5J x 14 35 mm 175/70
6J x 14 37 mm 185/65
6J x 15 43 mm 185/55
Only fit snow chains with links and locks not larger than
12 mm.
Remove the full wheel trims before installing the snow chains.
Observe the different national legal regulations relating to the use of snow chains
and the maximum vehicle speed with snow chains. WARNING
Please pay attention to the information in the supplied fitting instructions of
the snow chain manufacturer. CAUTION
You must take the chains off as soon as you drive on roads which are free of
snow. They adversely affect the handling of your vehicle, damage the tyres and
are rapidly destroyed. Note
We recommend that you use snow chains from ŠKODA Original Accessories. 165
Wheels and Tyres Using the system Safety Driving Tips General Maintenance Breakdown assis-
tance Praktik Technical data