Egr SKODA ROOMSTER 2012 1.G Owner's Manual
[x] Cancel search | Manufacturer: SKODA, Model Year: 2012, Model line: ROOMSTER, Model: SKODA ROOMSTER 2012 1.GPages: 194, PDF Size: 4.8 MB
Page 46 of 194
›
Release the lever. The washer system stops and the wiper continues for anoth-
er 1 to 3 wiper strokes (depending on the duration of the spraying process). The
lever will stay in position after releasing it 6
.
Switching windscreen wipers off
› Move the lever back into the home position 0
» Fig. 30.
ÐHeadlight cleaning system
First read and observe the introductory information and safety warn-
ings on page 42.
When the low beam or main beam are switched on, and the windscreen wiper
lever is pulled into the position
5
» Fig. 30 on page 43, the headlights are
sprayed briefly. To clean the headlights, the windshield is also sprayed after every
five squirts.
You should remove stubborn dirt (such as insect residues) from the headlight len-
ses at regular intervals, for example when refuelling. The following guidelines
must be observed » page 130, Headlight lenses.
To ensure the proper operation of the cleaning system during the winter, any
snow should be removed from the washer nozzle fixtures and ice should be
cleared with a de-icing spray. CAUTION
Never remove the nozzles from the headlight cleaning system by hand - risk of
damage! ÐReplacing the windscreen wiper blades
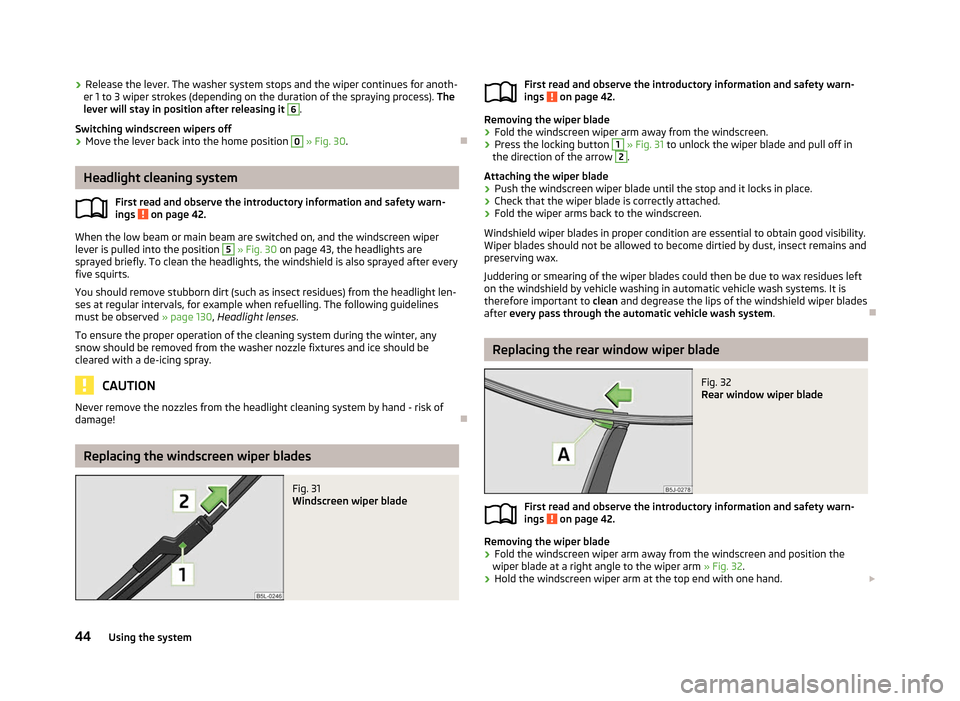
Fig. 31
Windscreen wiper blade
ä
First read and observe the introductory information and safety warn-
ings on page 42.
Removing the wiper blade
›
Fold the windscreen wiper arm away from the windscreen.
› Press the locking button 1
» Fig. 31 to unlock the wiper blade and pull off in
the direction of the arrow 2
.
Attaching the wiper blade
› Push the windscreen wiper blade until the stop and it locks in place.
› Check that the wiper blade is correctly attached.
› Fold the wiper arms back to the windscreen.
Windshield wiper blades in proper condition are essential to obtain good visibility.
Wiper blades should not be allowed to become dirtied by dust, insect remains and
preserving wax.
Juddering or smearing of the wiper blades could then be due to wax residues left
on the windshield by vehicle washing in automatic vehicle wash systems. It is
therefore important to clean and degrease the lips of the windshield wiper blades
after every pass through the automatic vehicle wash system .Ð Replacing the rear window wiper blade
Fig. 32
Rear window wiper blade
First read and observe the introductory information and safety warn-
ings on page 42.
Removing the wiper blade
›
Fold the windscreen wiper arm away from the windscreen and position the
wiper blade at a right angle to the wiper arm » Fig. 32.
› Hold the windscreen wiper arm at the top end with one hand.
£
ä
ä
44 Using the system
Page 75 of 194
Climatronic (automatic air conditioning system)
Introductory information
The Climatronic maintains fully automatically a convenience temperature. This is
achieved by automatically varying the temperature of the air flow, the blower
stages and air distribution. The system also takes sunlight into account, which
eliminates the need to alter the settings manually. The automatic
mode » page 74 ensures maximum well-being of the occupants at all times of
the year.
Description of Climatronic system
The cooling system only operates if the following conditions are met:
› engine running;
› outside temperature above approx. +2 °C;
› AC 18
» Fig. 77
on page 73 switched on.
The AC compressor is switched off at a high coolant temperature in order to pro-
vide cooling at a high load of the engine.
Recommended setting for all periods of the year.
› Set the desired temperature, we recommend 22 °C.
› Press the button
AUTO 12
» Fig. 77
on page 73.
› Move the air outlet vents
3 » page 68 and 4 so that the air flow is directed
slightly upwards.
Switching between Celsius and Fahrenheit
Press and hold the buttons AUTO and
AC » Fig. 77 on page
73 at the same time.
The information in the desired temperature measuring unit appears in the display. Note
We recommend that you have the Climatronic system cleaned by a ŠKODA spe-
cialist garage once every year. Ð Overview of the control elements
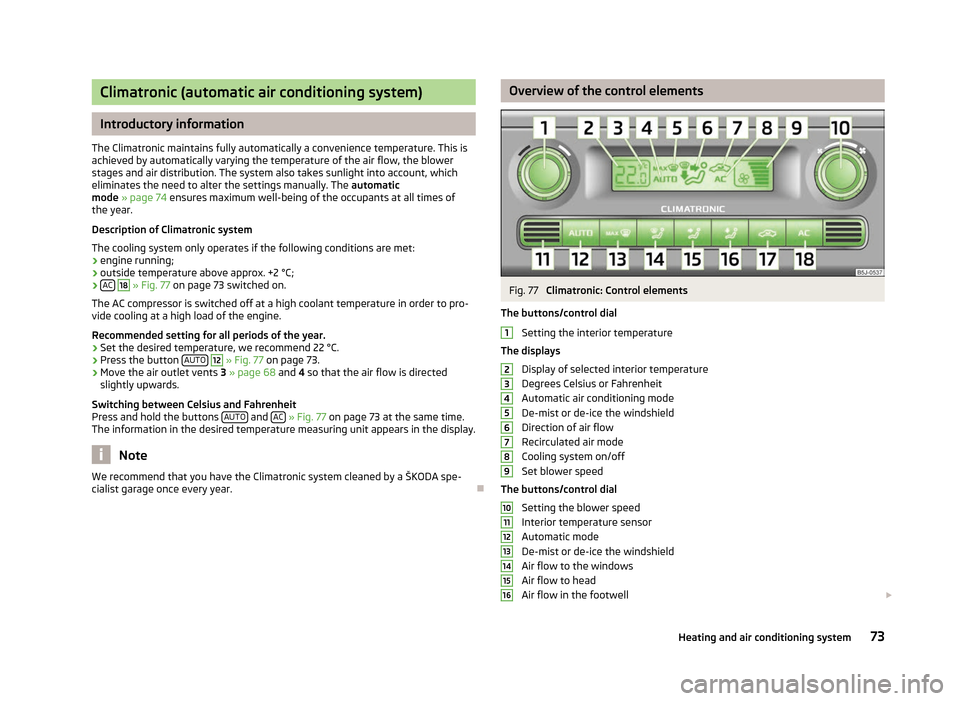
Fig. 77
Climatronic: Control elements
The buttons/control dial Setting the interior temperature
The displays Display of selected interior temperature
Degrees Celsius or Fahrenheit
Automatic air conditioning mode
De-mist or de-ice the windshield
Direction of air flow
Recirculated air mode
Cooling system on/off
Set blower speed
The buttons/control dial Setting the blower speed
Interior temperature sensor
Automatic mode
De-mist or de-ice the windshield
Air flow to the windows
Air flow to head
Air flow in the footwell £ 1
2
3
4
5
6
7
8
9
10
11
12
13
14
15
16
73
Heating and air conditioning system
Page 79 of 194
For the sake of the environment
Do not warm up the engine while the vehicle is stationary. If possible, start your
journey as soon as the engine has started. Through this the engine reaches its
operating temperature more rapidly and the pollutant emissions are lower. Note
■ The engine can only be started with a genuine ŠKODA key with the matching
code. ■ The engine running noises may louder at first be louder for a short time after
starting the cold engine. This is quite normal and is not an operating problem. ■ After switching off the ignition, the radiator fan can intermittently continue to
operate for approx. 10
minutes.
■ If the engine does not start up after a second attempt, the fuse for the fuel
pump may have a fault. Check the fuse and replace, if necessary » page 166,
Fuses or seek assistance from a
ŠKODA specialist garage.
■ We recommend locking the steering wheel whenever leaving the vehicle. This
acts as a deterrent against the attempted theft of your car. ÐAdjusting the steering wheel position
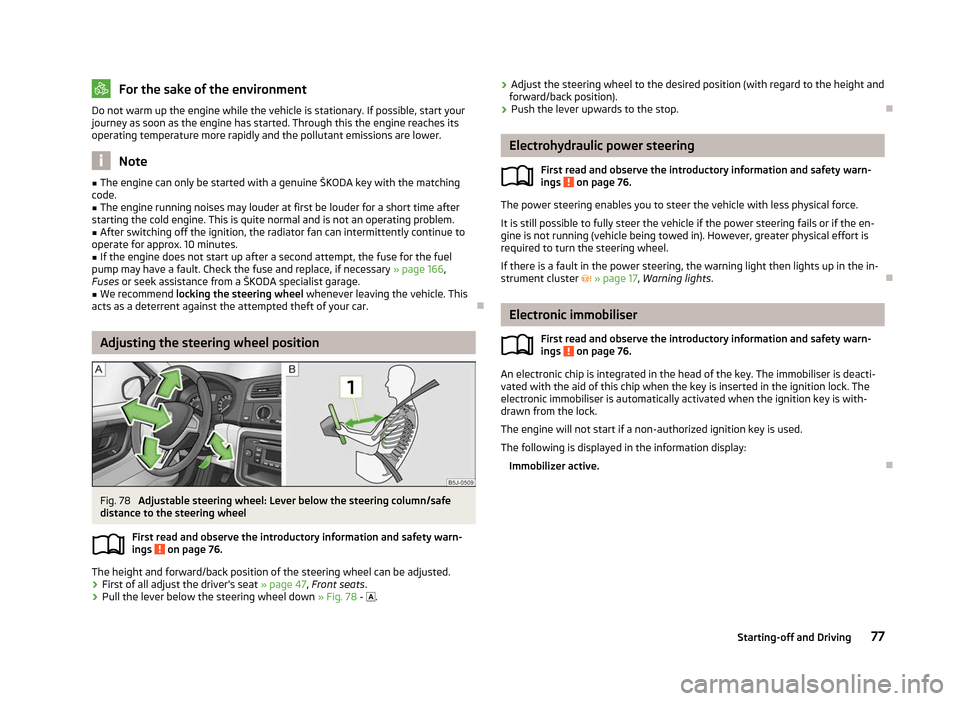
Fig. 78
Adjustable steering wheel: Lever below the steering column/safe
distance to the steering wheel
First read and observe the introductory information and safety warn-
ings on page 76.
The height and forward/back position of the steering wheel can be adjusted.
› First of all adjust the driver's seat
» page 47, Front seats .
› Pull the lever below the steering wheel down
» Fig. 78 - .
ä ›
Adjust the steering wheel to the desired position (with regard to the height and
forward/back position).
› Push the lever upwards to the stop. Ð Electrohydraulic power steering
First read and observe the introductory information and safety warn-
ings on page 76.
The power steering enables you to steer the vehicle with less physical force.
It is still possible to fully steer the vehicle if the power steering fails or if the en-
gine is not running (vehicle being towed in). However, greater physical effort is
required to turn the steering wheel.
If there is a fault in the power steering, the warning light then lights up in the in-
strument cluster » page 17, Warning lights . Ð Electronic immobiliser
First read and observe the introductory information and safety warn-
ings on page 76.
An electronic chip is integrated in the head of the key. The immobiliser is deacti-
vated with the aid of this chip when the key is inserted in the ignition lock. The
electronic immobiliser is automatically activated when the ignition key is with-
drawn from the lock.
The engine will not start if a non-authorized ignition key is used.
The following is displayed in the information display: Immobilizer active. Ð
ä
ä
77
Starting-off and Driving
Page 82 of 194
Faults in the brake surface
If it is found that the braking distance has suddenly become longer and that the
brake pedal can be depressed further, the brake system may be faulty. Visit a
ŠKODA specialist garage immediately and adjust your style of driving appropriate-
ly as you will not know how great the damage is.
Low brake fluid level
An insufficient level of brake fluid may result in problems in the brake system. The
level of the brake fluid is monitored electronically
» page 18, Brake system .
Brake booster
The brake booster increases the pressure generated with the brake pedal. The
brake booster only operates when the engine is running. ÐHandbrake
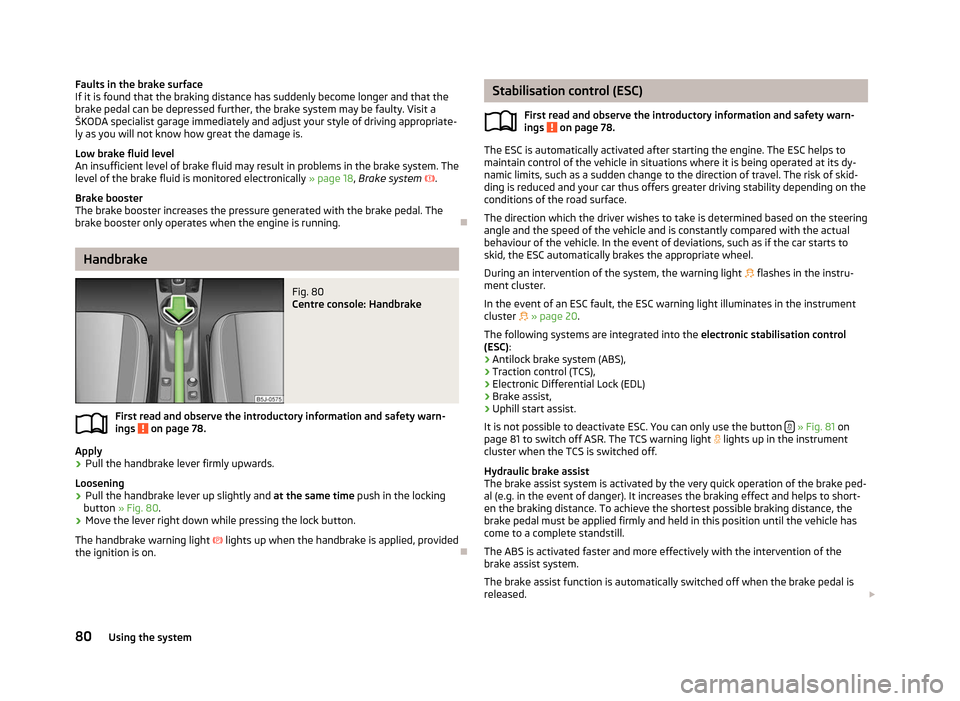
Fig. 80
Centre console: Handbrake
First read and observe the introductory information and safety warn-
ings on page 78.
Apply
› Pull the handbrake lever firmly upwards.
Loosening
› Pull the handbrake lever up slightly and
at the same time push in the locking
button » Fig. 80 .
› Move the lever right down while pressing the lock button.
The handbrake warning light lights up when the handbrake is applied, provided
the ignition is on. Ð
ä Stabilisation control (ESC)
First read and observe the introductory information and safety warn-
ings on page 78.
The ESC is automatically activated after starting the engine. The ESC helps to
maintain control of the vehicle in situations where it is being operated at its dy-
namic limits, such as a sudden change to the direction of travel. The risk of skid-
ding is reduced and your car thus offers greater driving stability depending on the
conditions of the road surface.
The direction which the driver wishes to take is determined based on the steering
angle and the speed of the vehicle and is constantly compared with the actual
behaviour of the vehicle. In the event of deviations, such as if the car starts to
skid, the ESC automatically brakes the appropriate wheel.
During an intervention of the system, the warning light flashes in the instru-
ment cluster.
In the event of an ESC fault, the ESC warning light illuminates in the instrument
cluster » page 20.
The following systems are integrated into the electronic stabilisation control
(ESC):
› Antilock brake system (ABS),
› Traction control (TCS),
› Electronic Differential Lock (EDL)
› Brake assist,
› Uphill start assist.
It is not possible to deactivate ESC. You can only use the button » Fig. 81 on
page 81 to switch off ASR. The TCS warning light lights up in the instrument
cluster when the TCS is switched off.
Hydraulic brake assist
The brake assist system is activated by the very quick operation of the brake ped-
al (e.g. in the event of danger). It increases the braking effect and helps to short-
en the braking distance. To achieve the shortest possible braking distance, the
brake pedal must be applied firmly and held in this position until the vehicle has
come to a complete standstill.
The ABS is activated faster and more effectively with the intervention of the
brake assist system.
The brake assist function is automatically switched off when the brake pedal is
released. £
ä
80 Using the system
Page 84 of 194
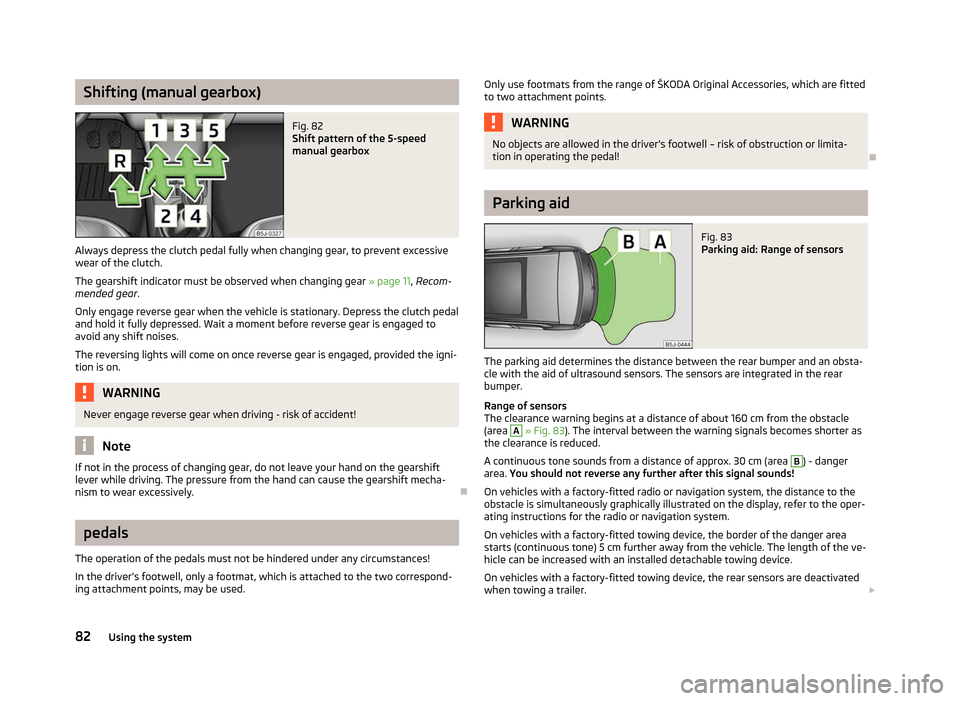
Shifting (manual gearbox)
Fig. 82
Shift pattern of the 5-speed
manual gearbox
Always depress the clutch pedal fully when changing gear, to prevent excessive
wear of the clutch.
The gearshift indicator must be observed when changing gear » page 11, Recom-
mended gear .
Only engage reverse gear when the vehicle is stationary. Depress the clutch pedal
and hold it fully depressed. Wait a moment before reverse gear is engaged to
avoid any shift noises.
The reversing lights will come on once reverse gear is engaged, provided the igni-
tion is on. WARNING
Never engage reverse gear when driving - risk of accident! Note
If not in the process of changing gear, do not leave your hand on the gearshift
lever while driving. The pressure from the hand can cause the gearshift mecha-
nism to wear excessively. Ðpedals
The operation of the pedals must not be hindered under any circumstances!
In the driver's footwell, only a footmat, which is attached to the two correspond-
ing attachment points, may be used. Only use footmats from the range of ŠKODA Original Accessories, which are fitted
to two attachment points. WARNING
No objects are allowed in the driver's footwell – risk of obstruction or limita-
tion in operating the pedal! Ð Parking aid
Fig. 83
Parking aid: Range of sensors
The parking aid determines the distance between the rear bumper and an obsta-
cle with the aid of ultrasound sensors. The sensors are integrated in the rear
bumper.
Range of sensors
The clearance warning begins at a distance of about 160 cm from the obstacle
(area A
» Fig. 83). The interval between the warning signals becomes shorter as
the clearance is reduced.
A continuous tone sounds from a distance of approx. 30 cm (area B
) - danger
area. You should not reverse any further after this signal sounds!
On vehicles with a factory-fitted radio or navigation system, the distance to the
obstacle is simultaneously graphically illustrated on the display, refer to the oper-
ating instructions for the radio or navigation system.
On vehicles with a factory-fitted towing device, the border of the danger area
starts (continuous tone) 5
cm further away from the vehicle. The length of the ve-
hicle can be increased with an installed detachable towing device.
On vehicles with a factory-fitted towing device, the rear sensors are deactivated
when towing a trailer. £
82 Using the system
Page 130 of 194
For the sake of the environment
■ Used cans of vehicle care products represent a special type of hazardous waste.
These must be disposed of in accordance with national legal regulations. ■ Only wash the vehicle at washing bays intended for this purpose. Note
■ Remove fresh stains such as those from ball-point pens, ink, lipstick, shoe pol-
ish, etc., from the material (leather), panels and textiles as quickly as possible. ■ Due to possible issues with the cleaning and care of the interior of your vehicle,
the special tools and knowledge required, we recommend that this is completed
by a
ŠKODA Service Partner. ÐWashing the vehicle
First read and observe the introductory information and safety warn-
ings on page 127.
The best protection for your vehicle against harmful environmental influences is
frequent washing and wax treatment. How often the vehicle should be washed
depends on a wide range of factors, such as:
›
Frequency of use;
› The parking situation (garage, below trees etc.);
› Season of the year;
› Weather conditions;
› Environmental influences.
The longer insect residues, bird droppings, tree sap, road and industrial dust, tar,
soot particles, road salt and other aggressive deposits remain adhering to the
paintwork of your vehicle, the more detrimental their destructive effect can be.
High temperatures, such as those caused by intensive sun's rays, accentuate this
caustic effect.
It is essential to also thoroughly clean the underside of the vehicle at the end of
the winter. ÐAutomatic car wash systems
First read and observe the introductory information and safety warn-
ings on page 127.ä
ä Your vehicle can be washed in automatic car wash systems.
Take the usual precautionary measures before washing the vehicle in an auto-
matic car wash system. (Close the windows etc.)
If your vehicle is fitted with any particular attached parts, such as a spoiler, roof
luggage rack, two-way radio aerial - it is best to consult the operator of the car
wash system beforehand.
It is important to degrease the lips of the windscreen wiper rubbers after passing
through the automatic vehicle wash system. Ð Washing by hand
First read and observe the introductory information and safety warn-
ings on page 127.
When washing by hand, first soften the dirt with plenty of water and rinse off as
much as possible.
Clean the vehicle with a soft
sponge, a washing glove or a washing brush. Work
from the top to the bottom - starting with the roof. Only apply slight pressure
when cleaning the vehicle's paintwork. Only use a car shampoo for stubborn dirt.
Wash out the sponge or washing glove thoroughly at short intervals.
Clean wheels, door sills and similar parts last. Use a second sponge for such
areas.
Give the vehicle a good rinse after washing it and dry it off using a chamois leath-
er. Ð Washing with a high-pressure cleaner
First read and observe the introductory information and safety warn-
ings on page 127.
When washing the vehicle with a high-pressure cleaner, the instructions for use
of the equipment must be observed. This applies in particular to the
pressure
used and to the spraying distance. Maintain a sufficiently large distance to the
parking aid sensors and soft materials such as rubber hoses or insulation materi-
al. £
ä
ä
128 General Maintenance