interior lights SKODA ROOMSTER 2013 1.G Owner's Manual
[x] Cancel search | Manufacturer: SKODA, Model Year: 2013, Model line: ROOMSTER, Model: SKODA ROOMSTER 2013 1.GPages: 219, PDF Size: 13.83 MB
Page 6 of 219
Table of Contents
Materials defect liability and ŠKODA warranty for
new cars5
Mobility warranty and ŠKODA extended
warranty
6
Abbreviations
Operation
Cockpit
9
Overview
8
Instruments and Indicator Lights
10
Instrument cluster
10
Multifunction display (MFD)
13
Service Interval Display
16
MAXI DOT display
18
Warning lights
20
Unlocking and locking
28
Unlocking and locking
28
Central locking system
31
Remote control
34
Anti-theft alarm system
35
Luggage compartment lid
37
Electrical power windows
38
Lights and visibility
41
Lights
41
Interior lights
46
Visibility
47
Windscreen wipers and washers
48
Rear window
51
Seats and stowing
52
Front seats
52
Rear seats
54Head restraints56Boot57
Variable loading floor in the luggage
compartment (Estate)
61
Bicycle carrier in the luggage compartment
63
Roof rack system
65
Useful equipment
65
Storage compartments
68
Praktik
73
Heating and air-conditioning
77
Heating, ventilation, cooling
77
Heating
78
Air conditioning system (manual air conditioning system)
80
Climatronic (automatic air conditioningsystem)
83
Communication and multimedia
86
Universal telephone preinstallation GSM II
86
Voice control
91
Multimedia
92
Driving
Starting-off and Driving
95
Steering
95
Starting and stopping the engine
96
Brakes
98
Manual gear changing and pedals
99
Automatic transmission
100
Running in
103
Economical driving and environmental
sustainability
104
Avoiding damage to your vehicle
108
Driving abroad
109
Assist systems
110
Brake assist systems
110
Parking aid
112Cruise Control System113START-STOP115
Towing a trailer
117
Towing device
117
Trailer
120
Safety
Passive Safety
123
General information
123
Correct seated position
124
Seat belts
127
Using seat belts
127
Inertia reels and belt tensioners
130
Airbag system
132
Description of the airbag system
132
Airbag overview
133
Deactivating airbags
136
Transporting children safely
139
Child seat
139
Fastening systems
141
General Maintenance
Car care
144
Service intervals
144
Services, modifications and technical
alterations
146
Washing your car
149
Taking care of your vehicle exterior
150
Taking care of the interior
154
Inspecting and replenishing
157
Fuel
157
Engine compartment
159
Engine oil
163
Coolant
1653Table of Contents
Page 12 of 219
Operation
Cockpit
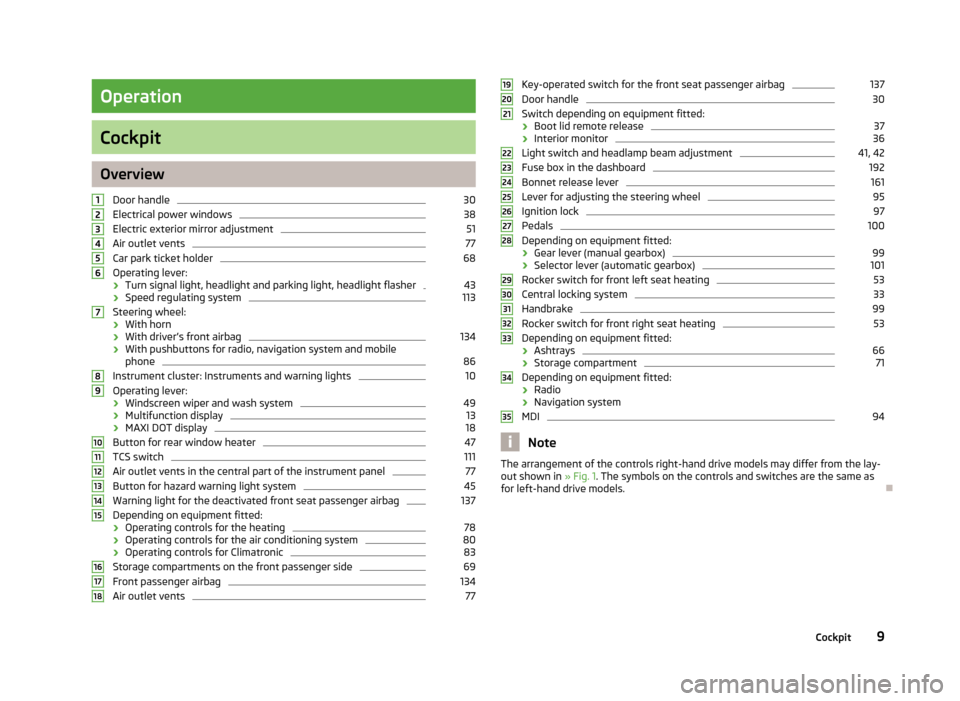
OverviewDoor handle
30
Electrical power windows
38
Electric exterior mirror adjustment
51
Air outlet vents
77
Car park ticket holder
68
Operating lever:
› Turn signal light, headlight and parking light, headlight flasher
43
›
Speed regulating system
113
Steering wheel:
› With horn
› With driver’s front airbag
134
›With pushbuttons for radio, navigation system and mobile
phone
86
Instrument cluster: Instruments and warning lights
10
Operating lever:
› Windscreen wiper and wash system
49
›Multifunction display
13
›
MAXI DOT display
18
Button for rear window heater
47
TCS switch
111
Air outlet vents in the central part of the instrument panel
77
Button for hazard warning light system
45
Warning light for the deactivated front seat passenger airbag
137
Depending on equipment fitted:
› Operating controls for the heating
78
›Operating controls for the air conditioning system
80
›Operating controls for Climatronic
83
Storage compartments on the front passenger side
69
Front passenger airbag
134
Air outlet vents
77123456789101112131415161718Key-operated switch for the front seat passenger airbag137Door handle30
Switch depending on equipment fitted:
› Boot lid remote release
37
›Interior monitor
36
Light switch and headlamp beam adjustment
41, 42
Fuse box in the dashboard
192
Bonnet release lever
161
Lever for adjusting the steering wheel
95
Ignition lock
97
Pedals
100
Depending on equipment fitted:
› Gear lever (manual gearbox)
99
›Selector lever (automatic gearbox)
101
Rocker switch for front left seat heating
53
Central locking system
33
Handbrake
99
Rocker switch for front right seat heating
53
Depending on equipment fitted:
› Ashtrays
66
›Storage compartment
71
Depending on equipment fitted:
› Radio
› Navigation system
MDI
94
Note
The arrangement of the controls right-hand drive models may differ from the lay-
out shown in » Fig. 1. The symbols on the controls and switches are the same as
for left-hand drive models.19202122232425262728293031323334359Cockpit
Page 34 of 219
Note■Lock the opened rear doors and front passenger door by closing them and
pressing the securing knob.■
It is not possible to lock the opened driver's door using the securing knob. This
prevents against inadvertently locking the key in the vehicle.
Emergency locking of the doors
Fig. 13
Rear door: Emergency locking of
the door
First read and observe the introductory information given on page 28.
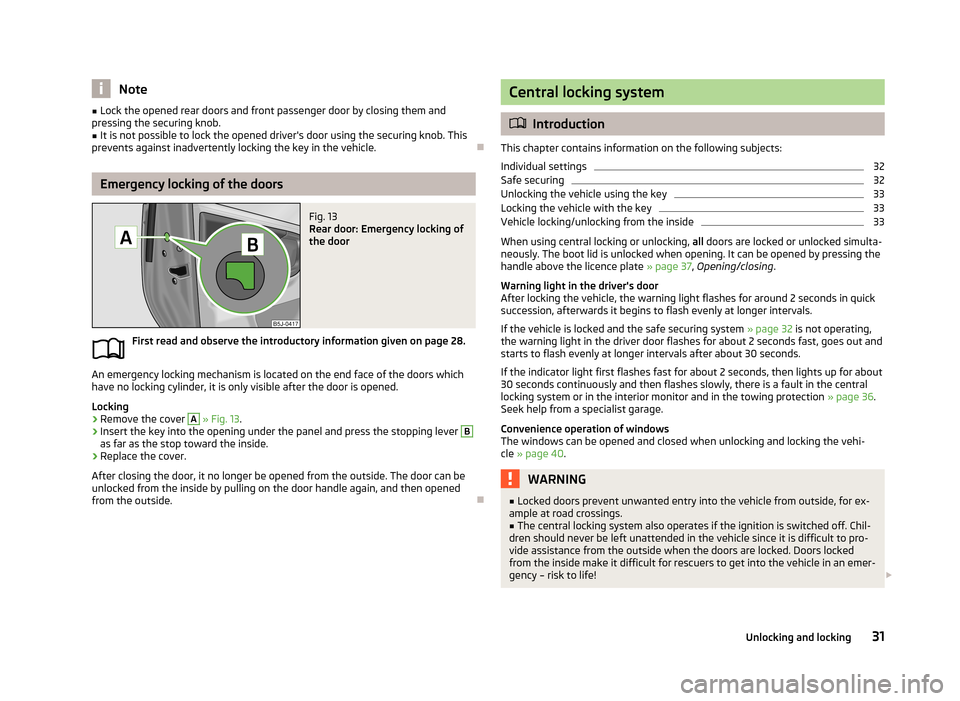
An emergency locking mechanism is located on the end face of the doors which
have no locking cylinder, it is only visible after the door is opened.
Locking
›
Remove the cover
A
» Fig. 13 .
›
Insert the key into the opening under the panel and press the stopping lever
B
as far as the stop toward the inside.
›
Replace the cover.
After closing the door, it no longer be opened from the outside. The door can be
unlocked from the inside by pulling on the door handle again, and then opened
from the outside.
Central locking system
Introduction
This chapter contains information on the following subjects:
Individual settings
32
Safe securing
32
Unlocking the vehicle using the key
33
Locking the vehicle with the key
33
Vehicle locking/unlocking from the inside
33
When using central locking or unlocking, all doors are locked or unlocked simulta-
neously. The boot lid is unlocked when opening. It can be opened by pressing the
handle above the licence plate » page 37, Opening/closing .
Warning light in the driver's door
After locking the vehicle, the warning light flashes for around 2 seconds in quick
succession, afterwards it begins to flash evenly at longer intervals.
If the vehicle is locked and the safe securing system » page 32 is not operating,
the warning light in the driver door flashes for about 2 seconds fast, goes out and
starts to flash evenly at longer intervals after about 30 seconds.
If the indicator light first flashes fast for about 2 seconds, then lights up for about
30 seconds continuously and then flashes slowly, there is a fault in the central
locking system or in the interior monitor and in the towing protection » page 36.
Seek help from a specialist garage.
Convenience operation of windows
The windows can be opened and closed when unlocking and locking the vehi-
cle » page 40 .
WARNING■
Locked doors prevent unwanted entry into the vehicle from outside, for ex-
ample at road crossings.■
The central locking system also operates if the ignition is switched off. Chil-
dren should never be left unattended in the vehicle since it is difficult to pro-
vide assistance from the outside when the doors are locked. Doors locked
from the inside make it difficult for rescuers to get into the vehicle in an emer-
gency – risk to life!
31Unlocking and locking
Page 36 of 219
NoteThis function is only enabled in certain countries.
Unlocking the vehicle using the key
Fig. 14
Turning the key for unlocking
and locking the vehicle
First read and observe the introductory information and safety warn-
ings on page 31.
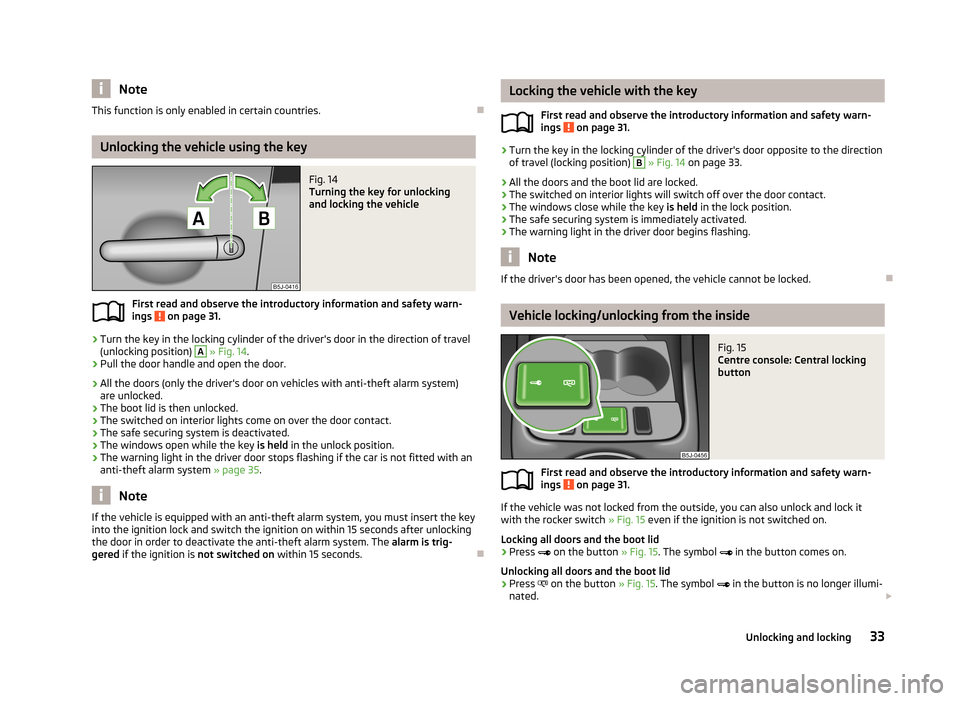
›
Turn the key in the locking cylinder of the driver's door in the direction of travel
(unlocking position)
A
» Fig. 14 .
›
Pull the door handle and open the door.
› All the doors (only the driver's door on vehicles with anti-theft alarm system)
are unlocked.
› The boot lid is then unlocked.
› The switched on interior lights come on over the door contact.
› The safe securing system is deactivated.
› The windows open while the key
is held in the unlock position.
› The warning light in the driver door stops flashing if the car is not fitted with an
anti-theft alarm system » page 35.
Note
If the vehicle is equipped with an anti-theft alarm system, you must insert the key
into the ignition lock and switch the ignition on within 15 seconds after unlocking
the door in order to deactivate the anti-theft alarm system. The alarm is trig-
gered if the ignition is not switched on within 15 seconds.
Locking the vehicle with the key
First read and observe the introductory information and safety warn-
ings
on page 31.
›
Turn the key in the locking cylinder of the driver's door opposite to the direction
of travel (locking position)
B
» Fig. 14 on page 33.
› All the doors and the boot lid are locked.
› The switched on interior lights will switch off over the door contact.
› The windows close while the key
is held in the lock position.
› The safe securing system is immediately activated.
› The warning light in the driver door begins flashing.
Note
If the driver's door has been opened, the vehicle cannot be locked.
Vehicle locking/unlocking from the inside
Fig. 15
Centre console: Central locking
button
First read and observe the introductory information and safety warn-
ings on page 31.
If the vehicle was not locked from the outside, you can also unlock and lock it
with the rocker switch » Fig. 15 even if the ignition is not switched on.
Locking all doors and the boot lid
›
Press
on the button » Fig. 15. The symbol
in the button comes on.
Unlocking all doors and the boot lid
›
Press
on the button » Fig. 15. The symbol
in the button is no longer illumi-
nated.
33Unlocking and locking
Page 37 of 219
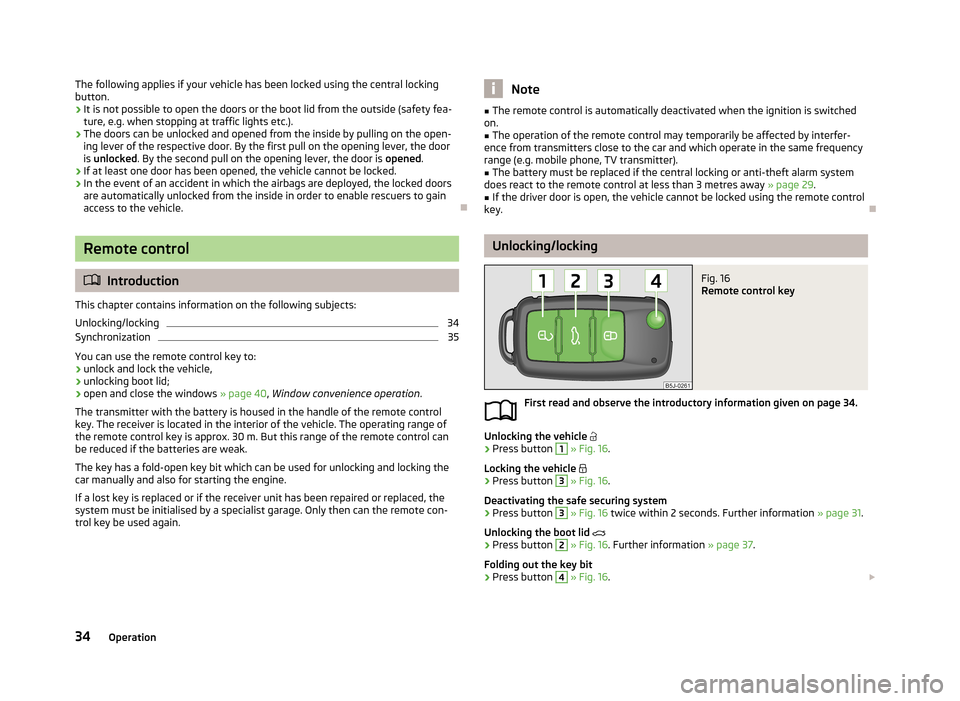
The following applies if your vehicle has been locked using the central lockingbutton.
› It is not possible to open the doors or the boot lid from the outside (safety fea-
ture, e.g. when stopping at traffic lights etc.).
› The doors can be unlocked and opened from the inside by pulling on the open-
ing lever of the respective door. By the first pull on the opening lever, the door is unlocked . By the second pull on the opening lever, the door is opened.
› If at least one door has been opened, the vehicle cannot be locked.
› In the event of an accident in which the airbags are deployed, the locked doors
are automatically unlocked from the inside in order to enable rescuers to gain access to the vehicle.
Remote control
Introduction
This chapter contains information on the following subjects:
Unlocking/locking
34
Synchronization
35
You can use the remote control key to:
› unlock and lock the vehicle,
› unlocking boot lid;
› open and close the windows
» page 40, Window convenience operation .
The transmitter with the battery is housed in the handle of the remote control
key. The receiver is located in the interior of the vehicle. The operating range of
the remote control key is approx. 30 m. But this range of the remote control can
be reduced if the batteries are weak.
The key has a fold-open key bit which can be used for unlocking and locking the
car manually and also for starting the engine.
If a lost key is replaced or if the receiver unit has been repaired or replaced, the
system must be initialised by a specialist garage. Only then can the remote con-
trol key be used again.
Note■ The remote control is automatically deactivated when the ignition is switched
on.■
The operation of the remote control may temporarily be affected by interfer-
ence from transmitters close to the car and which operate in the same frequency
range (e.g. mobile phone, TV transmitter).
■
The battery must be replaced if the central locking or anti-theft alarm system
does react to the remote control at less than 3 metres away » page 29.
■
If the driver door is open, the vehicle cannot be locked using the remote control
key.
Unlocking/locking
Fig. 16
Remote control key
First read and observe the introductory information given on page 34.
Unlocking the vehicle
›
Press button
1
» Fig. 16 .
Locking the vehicle
›
Press button
3
» Fig. 16 .
Deactivating the safe securing system
›
Press button
3
» Fig. 16 twice within 2 seconds. Further information » page 31.
Unlocking the boot lid
›
Press button
2
» Fig. 16 . Further information » page 37.
Folding out the key bit
›
Press button
4
» Fig. 16 .
34Operation
Page 38 of 219
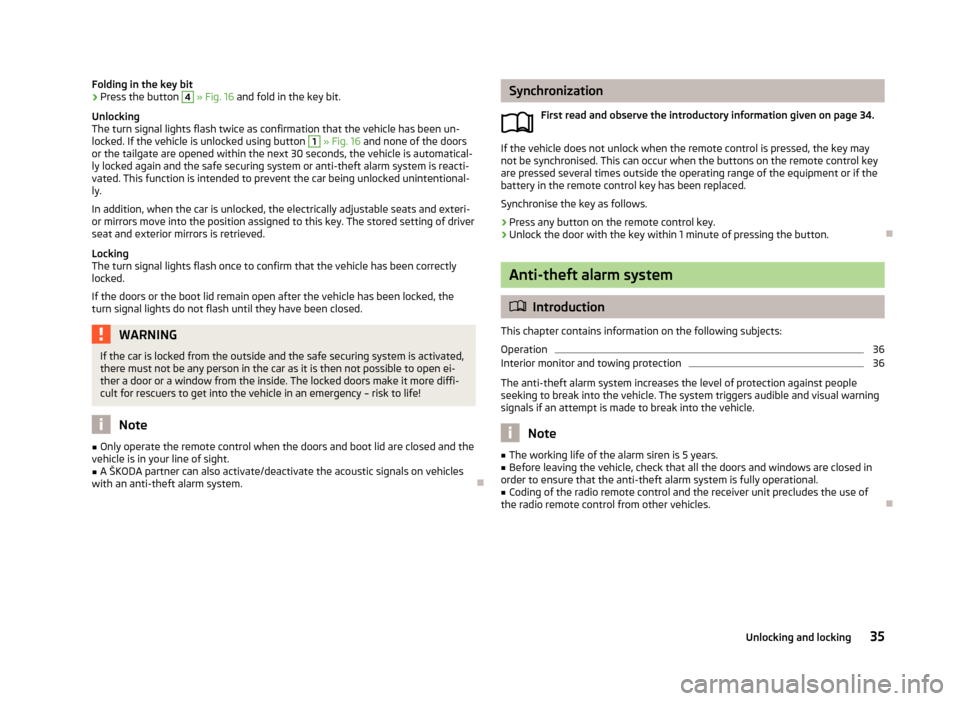
Folding in the key bit›Press the button 4 » Fig. 16 and fold in the key bit.
Unlocking
The turn signal lights flash twice as confirmation that the vehicle has been un-
locked. If the vehicle is unlocked using button 1
» Fig. 16 and none of the doors
or the tailgate are opened within the next 30 seconds, the vehicle is automatical-
ly locked again and the safe securing system or anti-theft alarm system is reacti- vated. This function is intended to prevent the car being unlocked unintentional-ly.
In addition, when the car is unlocked, the electrically adjustable seats and exteri-
or mirrors move into the position assigned to this key. The stored setting of driver
seat and exterior mirrors is retrieved.
Locking
The turn signal lights flash once to confirm that the vehicle has been correctly
locked.
If the doors or the boot lid remain open after the vehicle has been locked, the
turn signal lights do not flash until they have been closed.
WARNINGIf the car is locked from the outside and the safe securing system is activated,
there must not be any person in the car as it is then not possible to open ei-
ther a door or a window from the inside. The locked doors make it more diffi-
cult for rescuers to get into the vehicle in an emergency – risk to life!
Note
■ Only operate the remote control when the doors and boot lid are closed and the
vehicle is in your line of sight.■
A ŠKODA partner can also activate/deactivate the acoustic signals on vehicles
with an anti-theft alarm system.
Synchronization
First read and observe the introductory information given on page 34.
If the vehicle does not unlock when the remote control is pressed, the key may
not be synchronised. This can occur when the buttons on the remote control key are pressed several times outside the operating range of the equipment or if the
battery in the remote control key has been replaced.
Synchronise the key as follows.
›
Press any button on the remote control key.
›
Unlock the door with the key within 1 minute of pressing the button.
Anti-theft alarm system
Introduction
This chapter contains information on the following subjects:
Operation
36
Interior monitor and towing protection
36
The anti-theft alarm system increases the level of protection against people
seeking to break into the vehicle. The system triggers audible and visual warning
signals if an attempt is made to break into the vehicle.
Note
■ The working life of the alarm siren is 5 years.■Before leaving the vehicle, check that all the doors and windows are closed in
order to ensure that the anti-theft alarm system is fully operational.■
Coding of the radio remote control and the receiver unit precludes the use of
the radio remote control from other vehicles.
35Unlocking and locking
Page 42 of 219
Note■After switching the ignition off, it is still possible to open or close the windows
for approx. 10 minutes. The electrical power windows are only switched off com- pletely once the driver's door or front passenger door are opened.■
When driving always use the existing heating, air conditioning and ventilation
system for ventilating the interior of the vehicle. If the windows are opened, dust
as well as other dirt can get into the vehicle and in addition the wind noise is
more at certain speeds.
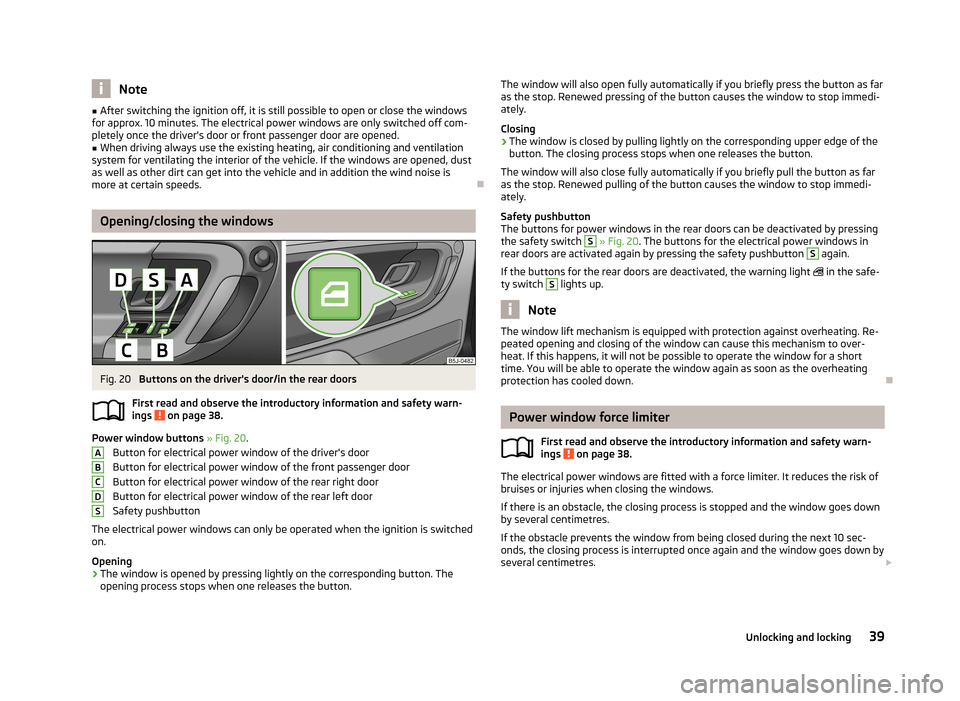
Opening/closing the windows
Fig. 20
Buttons on the driver's door/in the rear doors
First read and observe the introductory information and safety warn-
ings
on page 38.
Power window buttons » Fig. 20 .
Button for electrical power window of the driver's door
Button for electrical power window of the front passenger door
Button for electrical power window of the rear right door Button for electrical power window of the rear left door
Safety pushbutton
The electrical power windows can only be operated when the ignition is switched
on.
Opening
›
The window is opened by pressing lightly on the corresponding button. The opening process stops when one releases the button.
ABCDSThe window will also open fully automatically if you briefly press the button as far
as the stop. Renewed pressing of the button causes the window to stop immedi- ately.
Closing›
The window is closed by pulling lightly on the corresponding upper edge of the
button. The closing process stops when one releases the button.
The window will also close fully automatically if you briefly pull the button as far as the stop. Renewed pulling of the button causes the window to stop immedi-
ately.
Safety pushbutton
The buttons for power windows in the rear doors can be deactivated by pressing
the safety switch
S
» Fig. 20 . The buttons for the electrical power windows in
rear doors are activated again by pressing the safety pushbutton
S
again.
If the buttons for the rear doors are deactivated, the warning light
in the safe-
ty switch
S
lights up.
Note
The window lift mechanism is equipped with protection against overheating. Re-
peated opening and closing of the window can cause this mechanism to over-
heat. If this happens, it will not be possible to operate the window for a short
time. You will be able to operate the window again as soon as the overheating
protection has cooled down.
Power window force limiter
First read and observe the introductory information and safety warn-
ings
on page 38.
The electrical power windows are fitted with a force limiter. It reduces the risk of
bruises or injuries when closing the windows.
If there is an obstacle, the closing process is stopped and the window goes down
by several centimetres.
If the obstacle prevents the window from being closed during the next 10 sec-
onds, the closing process is interrupted once again and the window goes down by several centimetres.
39Unlocking and locking
Page 49 of 219
Switching on the side lights on both sides ›Turn the light switch » Fig. 21 on page 41 to the position and lock the vehicle.
Note
■
The parking light can only be activated if the ignition is switched off.■If the right or left turn signal light has been switched on and the ignition is
switched off, the parking light is not automatically switched on.
Interior lights
Introduction
This chapter contains information on the following subjects:
Interior lighting - version 1
46
Interior lighting - version 2
46
Illuminated storage compartment on the passenger side
47
Luggage compartment light
47
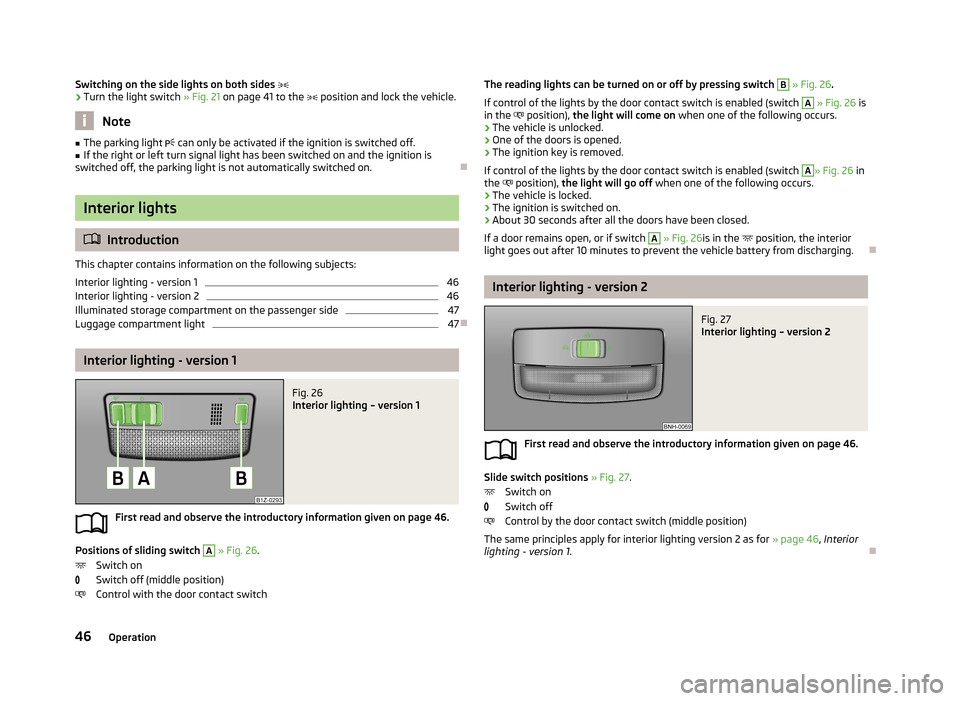
Interior lighting - version 1
Fig. 26
Interior lighting – version 1
First read and observe the introductory information given on page 46.
Positions of sliding switch
A
» Fig. 26 .
Switch on
Switch off (middle position)
Control with the door contact switch
The reading lights can be turned on or off by pressing switch B » Fig. 26 .
If control of the lights by the door contact switch is enabled (switch A
» Fig. 26 is
in the position), the light will come on when one of the following occurs.
› The vehicle is unlocked.
› One of the doors is opened.
› The ignition key is removed.
If control of the lights by the door contact switch is enabled (switch
A
» Fig. 26 in
the position), the light will go off when one of the following occurs.
› The vehicle is locked.
› The ignition is switched on.
› About 30 seconds after all the doors have been closed.
If a door remains open, or if switch
A
» Fig. 26 is in the
position, the interior
light goes out after 10 minutes to prevent the vehicle battery from discharging.
Interior lighting - version 2
Fig. 27
Interior lighting – version 2
First read and observe the introductory information given on page 46.
Slide switch positions » Fig. 27 .
Switch on
Switch off
Control by the door contact switch (middle position)
The same principles apply for interior lighting version 2 as for » page 46, Interior
lighting - version 1 .
46Operation
Page 54 of 219
Rear window
Introduction
This chapter contains information on the following subjects:
Manually dimmed rear-view mirror
51
Exterior mirrors
51WARNING■ Make sure that the mirror is not covered by ice, snow, condensation or other
objects.■
Convex (curved outward) or aspheric exterior mirrors increase the field of vi-
sion. They do, however, make objects appear smaller in the mirror. These mir-
rors are therefore only of limited use for estimating distances to the following vehicles.
■
Whenever possible use the interior mirror for estimating the distances to
the following vehicles.
Manually dimmed rear-view mirror
First read and observe the introductory information and safety warn-ings
on page 51.
Basic setting
›
Pull the lever on the lower edge of the mirror away from the windscreen.
Dimming mirror
›
Push the lever on the lower edge of the mirror towards the windscreen.
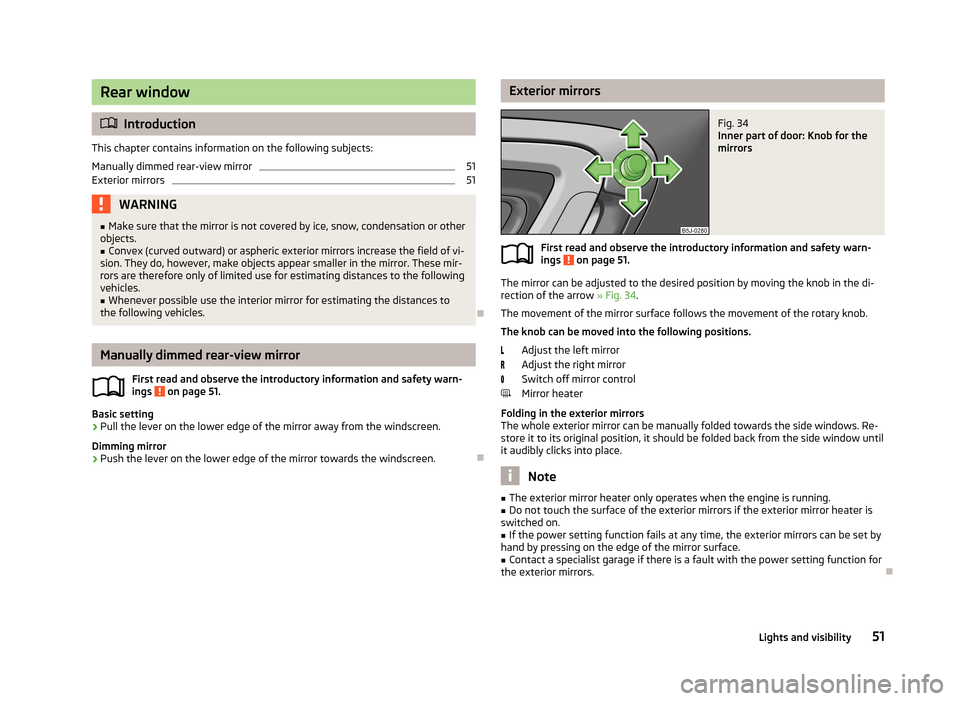
Exterior mirrorsFig. 34
Inner part of door: Knob for the
mirrors
First read and observe the introductory information and safety warn-
ings on page 51.
The mirror can be adjusted to the desired position by moving the knob in the di-
rection of the arrow » Fig. 34.
The movement of the mirror surface follows the movement of the rotary knob.
The knob can be moved into the following positions.
Adjust the left mirror
Adjust the right mirror
Switch off mirror control
Mirror heater
Folding in the exterior mirrors
The whole exterior mirror can be manually folded towards the side windows. Re- store it to its original position, it should be folded back from the side window until
it audibly clicks into place.
Note
■ The exterior mirror heater only operates when the engine is running.■Do not touch the surface of the exterior mirrors if the exterior mirror heater is
switched on.■
If the power setting function fails at any time, the exterior mirrors can be set by
hand by pressing on the edge of the mirror surface.
■
Contact a specialist garage if there is a fault with the power setting function for
the exterior mirrors.
51Lights and visibility
Page 83 of 219
We recommend that you leave the air outlet vents 3 » Fig. 80 on page 77 in the
open position in all operating modes.
Note
If the air distribution is set only to the windows, the entire volume of air is used
to defrost the windows and thus no air will be fed to the footwell. This can limit
the heating comfort.
Recirculated air mode
First read and observe the introductory information given on page 78.
Recirculated air mode prevents polluted air from outside the vehicle getting into
the vehicle, for example when driving through a tunnel or when standing in a
traffic jam.
Switching on/off
›
Press the
button.
The indicator light in the button lights up.
›
Press the
button again.
The indicator light in the button goes out.
Recirculated air mode is switched off automatically if the air distribution control
C
» Fig. 81 on page 79 is turned to the
position. Recirculated air mode can be
switched on again from this setting by pressing the
button again.
WARNINGNever leave recirculated air mode on over a longer period of time, as “stale air”
can cause fatigue of the driver and the passengers, reduce attention levels
and also cause the windows to mist up. The risk of having an accident increa-
ses. Switch off recirculated air mode as soon as the windows start to mist up.
Air conditioning system (manual air conditioning
system)
Introduction
This chapter contains information on the following subjects: Operation
81
Setting the air conditioning system
82
Recirculated air mode
82
The cooling system operates only if the following conditions are met. The cooling system is switched on » page 81.
The engine is running.
The outside temperature is above approximately +2 °C.
The blower switch is switched on (positions 1-4).
If the desired interior temperature can also be achieved without activating the cooling system, fresh air mode should be selected.
If the coolant temperature is too high, the cooling system is switched off to en-
sure that the engine cools down.
CAUTION
■ Under certain circumstances, air at a temperature of about 5 °C can flow out of
the vents when the cooling system is switched on.■
Lengthy and uneven distribution of the air flow out of the vents (especially
around the feet) and large differences in temperature, for example, when getting
out of the vehicle, can cause susceptible individuals to catch a cold.
Note
We recommend that you have the air conditioning system cleaned by a specialist
garage once every year.80Operation