service interval SKODA ROOMSTER 2014 1.G Owner's Manual
[x] Cancel search | Manufacturer: SKODA, Model Year: 2014, Model line: ROOMSTER, Model: SKODA ROOMSTER 2014 1.GPages: 204, PDF Size: 14.15 MB
Page 5 of 204
Table of Contents
Board literature4
Notes
5
Structure and more information about the
Operating Instructions
6
Abbreviations
Safety
Passive Safety
8
General information
8
Correct and safe seated position
9
Seat belts
12
Using seat belts
12
Inertia reels and belt tensioners
15
Airbag system
16
Description of the airbag system
16
Airbag overview
17
Deactivating airbags
20
Transporting children safely
22
Child seat
22
Fastening systems
25
Operation
Cockpit
29
Overview
28
Instruments and Indicator Lights
30
Instrument cluster
30
Multifunction display (MFD)
33
Service Interval Display
36
MAXI DOT display
37
Warning lights
39Unlocking and locking47Unlocking and locking47
Central locking system
49
Remote control
52
Anti-theft alarm system
53
Luggage compartment lid
54
Electrical power windows
55
Mechanical windows
58
Lights and visibility
59
Lights
59
Interior lights
63
Visibility
64
Windscreen wipers and washers
65
Rear window
67
Seats and stowing
69
Front seats
69
Rear seats
70
Head restraints
72
Boot
73
Variable loading floor in the luggage
compartment (Estate)
76
Bicycle carrier in the luggage compartment
78
Roof rack system
80
Useful equipment
80
Storage compartments
83
Praktik
87
Heating and air-conditioning
90
Heating, ventilation, cooling
90
Heating
91Air conditioning system (manual air
conditioning system)93
Climatronic (automatic air conditioning
system)
95
Communication and multimedia
97
Universal telephone preinstallation GSM II
97
Voice control
102
Multimedia
103
Driving
Starting-off and Driving
106
Starting and stopping the engine
106
Brakes
108
Manual gear changing and pedals
109
Automatic transmission
110
Running in
113
Economical driving and environmental
sustainability
113
Avoiding damage to your vehicle
117
Driving abroad
118
Assist systems
119
Brake assist systems
119
Parking aid
120
Cruise Control System
121
START-STOP
123
Tyre pressure monitoring
125
Hitch and trailer
126
Hitch
126
Trailer
129
General Maintenance
Car care
132
Services, modifications and technical
alterations
132
Washing vehicle
1352Table of Contents
Page 33 of 204
Instruments and Indicator Lights
Instrument cluster
Introduction
This chapter contains information on the following subjects:
Overview
30
Engine revolutions counter
31
Speedometer
31
Coolant temperature gauge display
31
Fuel gauge
31
Counter for distance driven
32
Digital clock
32
Display of the second speed
32
Recommended gear
32
Fault display
The Error message will appear in the display if there is a fault in the instru-
ment cluster. Ensure that the fault is rectified as soon as possible by a special-
ist workshop.
WARNING■ Concentrate fully at all times on your driving! As the driver you are fully
responsible for road safety.■
Never operate the controls in the instrument cluster while driving, only
when the vehicle is stationary!
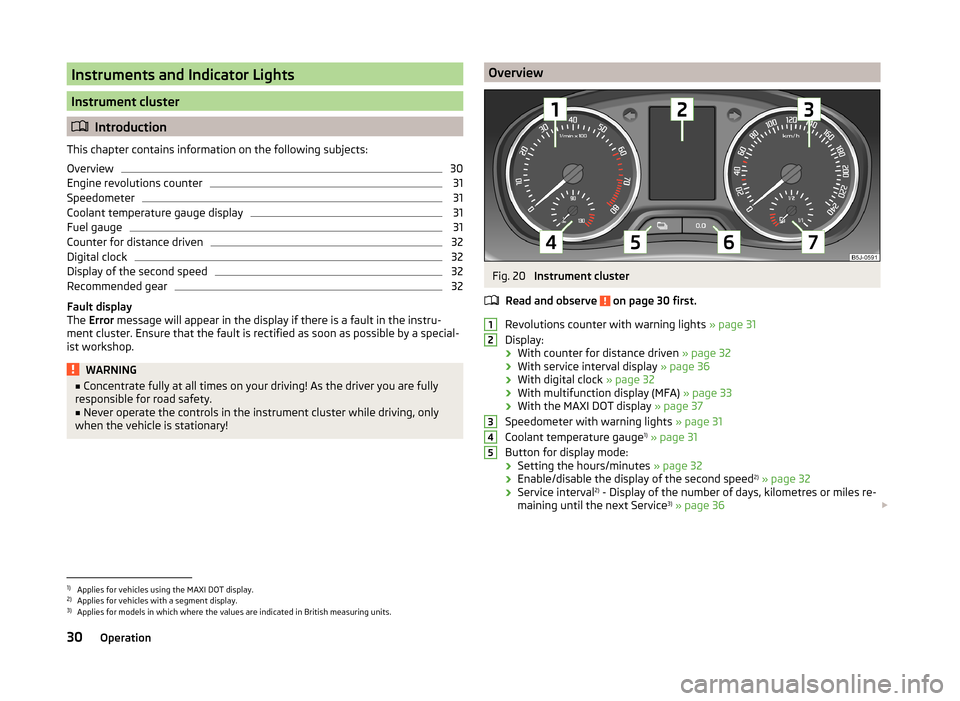
OverviewFig. 20
Instrument cluster
Read and observe
on page 30 first.
Revolutions counter with warning lights » page 31
Display:
› With counter for distance driven
» page 32
› With service interval display
» page 36
› With digital clock
» page 32
› With multifunction display (MFA)
» page 33
› With the MAXI DOT display
» page 37
Speedometer with warning lights » page 31
Coolant temperature gauge 1)
» page 31
Button for display mode:
› Setting the hours/minutes
» page 32
› Enable/disable the display of the second speed 2)
» page 32
› Service interval 2)
- Display of the number of days, kilometres or miles re-
maining until the next Service 3)
» page 36
123451)
Applies for vehicles using the MAXI DOT display.
2)
Applies for vehicles with a segment display.
3)
Applies for models in which where the values are indicated in British measuring units.
30Operation
Page 39 of 204
The speed limit set mode is stored even after the ignition is switched off and
on.
Service Interval Display
Introduction
This chapter contains information on the following subjects:
Prompt in the segment display
36
Display in the MAXI DOT display
36
Resetting the service interval display
37
The service interval display shows the time and mileage to the next service
event.
The service due date is automatically displayed on the display and this infor-
mation can be displayed manually at any time if necessary.
The kilometre indicator or the days indicator reduces in steps of 100 km or
days until the service due date is reached.
The information regarding the service intervals can be found in the service
schedule.
Note
Information is retained in the Service Interval Display even after the vehicle
battery is disconnected.
Prompt in the segment display
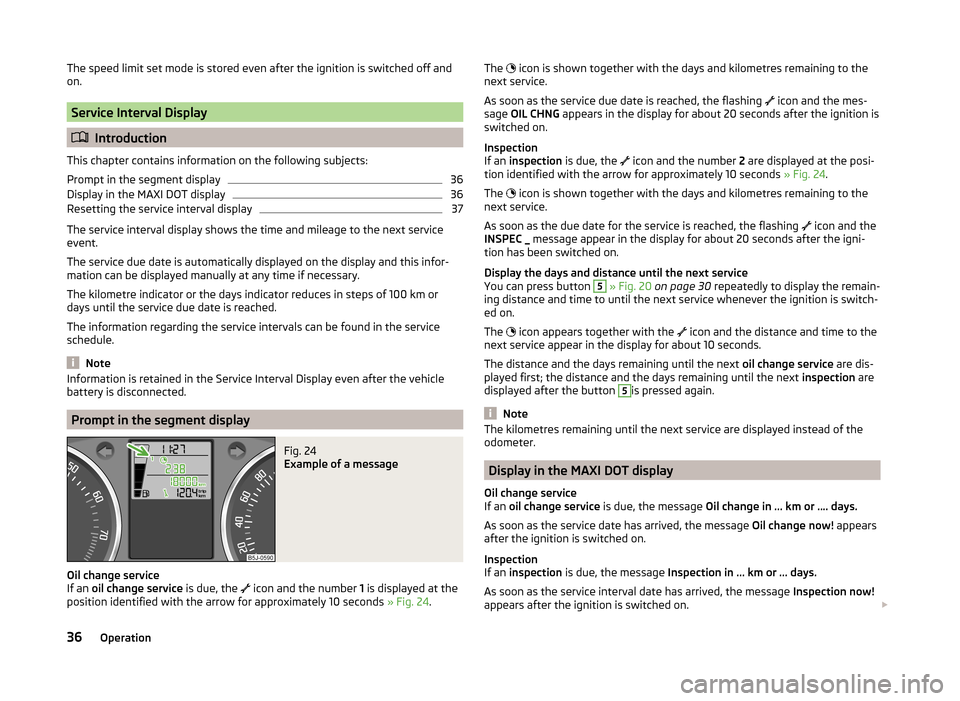
Fig. 24
Example of a message
Oil change service
If an oil change service is due, the
icon and the number 1 is displayed at the
position identified with the arrow for approximately 10 seconds » Fig. 24.
The icon is shown together with the days and kilometres remaining to the
next service.
As soon as the service due date is reached, the flashing
icon and the mes-
sage OIL CHNG appears in the display for about 20 seconds after the ignition is
switched on.
Inspection
If an inspection is due, the
icon and the number 2 are displayed at the posi-
tion identified with the arrow for approximately 10 seconds » Fig. 24.
The
icon is shown together with the days and kilometres remaining to the
next service.
As soon as the due date for the service is reached, the flashing icon and the
INSPEC _ message appear in the display for about 20 seconds after the igni-
tion has been switched on.
Display the days and distance until the next service
You can press button 5
» Fig. 20 on page 30 repeatedly to display the remain-
ing distance and time to until the next service whenever the ignition is switch-
ed on.
The icon appears together with the
icon and the distance and time to the
next service appear in the display for about 10 seconds.
The distance and the days remaining until the next oil change service are dis-
played first; the distance and the days remaining until the next inspection are
displayed after the button
5
is pressed again.
Note
The kilometres remaining until the next service are displayed instead of the
odometer.
Display in the MAXI DOT display
Oil change service
If an oil change service is due, the message Oil change in ... km or .... days.
As soon as the service date has arrived, the message Oil change now! appears
after the ignition is switched on.
Inspection
If an inspection is due, the message Inspection in ... km or ... days.
As soon as the service interval date has arrived, the message Inspection now!
appears after the ignition is switched on.
36Operation
Page 40 of 204
Displaying the distance and days until the next service interval
You can display the remaining distance and days until the next service in the
Settings menu whenever the ignition is switched on » page 38.
The following message is displayed for 10 seconds. Oil change ... km / ... days
Inspection ... km / ... days
Resetting the service interval display
We recommend that the display reset is completed by a specialist garage.
We recommend that you do not reset the service interval display yourself. In-
correctly setting the service interval display could cause problems to the vehi-
cle.
Variable service interval
For vehicles with variable service intervals, after resetting the oil change serv-
ice display, the values of a new service interval are displayed, which are based
on the previous operating conditions of the vehicle.
These values are then continuously matched according to the actual operating
conditions of the vehicle.
MAXI DOT display
Introduction
This chapter contains information on the following subjects:
Main menu
37
Settings
38
Door, boot lid and bonnet warning
38
Auto Check Control
38
The MAXI DOT display provides you with information about the current operat-
ing state of your vehicle . The information system also provides you with data
(depending on the vehicle equipment) relating to the radio, mobile phone, mul-
ti-functional display, navigation system, the device connected to the MDI input
and the automatic gearbox » page 110.
Lighting up of certain symbols is combined with an acoustic warning signal.
WARNINGConcentrate fully on your driving at all times. As the driver you are fully re-
sponsible for the operation of your vehicle.
Main menu
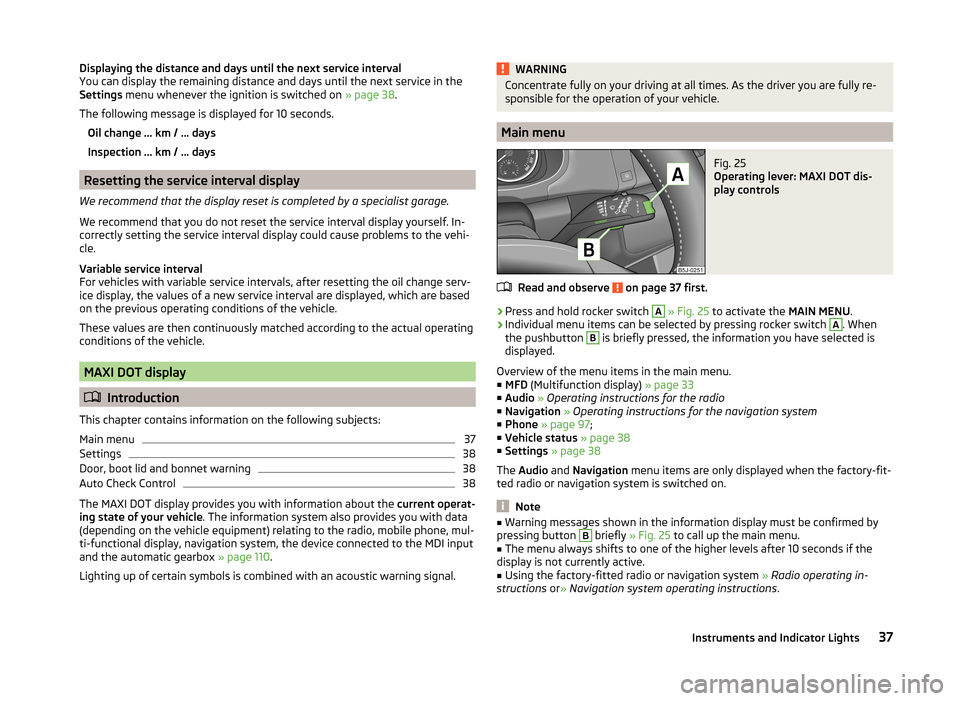
Fig. 25
Operating lever: MAXI DOT dis-
play controls
Read and observe on page 37 first.
›
Press and hold rocker switch
A
» Fig. 25 to activate the MAIN MENU.
›
Individual menu items can be selected by pressing rocker switch
A
. When
the pushbutton
B
is briefly pressed, the information you have selected is
displayed.
Overview of the menu items in the main menu.
■ MFD (Multifunction display) » page 33
■ Audio » Operating instructions for the radio
■ Navigation » Operating instructions for the navigation system
■ Phone » page 97 ;
■ Vehicle status » page 38
■ Settings » page 38
The Audio and Navigation menu items are only displayed when the factory-fit-
ted radio or navigation system is switched on.
Note
■ Warning messages shown in the information display must be confirmed by
pressing button B briefly » Fig. 25 to call up the main menu.■
The menu always shifts to one of the higher levels after 10 seconds if the
display is not currently active.
■
Using the factory-fitted radio or navigation system » Radio operating in-
structions or» Navigation system operating instructions .
37Instruments and Indicator Lights
Page 47 of 204
In order to clean the filter, and where traffic conditions permit » , the vehicle
should be driven at an even speed of at least 60 km/h at engine speeds of 1
800 - 2 500 rpm for at least 15 minutes or until the warning light goes out with
the 4th or 5th gear engaged (automatic gearbox: position S) when the traffic
situation permits it.
The
warning light only goes out once the diesel particulate filter has been
successfully cleaned.
If the filter is not properly cleaned, the warning light
does not go out and
the warning light
begins to flash.
The following message is shown in the MAXI DOT display. Diesel particulate filter: Owner's manual!
The engine control unit allows the vehicle to run in emergency mode. After
switching the ignition off and on again the indicator light, the indicator light
also lights up.
Seek help from a specialist garage.WARNING■ The diesel particulate filter reaches very high temperatures - there is a
fire hazard and serious injury could be caused. Therefore, never stop the
vehicle at places where the underside of your vehicle can come into contact
with flammable materials such as dry grass, undergrowth, leaves, spilled
fuel or such like.■
Always adjust your speed to suit weather, road, region and traffic condi-
tions. The recommendations indicated by the warning light must not tempt
you to disregard the national regulations for road traffic.
CAUTION
As long as the warning light lights up, one must take into account an in-
creased fuel consumption and in certain circumstances a power reduction of
the engine.Note■ We recommend avoiding regularly driving short distances to assist the com-
bustion process of the soot particles in the filter.■
Using diesel fuel with an increased sulphur content can considerably reduce
the service life of the filter. A ŠKODA Service Partner will be able to tell you
which countries use diesel fuel with a high sulphur content.
■
If the engine is turned off during the filter cleaning process or shortly after-
wards, the cooling fan may turn on automatically for a few minutes.
Fuel reserve
Read and observe
on page 39 first.
The indicator light will come on if the fuel level is less than 7 litres.
An audible signal sounds as a warning signal.
The following message is shown in the MAXI DOT display. Please refuel. Range: ... km
Note
The text in the MAXI DOT display only goes out after the vehicle has been re-
fuelled and driven a short distance.
Airbag system
Read and observe
on page 39 first.
If the warning light
lights up, there is a fault in the airbag system.
The following message is shown in the MAXI DOT display.
Error: Airbag
The operational capability of the airbag system is monitored electronically,
even if one of the airbags is switched off.
If a front, side or head airbag or belt tensioner has been switched off using
the vehicle system tester:
› The
warning light comes on for around 4 seconds after the ignition is
switched on and then flashes for approximately another 12 seconds at 2 sec-
ond intervals.
The following message is shown in the MAXI DOT display. Airbag/belt tensioner deactivated.
44Operation
Page 119 of 204
Each kilogramme of weight increases the fuel consumption. Therefore we rec-
ommend to carry no unnecessary weight.
It is particularly in town traffic, when one is accelerating quite often, that the
vehicle weight will have a significant effect upon the fuel consumption. A rule
of thumb here is that an increase in weight of 100 kilograms will cause an in-
crease in fuel consumption of about 1 litre/100 kilometres.
At a speed of 100 - 120 km/h, a vehicle fitted with a roof rack cross member without a load will use about 10 % more fuel than normal due to the increased
aerodynamic drag.
Regular maintenance
Read and observe
on page 114 first.
A poorly tuned engine uses an unnecessarily high amount of fuel.
By having your vehicle regularly maintained by a specialist garage, you create
the conditions needed for economical driving. The maintenance state of your
vehicle has a positive effect on traffic safety and value retention
A poorly tuned engine can result in a fuel consumption which is 10 % higher than normal.
Check the oil level at regular intervals, e.g. when filling up. Oil consumption is
dependent to a considerable extent on the load and speed of the engine. Oil
consumption could be as high as 0.5 litres/1 000 km depending on your style
of driving.
It is quite normal that a new engine has a higher oil consumption at first, and
reaches its lowest level only after a certain running in time. The oil consump-
tion of a new vehicle can therefore only be correctly assessed after driving
about 5 000 km.
For the sake of the environment
■ Additional improvements to the fuel economy can be made by using synthet-
ic high-lubricity oils.■
Regularly check the ground under the vehicle. Have your vehicle inspected by
a specialist garage if you find any stains caused by oil or other fluids on the
ground.
Note
We recommend that your vehicle be serviced on a regular basis by a ŠKODA
service partner.Saving electrical energy
Read and observe
on page 114 first.
When the engine is running, the alternator generates and supplies electricalpower. If more electrical components of the electrical system are switched on,
more fuel is needed to operate the alternator. We therefore recommend
switching off electrical components if these are no longer required.
Environmental compatibility
Read and observe
on page 114 first.
Environmental protection has played a major role in the design, material selec-
tion and production of your new ŠKODA. Particular emphasis has been placed
on the following points.
Design measures › Joints designed to be easily detached.
› Simplified disassembly due to the modular structure system.
› Improved purity of different classes of materials.
› Identification of all plastic parts in accordance with VDA Recommendation
260.
› Reduced fuel consumption and exhaust emission CO
2.
› Minimum fuel leakage during accidents.
› Reduced noise.
Choice of materials
› Extensive use of recyclable material.
› Air conditioning filled with CFC-free refrigerant.
› No cadmium.
› No asbestos.
› Reduction in the “vaporisation” of plastics.
Manufacture
› Solvent-free cavity protection.
› Solvent-free protection of the vehicle for transportation from the production
plant to the customer.
› The use of solvent-free adhesives.
› No CFCs used in the production process.
› Without use of mercury.
› Use of water-soluble paints.
116Driving
Page 134 of 204
The towed weight comprises the actual weights of the (loaded) towing vehicle
and the (loaded) trailer.
The trailer and drawbar load information on the type plate of the towing
equipment are merely test data for the towing equipment. The vehicle-specific
values are detailed in the vehicle documents.WARNING■ The maximum permissible axle and drawbar load and the permissible
weight of the trailer must not exceed - this could cause an accident!■
A sliding cargo can significantly adversely affect stability and driving safe-
ty - there is a risk of accident!
Towing a trailer
Driving speed
For safety reasons, do not drive faster than 80 km/h when towing a trailer.
Immediately reduce your speed as soon as even the slightest swaying of the
trailer is detected. Never attempt to stop the trailer from “swaying” by acceler-
ating.
Brakes
Apply the brakes in good time! If the trailer is fitted with a trailer brake, apply
the brakes gently at first, then brake firmly. This will avoid brake jolts resulting
from the trailer wheels locking.
On downhill sections shift down a gear in good time to also use the engine as
a brake.
Engine overheating
The speed must be reduced immediately if the needle for the coolant tempera-
ture gauge moves into the right-hand area or the red area of the scale.
Stop and switch off the engine if the warning light in the instrument cluster
starts to flash. Wait a few minutes and check the level of coolant » page 151,
Checking the coolant level .
Further information » page 41,
Coolant
.
The coolant temperature can be reduced by switching on the heating.
WARNING■ Always drive particularly carefully with the trailer.■Adapt your speed to the conditions of the road surface and to the traffic
situation.
Note
If you tow a trailer frequently, you should also have your vehicle inspected be-
tween service intervals.
Anti-theft alarm system
When the vehicle is locked, the alarm is activated when the electrical connec-
tion to the trailer is interrupted.
Always switch off the anti-theft alarm system before a trailer is coupled or un-
coupled » page 53 .
Conditions for including a trailer in the anti-theft alarm system. The vehicle is factory-fitted with an anti-theft alarm system and towing
equipment.
The trailer is electrically connected to the towing vehicle by means of the
trailer socket.
The electrical system of the vehicle and trailer is functional.
The vehicle is locked with the vehicle key and the anti-theft alarm system
is activated.
CAUTION
For technical reasons, trailers with rear LED lights cannot be connected to the
anti-theft alarm system.131Hitch and trailer
Page 135 of 204
General Maintenance
Car care
Services, modifications and technical alterations
Introduction
This chapter contains information on the following subjects:
Vehicle operating under different weather conditions
132
Statutory checks
132
ŠKODA Service Partners
133
ŠKODA Original parts
133
ŠKODA Original accessories
133
Spoiler
134
Airbags
134
The instructions and guidelines from ŠKODA AUTO a.s. must be observed when
carrying out all modifications, repairs or technical alterations to your vehicle.
Adhering to these instructions and guidelines helps ensure road safety and
helps keep your vehicle in a good technical condition. After carrying out modifi-
cations, repairs or technical alterations, the vehicle will comply with German
road transport regulations (StVZO)
Always consult a ŠKODA Partner » page 133before buying accessories or
parts, or before carrying out any modifications, repairs or technical alterations
to your vehicle.
WARNING■ Works on your vehicle, which have been carried out unprofessionally, can
cause operational faults – risk of accident!■
Interference on the electronic components and their software can lead to
operational faults. This interference can also impair not directly affected
systems because of the networking of the electronic components. The op-
erational safety of the vehicle may be at significant risk and can lead to in-
creased wear of parts.
For the sake of the environmentTechnical documents regarding alterations carried out on the vehicle must be
kept by the vehicle user in order to be handed over to the recyclers at a later
date. This ensures that the vehicle is recycled in an environmentally sound
manner.
Note
■ We recommend only having these modifications and technical alterations
carried out by a specialist garage.■
Any damage caused by technical alterations made without the approval of
the manufacturer is excluded from the warranty » Service schedule .
■
The ŠKODA Partner does not assume any liability for products that have not
been approved by ŠKODA AUTO a.s. even though these may be products with
an operational approval or that have been approved by a government testing
institute.
■
We advise you only to use ŠKODA Original Accessories and ŠKODA Original
Parts which have been expressly approved for use on your vehicle. Reliability,
safety and suitability for your vehicle are guaranteed with these.
■
ŠKODA Original Accessories and ŠKODA Original Parts can be purchased from
ŠKODA Partners, who will also perform the professional assembly of the pur-
chased parts.
Vehicle operating under different weather conditions
Read and observe
on page 132 first.
If you would like to operate your vehicle in countries other than those with itsintended weather conditions, you should contact a ŠKODA Partner.
He will advise you if certain precautions need to be taken to ensure the full
functioning of the vehicle as well as to prevent damage.
This involves, for example, the coolant, battery replacement and the like.
Statutory checks
Read and observe
on page 132 first.
Many countries have legislation requiring the operational reliability and roadworthiness and/or exhaust gas properties of a vehicle to be tested at specific
intervals. These tests can be carried out by workshops or testing stations that
have been legally authorised for this purpose.
132General Maintenance
Page 143 of 204
CAUTION■Be sure to check clothing for colourfastness to avoid any damage or visible
stains on the material (leather), panels and textiles.■
Remove fresh stains such as those from ball-point pens, ink, lipstick, shoe
polish, etc., from the material (leather), panels and textiles as quickly as possi-
ble.
■
Air fresheners and scents can be hazardous to heath when the temperature
inside the vehicle is high.
■
Do not attach scent dispensers or air fresheners to the dash panel – risk of
damage to the dash panel.
■
Do not stick any stickers on the inside of the rear windows, the rear side win-
dows and in the vicinity of the heating elements on the windscreen or near the
window aerial. These may get damaged.
■
Do not clean the roof panelling with a brush – risk of damage to the surface
of the panelling.
■
Cleaner that contain solvents can damage the material being cleaned.
■
Apply only a small amount of the cleaning and care product.
For the sake of the environment
Used cans of vehicle care product represent hazardous waste that is harmful
to the environment. These must be disposed of in accordance with national
legislation.
Note
Because of the special tools and knowledge required, and to avoid any poten-
tial problems with the cleaning and care of the interior of your vehicle, we rec-
ommend that cleaning and care of the interior of your vehicle be carried out by
a ŠKODA Service Partner.
Natural leather
Read and observe
and on page 139 first.
Leather is a natural material with specific properties, and requires regular
cleaning and maintenance.
The leather should be cleaned on a regular basis depending on the amount of
wear-and-tear.
Dust and dirt in the pores and folds act as abrasive materials. This leads to se-
vere corrosion and the premature brittleness of the leather surface.
We recommend that you remove dust regularly and at short intervals using a
cloth or vacuum cleaner.
Clean soiled leather surfaces with a water-dampened cotton or woollen cloth
and then dry with a clean, dry cloth »
.
Clean severely soiled areas with a cloth soaked in a mild soap solution (2 ta-
blespoons of neutral soap to 1 litre of water).
To remove stains, use a cleaning agent specially designed for this purpose.
Treat the leather regularly and at suitable intervals using a suitable leather
care product.
CAUTION
■ Ensure that no part of the leather is soaked through during cleaning and that
no water gets into the seams. Otherwise, the leather could become brittle or
cracked.■
Avoid leaving the vehicle for lengthy periods in bright sunlight to avoid the
leather from bleaching. If the vehicle is parked in the open for lengthy periods,
protect the leather from direct sunlight by covering it.
■
Sharp-edged objects on items of clothing such as zip fasteners, rivets, sharp-
edged belts, jewellery and pendants may leave permanent scratches or signs
of rubbing on the surface. Such damage cannot be subsequently recognised as
a justified complaint.
■
The use of a mechanical steering wheel lock may damage the leather surface
of the steering wheel.
■
Use a care cream with light blocker and impregnation effect on a regular ba-
sis and each time after cleaning. The cream nourishes the leather, allows it to
breathe and keeps it supple and also provides moisture. It also creates surface
protection.
■
Some clothing materials, e.g. dark denim, do not have sufficient colour fast-
ness. This can cause damage or clearly visible discolouration to seat covers,
even when used correctly. This applies particularly to light-coloured seat cov-
ers. This does not relate to a fault in the seat cover, but rather to poor colour
fastness of the clothing textiles.
Note
When using the vehicle, minor visible changes may occur to the leather parts
of the covers (e.g. wrinkles or creases) as a result of the stress applied to the
covers.140General Maintenance
Page 151 of 204
Clear water is not sufficient to intensively clean the windscreen and head-
lights. We recommend using clean water together with a screen cleaner from
the range of ŠKODA Original Accessories (with antifreeze in winter), which will
remove any stubborn dirt.
The washing water should always be mixed with antifreeze in winter even if
the vehicle has heated windscreen washer nozzles.
Under exceptional circumstances, methylated spirits can also be used if no
screen cleaner with antifreeze is available. The concentration of methylated
spirits must not be more than 15 %. The freeze protection at this concentration
is sufficient only to -5 °C.
CAUTION
■ Under no circumstances must radiator antifreeze or other additives be added
to the windscreen washer fluid.■
If the vehicle is fitted with a headlight cleaning system, only cleaning prod-
ucts which do not attack the polycarbonate coating of the headlights must be
added to the windscreen washer fluid.
■
Do not remove the filter from the windscreen washer fluid reservoir when re-
filling, as this may cause contamination of the liquid transportation system,
leading in turn to a windscreen washer system malfunction.
Engine oil
Introduction
This chapter contains information on the following subjects:
Specifications and capacity
148
Checking the oil level
149
Replenishing
150
The engine has been factory-filled with a high-grade oil that can be use
throughout the year - except in extreme climate zones.
The engine oils are undergoing continuous further development. Thus the in- formation stated in this Owner's Manual is only correct at the time of publica-
tion.
ŠKODA Service Partners are informed about the latest changes by the manu-
facturer. We therefore recommend that the oil change be completed by a
ŠKODA Service Partner.
The specifications (VW standards) stated in the following can be indicated sep-
arately or together with other specifications on the bottle.
The oil capacities include oil filter change. Check the oil level when filling; do
not over fill. The oil level must be between the markings » page 149.WARNING■
The engine compartment of your car is a hazardous area. The following
warning instructions must be followed at all times when working in the en-
gine compartment » page 145.■
Do not continue your journey if for some reason it is not possible
to top
up the engine oil under the prevailing conditions! Switch off the engine and
seek assistance from a specialist garage.
■
Do not drive on if the oil level is above range
A
» Fig. 136 on
page 149 . Switch off the engine and seek assistance from a specialist ga-
rage.
CAUTION
Do not pour any additives into the engine oil – risk of serious damage to the
engine parts!
Note
■ Before a long drive we recommend that you purchase and carry with you en-
gine oil which complies with the specification for your vehicle.■
We recommend that you use oils from ŠKODA Original Accessories.
■
If oil comes into contact with your skin, the affected area must be washed
thoroughly.
Specifications and capacity
Read and observe
and on page 148 first.
Specifications and capacity (in l) for vehicles with flexible service intervals
Petrol enginesSpecificationCapacity1.2 litres/51 kWVW 503 00, VW 504 002.81.2 l/63 kW TSIVW 504 003.91.2l/77 kW TSIVW 504 003.91.4 litres/63 kWVW 503 00, VW 504 003.2 148General Maintenance