winter tyres SKODA ROOMSTER 2014 1.G Owner's Manual
[x] Cancel search | Manufacturer: SKODA, Model Year: 2014, Model line: ROOMSTER, Model: SKODA ROOMSTER 2014 1.GPages: 204, PDF Size: 14.15 MB
Page 6 of 204
Taking care of your vehicle exterior136Taking care of the interior139
Inspecting and replenishing
142
Fuel
142
Engine compartment
145
Engine oil
148
Coolant
150
Brake fluid
152
Vehicle battery
153
Wheels
156
Tyres and wheel rims
156
Approved tyre / rim combinations
160
Winter operation
163
Do-it-yourself
Emergency equipment and self-help
165
Emergency equipment
165
Changing a wheel
166
Puncture set
169
Jump-starting
172
Towing the vehicle
173
Fuses and light bulbs
175
Fuses
175
Replacing bulbs
178
Technical data
Technical data
183
Vehicle data
183
Index
3Table of Contents
Page 41 of 204
SettingsRead and observe
on page 37 first.
You can change certain settings yourself through the MAXI DOT display. The
current menu item is shown in the top of the display under a line.
You can select the following menu options:
Language
You can set the language for the warning and information texts here.
MFD data
Activate or deactivate certain displays of the multifunction display here.
Time
The time, time format (12 or 24 hour indicator) and the changeover between
summer/winter time can be set here.
Winter tyres
Here, you can set the speed at which an audible signal should sound. This
function is, for example, used for winter tyres where the maximum permissible
speed is lower than the maximum speed of the vehicle.
The following is shown on the information display if this speed is exceeded: Winter tyres: max. speed ... km/h.
Units of measurement
The units for the temperature, consumption and distance driven can be set
here.
Alt. speed dis.
Display of the second speed in mph 1)
can be activated here.
Service
The days and kilometres remaining until the next service can be displayed
here.
Factory setting
The display can be restored to its factory settings here.
Door, boot lid and bonnet warning
Read and observe
on page 37 first.
If at least one door is open, or the boot or bonnet is open, the MAXI DOT dis-
play shows the vehicle with the corresponding door or boot/bonnet open.
An audible signal also sounds if the vehicle is travelling at more than 6 km/h.
Auto Check Control
Read and observe
on page 37 first.
Vehicle condition
Certain functions and conditions of individual vehicle systems are checked
continuously when the ignition is switched on and also while driving.
Some error messages and other information are displayed in the MAXI DOT
display. The messages are displayed simultaneously with the icons in the MAXI
DOT display or with the warning lights in the instrument cluster » page 39.
The Vehicle status menu item is shown in the main menu of the MAXI DOT
display whenever at least one fault message is present. The first of the fault
messages is displayed after this menu item is selected. Several error messages
are shown on the display under the message e.g. 1/3. This indicates that the
first of a total of three error messages is being displayed.
As long as the operational faults are not rectified, the symbols are always indi-
cated again. After they are displayed for the first time, the symbols continue to
be indicated without any extra messages for the driver.
Warning symbols
Engine oil pressure too low» page 40Clutches of the automatic DSG gearbox
are too hot» page 38Check engine oil level,
engine oil sensor defective» page 40
Clutches of the automatic DSG gearbox are too hot
If the symbol appears in the MAXI DOT display, this indicates that the tem-
perature of the automatic DSG gearbox clutches is too high.
1)
On models on which the speedometer indicates mph, the second speed is displayed in km/h.
38Operation
Page 117 of 204
Avoiding unnecessary ballast115Regular maintenance116
Saving electrical energy
116
Environmental compatibility
116
The technical requirements for low fuel usage and economic efficiency of the
vehicle have already been built into the vehicle at the works. ŠKODA places a
particular emphasis on minimising negative effects on the environment.
It is necessary to take note of the guidelines given in this chapter in order to make best use of these characteristics and to maintain their effectiveness.
Fuel consumption, environmental pollution and the wear to the engine, brakes
and tyres depend essentially on the following three factors.
› Your personal driving style
› Operating conditions
› Technical requirements
The fuel economy by can be improved by 10 -15 % by always looking ahead and
driving in an economical way.
Fuel consumption is also be influenced by external factors which are beyond
the driver's control. Consumption increases during the winter or under difficult
conditions, on poor roads, etc.
Fuel consumption can vary considerably from the manufacturer's data, as a re-
sult of outside temperatures, the weather and driving style.
The optimal engine speed should be maintained when accelerating, to avoid a high fuel consumption and resonance of the vehicle.
CAUTION
All the speed and engine revolution figures apply only when the engine is at
its normal operating temperature.
Looking ahead
Read and observe
on page 114 first.
A vehicle's highest fuel consumption occurs when accelerating, therefore un-necessary accelerating and braking should be avoided. If looking ahead when
driving, less braking and consequently less accelerating are required.
If possible, let your vehicle coast to a stop, or use the engine brake, if you can see that the next set of traffic lights is on red, for example.
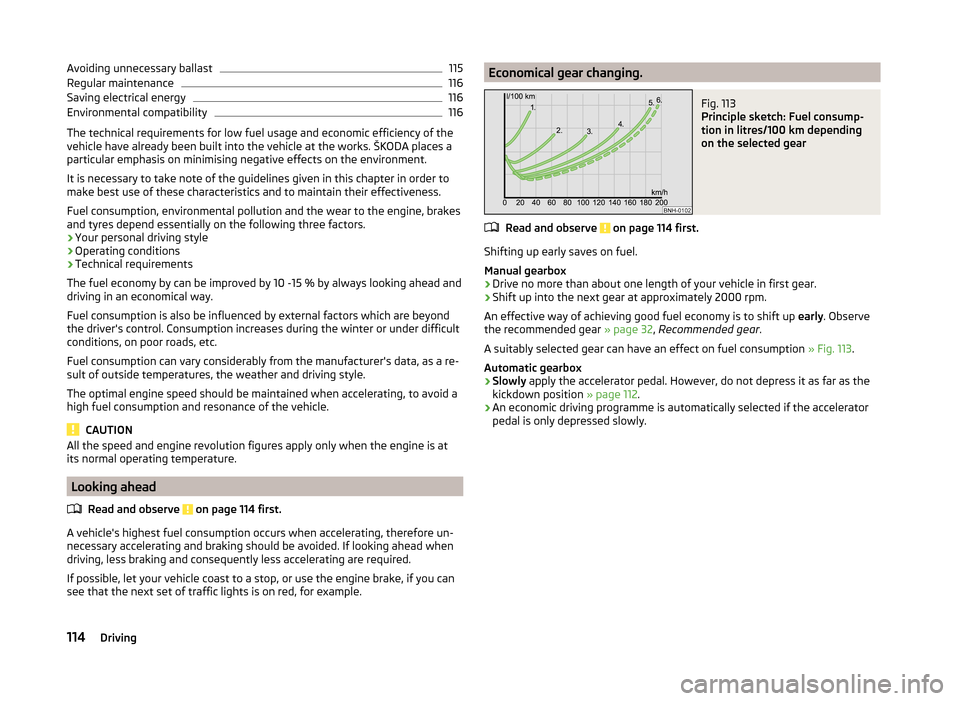
Economical gear changing.Fig. 113
Principle sketch: Fuel consump-
tion in litres/100 km depending
on the selected gear
Read and observe on page 114 first.
Shifting up early saves on fuel.
Manual gearbox › Drive no more than about one length of your vehicle in first gear.
› Shift up into the next gear at approximately 2000 rpm.
An effective way of achieving good fuel economy is to shift up early. Observe
the recommended gear » page 32, Recommended gear .
A suitably selected gear can have an effect on fuel consumption » Fig. 113.
Automatic gearbox
› Slowly
apply the accelerator pedal. However, do not depress it as far as the
kickdown position » page 112.
› An economic driving programme is automatically selected if the accelerator
pedal is only depressed slowly.
114Driving
Page 162 of 204
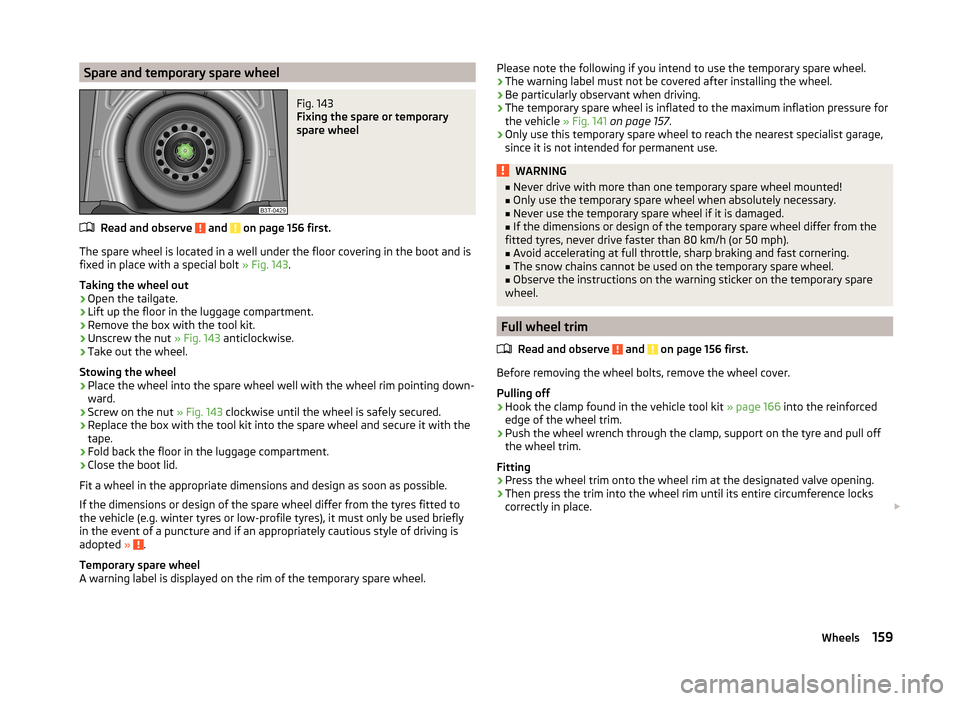
Spare and temporary spare wheelFig. 143
Fixing the spare or temporary
spare wheel
Read and observe and on page 156 first.
The spare wheel is located in a well under the floor covering in the boot and is
fixed in place with a special bolt » Fig. 143.
Taking the wheel out
›
Open the tailgate.
›
Lift up the floor in the luggage compartment.
›
Remove the box with the tool kit.
›
Unscrew the nut » Fig. 143 anticlockwise.
›
Take out the wheel.
Stowing the wheel
›
Place the wheel into the spare wheel well with the wheel rim pointing down-
ward.
›
Screw on the nut » Fig. 143 clockwise until the wheel is safely secured.
›
Replace the box with the tool kit into the spare wheel and secure it with the
tape.
›
Fold back the floor in the luggage compartment.
›
Close the boot lid.
Fit a wheel in the appropriate dimensions and design as soon as possible.
If the dimensions or design of the spare wheel differ from the tyres fitted to
the vehicle (e.g. winter tyres or low-profile tyres), it must only be used briefly
in the event of a puncture and if an appropriately cautious style of driving is
adopted »
.
Temporary spare wheel
A warning label is displayed on the rim of the temporary spare wheel.
Please note the following if you intend to use the temporary spare wheel.
› The warning label must not be covered after installing the wheel.
› Be particularly observant when driving.
› The temporary spare wheel is inflated to the maximum inflation pressure for
the vehicle » Fig. 141 on page 157 .
› Only use this temporary spare wheel to reach the nearest specialist garage,
since it is not intended for permanent use.WARNING■ Never drive with more than one temporary spare wheel mounted!■Only use the temporary spare wheel when absolutely necessary.■
Never use the temporary spare wheel if it is damaged.
■
If the dimensions or design of the temporary spare wheel differ from the
fitted tyres, never drive faster than 80 km/h (or 50 mph).
■
Avoid accelerating at full throttle, sharp braking and fast cornering.
■
The snow chains cannot be used on the temporary spare wheel.
■
Observe the instructions on the warning sticker on the temporary spare
wheel.
Full wheel trim
Read and observe
and on page 156 first.
Before removing the wheel bolts, remove the wheel cover.
Pulling off
›
Hook the clamp found in the vehicle tool kit » page 166 into the reinforced
edge of the wheel trim.
›
Push the wheel wrench through the clamp, support on the tyre and pull off
the wheel trim.
Fitting
›
Press the wheel trim onto the wheel rim at the designated valve opening.
›
Then press the trim into the wheel rim until its entire circumference locks
correctly in place.
159Wheels
Page 164 of 204
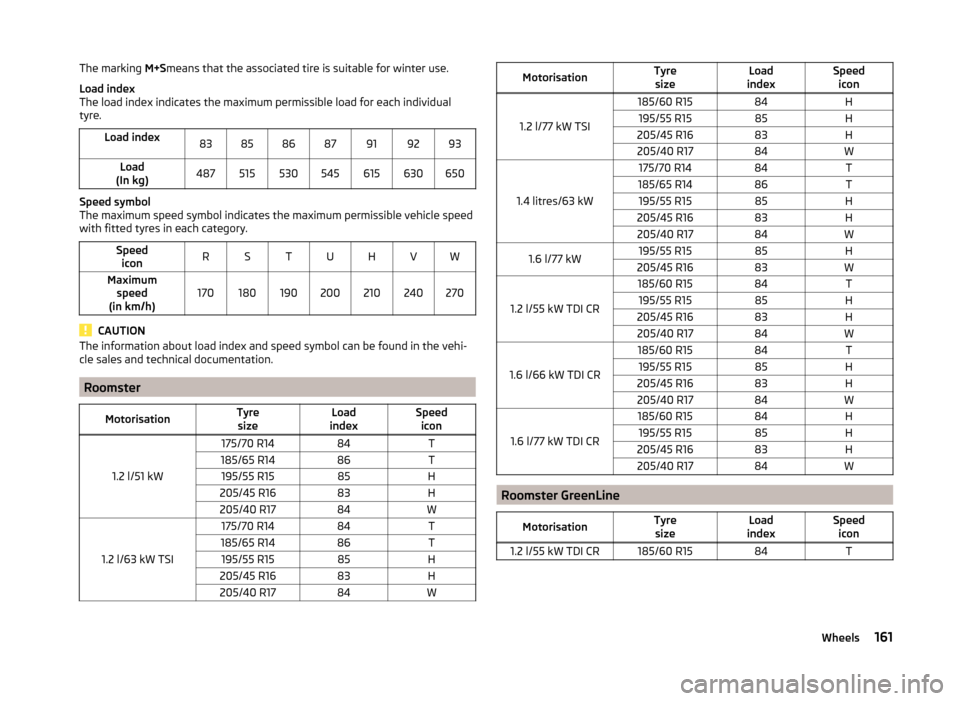
The marking M+Smeans that the associated tire is suitable for winter use.
Load index
The load index indicates the maximum permissible load for each individual
tyre.Load index83858687919293Load
(In kg)487515530545615630650
Speed symbol
The maximum speed symbol indicates the maximum permissible vehicle speed
with fitted tyres in each category.
Speed iconRSTUHVWMaximum speed
(in km/h)170180190200210240270
CAUTION
The information about load index and speed symbol can be found in the vehi-
cle sales and technical documentation.
Roomster
MotorisationTyre sizeLoad
indexSpeed icon
1.2 l/51 kW
175/70 R1484T185/65 R1486T195/55 R1585H205/45 R1683H205/40 R1784W
1.2 l/63 kW TSI
175/70 R1484T185/65 R1486T195/55 R1585H205/45 R1683H205/40 R1784WMotorisationTyresizeLoad
indexSpeed icon
1.2 l/77 kW TSI
185/60 R1584H195/55 R1585H205/45 R1683H205/40 R1784W
1.4 litres/63 kW
175/70 R1484T185/65 R1486T195/55 R1585H205/45 R1683H205/40 R1784W1.6 l/77 kW195/55 R1585H205/45 R1683W
1.2 l/55 kW TDI CR
185/60 R1584T195/55 R1585H205/45 R1683H205/40 R1784W
1.6 l/66 kW TDI CR
185/60 R1584T195/55 R1585H205/45 R1683H205/40 R1784W
1.6 l/77 kW TDI CR
185/60 R1584H195/55 R1585H205/45 R1683H205/40 R1784W
Roomster GreenLine
MotorisationTyresizeLoad
indexSpeed icon1.2 l/55 kW TDI CR185/60 R1584T161Wheels
Page 166 of 204
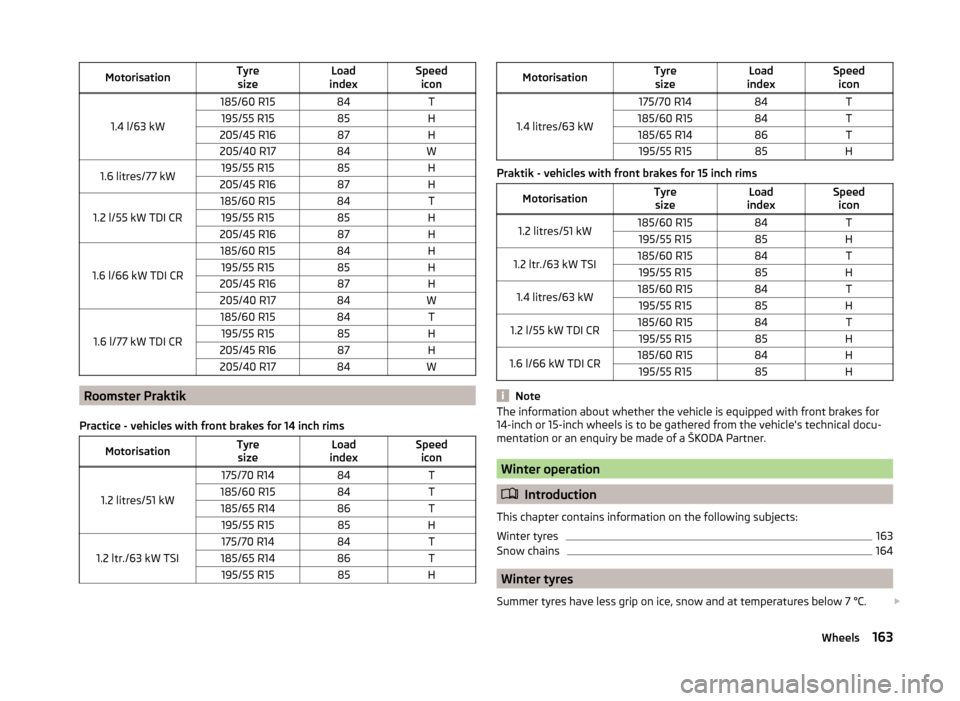
MotorisationTyresizeLoad
indexSpeed icon
1.4 l/63 kW
185/60 R1584T195/55 R1585H205/45 R1687H205/40 R1784W1.6 litres/77 kW195/55 R1585H205/45 R1687H
1.2 l/55 kW TDI CR
185/60 R1584T195/55 R1585H205/45 R1687H
1.6 l/66 kW TDI CR
185/60 R1584H195/55 R1585H205/45 R1687H205/40 R1784W
1.6 l/77 kW TDI CR
185/60 R1584T195/55 R1585H205/45 R1687H205/40 R1784W
Roomster Praktik
Practice - vehicles with front brakes for 14 inch rims
MotorisationTyre sizeLoad
indexSpeed icon
1.2 litres/51 kW
175/70 R1484T185/60 R1584T185/65 R1486T195/55 R1585H
1.2 ltr./63 kW TSI
175/70 R1484T185/65 R1486T195/55 R1585HMotorisationTyresizeLoad
indexSpeed icon
1.4 litres/63 kW
175/70 R1484T185/60 R1584T185/65 R1486T195/55 R1585H
Praktik - vehicles with front brakes for 15 inch rims
MotorisationTyresizeLoad
indexSpeed icon1.2 litres/51 kW185/60 R1584T195/55 R1585H1.2 ltr./63 kW TSI185/60 R1584T195/55 R1585H1.4 litres/63 kW185/60 R1584T195/55 R1585H1.2 l/55 kW TDI CR185/60 R1584T195/55 R1585H1.6 l/66 kW TDI CR185/60 R1584H195/55 R1585H
Note
The information about whether the vehicle is equipped with front brakes for
14-inch or 15-inch wheels is to be gathered from the vehicle's technical docu-
mentation or an enquiry be made of a ŠKODA Partner.
Winter operation
Introduction
This chapter contains information on the following subjects:
Winter tyres
163
Snow chains
164
Winter tyres
Summer tyres have less grip on ice, snow and at temperatures below 7 °C.
163Wheels
Page 167 of 204
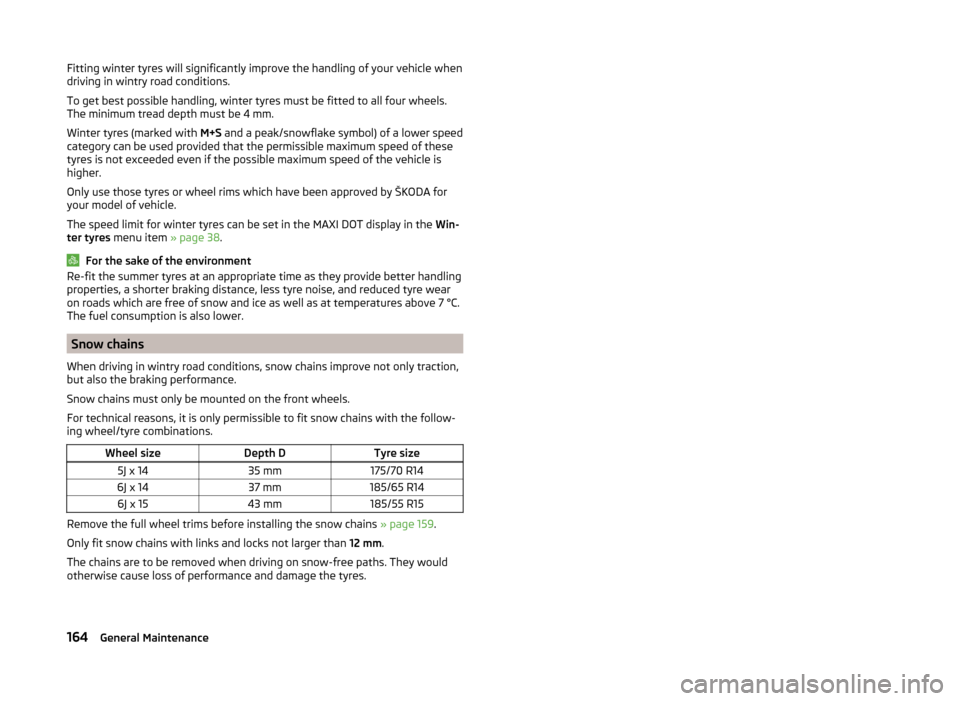
Fitting winter tyres will significantly improve the handling of your vehicle when
driving in wintry road conditions.
To get best possible handling, winter tyres must be fitted to all four wheels.
The minimum tread depth must be 4 mm.
Winter tyres (marked with M+S and a peak/snowflake symbol) of a lower speed
category can be used provided that the permissible maximum speed of these
tyres is not exceeded even if the possible maximum speed of the vehicle is
higher.
Only use those tyres or wheel rims which have been approved by ŠKODA for
your model of vehicle.
The speed limit for winter tyres can be set in the MAXI DOT display in the Win-
ter tyres menu item » page 38.
For the sake of the environment
Re-fit the summer tyres at an appropriate time as they provide better handling
properties, a shorter braking distance, less tyre noise, and reduced tyre wear
on roads which are free of snow and ice as well as at temperatures above 7 °C.
The fuel consumption is also lower.
Snow chains
When driving in wintry road conditions, snow chains improve not only traction,
but also the braking performance.
Snow chains must only be mounted on the front wheels.
For technical reasons, it is only permissible to fit snow chains with the follow-
ing wheel/tyre combinations.
Wheel sizeDepth DTyre size5J x 1435 mm175/70 R146J x 1437 mm185/65 R146J x 1543 mm185/55 R15
Remove the full wheel trims before installing the snow chains » page 159.
Only fit snow chains with links and locks not larger than 12 mm.
The chains are to be removed when driving on snow-free paths. They would otherwise cause loss of performance and damage the tyres.
164General Maintenance
Page 199 of 204
Washing by hand135
Wash system135
Wax treatment137
Taking care of your vehicles Fabric covers
141
Technical data183
Telephone97
Temporary spare wheel159
the rear seats fold down seat backrest and fold seat fully for-ward
71
Tiptronic111
Tire size see wheels
161
Tools166
TOP TETHER26
Tourist lights62
Towing173
Towing a trailer131
Towing device Description
126
Use and care139
Towing eye Front
174
Rear174
Towing protection54
Traction Control System (ASR)120
Trailer129
13-pin socket130
connection and disconnection130
Loading130
Safety eye130
Towing a trailer131
Trailer operation126
Transport Boot
73
Roof rack system80
Transporting children safely22
Trays folding table in the middle back seat86
Turning the light on and off
59
Turning the light on and off59
Turn signals61
Two-way radio systems97
Tyre Explanation of the labelling
160
see wheels160
Tyre load-bearing capacity Refer to Wheels
161
Tyre pressure Indicator light
45
Tyre pressure monitoring125
Display45
Save tyre pressure values125
Tyre repair Preparations
171
Pressure test171
Sealing and inflating the tyre171
Tyres156
Inflation pressure157
Sizes157
Tyre wear indicator157
Tyre size160, 161
see wheels160
U
Underbody protection
139
Unleaded petrol118
unlock Central locking system
51
Unlocking Remote control
52
without central locking49
Unlocking and locking47
USB104
Useful equipment80
12-volt power outlet82
Ashtray81
Car park ticket holder83
Cigarette lighter82
Clothes hood83
Cupholders81
Using the selector lever110
V
Variable loading floor
76
Dividing the luggage compartment77
Removing and refitting77
Vehicle battery Automatic load deactivation
156
Charging155
Checking the battery electrolyte level154
Cover154
Disconnecting and reconnecting155
Operation in winter154
Replacing155
Safety instructions153
Vehicle care Alcantara
141
Fabrics141
Synthetic leather141
washing135
Vehicle data sticker183
Vehicle data sticker and nameplate Vehicle data sticker and nameplate
183
Vehicle dimensions185
Vehicle height185
Vehicle Identification Number (VIN)183
Vehicle key47
Vehicle length185
Vehicle status see Auto Check Control
38
Vehicle tool kit166
Vehicle width185
196Index
Page 200 of 204
VINVehicle Identification Number183
Visors65
W
Warning lights
39
Warning symbols see warning lights
39
Warning triangle165
Washing Automatic car wash system
135
by hand135
Chrome parts137
High-pressure cleaner136
Washing vehicles135
Water Driving through
117
Wax treatment See Taking care of your vehicle
137
Weather conditions132
Wheel bolts Anti-theft wheel bolts
169
Caps160
Loosening and tightening168
Wheel rims156
Wheels Changing
166
Full trim159
General information156
Load index161
Replacing wheels157
Service life of tyres157
Snow chains164
Spare wheel159
Speed symbol161
Storing wheels157
Temporary spare wheel159
Tyre pressure157
Tyre size160, 161
Tyre sizes157
Tyre wear indicator157
Unidirectional tyres158
Winter tyres163
Window convenience operation57
Windows138
Deicing138
See Electrical power windows55
Window wipers Replacing the rear window wiper blade
67
Windscreen Deicing
138
Windscreen washer fluid Checking
147
Replenishing147
Warning light45
Winter147
Windscreen washer system147
Windscreen wash system Windscreen washer
66
Windscreen wiper Operate
66
Windscreen wipers Cleaning the windscreen wiper blades
67
Replacing the windscreen wiper blades67
Windscreen washer fluid147
Winter Deicing windows
138
Winter operation163
Snow chains164
Winter tyres163
Winter tyres See Wheels
163
197Index