warning SKODA SUPERB 2003 1.G / (B5/3U) Owner's Manual
[x] Cancel search | Manufacturer: SKODA, Model Year: 2003, Model line: SUPERB, Model: SKODA SUPERB 2003 1.G / (B5/3U)Pages: 259
Page 191 of 259
Care and cleaning
190
Automatic vehicle wash systems
The paintwork of the vehicle is sufficiently resistant that the vehicle can be
washed normally in automatic vehicle wash plants without any problem.
The actual stress to which the paintwork is subjected, however, depends
greatly on the design of the vehicle wash system, the filtering of the water
and the type of washing and care products used. If the paintwork of your
vehicle appears mat after being washed or even has scratches, point this
out to the operator of the vehicle wash plant. Use a different vehicle wash
plant, if necessary.
There are no particular points to note before washing your vehicle in such
a plant other than the usual precautionary measures (closing windows
and sliding/tilting roof, moving any factory-fitted aerials down flat against
the bodywork, etc.).
If you have any particular attached parts fitted to your car - such as spoiler,
roof rack system, two-way radio aerial - it is best to first of all consult the
operator of the car wash plant.
It is important to degrease the lips of the windscreen wiper rubbers after
passing through the automatic vehicle wash system.
Caution
Do not screw the swivelling down roof aerial tight before washing the
vehicle in an automatic vehicle wash system - risk of damage!
Washing vehicle by hand
It is important to first soften the dirt with plenty of water and rinse it off as
thoroughly as possible before washing your vehicle by hand.
One should then clean the vehicle using a soft washing sponge,
washing glove or a washing brush and only slight pressure. Work from
the top to the bottom - beginning with the roof. Only place slight pressure
on the vehicle paintwork during cleaning Only use a shampoo for stub-
born dirt.
Wash out the sponge or washing glove thoroughly at short intervals.
Clean wheels, door sills and similar parts last. Use a second sponge for
such areas.
Rinse off the vehicle well after giving it a wash and dry it off using a
chamois leather.
Caution
•Do not wash your vehicle in bright sunlight - risk of paint damage.
•Ensure that the jet of water is not aimed directly at the locks or at the
door and panel joints if you spray your vehicle in winter down with a hose
- risk of freezing.
•Do not use any insect sponges, rough kitchen sponges or similar
cleaning products - risk of damage to the surface of paintwork.
WARNING
When washing your vehicle in the winter: Water and ice in the
brake system can affect the braking efficiency - risk of accident.
WARNING
•The ignition should always be switched off when you wash your
vehicle - risk of accident!
•Protect your hands and arms from sharp-edged metal parts
when you are cleaning the underfloor, the inside of the wheel hous-
ings or the wheel trims - risk of cuts.
Page 194 of 259

Care and cleaning193
Using the systemSafetyDriving TipsGeneral MaintenanceBreakdown assistanceTechnical Data
of the seals and prevent leakages in this way. It is also easier to open the
doors. Rubber seals which are well cared for also do not stick together in
cold winter weather.
Locks
We recommend that you use Genuine Škoda Spray with regreasing and
anticorrosive effect for de-icing locks.
Note
When washing your vehicle, ensure that as little water as possible gets
into the locks.
Wheels
Steel wheels
You should also thoroughly wash the wheels and wheel trims when giving
your vehicle its regular wash. This prevents any brake dust, dirt and road
salt from sticking to the wheel hubs. You can remove stubborn brake abra-
sion adhering to the wheels with an industrial cleaner. Touch up any
damage to the paintwork on the wheels before rust is able to form.
Light alloy wheels
Regular care of light alloy wheels is necessary in order to retain their
decorative appearance over long periods. It is particularly important to
remove any road salt and brake abrasion from light alloy wheels every two
weeks, otherwise the surface will suffer. Wash thoroughly and then treat
the wheels with a protective product for light alloy wheels which does not
contain any acidic components. You should provide the wheel hubs with
a hard wax layer every three months. You must not use any products
which cause abrasion when treating the wheel hubs. Any damage to the
paint layer on the wheel hubs must be touched up immediately.
We recommend using a preservative from the range of accessories
offered by your Skoda dealer.
Note
Severe layers of dirt on the wheels can also result in wheel imbalance.
This may show itself in the form of wheel vibration which is transmitted to
the steering wheel which, in certain circumstances, can cause premature
wear of the steering. It is therefore important to clean dirty wheels.
Underbody protection
The underside of your vehicle is protected for life against chemical and
mechanical influences.
One cannot, however, completely rule out damage to the
protective layer
when driving so we recommend that you inspect the protective layer on
the underside of your vehicle and on the chassis at certain intervals - this
is best done at the beginning and end of the winter - and to touch up any
damaged areas.
Škoda dealers have suitable spray products available as well as the
necessary equipment and are familiar with the instructions for its use. It is
therefore best to have such touch-up work or additional corrosion protec-
tion measures carried out by a Škoda dealer.
WARNING
One should remember when cleaning the wheels that moisture, ice
and road salt may adversely affect braking efficiency - risk of an
accident!
Page 195 of 259

Care and cleaning
194
Protection of hollow spaces
All the cavities of your vehicle which are at risk from corrosion are
protected for life by a layer of protective wax applied in the factory.
This wax protection does not require to be inspected or re-treated. If a
small amount of wax flows out of the cavities at high temperatures, please
remove it with a plastic scraper and cleaning petroleum.
Care of the interior of vehicle
Plastic parts, artificial leather and cloths
You can clean plastic parts and artificial leather with a moist cloth. You
should only treat such parts with special solvent-free plastic cleaning
and care products it does prove to be adequate. Upholstery cloth and cloth trim on the doors, luggage compartment cover,
headliner etc. are best treated with special cleaning products, using if
necessary a
dry foam and a soft sponge or brush.
Fabric covers of electrically heated seats
Do not clean the seat covers moist as this may result in damage to the
seat heating system.
Clean such covers using special agents, for example dry foam.
Natural leather
Natural leather requires quite particular care and attention.
General
The intensity of the dyeing determines the visual appearance and the
properties. If the typical signature of nature is detectable on the surface of
the leather, then this is a natural nappa leather which offers excellent
seating comfort and well being. Fine veins, closed scabs, insect bites,
natural creases as well as a fogginess with graduations in shade, remain
visible and represent characteristics of the genuineness of the natural
material.
Natural nappa leather does not have a covering dye layer. It is therefore
more sensitive. Remember that leather is subject to particularly severe
wear-and-tear from children, animals or other influences.
In contrast, leathers with a more or less covering dye layer are harder
wearing. This has a positive effect on the wear properties of the leather in
daily use. In this case, however, the typical natural characteristics are
scarcely or no longer visible, which does not have any effect on the quality
of the leather itself, however.
WARNING
Never use additional underbody protection or corrosion-protec-
tion agents for the exhaust pipes, catalytic converters or heat
shields. Such substances might ignite when driving - risk of fire!
WARNING
Safety and environmental protection regulations should observed
when using petroleum cleaner to remove wax - a risk of fire!
Page 197 of 259
Care and cleaning
196
–Eliminate special stains (e.g. ball-point pens, felt pen, nail
varnish, dispersion paint, shoe cream etc.) with a special stain
remover suitable for leather.
Leather care
– Treat the leather every six months with the leather care product available from Škoda dealers.
– Apply only a small amount of the care product.
– Dry the leather off with a soft cloth
It is best to consult your Škoda dealer if you have any questions regarding
cleaning and care of the leather interior.
Caution
You must on no account treat the leather with solvents (e.g. gasoline,
turpentine), floor wax, shoe cream or such like.
Alcantara upholstery
Do not use any leather care products for cleaning Alcantara upholsteries.
Eliminating dust and dirt
Wipe the Alcantara upholstery with a slightly moistened, soft cloth or clean
the covers with a suitable shampoo.
Removing stains
Moisten a soft cloth with lukewarm water or diluted methylated spirits and
dab the stain from the edges toward the middle.
Seat belts
– Keep the seat belts clean.
– Wash seat belts which have become soiled using a mild soapy solution.
– Inspect the seat belts regularly to ensure they are in good condition.
Belt webbing which has become severely soiled may prevent the inertia
reel from reeling up the belt properly.
Engine compartment
Good corrosion protection is very important, particularly in winter when
one often drives over its salt-strewn roads. One should therefore clean the
whole engine compartment and the radiator tank before and after the salt
spreading period and treat with preservative in order to prevent the salt
from being destructive.
WARNING
•The seat belts must not be removed for cleaning.
•Never clean the seat belts chemically as dry cleaning may
destroy the fabric. The seat belts must also not be allowed to come
into contact with corrosive liquids (such as acids etc.).
•Seat belts which have damage to the webbing, the connections,
the inertia reel or the lock should be replaced by a Škoda dealer.
•Inertia reel belts must be completely dried before being reeled
up.
Page 198 of 259

Care and cleaning197
Using the systemSafetyDriving TipsGeneral MaintenanceBreakdown assistanceTechnical Data
Skoda dealers have the cleaning agents and preservatives recommended
by the manufacturer and also the required equipment.
Caution
•Engine cleaning may be only be undertaken when the ignition is off.
•It is recommended to cover the generator before washing the engine
compartment.
For the sake of the environment
The dirty water produced by washing the engine has washed away petrol,
and residues of grease and oil and should therefore be cleaned by an oil
separator. This is why engine washing should only be undertaken in a
garage or at a fueling station (when these are fitted with the required
equipment).
WARNING
It is necessary to observe the guidelines given in the chapter
before working on the engine compartment ⇒page 203.
Page 201 of 259
Fuel
200
Prewarming fuel
The vehicle is fitted with a fuel filter prewarming system. This secures
operation of a vehicle using diesel fuel down to an environmental temper-
ature of -25°C.
Biofuel
We recommend refuelling with diesel fuel at temperatures below -10°C.
Caution
It is not permitted to add the various fuel additives on the market, including
petrol, to diesel fuel in order to improve its flow properties.
Refuelling
Refuelling procedure
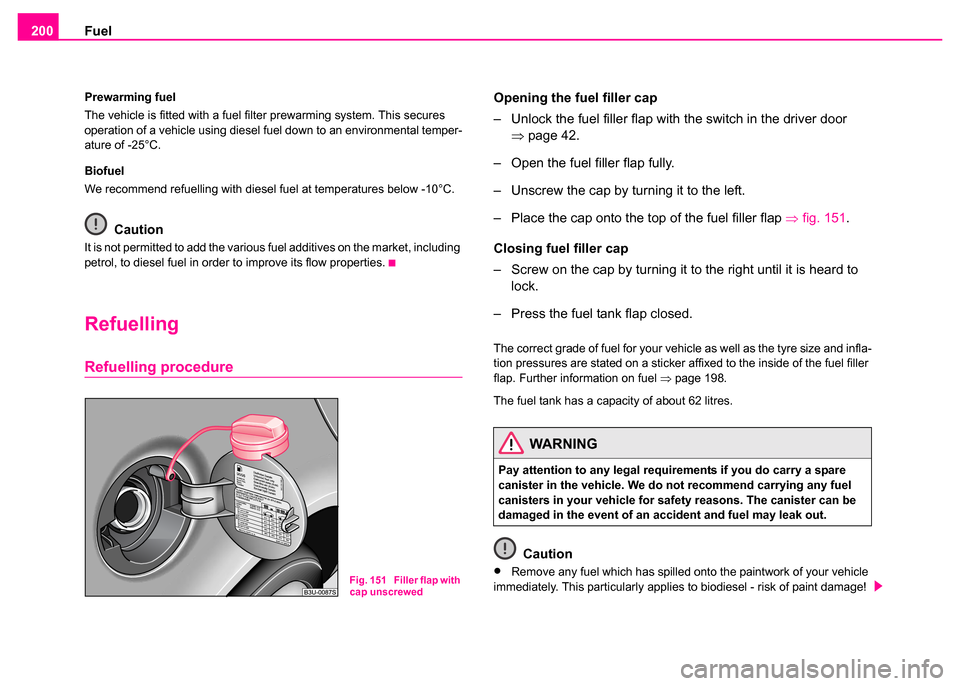
Opening the fuel filler cap
– Unlock the fuel filler flap with the switch in the driver door
⇒page 42.
– Open the fuel filler flap fully.
– Unscrew the cap by turning it to the left.
– Place the cap onto the top of the fuel filler flap ⇒fig. 151.
Closing fuel filler cap
– Screw on the cap by turning it to the right until it is heard to lock.
– Press the fuel tank flap closed.
The correct grade of fuel for your vehicle as well as the tyre size and infla-
tion pressures are stated on a sticker affixed to the inside of the fuel filler
flap. Further information on fuel ⇒page 198.
The fuel tank has a capacity of about 62 litres.
Caution
•Remove any fuel which has spilled onto the paintwork of your vehicle
immediately. This particularly applies to biodiesel - risk of paint damage!Fig. 151 Filler flap with
cap unscrewed
WARNING
Pay attention to any legal requirements if you do carry a spare
canister in the vehicle. We do not recommend carrying any fuel
canisters in your vehicle for safety reasons. The canister can be
damaged in the event of an accident and fuel may leak out.
Page 202 of 259

Fuel201
Using the systemSafetyDriving TipsGeneral MaintenanceBreakdown assistanceTechnical Data
•Vehicles fitted with catalytic converter should never be allowed to let
the fuel tank to run completely empty. An irregular supply of fuel to the
engine can result in misfiring and unburnt fuel may get into the exhaust
system, which may result in overheating and damage to the catalytic
converter.
For the sake of the environment
The fuel tank is full just as soon as the pump nozzle switches off for the
first time, provided the nozzle has been operated properly. You should not
continue refuelling - otherwise the expansion chamber in the fuel tank will
also be filled with fuel. Fuel might flow out of the tank when it heats up.
Emergency release of fuel filler flap
If the electric lock is faulty, you can also unlock the fuel filler flap
manually. – Open the boot lid/luggage compartment door.
– Unscrew the clip attaching the right-hand side trim panel and
pull the trim panel off the body.
– Pull on the loop in direction of arrow in order to unlock the fuel filler flap ⇒fig. 152 .
Fig. 152 Luggage
compartment: Emer-
gency release of fuel
filler flap
WARNING
Reel up the belt webbing once again until it is fitted snugly against
the child seat.
Page 204 of 259
Inspecting and Replenishing203
Using the systemSafetyDriving TipsGeneral MaintenanceBreakdown assistanceTechnical Data
The bonnet is held in the opened position by a pressurized gas spring.
Caution
•Never open the bonnet using the handle - danger of causing damage.
•Before opening the bonnet, ensure that the arms of the windscreen
wipers are correctly in place against the windscreen. Otherwise, there is
a risk of damage to the paintwork.
Working in the en gine compartment
Particular care is required when carrying out any work in
the engine compartment!
There is a risk of injuries, scalding , accidents and fire when working
in the engine compartment, e.g. inspecting and replenishing oil and
other fluids. For this reason, it is essential to comply with the
warning instructions st ated below and with the general applicable
rules of safety. The engine compartment of your car is a hazardous
area ⇒ .
WARNING
•Never open the bonnet if you see that steam or coolant is
flowing out of the engine compartmen t - risk of scalding! Wait long
enough until the steam or coolant has stopped escaping.
•For safety reasons, the bonnet must always be properly closed
when driving. One should therefore check that the lock has in fact
engaged properly after closing the bonnet.
•Stop your vehicle immediately wh ile driving if you notice that
the lock is not properly engaged and close the bonnet properly -
risk of an accident!
WARNING
•Switch off the engine and pull out the ignition key.
•Apply the handbrake firmly.
•If your vehicle is fitted with a manual gearbox, move the gear-
shift lever into Neutral, or if it is fitted with automatic gearbox,
move the selector lever into position P.
•Allow the engine to cool down.
•Keep children clear of the engine compartment.
•Never spill oil and other fluids over the hot engine. Such fluids
(e.g. the antifreeze contained in the coolant) may ignite!
•Avoid short circuits in the electrical system - particularly on the
battery.
•Never place your hand into the radiator fan as long as the
engine is still warm. The fan might suddenly start running!
•Never open the cap of the coolant expansion bottle as long as
the engine is still warm. The cooling system is pressurized!
•Cover over the cap of the coolant expansion reservoir with a
large cloth when opening it as protection for your face, hands and
arms from hot steam or hot coolant.
•In cases where it be necessary to carry out inspection work
when the engine is running there is an additional risk from rotating
parts (e.g. the V-ribbed belt, alternator, radiator fan) and from the
high-voltage ignition system.
•Please also comply with the warning instructions stated below
when carrying out any essential work on the fuel system or on the
electrical system:
−Always separate the car battery from the electrical system.
− Do not smoke.
− Never carry out any work close to naked flames.
Page 205 of 259
Inspecting and Replenishing
204
Caution
When replenishing fluids in the engine, always ensure that the fluids are
on no account mixed up. This may result in major operating problems and
also vehicle damage!
Overview of the engine compartment
Overview of the engine compartment
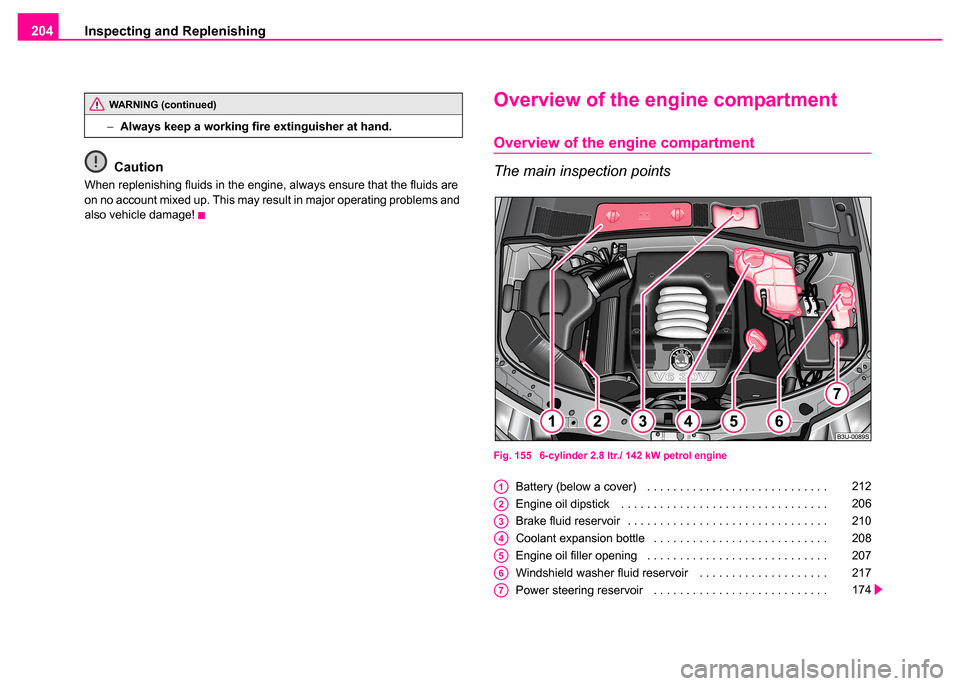
The main inspection points
Fig. 155 6-cylinder 2.8 ltr./ 142 kW petrol engine
Battery (below a cover) . . . . . . . . . . . . . . . . . . . . . . . . . . . .
Engine oil dipstick . . . . . . . . . . . . . . . . . . . . . . . . . . . . . . . .
Brake fluid reservoir . . . . . . . . . . . . . . . . . . . . . . . . . . . . . . .
Coolant expansion bottle . . . . . . . . . . . . . . . . . . . . . . . . . . .
Engine oil filler opening . . . . . . . . . . . . . . . . . . . . . . . . . . . .
Windshield washer fluid reservoir . . . . . . . . . . . . . . . . . . . .
Power steering reservoir . . . . . . . . . . . . . . . . . . . . . . . . . . .
WARNING (continued)
−Always keep a working fire extinguisher at hand.
A1212
A2206
A3210
A4208
A5207
A6217
A7174
Page 207 of 259
Inspecting and Replenishing
206
Note
•We recommend using a preservative from the range of accessories
offered by your Skoda dealer.
•For further information - see Service Schedule.
Inspecting the engine oil level
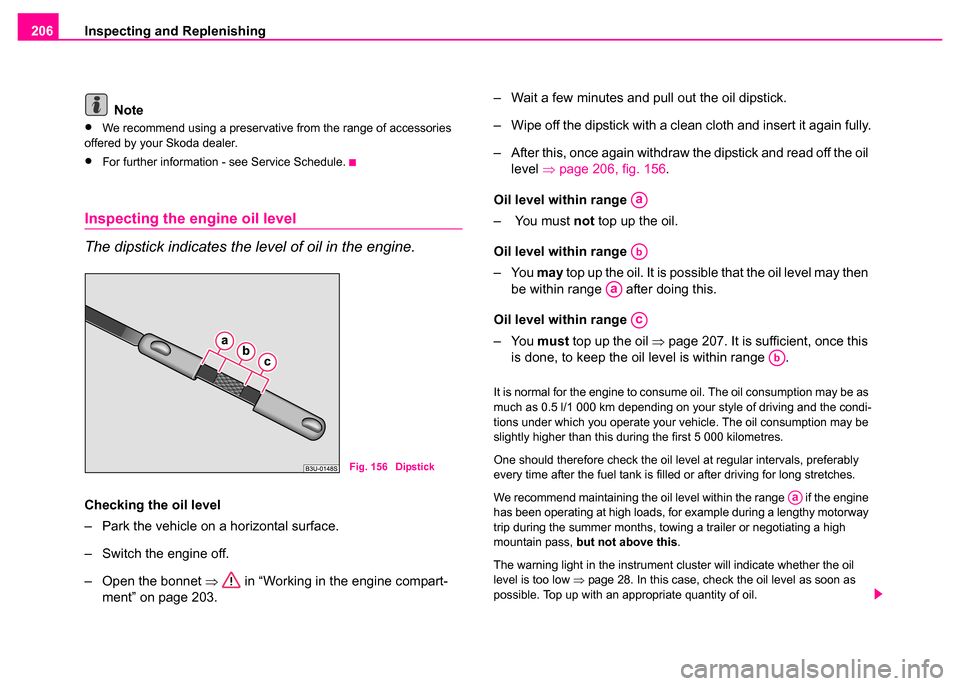
The dipstick indicates the level of oil in the engine.
Checking the oil level
– Park the vehicle on a horizontal surface.
– Switch the engine off.
– Open the bonnet ⇒ in “Working in the engine compart-
ment” on page 203. – Wait a few minutes and pull out the oil dipstick.
– Wipe off the dipstick with a clean cloth and insert it again fully.
– After this, once again withdraw the dipstick and read off the oil
level ⇒page 206, fig. 156 .
Oil level within range
– You must not top up the oil.
Oil level within range
–You may top up the oil. It is possible that the oil level may then
be within range after doing this.
Oil level within range
–You must top up the oil ⇒page 207. It is sufficient, once this
is done, to keep the oil level is within range .
It is normal for the engine to consume oil. The oil consumption may be as
much as 0.5 l/1 000 km depending on your style of driving and the condi-
tions under which you operate your vehicle. The oil consumption may be
slightly higher than this during the first 5 000 kilometres.
One should therefore check the oil level at regular intervals, preferably
every time after the fuel tank is filled or after driving for long stretches.
We recommend maintaining the oil level within the range if the engine
has been operating at high loads, for example during a lengthy motorway
trip during the summer months, towing a trailer or negotiating a high
mountain pass, but not above this .
The warning light in the instrument cluster will indicate whether the oil
level is too low ⇒page 28. In this case, check the oil level as soon as
possible. Top up with an appropriate quantity of oil.
Fig. 156 Dipstick
Aa
Ab
Aa
Ac
Ab
Aa