warning SKODA SUPERB 2003 1.G / (B5/3U) Owner's Manual
[x] Cancel search | Manufacturer: SKODA, Model Year: 2003, Model line: SUPERB, Model: SKODA SUPERB 2003 1.G / (B5/3U)Pages: 259
Page 225 of 259
Wheels and Tyres
224
correct length and shape of spherical cap. This is essential to ensure that
the wheels are tightly fitted and that the brake system operates properly.
If you retrofit wheel trims (or have this done), please also ensure that an
adequate flow of air remains assured for cooling the brake system.
Škoda dealers are instructed in the technical possibilities which exist
regarding converting or retrofitting wheels, tyres and wheel trim.
The wheel bolts must be clean and must turn easily.
Winter tyres
The handling of your vehicle will be significantly improved when driving on
wintry roads and at temperatures below 7 °C if you fit winter tyres.
Summer tyres do not offer the same grip on ice and snow because of their
construction (width, rubber blend, tread pattern). This applies in particular
to vehicles which are equipped with low-profile tyres or high-speed
tyres (code index V, W or Y on wall of tyre).
Winter tyres must be mounted on all four wheels to obtain the best
handling characteristics.
Only use radial winter tyres.
You must only fit those types of winter tyre which are approved for your
vehicle. The permissible sizes of winter tyres are stated in your vehicle
documents. Approvals may differ because of national legislation.
Please remember that the tyres should be inflated to 0.2 bar more than is
the case for summer tyres ⇒page 220.
Winter tyres no longer offer the same winter performance once the tyre
tread has worn down to a depth of about 4 mm.
Ageing also causes winter tyres to lose most of their winter performance
properties - even in cases where the remaining tread depth is still clearly
more than 4 mm. Speed restrictions
apply to winter tyres as well as to summer tyres
⇒ .
You can fit winter tyres of a lower speed category to your vehicle provided
that you also do not drive faster than the permissible maximum speed for
such tyres, even if the possible maximum speed of your vehicle is higher.
Exceeding the speed category of the tyre can lead to damage occurring.
Please pay attention to the notes if you decide to fit winter tyres
⇒ page 219.
You can also fit so-called “all-weather tyres” instead of winter tyres.
Please contact your Škoda dealer If there are any points which are not
clear who will be able to provide you with information regarding the
maximum speed fo r your tyres.
For the sake of the environment
Fit your summer tyres on again in good time since summer tyres offer you
better grip and handling on roads which are free of snow and ice - the
braking distance is shorter, there is less tyre noise, tyre wear is reduced
and fuel consumption is reduced.
Note
Please observe the various differing legal requirements regarding tyres.
WARNING
You must on no account drive your car at more than the permis-
sible maximum speed for your winter tyres - risk of an accident
resulting from tyre damage and loss of control over your car.
Page 227 of 259
Accessories, changes and replacement of parts
226
Accessories, changes an d replacement of parts
General
Škoda vehicles have been built according to the latest discoveries in
safety engineering. Thus one should not change the condition in which the
vehicle was delivered from the manufacturer without some thought.
The following guidelines should be observed when a vehicle is to be retro-
fitted with accessories, have technical changes made to it or a part has to
be replaced at some time in the future.
•Advise should always be obtained from a Škoda dealer before buying
any accessories and before making any technical changes ⇒.
•This is particularly the case when accessories are bought in a foreign
country.
•Skoda accessories which have been released for use and original
Škoda parts can be obtained from Škoda dealers. They will install them
professionally and correctly.
•All original accessories which are listed in the catalogue such as tilting
roofs, spoilers, wheels etc. must have an official stamp of approval.
•Radios, aerials and other electrical accessories should only be
installed by an authorised workshop.
•The guidelines issued by Škoda Auto must be observed when making
technical changes.
•This is to ensure that no technical damage occurs to the vehicle, that
travelling and operating safety are maintained and that the chnages are
permissible. Škoda dealers undertake this work professionally or refer it
to an specialist company in special cases.
Any damage which is done caused by technical changes made
without consulting a Škoda Auto is excluded from the warranty.
WARNING
•We advise you, in your own interest, to only use Škoda acces-
sories and original Skoda parts which have been expressly
approved for use on your Škoda. Reliability, safety and suitabiliity
have been established for these parts.
•We cannot guarantee suitability of installation into your vehicle
of other products despite keeping a constant eye on market devel-
opments (also not in the case where there is an attestation or
permission can be produced).
Page 228 of 259

Breakdown assistance227
Using the systemSafetyDriving TipsGeneral MaintenanceBreakdown assistanceTechnical Data
Breakdown assistance
Breakdown assistance
First-aid box*
First-aid box
The compartment for stowing the first-aid box is located in the left of the
luggage compartment ⇒fig. 168 .
Note
Pay attention to the use-by-date of the contents of the first-aid box.
Warning triangle
– To remove the warning triangle, turn the rotary lock in direc-
tion of arrow ⇒fig. 169 and fold the fixture down.
Fig. 168 Compartment
for stowing first-aid
boxFig. 169 Warning
triangle fitted inside
boot lid
Page 230 of 259
Breakdown assistance229
Using the systemSafetyDriving TipsGeneral MaintenanceBreakdown assistanceTechnical Data
Spare wheel
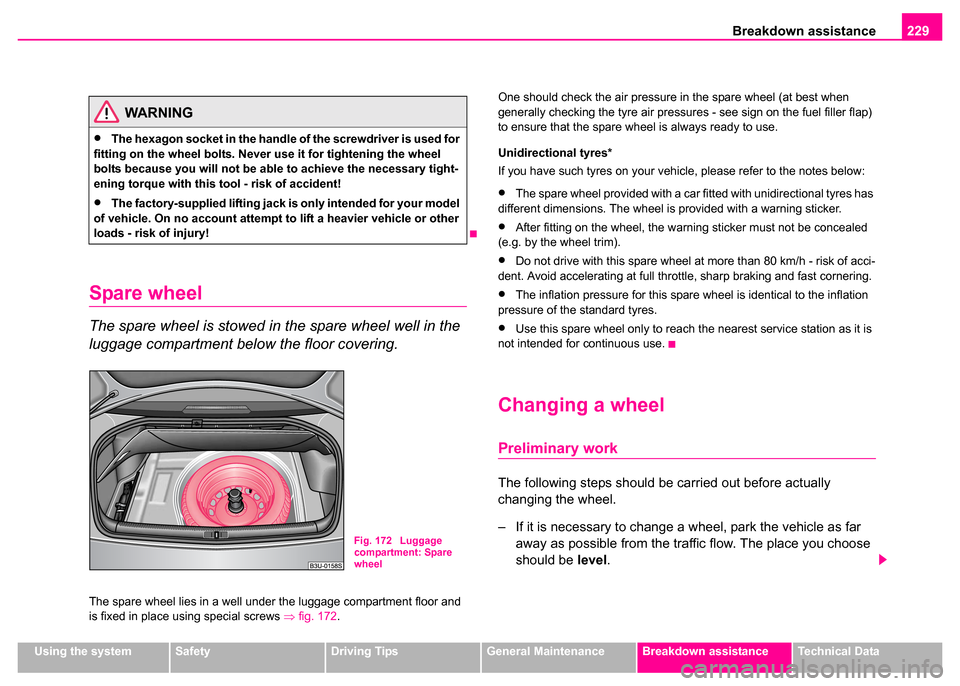
The spare wheel is stowed in the spare wheel well in the
luggage compartment below the floor covering.
The spare wheel lies in a well under the luggage compartment floor and
is fixed in place using special screws ⇒fig. 172 . One should check the air pressure in the spare wheel (at best when
generally checking the tyre air pressures - see sign on the fuel filler flap)
to ensure that the spare wheel is always ready to use.
Unidirectional tyres*
If you have such tyres on your vehicle, please refer to the notes below:
•The spare wheel provided with a car fitted with unidirectional tyres has
different dimensions. The wheel is provided with a warning sticker.
•After fitting on the wheel, the warning sticker must not be concealed
(e.g. by the wheel trim).
•Do not drive with this spare wheel at more than 80 km/h - risk of acci-
dent. Avoid accelerating at full throttle, sharp braking and fast cornering.
•The inflation pressure for this spare wheel is identical to the inflation
pressure of the standard tyres.
•Use this spare wheel only to reach the nearest service station as it is
not intended for continuous use.
Changing a wheel
Preliminary work
The following steps should be carried out before actually
changing the wheel.
– If it is necessary to change a wheel, park the vehicle as far away as possible from the traffic flow. The place you choose
should be level.
WARNING
•The hexagon socket in the handle of the screwdriver is used for
fitting on the wheel bolts. Neve r use it for tightening the wheel
bolts because you will not be able to achieve the necessary tight-
ening torque with this tool - risk of accident!
•The factory-supplied lifting jack is only intended for your model
of vehicle. On no account attempt to lift a heavier vehicle or other
loads - risk of injury!
Fig. 172 Luggage
compartment: Spare
wheel
Page 231 of 259
Breakdown assistance
230
– Have all the occupants get out. While changing a wheel, the
occupants of the vehicle should not stand on the road (it is
better behind a crash barrier).
– Apply the handbrake firmly.
– Engage 1st gear or if your vehicle is fitted with an automatic
gearbox, position the selector lever into position P .
– If a trailer is coupled, uncouple it.
– Take the vehicle tool kit and the spare wheel ⇒ page 229
out of the luggage compartment.
Caution
If you have to change a wheel on a slope first block the opposite wheel
with a stone or similar object in order to secure the vehicle from unexpect-
edly rolling away.
Note
Comply with the national legal regulations.
Changing a wheel
Always change a wheel on a level surface as far as possible.
– Take off the full wheel trim/wheel trim cap ⇒page 232,
“Wheel trim caps*” or the caps ⇒page 232, “Wheel bolts with
caps*”.
– Slacken the wheel bolts ⇒ page 233.
– Jack up the vehicle until the wheel is clear of the ground ⇒page 233.
– Unscrew the wheel bolts and place them on a clean surface (cloth, paper etc.).
– Take off the wheel.
– Fit on the spare wheel and tighten the wheel bolts slightly.
– Lower the car.
– Tighten the wheel bolts firmly, alternately and diagonally using the wheel wrench ⇒page 233.
– Mount the full wheel trim/wheel trim cap or the caps.
Note
•All bolts must be clean and must turn easily.
•You must never grease or oil the wheel bolts!
WARNING
•If you find yourself in flowing traffic put on the hazard warning
lights system and place the warning triangle on the side of the road
at the prescribed distance from your vehicle while observing all
national legal provisions. In this way you are protecting not only
yourself but also other road users.
•Never start the engine with the vehicle sitting on the raised jack
- danger of suffering injury!
Page 232 of 259
Breakdown assistance231
Using the systemSafetyDriving TipsGeneral MaintenanceBreakdown assistanceTechnical Data
Subsequent steps
After changing the wheel, you must perform the following steps.
– Stow and attach the replaced wheel in the spare wheel well.
– Stow the vehicle tool kit in the space provided.
–Check the tyre pressure on the spare wheel just mounted as
soon as possible.
– Have the tightening torque of the wheel bolts checked with
a torque wrench as soon as possible. The tightening torque
must be 120 Nm.
– Have the defective tyre repaired as soon as possible.
Note
•If you find, when changing the wheel, that the wheel bolts are corroded
and difficult to turn, the bolts must be replaced before checking the tight-
ening torque.
•Drive cautiously and only at a moderate speed to a workshop where
the tightening torque can be checked.
Full wheel trim*
Removing
– Hook the clamp (found in the vehicle toolkit) into the reinforced edge of the full wheel trim.
– Push the wheel key through the clamp, support the wheel key at the tyre and pull off the wheel trim.
Installing
– First press the full wheel trim onto the wheel at the valve opening provided. Then press the full wheel trim into the
wheel in such a way that its entire circumference locks
correctly in place.
Caution
Use the pressure of your hand, do not knock on the full wheel trim! Heavy
knocks mainly on the points where the full wheel trim has not been
inserted into the wheel, can result in damage to the guide and centering
elements of the full wheel trim.WARNING
It is necessary to observe the guidelines given on ⇒page 222,
“New tyres and wheels” if the vehicle is subsequently fitted with
tyres which are different to those it was fitted with at the works.
Page 234 of 259

Breakdown assistance233
Using the systemSafetyDriving TipsGeneral MaintenanceBreakdown assistanceTechnical Data
Slackening and tightening wheel bolts
Slacken the wheel bolts before jacking up the vehicle.
Slackening wheel bolts
– Push the wheel wrench fully onto the wheel bolt
3).
– Grasp the end of the wrench and turn the bolt about one turn to the left ⇒fig. 175.
Tightening wheel bolts
– Push the wheel wrench fully onto the wheel bolt
3).
– Grasp the end of the wrench and turn the bolt to the right until it is tight. Note
•Do not use the hexagon socket in the handle of the screwdriver for
slackening or tightening the wheel bolts.
•apply pressure carefully with your foot to the end of the wheel wrench
if it proves difficult to slacken the wheel bolts. Hold tight on the vehicle
when doing this and ensure that you have a steady position.
Raise vehicle
You have to raise the vehicle with a lifting jack in order to
be able to take off the wheel.
3)Use the appropriate adapter for slackening and tightening the safety wheel bolts
⇒ page 235.
Fig. 175 Changing a
wheel: Slackening
wheel bolts
WARNING
Slacken the wheel bolts only a little (about one turn) as long as the
vehicle has not yet been jacked up - risk of an accident!.
Fig. 176 Changing a
wheel: Points for posi-
tioning car jack
Page 235 of 259

Breakdown assistance
234
– Position the lifting jack by selecting the jacking point - lower sill - which is closest to the wheel to be removed ⇒page 233,
fig. 176 .
– Position the lifting jack below the jacking point and move it up until its claw is positioned directly below the vertical web of the
lower sill.
– Align the lifting jack so that its claw grasps the web of the lower sill and the moving base plate of the jack is resting flat
against firm ground.
– Turn the lifting jack up further until the wheel is just clear of the ground.
Ground below the lifting jack which is soft and slippery can cause the
vehicle to slip off the jack. It is therefore always necessary to place the lift-
ingjack on a solid surface. Use a wide, stable base, if necessary. Use a
non-slip base (e.g. a rubber foot mat) if the surface is smooth, such as
cobbled stones, a tiled floor,etc.
Taking off and fitting on wheel
After you have slackened the wheel bolts and have raised the car
with the car jack, replace the wheel as follows:
WARNING
•Take suitable measures to prevent the base of the lifting jack
from slipping off - risk of injury!
•Not positioning the lifting jack at the specified points can result
in damage to the vehicle. The jack can also slip off if it does not
have sufficient grip - risk of injury!
•It is important to support the vehicle with suitable supporting
blocks if you wish to work under the lifted vehicle - risk of injury!
AAAB
Fig. 177 Changing a
wheel: Remove bolts
with hexagon in screw-
driver
Fig. 178 Changing a
wheel: assembly pin
Page 237 of 259
Breakdown assistance
236
– Have the tightening torque checked with a torque wrench as
soon as possible. The tightening torque must be 120 Nm.
The safety wheel bolts on vehicles fitted with them (one safety wheel bolt
per wheel) can only be loosened or tighten up by using the adapter
provided.
It is meaningful to note the code number hammered into the rear side of
the adapter or the rear side of the safety wheel bolts. You can obtain a
replacement adapter from a Škoda Dealer, if necessary, by quoting this
number.
We recommend that you always carry the adapter for the wheel bolts with
you in the vehicle. It should be stowed in the vehicle tool kit.
Caution
Damage can occur to the adapter and safety wheel bolt if the safety wheel
bolt is tightened up too much.
Note
The set of safety wheel bolts can be obtained from your Skoda dealer as
an original accessory.
Jump-starting
Initial steps
You can use the battery of another vehicle for jump-starting yours if the
engine does not start because the battery on your vehicle is flat. You will
require jump-start cables for this purpose. Both batteries must have a rated voltage of 12 V. The
capacity (Ah) of the
battery supplying the power must not be significantly less than the
capacity of the discharged battery in your vehicle.
Jump-start cables
Only use jump-start cables which have an adequately large cross-section
and insulated terminal clamps. Please pay attention to the manufacturer's
instructions.
Positive cable - colour coding in the majority of cases red.
Negative cable - colour coding in the majority of cases black.
Note
•There must not be any contact between the two vehicles otherwise
current may flow as soon as the negative terminals are connected.
•The discharged battery must be properly connected to the system of
the vehicle.
•Switch off any mobile phone, pay attention to the instructions for use
of the mobile phone in such a situation.
•We recommend purchasing jump-start cables from a Skoda dealer as
an original accessory or from retailers who sell branded batteries.
WARNING
•A discharged battery may already freeze at temperatures just
below 0°C. It is essential to thaw out a frozen battery before you
connect the jump-start cables - risk of an explosion!
•Please pay attention to the warning instructions relating to
working in the engine compartment ⇒page 203.
Page 238 of 259

Breakdown assistance237
Using the systemSafetyDriving TipsGeneral MaintenanceBreakdown assistanceTechnical Data
Starting engine
It is important to connect the jump-start cables in the correct
order.
Connecting positive terminals
– Attach one end to the positive terminal ⇒fig. 180 of the
discharged battery .
– Attach the other end to the positive terminal of the battery supplying the power .
Connecting negative terminal and engine block
– Attach one end to the negative terminal of the battery supplying the power .
– Attach the other end to a solid metal part which is connected firmly to the engine block, or to the engine block
itself. Starting engine
– Start the engine of the vehicle providing current and run the
engine at idling speed.
– Now start the engine of the vehicle with the discharged battery.
– Interrupt the attempt at starting an engine after 10 seconds if it does not start right away and wait for about 30 seconds
before repeating the attempt.
– Disconnect the cables on the engine in exactly the reverse
order they were connected up.
Fig. 180 Jump-starting
using the battery from
another vehicle: A - flat
vehicle battery, B -
battery providing
current
A1
AA
A2
AB
A3
AB
A4
WARNING
•The non-insulated parts of the terminal clamps must never
make contact with each other. Furthermore, the cable connected to
the positive terminal of the battery must not come into contact with
electrically conducting parts of the vehicle - risk of a short circuit!
•Do not affix the jump starting cables to the negative terminal of
the discharged battery. There is the risk of detonating gas seeping
out the battery being ignited by the strong spark which results
from the engine being started.
•Run the jump-start cables so that they cannot be caught by any
rotating parts in the engine compartment.
•Do not bend over the batteries - risk of caustic burns!
•The vent screws of the battery cells must be tightened firmly.
•Keep any sources of ignition (naked flame, smouldering ciga-
rettes etc.) away from the battery - risk of an explosion!