battery SKODA SUPERB 2003 1.G / (B5/3U) User Guide
[x] Cancel search | Manufacturer: SKODA, Model Year: 2003, Model line: SUPERB, Model: SKODA SUPERB 2003 1.G / (B5/3U)Pages: 259
Page 53 of 259
Unlocking and locking
52
You can interrupt the opening or closing operation of the windows imme-
diately by releasing the key of the button of the remote control.
Operational problems
Automatic closing or opening does not operate
If the battery of the car has been disconnected and then reconnected, the
automatic closing and opening function does not operate. The system
must be activated. Proceed as follows in order to re-establish the function:
•Turn the key in the lock of the driver door into the closing position and
hold it there until all of the windows are closed.
•Release the key.
•Insert the key again and turn it to the closing position for about 3
seconds.
Operation in winter
Ice accumulating on the surface of the windows during the winter may
result in a greater resistance when closing the windows and the window
may stop and move back several centimetres
Proceed as follows to close the window fully:
•Turn the key in the lock of the driver door into the closing position and
hold it there until all of the windows are closed.
•Repeat this operatiive cycle when the window stops.
Electric sliding/tilting roof*
Description
WARNING
•Obstruction protection is not active during the convenience
operating feature ⇒ in “Switches in front passenger door and in
rear doors”.
•You should take particular care when closing the windows! A
person may otherwise suffer severe injuries as a result of getting
an arm, for example, jammed in the window!
WARNING
•Obstruction protection is not active during the closing of the
windows ⇒ in “Switches in front passenger door and in rear
doors” on page 51.
•You should take particular care when closing the windows! A
person may otherwise suffer severe injuries as a result of getting
an arm, for example, jammed in the window!
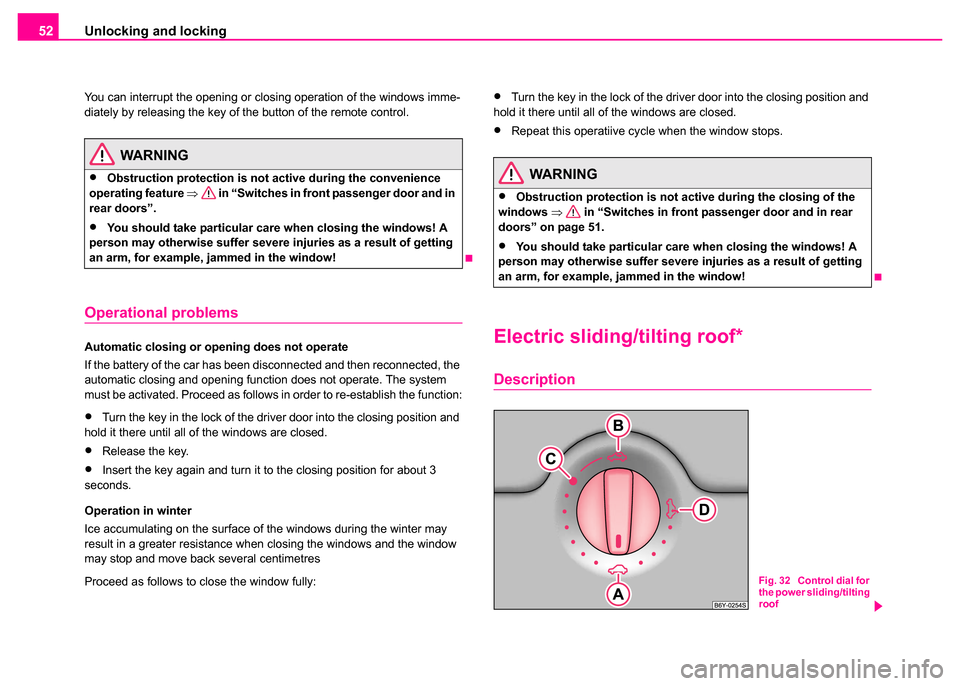
Fig. 32 Control dial for
the power sliding/tilting
roof
Page 54 of 259
Unlocking and locking53
Using the systemSafetyDriving TipsGeneral MaintenanceBreakdown assistanceTechnical Data
The sliding/tilting roof is operated by means of the control dial
⇒page 52,
fig. 32 and only functions when the ignition is switched on. The control dial
has a number of fixed positions.
After switching the ignition off, it is still possible to open or close the
windows for a further 10 minutes. It is no longer possible to operate the
sliding/tilting roof after opening or closing one of the front doors, however.
Note
•It is possible that the sliding/tilting roof does not close fully after the car
battery has been disconnected and reconnected. Here you have to press
the control dial forward to switch position for about 10 seconds.
•It is necessary after each emergency operation (using crank handle)
to move the sliding/tilting roof into the basic position. Here you have to
press the control dial forward to switch position for about 10
seconds.
Opening and tilting
Comfort position
– Turn the switch to position ⇒page 52, fig. 32 .
Opening roof fully
– Turn the switch to position and hold it in this position (spring-tensioned position).
Tilting roof
– Turn the switch to position .
The wind noise in the comfort position is less than when the roof is fully
opened. The sun screen is also opened automatically when the roof slides open.
You can slide the sun screen into the opened or closed position by hand
when the sliding/tilting roof is closed. (This does not apply for models fitted
with sliding/tilting roof with solar cells, in which the sun screen is a fixed
element.)
Caution
It may be necessary during winter to remove any ice and snow in the area
of the sliding/tilting roof before opening it in order to prevent damaging the
opening mechanism.
Closing
Sliding closed/closing the sliding/tilting roof
– Turn the switch to position
⇒page 52, fig. 32 .
Safety closing
The sliding/tilting roof is equipped with an overload protection system. The
sliding/tilting roof stops and moves back several centimetres when it
cannot be closed because there is something in the way (e.g. ice). You
can close the sliding/tilting roof completely without overload protection by
pressing the switch to the position ⇒page 52, fig. 32 at the front for as
long as it takes for the sliding/tilting roof to shut completely ⇒.
AA
AA
AC
AB
AD
WARNING
Close the sliding/tilting roof carefully - risk of injury!
AA
AA
Page 62 of 259
Lights and Visibility61
Using the systemSafetyDriving TipsGeneral MaintenanceBreakdown assistanceTechnical Data
Switching the interior light on
– Press the switch on the symbol
.
Switching the interior light off
– Press the switch on the symbol O.
Front reading lights
– Press on one of the switches ⇒page 60, fig. 40 in order to
switch the right or left reading light on or off.
Lighting of storage compar tment on the front passenger
side
– Open the flap of the storage compartment on the front passenger side, the lighting of the storage compartment
switches on automatically and switches off when the flap is
closed.
If the interior lighting is fitted with a delayed-off control*, the lighting of the
interior of the car remains on for a few seconds after the doors are closed.
The interior light comes on as soon as you unlock the car or open a door
or when the ignition key has been removed. The light goes out again
about 30 seconds after all the doors have been closed. The interior
lighting is switched off when you lock the car or switch the ignition on. This
only applies when the switch for the corresponding interior lights is
standing n the door contact setting.
The interior lighting goes off after about 60 minutes when a door has been
left open in order to avoid discharging the battery of the vehicle.
Two LEDs are integrated in the interior lighting, which illuminates the shift
lever and the middle of the dash panel. They are switched on automati-
cally when switching on the parking light.
Rear interior lighting
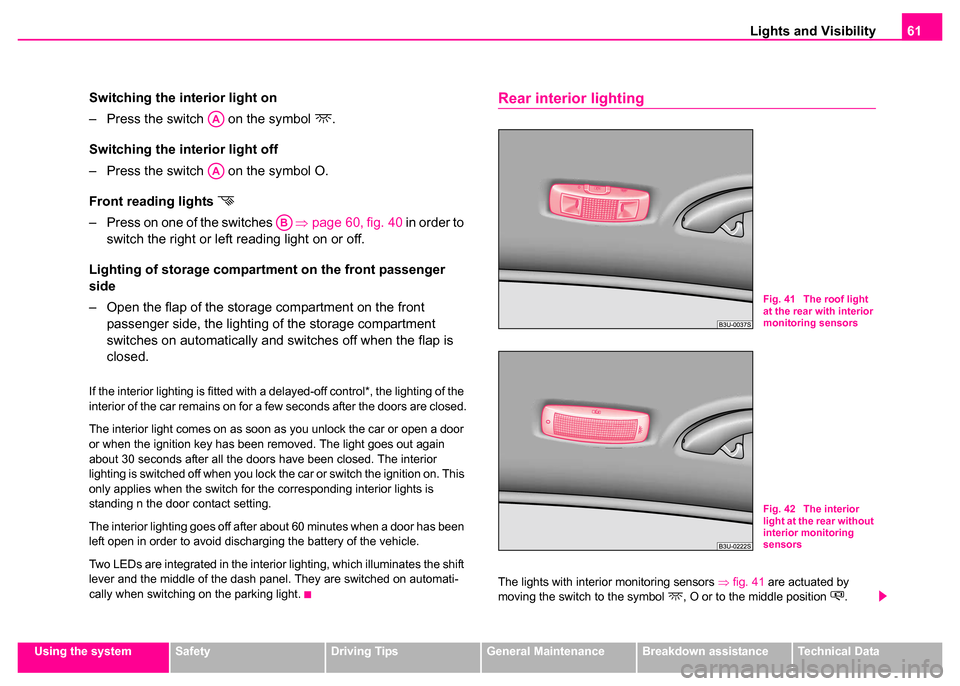
The lights with interior monitoring sensors ⇒fig. 41 are actuated by
moving the switch to the symbol , O or to the middle position .
AA
AA
AB
Fig. 41 The roof light
at the rear with interior
monitoring sensors
Fig. 42 The interior
light at the rear without
interior monitoring
sensors
Page 79 of 259
Seats and Stowage
78
Front seats
– You can switch on and adjust the heaters of the driver and front passenger seats by turning the rotary controls and
⇒page 77, fig. 60 , respectively.
Rear seats
– You can switch on and adjust the heaters of the left and right rear seats by turning the rotary controls and
⇒page 77, fig. 61 , respectively.
If the rotary controls are in the 0 position, the seat heater is switched off.
When the seat heater is switched on, the numerical marking of the rotary
control is illuminated. The control range extends from 1 to 5.
Caution
•You should not kneel on the seats and avoid applying pressure at
specific points in order to avoid damaging the heating elements of the seat
heaters.
•Do not clean the seats moist ⇒page 194.
Note
The seat heating should only be switched on when the engine is running.
This has a significant effect of saving on the battery capacity.
Pedals
You should use only footmats which do not obstruct the movement of the
pedals and have an anti-slip protection. Operation of the pedals must not be hindered!
Luggage compartment
Loading the luggage compartment
Please observe the following in the interest of having good
handling characteristics of your vehicle:
– Distribute the items of luggage as evenly as possible.
– Place heavy objects as far forward as possible.
– Attach the items of luggage with the safety net* or with
tensioning straps attached to the lashing eyes ⇒page 79.
A1A2
AAAB
WARNING
•Greater pedal distances may be needed when there is a fault in
the brake system.
•Do not place any footmats or other additional floor coverings in
the area of the pedals in order to ensure that all the pedals can be
fully depressed and are able to return unobstructed to their initial
position - risk of accident!
•There must be no objects on the floor which could roll under the
pedals. You would then no longer be able to apply the brakes,
operate the clutch or accelerator - risk of accident!
Page 84 of 259

Seats and Stowage83
Using the systemSafetyDriving TipsGeneral MaintenanceBreakdown assistanceTechnical Data
You can remove the cool box if necessary
⇒page 84. You can replace the
cool box with a storage net ⇒fig. 68 .
Caution
Never cover the ventilator on the cool box otherwise it will overheat and
could be damaged.
Note
The cool box also operates if the ignition is switched off. The battery will
not run down fully, however, since the system is fitted with a device which
monitors the battery charge level. The cool box will be automatically
switched off when it is threatening to empty the battery.
Partition with storage net
If the cool box is removed, install the partition with the storage net
⇒fig. 68 which is fixed with a velcro fastener to the side wall of
the cool box.
– The partition is installed and removed in a similar way to the cool box ⇒ page 84.
Fig. 68 Partition with
storage net
Page 94 of 259
Seats and Stowage93
Using the systemSafetyDriving TipsGeneral MaintenanceBreakdown assistanceTechnical Data
Cigarette lighters and power sockets
Cigarette lighter
You can also use the socket on the cigarette lighter for
other electrical appliances.
Using the cigarette lighter
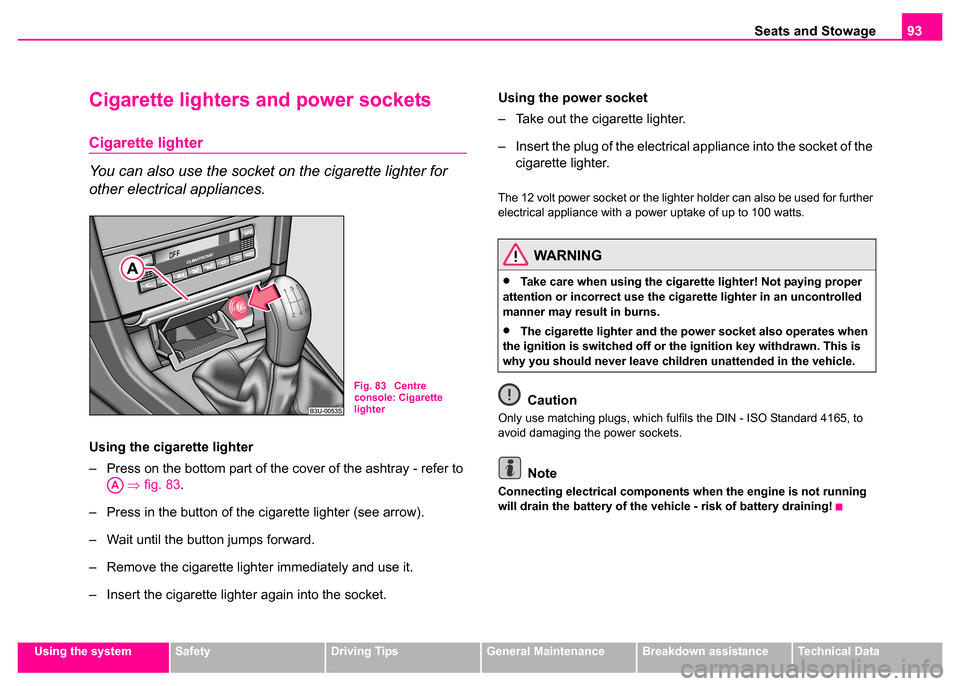
– Press on the bottom part of the cover of the ashtray - refer to
⇒ fig. 83.
– Press in the button of the cigarette lighter (see arrow).
– Wait until the button jumps forward.
– Remove the cigarette lighter immediately and use it.
– Insert the cigarette lighter again into the socket. Using the power socket
– Take out the cigarette lighter.
– Insert the plug of the electrical appliance into the socket of the
cigarette lighter.
The 12 volt power socket or the lighter holder can also be used for further
electrical appliance with a power uptake of up to 100 watts.
Caution
Only use matching plugs, which fulfils the DIN - ISO Standard 4165, to
avoid damaging the power sockets.
Note
Connecting electrical components when the engine is not running
will drain the battery of the vehicle - risk of battery draining!
Fig. 83 Centre
console: Cigarette
lighter
AA
WARNING
•Take care when using the cigarette lighter! Not paying proper
attention or incorrect use the cigarette lighter in an uncontrolled
manner may result in burns.
•The cigarette lighter and the power socket also operates when
the ignition is switched off or th e ignition key withdrawn. This is
why you should never leave children unattended in the vehicle.
Page 95 of 259

Seats and Stowage
94
Cigarette lighter in rear compartment
Operating and further information regarding the use of the cigarette lighter
⇒page 93.
Power socket in the luggage compartment
– Open the cover of the power socket ⇒fig. 85.
– Connect the plug of the electrical appliance to the socket.
It fulfils the requirements of DIN standard ISO 4165 and must only be used
for connecting approved electrical accessories with a power uptake of up
to 100 watts. The vehicle battery will be discharged in the process if the
engine is stationary.
Further information concerning use of the power socket ⇒page 93.
Fig. 84 Centre
console: Cigarette
lighterFig. 85 Luggage
compartment: Power
socket
Page 116 of 259
Starting-off and Driving115
Using the systemSafetyDriving TipsGeneral MaintenanceBreakdown assistanceTechnical Data
- start engine
Diesel engines - fuel supply interrupted, ignition switched off, engine off
- heating glow plugs on, ignition switched on
•You should not switch on any major electrical components during the
heating period otherwise the vehicle battery will be drained unnecessarily.
- start engine
Applies to all models:
Position
To lock the steering , with the ignition key withdrawn, turn the steering
wheel until the steering locking pin is heard to engage. You should always
lock the steering as a general rule if you leave your vehicle. This acts as
a deterrent against possible theft of your vehicle ⇒.
Position
Move the steering wheel back and forward a little if the ignition key cannot,
or cannot easily be turned into this position, in order to release the
steering lock.
Position
The engine is started in this position. At the same time switched on low
beam or main beam or other electrical components with major power
consumption are briefly switched off. The ignition key moves back into
position when one releases the key.
The ignition key must be turned back into position each time before
starting the engine again. The starter repeat lock in the ignition lock
prevents the starter being engaged when the engine is running and thus
getting damaged. Ignition key withdrawal lock (automatic gearbox)
You can only withdraw the ignition key after switching off the ignition if the
selector lever is in position
P.
Starting engine
General
You can only start the engine only using an original ignition
key.
•Place the gearshift lever into neutral (or place the selector lever to the
position P or N in the case of an automatic gearbox) and put on the hand-
brake firmly before starting the engine.
A3
A1
A2
A3
A1
A2
A3
A2
A1
WARNING
•When driving, the ignition key must always be in the position
(ignition switched on) without the engine running. This position is
indicated by the warning lights coming on. If this is not the case, it
could result in unexpected locking of the steering wheel - risk of
accident!
•Only remove the ignition key fr om the ignition lock when the
vehicle has come to a standstill (put on the handbrake or select the
selector lever position P). The steering lock might otherwise
engage unintentionally - risk of accident!
•Always withdraw the ignition key if you are going to leave the
vehicle, even for a short time. This is particularly important if chil-
dren are left in the vehicle. The children might otherwise start the
engine or operate electrical equipment (e.g. power windows) - risk
of injury!
A2
Page 117 of 259
Starting-off and Driving
116
•The clutch pedal should be fully depressed when starting the engine
which means that the starter only has to crank the engine.
•Let go of the key as soon as the engine starts otherwise there may be
damage to the starter.
The engine running noises may louder at first be louder for a short time
after starting the cold engine until oil pressure can be built up in the
hydraulic valve clearance compensation. This is quite normal and is not
an operating problem.
If the engine does not start ...
You can use the battery of another vehicle as a jump-start aid
⇒ page 236.
It is only possible to tow-start vehicles fitted with a manual gearbox. The
tow-starting distance must not be more than 50 metres ⇒page 238.
Caution
•Avoid high engine revolutions, full throttle and high engine loads as
long as the engine has not yet reached its normal operating temperature
- risk of damaging the engine!
•Do not allow the engine to idle for long periods. If vehicle is stationary,
there is not sufficient air flowing through the cooler. In certain specific situ-
ations it can happen that the engine overheats - risk of engine damage!
•Vehicles which are fitted with an exhaust gas catalytic converter
should not be tow-started over a distance of more than 50 metres.
For the sake of the environment
Never warm up the engine when the vehicle is standing. Drive off right
away. This enables you to avoid unnecessary pollutant emissions.
Petrol engine
These engines are fitted with a starter system which selects the correct
fuel/air mixture for every external air temperature.
•Do not operate accelerator before and when starting engine.
•Interrupt the attempt at starting after 10 seconds if the engine does not
start right awayand wait for about 30 seconds before repeating the
attempt.
•It is possible that the fuse on the electrical fuel pump is defect if the
engine still does not start ⇒page 241.
•Contact the nearest Škoda dealer to obtain professional assistance.
It may be necessary, if the engine is very hot, to slightly depress the
accelerator after the engine has started.
Diesel engine
Glow plug system
Diesel engines are equipped with a glow plug system, the preglow period
being controlled automatically in line with the coolant temperature and
outside temperature.
The preglow indicator light
comes on after the ignition has been
switched on.
WARNING
There is the danger of poisoning if the engine is left running in an
enclosed space!
Page 118 of 259
Starting-off and Driving117
Using the systemSafetyDriving TipsGeneral MaintenanceBreakdown assistanceTechnical Data
You should not switch on any major electrical components during
the heating period otherwise the ve
hicle battery will be drained
unnecessarily.
•You should start the engine immediately after the glow plug warning
light has gone out.
•The glow plug warning light will come on for about one second if the
engine is at a normal operating temperature or if the outside temperature
is above +5°C. This means that you can start the engine right away.
•Interrupt the attempt at starting after 10 seconds if the engine does not
start right awayand wait for about 30 seconds before repeating the
attempt.
•It is possible that the fuse on the diesel preglow system is defect if the
engine still does not start ⇒page 241.
•Contact the nearest Škoda dealer to obtain professional assistance.
Starting the engine after the fuel tank has run dry
It may take longer than normal to start the engine after refuelling if the fuel
tank has run completely dry - up to one minute. This is because the fuel
system must first of all be filled while the attempting to start the engine.
Switching the engine off
– Turn the ignition key into position ⇒page 114.
Caution
you should not switch the engine off right away at the end of your journey
after the engine has been operated for a lengthy period at high loads but
should be allowed it to run at idling speed for about 2 minutes. This
prevents any accumulation of heat when the engine is switched off.
Note
•The radiator fan may continue running for a further 10 minutes or so
after the engine and the ignition have been switched off. The coolant fan
may, however, also switch on again after some time if the coolant temper-
ature rises because of an accumulation of heat in the engine or if the
engine is warm and the engine compartment is additionally heated by
strong sunlight.
•This is why particular care is required when carrying out any work in
the engine compartment ⇒page 203.
A1