battery SKODA SUPERB 2003 1.G / (B5/3U) Owner's Manual
[x] Cancel search | Manufacturer: SKODA, Model Year: 2003, Model line: SUPERB, Model: SKODA SUPERB 2003 1.G / (B5/3U)Pages: 259
Page 5 of 259
Contents
4
Driving Tips . . . . . . . . . . . . . . . . . . . . . .
Intelligent Technology . . . . . . . . . . . . . . . . . .
Electronic stability programme (ESP)* . . . . . .
Brakes . . . . . . . . . . . . . . . . . . . . . . . . . . . . . .
Antilock brake system (ABS) . . . . . . . . . . . . .
Brake Assist* . . . . . . . . . . . . . . . . . . . . . . . . .
Power steering . . . . . . . . . . . . . . . . . . . . . . . .
Driving and the Environment. . . . . . . . . . . .
The first 1 500 kilometres and then afterwards
Catalytic converter . . . . . . . . . . . . . . . . . . . . .
Motoring abroad . . . . . . . . . . . . . . . . . . . . . . .
Avoiding damage to your vehicle . . . . . . . . . .
Driving in an economical and environmentally
conscious manner . . . . . . . . . . . . . . . . . . . . .
Environmental compatibility . . . . . . . . . . . . . .
Towing a trailer . . . . . . . . . . . . . . . . . . . . . . . .
Towing a trailer . . . . . . . . . . . . . . . . . . . . . . . .
Detachable towing device* . . . . . . . . . . . . . .
General Maintenance . . . . . . . . . .
Care and cleaning . . . . . . . . . . . . . . . . . . . . .
General . . . . . . . . . . . . . . . . . . . . . . . . . . . . .
Care of the exterior of vehicle . . . . . . . . . . . .
Care of the interior of vehicle . . . . . . . . . . . . .
Engine compartment . . . . . . . . . . . . . . . . . . .
Fuel. . . . . . . . . . . . . . . . . . . . . . . . . . . . . . . . . .
Petrol . . . . . . . . . . . . . . . . . . . . . . . . . . . . . . .
Diesel . . . . . . . . . . . . . . . . . . . . . . . . . . . . . . .
Refuelling . . . . . . . . . . . . . . . . . . . . . . . . . . . .
Inspecting and Replenishing. . . . . . . . . . . .
Engine compartment . . . . . . . . . . . . . . . . . . .
Overview of the engine compartment . . . . . .
Engine oil . . . . . . . . . . . . . . . . . . . . . . . . . . . .
Cooling system . . . . . . . . . . . . . . . . . . . . . . . Brake fluid . . . . . . . . . . . . . . . . . . . . . . . . . . .
The battery . . . . . . . . . . . . . . . . . . . . . . . . . .
Windscreen Wiper and Washer System . . . .
Spark plugs . . . . . . . . . . . . . . . . . . . . . . . . . .
V-ribbed belts . . . . . . . . . . . . . . . . . . . . . . . . .
The dust and pollen filter* . . . . . . . . . . . . . . .
Wheels and Tyres . . . . . . . . . . . . . . . . . . . . .
Wheels . . . . . . . . . . . . . . . . . . . . . . . . . . . . .
Accessories, changes and replacement of
parts . . . . . . . . . . . . . . . . . . . . . . . . . . . . . . . . .
General . . . . . . . . . . . . . . . . . . . . . . . . . . . . .
Breakdown assistance . . . . . . . .
Breakdown assistance . . . . . . . . . . . . . . . . .
First-aid box* . . . . . . . . . . . . . . . . . . . . . . . . .
Warning triangle . . . . . . . . . . . . . . . . . . . . . .
Fire extinguisher* . . . . . . . . . . . . . . . . . . . . . .
Vehicle tool kit . . . . . . . . . . . . . . . . . . . . . . . .
Spare wheel . . . . . . . . . . . . . . . . . . . . . . . . . .
Changing a wheel . . . . . . . . . . . . . . . . . . . . .
Jump-starting . . . . . . . . . . . . . . . . . . . . . . . . .
Tow-starting and towing vehicle . . . . . . . . . . .
Fuses and light bulbs . . . . . . . . . . . . . . . . . .
Electric fuses . . . . . . . . . . . . . . . . . . . . . . . . .
Bulbs . . . . . . . . . . . . . . . . . . . . . . . . . . . . . . .
Technical Data. . . . . . . . . . . . . . . . . . .
General . . . . . . . . . . . . . . . . . . . . . . . . . . . . . .
Vehicle identification data . . . . . . . . . . . . . . .
Index. . . . . . . . . . . . . . . . . . . . . . . . . . . . . . .
169
169
169
172
173
174
174
176
176
177
178
178
179
183
184
184
186
189
189
189
189
194
196
198
198
198
200
202
202
204
205
208 210
212
217
217
218
218
219
219
226
226
227
227
227
227
228
228
229
229
236
238
241
241
243
249
249
249
251
Page 19 of 259
Instruments and Indicator/Warning Lights
18
Note
•Never reset the display between service intervals otherwise this may
result in incorrect readouts.
•information is retained in the Service Interval Display also after the
battery of the vehicle is disconnected.
•it is necessary to re-code the Service Interval Display if a new instru-
ment cluster is installed during repair work. this work is carried out by a
Škoda dealer.
•After resetting the display with flexible service intervals (QG1) using
the reset button of the counter for distance driven, the data displayed are
the same as for a car with fixed service intervals (QG2).
•We therefore recommend having the Service Interval Display reset
only by a Škoda dealer who is familiar with the procedure for resetting the
display with a vehicle system tester.
•Please refer to the brochure Service Plan for extensive information
about the service intervals.
Multi-functional indicator*
Introduction
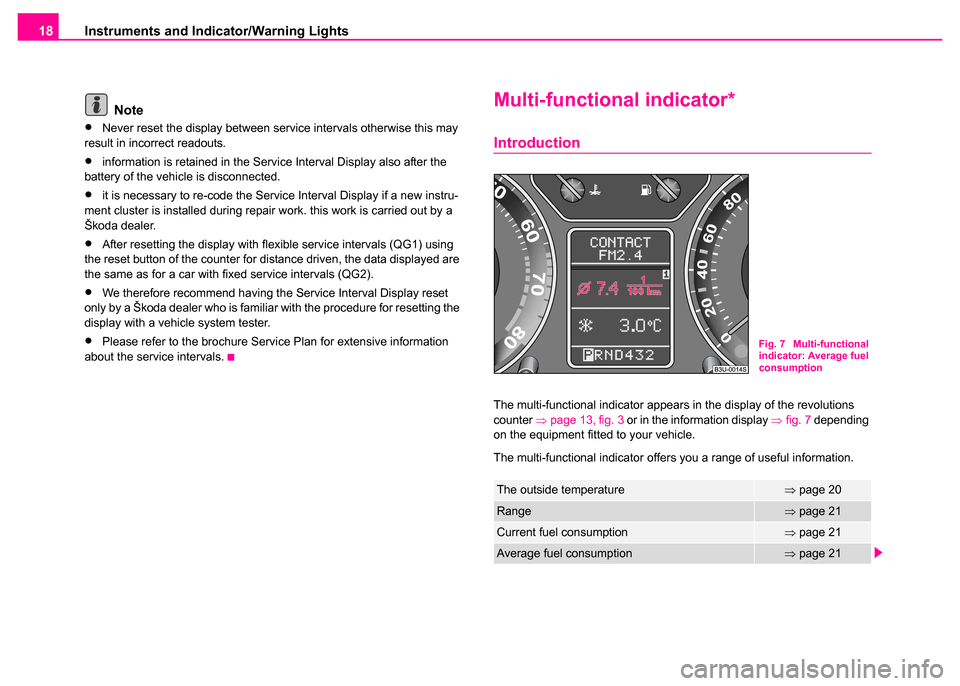
The multi-functional indicator appears in the display of the revolutions
counter ⇒page 13, fig. 3 or in the information display ⇒fig. 7 depending
on the equipment fitted to your vehicle.
The multi-functional indicator offers you a range of useful information.
The outside temperature⇒ page 20
Range⇒page 21
Current fuel consumption⇒page 21
Average fuel consumption⇒page 21
Fig. 7 Multi-functional
indicator: Average fuel
consumption
Page 20 of 259
Instruments and Indicator/Warning Lights19
Using the systemSafetyDriving TipsGeneral MaintenanceBreakdown assistanceTechnical Data
Note
In certain national versions the displays appear in the Imperial system of
measures.
Memory
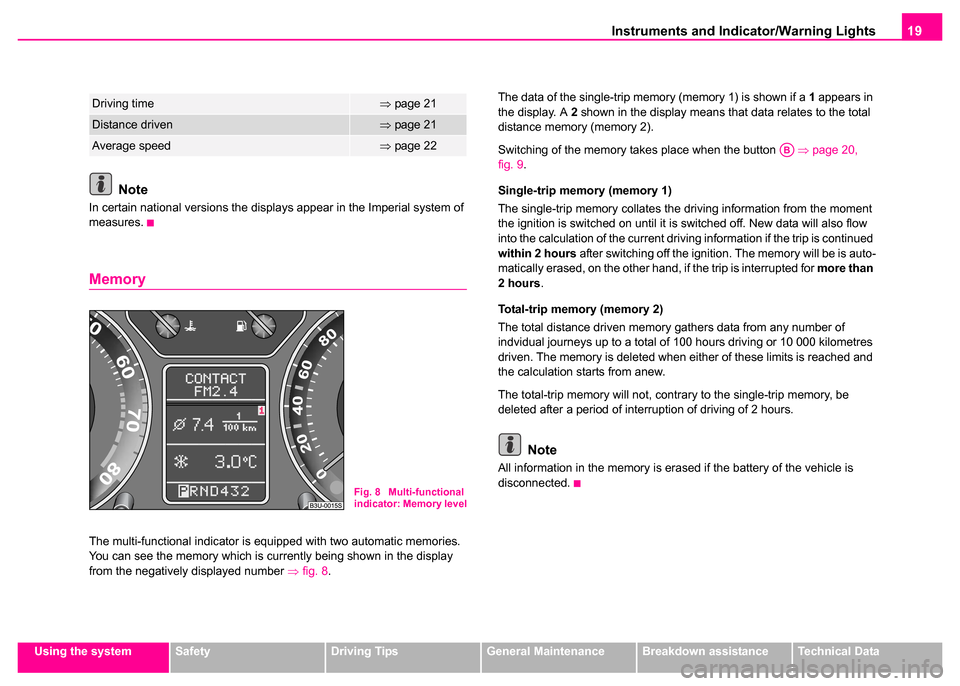
The multi-functional indicator is equipped with two automatic memories.
You can see the memory which is currently being shown in the display
from the negatively displayed number ⇒fig. 8 . The data of the single-trip memory (memory 1) is shown if a
1 appears in
the display. A 2 shown in the display means that data relates to the total
distance memory (memory 2).
Switching of the memory takes place when the button ⇒page 20,
fig. 9 .
Single-trip memory (memory 1)
The single-trip memory collates the driving information from the moment
the ignition is switched on until it is switched off. New data will also flow
into the calculation of the current driving information if the trip is continued
within 2 hours after switching off the ignition. The memory will be is auto-
matically erased, on the other hand, if the trip is interrupted for more than
2 hours .
Total-trip memory (memory 2)
The total distance driven memory gathers data from any number of
indvidual journeys up to a total of 100 hours driving or 10 000 kilometres
driven. The memory is deleted when either of these limits is reached and
the calculation starts from anew.
The total-trip memory will not, contrary to the single-trip memory, be
deleted after a period of interruption of driving of 2 hours.
Note
All information in the memory is erased if the battery of the vehicle is
disconnected.
Driving time⇒ page 21
Distance driven⇒page 21
Average speed⇒page 22
Fig. 8 Multi-functional
indicator: Memory level
AB
Page 22 of 259
Instruments and Indicator/Warning Lights21
Using the systemSafetyDriving TipsGeneral MaintenanceBreakdown assistanceTechnical Data
Note
The outside temperature is not indicating when showing navigation data
(guidance to the destination). It must be called up over the menu (valid for
vehicles which have a navigation and information display).
Range
The estimated range in kilometres is shown on the display. It indicates the
distance you can still drive with your vehicle based on the present level of
fuel in the tank for the same style of driving. The readout is shown in steps
of 5 km.
The fuel consumption for the last 50 km is taken as a basis for calculating
the range. If you drive in a more economical manner from this moment on,
the range will be increased accordingly.
You first drive 50 km if the readout is reset (after disconnecting the battery)
before a new readout for the range is displayed.
Current fuel consumption
The current fuel consumption level is shown in the display in litres/100 km.
This information can help you to adapt your style of driving to the fuel
consumption you wish to achieve.
The display appears in litres/hour if the vehicle is stationary or driving at a
low speed.
Average fuel consumption
The average fuel consumption since the memory was last erased is
shown in the display in litres/100 km ⇒page 19. This information can help
you to adapt your style of driving to the fuel consumption you wish to
achieve.
If you wish to determine the average fuel consumption over a certain
period of time you must first erase the memory at the start of the new
measurement using the button ⇒page 20, fig. 9 . A zero appears in
the display for the first 300 metres you drive after erasing the memory.
The indicated value will be updated every 30 metres while you are driving.
Note
The amount of fuel consumed will not be indicated.
Driving time
The driving time which has elapsed since the memory was last erased,
appears in the display ⇒page 19. If you wish to calculate the driving time
from a particular time of day you must first erase the memory at this
moment in time by pressing the button ⇒page 20, fig. 9 .
The maximum time indicated in both switch positions is 99 hours and 59
minutes. The indicator is set back to null if this period is exceeded.
Distance driven
The distance driven since the memory ⇒page 19 was last erased
appears in the display. If you wish to calculate the distance driven from a
AB
AB
Page 37 of 259
Instruments and Indicator/Warning Lights
36
. Visit the next Škoda dealer immediately and have the brake system
checked.
3 peeps sound as an additional warning signal.
One should get used to high pedal forces, long braking distances and long
free play of the brake pedal when driving to the next Škoda dealer.
The following text will be displayed in the information display*:
STOP BRAKE FAULT SERVICE MANUAL
For further information on the brake system ⇒page 172.
Handbrake applied
The warning light
also comes on if the handbrake is applied. An audible
warning is also given if you drive the vehicle for at least 3 seconds at a
speed of more than 6 km/h.
The following text will be displayed in the information display*:
HANDBRAKE ON
Dynamo
The warning light comes on after the ignition has been switched on. It
should go out after the engine has started.
If the warning light does not go out after the engine has started, or comes
on when driving, drive to the nearest Škoda Dealer. The vehicle battery
will be discharged in this case so switch off all non-essential electrical
components.
The following text will be displayed in the information display*:
ALTERNATOR WORKSHOP!
Caution
If the warning light comes on when driving and in addition the warning
light (cooling system fault) also comes on in display, you must then
stop the car immediately and switch the engine off - risk of engine
damage!
Seat belt warning light
The warning light comes on for a few seconds after the ignition is
switched on as a reminder to fasten the seat belt.
If you do not fasten the seat belt, a long warning signal sounds for 6
seconds.
For further information on the seat belts ⇒page 138.
The following text will be displayed in the information display*: FASTEN SEATBELT
For further information on the seat belts ⇒page 138.
WARNING
•Pay attention to the following instructions ⇒page 203 before
checking the brake fluid level and opening the bonnet.
•If the brake system warning light does not go out a few
seconds after switching on the ignition or comes on when driving,
stop immediately and check the brake fluid in the reservoir
⇒ page 210. If the fluid level has dropped below the MIN marking,
do not drive any further - risk of accident! Contact a Škoda dealer
to obtain professional assistance.
Page 39 of 259
Unlocking and locking
38
Key ring
The key ring only has the key number on it which is essential for producing
other keys. This number can be used to order replacement keys from
Škoda dealers.
The key ring with the number should be separately and securely kept in
safe keeping since keys can only be replaced if they are lost or damaged
by giving this number. You should also therefore give this key ring to the
purchaser when selling the vehicle.
Note
•Keep the groove of the keys absolutely clean as impurities (textile
fibres, dust etc.) have a negative effect on proper operation of the keys
and the ignition lock.
•Please approach a Škoda dealer if you lose a key since he can obtain
a new one for you.
Changing the key battery
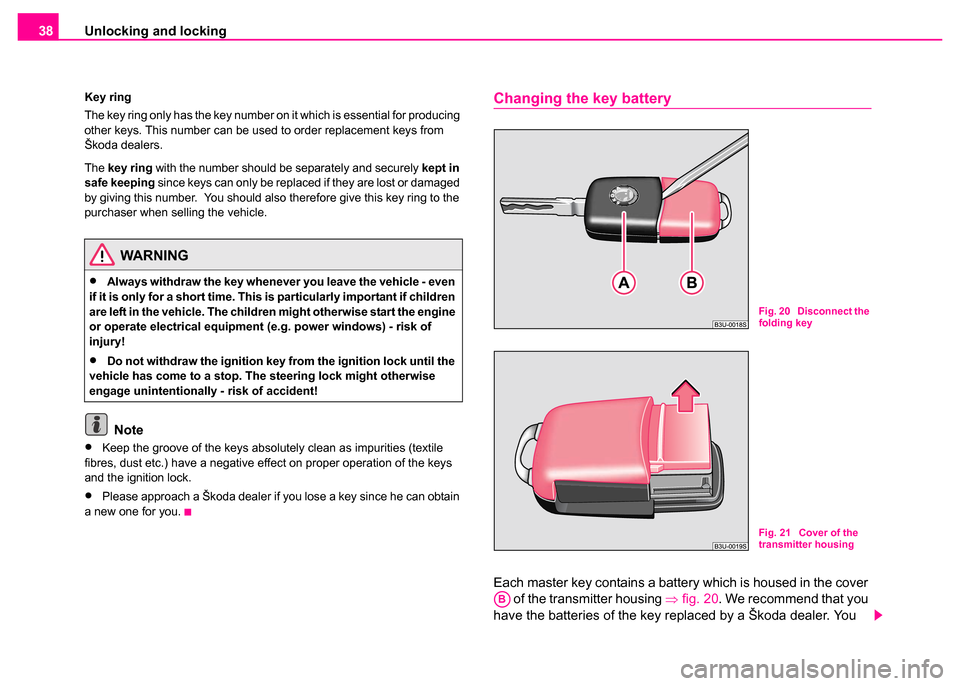
Each master key contains a battery which is housed in the cover of the transmitter housing ⇒fig. 20 . We recommend that you
have the batteries of the key replaced by a Škoda dealer. You
WARNING
•Always withdraw the key whenever you leave the vehicle - even
if it is only for a short time. This is particularly important if children
are left in the vehicle. The children might otherwise start the engine
or operate electrical equipment (e.g. power windows) - risk of
injury!
•Do not withdraw the ignition key from the ignition lock until the
vehicle has come to a stop. The steering lock might otherwise
engage unintentionally - risk of accident!
Fig. 20 Disconnect the
folding key
Fig. 21 Cover of the
transmitter housing
AB
Page 40 of 259
Unlocking and locking39
Using the systemSafetyDriving TipsGeneral MaintenanceBreakdown assistanceTechnical Data
should, however, proceed as follows if you wish to replace the
battery yourself:
– Fold open the key.
– Use a screwdriver to carefully lever off the front part of the key
⇒ page 38, fig. 20 from the transmitter housing .
– Take off the cover of the transmitter housing ⇒page 38,
fig. 21 in direction of arrow.
– Take the used battery out of the housing cover.
– Insert the new battery. Ensure that the “+” symbol on the battery is facing downwards. The correct polarity is also
shown on the cover of the transmitter housing.
– Insert cover with battery in place at the rear of the transmitter housing and press both parts together.
– Insert the transmitter housing into the front part of the key so that the two parts lock into each other.
For the sake of the environment
Dispose of an old battery in accordance with environmental regulations.
Note
•The replacement battery must have the same specification as the orig-
inal battery.
•If it is still not be possible to unlock or lock the vehicle with the remote
control even after replacing the battery this means that the system has to
be synchronised ⇒page 47.
Electronic immobiliser
The electronic immobiliser prevents the vehicle being
operated by an unauthorised person.
An electronic chip is integrated in the head of the key. The immobiliser is
deactivated with the aid of this chip when the key is inserted in the ignition
lock. The electronic immobiliser is automatically activated when you with-
draw the ignition key from the lock.
Note
It is only possible to start the engine of your car with a Genuine Škoda key
with the matching code ⇒page 35.
Central locking system
Description
Unlocking or locking the vehicle causes all doors to be unlocked or locked
at the same time by the central locking system. The boot lid is unlocked
when opening. It can be opened by pressing the hand grip above the
licence plate.
The car can be unlocked and locked either with the remote control
⇒ page 46 or with the key inserted at the driver door ⇒page 41.
It is also possible to open and close the windows by means of the central
locking system ⇒page 51. The electric sliding/tilting roof* can only be
closed by the central locking system.
AAAB
Page 47 of 259
Unlocking and locking
46
So long as the child safety lock is switched on it is not possible to open the
door from the inside with the door opening lever. In this case the door can
be opened only from the outside.
Remote control
Description
You can use the remote control:
•to unlock and lock the car
•unlocking boot lid
•Opening and closing window
The transmitter with the battery is housed in the handle of the master key.
The receiver is located in the interior of the car. The operating range of the
remote control is 10 metres but this range can be reduced if the batteries
are waek.
The master key has a fold-open key bit which can be used for unlocking
and locking the car manually and also for starting the engine.
If a lost key is replaced or if the receiver unit has been repaired or a new
unit installed, it is then necessary for a Škoda Dealer to initialise the
system. Only after this is it possible to again use the remote control.
Note
•The remote control is automatically deactivated when the ignition is
switched on.
•The operation of the remote control may temporarily be affected by
interference from transmitters close to the car and which operate in the
same frequency range (e.g. mobile phone, TV transmitter).
Unlocking and locking car
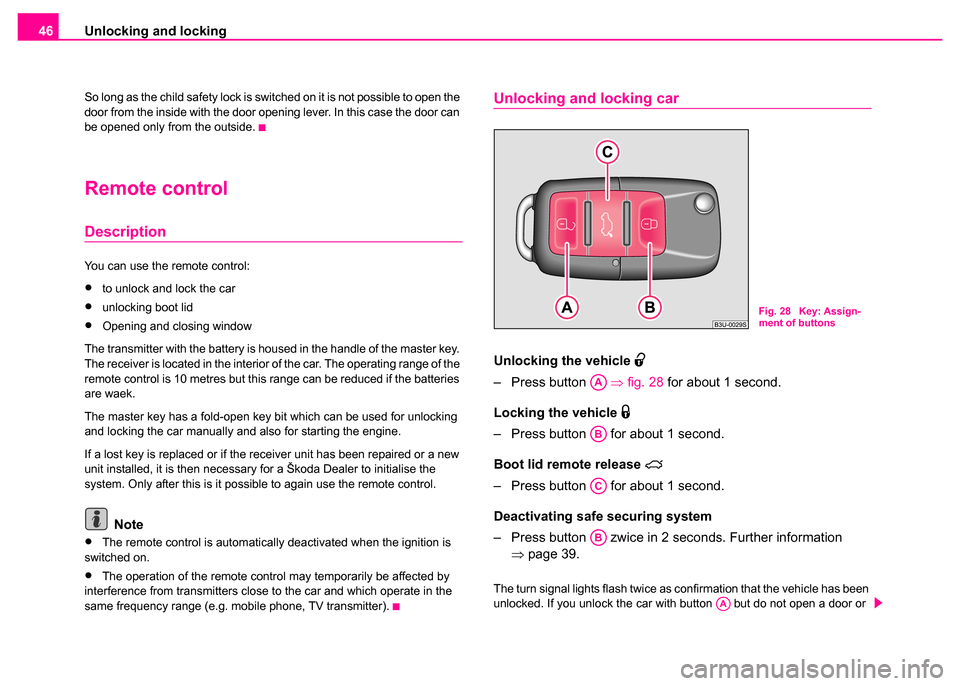
Unlocking th e vehicle
– Press button ⇒fig. 28 for about 1 second.
Locking the vehicle
– Press button for about 1 second.
Boot lid remote release
– Press button for about 1 second.
Deactivating safe securing system
– Press button zwice in 2 seconds. Further information ⇒page 39.
The turn signal lights flash twice as confirmation that the vehicle has been
unlocked. If you unlock the car with button but do not open a door or
Fig. 28 Key: Assign-
ment of buttons
AA
AB
AC
AB
AA
Page 48 of 259
Unlocking and locking47
Using the systemSafetyDriving TipsGeneral MaintenanceBreakdown assistanceTechnical Data
the boot lid within the next 30 seconds, the car locks again automatically.
This function is intended to prevent the vehicle being unlocked uninten-
tionally.
The safe securing system along with the anti-theft alarm system* are,
however, deactivated during these 30 seconds.
If the
single door opening function has been activated on your car, you
unlock only the driver door by pressing button once and the complete
vehicle by pressing the button twice ⇒page 43.
In addition, when the car is unlocked, the power seats and exterior
mirrors* move into the position assigned to this key. The stored setting of
driver seat and exterior mirrors is retrieved automatically.
When the vehicle is unlocked or locked, the interior lights in the door
contact are automatically switched on or off.
The turn signal lights flash once to confirm that the vehicle has been
correctly locked.
Note
•Operate the radio remote control only when the doors and boot lid are
closed and you have visual contact with the vehicle.
•Once in the car, you must not press the lock button of the master key
before inserting the key into the ignition lock in order to avoid the car being
inadvertently locked and, in addition, the anti-theft alarm system being switched on. Should this happen, press the unlock button
of the master
key.
Synchronisation of the vehicle key code
If the vehicle cannot be unlocked by actuating the remote control system
then it is possible that the code in the key and the control unit in the vehicle
are no longer synchronised. This can occur when the buttons on the radio-
operated key are actuated a number of times outside of the operative
range of the equipment or the battery on the remote control was replaced.
This means it is necessary to synchronise the code as follows:
•Press any button on the remote control.
•Pressing of the button means that the door will open with the key within
1 minute.
Anti-theft alarm system
Description
The anti-theft alarm system increases the level of protection against
people seeking to break into the vehicle. The system triggers audible and
visual warning signals if an attempt is made to break into the vehicle.
How is the alarm system switched on?
The anti-theft alarm system is activated automatically when the vehicle is
locked with the key on the closed driver's door or by using the remote
control. It is activated 30 seconds after closing the door.
WARNING
If the vehicle is locked from the outside and the safe securing
system is activated, there must not be any person in the vehicle as
it is then not possible to open either a door or a window from the
inside. The locked doors make it more difficult for rescuers to get
into the vehicle in an emergency - hazard!
AA
Page 49 of 259
Unlocking and locking
48
How is the alarm system switched off?
The anti-theft alarm system is switched off if the vehicle is unlocked by
only using the remote control. The vehicle is automatically locked again if
the vehicle is not opened within 30 seconds after reactivating the anti-theft
alarm system.
Once you unlock the vehicle by inserting the key into the driver door you
then have to insert the key into the ignition lock and switch the ignition on
within 15 seconds after opening the door in order to deactivate the anti-
theft alarm system. The alarm will be triggered if you do not switch on
the ignition within 15 seconds.
When is the alarm triggered?
The following security areas of the locked vehicle are monitored:
•Bonnet
•Boot lid
•Doors
•Ignition lock
•Vehicle interior* ⇒page 49.
•A drop in voltage of the on-board power supply
An alarm is immediately triggered if either of the two battery terminals is
disconnected while the anti-theft alarm system is activated.
If you unlock and open the boot lid with the key, the alarm is immediately
triggered.
How is the alarm switched off?
You switch the alarm off if you unlock the car with the radio remote control
in the key or if you switch the ignition on.
Turn signals
All of the turn signal lights flash once to indicate that the doors, the bonnet
and the boot lid have been correctly closed when locking the car. If the turn signal lights do not flash, check the doors, bonnet and boot lid
again to ensure that they are closed. If the doors, the bonnet or the boot
lid remain open when the anti-theft alarm system is activated, the turn
signal lights do not flash until after they have been closed.
Indicator light (LED)
The LED in the top of the door trim on the driver door first of all flashes
rapidly after the car is locked, then slowly. This indicates that the anti-theft
alarm system
including the interior monitor* is activated.
Note
•Before leaving the car, check that all the doors, windows and the elec-
tric sliding/tilting roof* are properly closed in order to ensure that the anti-
theft alarm system is fully operational.
•Power supply for the remote control operation is provided by a battery.
The battery must be replaced, ideally by the Škoda dealer, if the central
locking or anti-theft alarm system does react to the remote control at less
than 3 metres away.