lock SKODA SUPERB 2003 1.G / (B5/3U) Service Manual
[x] Cancel search | Manufacturer: SKODA, Model Year: 2003, Model line: SUPERB, Model: SKODA SUPERB 2003 1.G / (B5/3U)Pages: 259
Page 87 of 259

Seats and Stowage
86
Caution
The parts of the folding box can be damaged if handled roughly or in an
unprofessional way.
Opening folding box
You can transport the opened folding box in the secured end or
middle position against the partition of the luggage compartment.
Opening folding box
– Lower the folding box into the ready position ⇒page 85.
– Press the button marked “PUSH” ⇒page 86, fig. 73 .
– Grasp the folding box at the handle and push it in direction of arrow 1 against the partition of the luggage compartment
into the secured position. The lock below the button must be
heard to engage. If correctly locked, the button marked
“PUSH” moves back into its initial position.
– Raise the lid in direction of arrow 2 ⇒ page 86, fig. 74 .
Fig. 73 Luggage
compartment: folding
box
Fig. 74 Opening
folding box
AB
AA
AB
Page 88 of 259

Seats and Stowage87
Using the systemSafetyDriving TipsGeneral MaintenanceBreakdown assistanceTechnical Data
– Press on the bottom part of the handle and open the
compartments in the direction of arrow 3. The compartment
wall must be heard to engage in the slot in the bottom part of
the box.
Moving folding box into secured middle position
– Press on the button marked “PUSH” ⇒page 86, fig. 74
and carefully push the folding box into the secured middle
position. If correctly locked, the button marked “PUSH” is
moved back into its initial position. You can now use the space
which has become available for stowing further items of
luggage.
Caution
•The parts of the folding box can be damaged if handled roughly or in
an unprofessional way.
•The maximum weight of goods to be loaded should not exceed 25
kg.
Lowering folding boxAC
AD
AD
Fig. 75 Lowering
folding box
Fig. 76 Securing
folding box
Page 89 of 259

Seats and Stowage
88
– Press the bottom part of the handle ⇒page 87, fig. 75 and
fold the compartments in direction of arrow 1. The compart-
ments must be heard to engage in the lid.
– Close the lid in direction of arrow 2.
– Press on the button marked “PUSH” ⇒page 87, fig. 76
and push the folding box into the secured middle position.
– Once again press on the button marked “PUSH” and push the folding box carefully into the secured position against the
partition of the luggage compartment in direction of arrow
(ready position). If correctly locked, the button marked “PUSH” is moved back into its initial position.
You can leave the folding box in the ready position for use, or lower it into
the transport position ⇒page 85.
Caution
•The parts of the folding box can be damaged if handled roughly or in
an unprofessional way.
•First check for yourself whether the cover for the through-loading bag*
is closed before you lower the folding box into the ready position on the
partition of the luggage compartment ⇒page 81.
The roof luggage rack system
Description
Pay attention to the following points if you wish to transport luggage or
other items on the roof of your vehicle:
•Your car has streamlined rain channels integrated into the roof. For
this reason, it is not possible to use conventional roof racks. We therefore
recommend that you only use base roof bars from the Škoda Genuine
Accessories.
•These base roof bars are the supporting elements for a complete roof
bar system. Separate additional components are required for safety
reasons for transporting luggage, bikes, surfboards, skis and boats. All
these system components are available from Škoda Dealers.
Caution
•If you use other roof rack systems or if the roof bars are not properly
fitted, then any damage which may result to your car is not covered by the
warranty agreements. It is therefore essential to pay attention to the fitting
instructions supplied with the roof luggage rack system.
•On models fitted with a power sliding/tilting roof, ensure that the
opened sliding/tilting roof does not strike any items of luggage transported
on the roof.
For the sake of the environment
The increased aerodynamic drag results in a higher fuel consumption.
One should therefore take off the roof bar system after use.
AA
AB
AB
A3
AB
Page 91 of 259

Seats and Stowage
90
Drinks can holder
Drinks can holder in front compartment
You can place two cups or beverage cans into the recesses ⇒fig. 78 .
Drinks can holder in armrest of the rear seats*
The drinks can holder is provided in the stowage compartment.
Access to drinks can holder
– Raise the cover of the armrest.
– You can take off the drinks can holder. Unlock it ⇒fig. 79 and
attach it to the cover of the armrest.
Only place cans into the drinks can holder which are held tight in the
holder.
It is possible to place up to two beverage cans in the drinks can holder of
the armrest.
WARNING
•Do not place any hot beverages into the cup holder while the car
is moving. The hot beverages may spill - risk of scalding!
•Do not use any cups or beakers which are made of hard or
brittle material (e.g. glass, porcelain). You might be injured by them
in the event of an accident.
Fig. 78 Centre
console: Drinks can
holder
Fig. 79 Drinks can
holder in rear armrest
Page 96 of 259

Seats and Stowage95
Using the systemSafetyDriving TipsGeneral MaintenanceBreakdown assistanceTechnical Data
Storage facilities
An overview
You will find the following storage facilities in your vehicle:
Storage compartment on the front passenger side
The storage compartment on the front passenger side is
lockable* and illuminated.
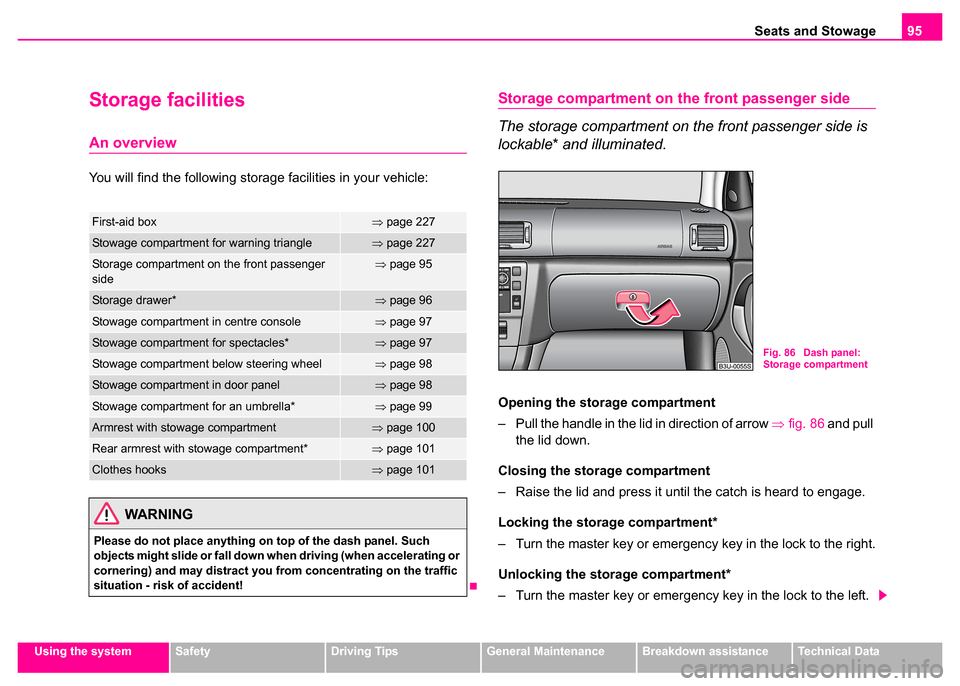
Opening the storage compartment
– Pull the handle in the lid in direction of arrow ⇒fig. 86 and pull
the lid down.
Closing the stor age compartment
– Raise the lid and press it until the catch is heard to engage.
Locking the storage compartment*
– Turn the master key or emergency key in the lock to the right.
Unlocking the stor age compartment*
– Turn the master key or emergency key in the lock to the left.
First-aid box⇒ page 227
Stowage compartment for warning triangle⇒page 227
Storage compartment on the front passenger
side⇒page 95
Storage drawer*⇒page 96
Stowage compartment in centre console⇒page 97
Stowage compartment for spectacles*⇒page 97
Stowage compartment below steering wheel⇒page 98
Stowage compartment in door panel⇒page 98
Stowage compartment for an umbrella*⇒page 99
Armrest with stowage compartment⇒page 100
Rear armrest with stowage compartment*⇒page 101
Clothes hooks⇒page 101
WARNING
Please do not place anything on top of the dash panel. Such
objects might slide or fall down when driving (when accelerating or
cornering) and may distract you from concentrating on the traffic
situation - risk of accident!
Fig. 86 Dash panel:
Storage compartment
Page 115 of 259

Starting-off and Driving
114
Starting-off and Driving
Setting steering wheel position
You can set the height and the forward/back position of the
steering wheel to the desired position.
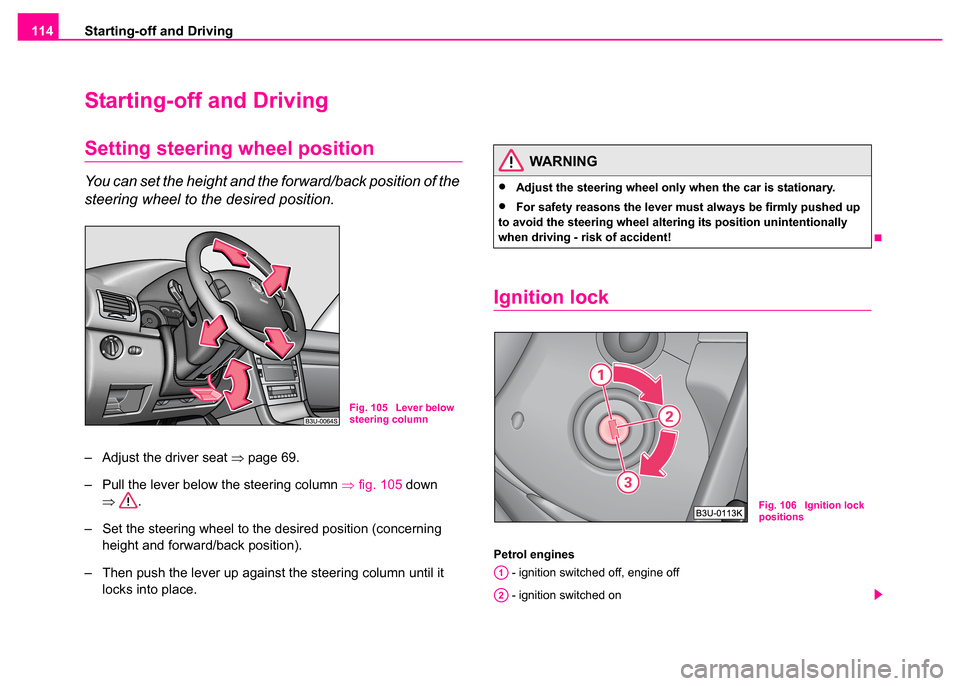
– Adjust the driver seat ⇒page 69.
– Pull the lever below the steering column ⇒fig. 105 down
⇒ .
– Set the steering wheel to the desired position (concerning height and forward/back position).
– Then push the lever up against the steering column until it locks into place.
Ignition lock
Petrol engines
- ignition switched off, engine off
- ignition switched on
Fig. 105 Lever below
steering column
WARNING
•Adjust the steering wheel only when the car is stationary.
•For safety reasons the lever must always be firmly pushed up
to avoid the steering wheel alte ring its position unintentionally
when driving - risk of accident!
Fig. 106 Ignition lock
positions
A1
A2
Page 116 of 259

Starting-off and Driving115
Using the systemSafetyDriving TipsGeneral MaintenanceBreakdown assistanceTechnical Data
- start engine
Diesel engines - fuel supply interrupted, ignition switched off, engine off
- heating glow plugs on, ignition switched on
•You should not switch on any major electrical components during the
heating period otherwise the vehicle battery will be drained unnecessarily.
- start engine
Applies to all models:
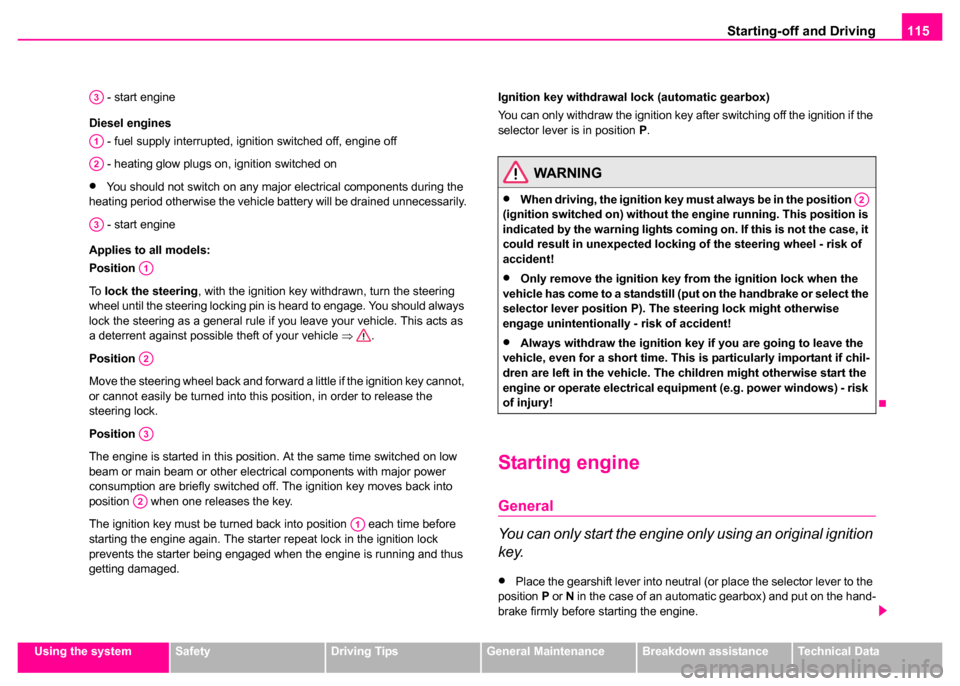
Position
To lock the steering , with the ignition key withdrawn, turn the steering
wheel until the steering locking pin is heard to engage. You should always
lock the steering as a general rule if you leave your vehicle. This acts as
a deterrent against possible theft of your vehicle ⇒.
Position
Move the steering wheel back and forward a little if the ignition key cannot,
or cannot easily be turned into this position, in order to release the
steering lock.
Position
The engine is started in this position. At the same time switched on low
beam or main beam or other electrical components with major power
consumption are briefly switched off. The ignition key moves back into
position when one releases the key.
The ignition key must be turned back into position each time before
starting the engine again. The starter repeat lock in the ignition lock
prevents the starter being engaged when the engine is running and thus
getting damaged. Ignition key withdrawal lock (automatic gearbox)
You can only withdraw the ignition key after switching off the ignition if the
selector lever is in position
P.
Starting engine
General
You can only start the engine only using an original ignition
key.
•Place the gearshift lever into neutral (or place the selector lever to the
position P or N in the case of an automatic gearbox) and put on the hand-
brake firmly before starting the engine.
A3
A1
A2
A3
A1
A2
A3
A2
A1
WARNING
•When driving, the ignition key must always be in the position
(ignition switched on) without the engine running. This position is
indicated by the warning lights coming on. If this is not the case, it
could result in unexpected locking of the steering wheel - risk of
accident!
•Only remove the ignition key fr om the ignition lock when the
vehicle has come to a standstill (put on the handbrake or select the
selector lever position P). The steering lock might otherwise
engage unintentionally - risk of accident!
•Always withdraw the ignition key if you are going to leave the
vehicle, even for a short time. This is particularly important if chil-
dren are left in the vehicle. The children might otherwise start the
engine or operate electrical equipment (e.g. power windows) - risk
of injury!
A2
Page 120 of 259

Starting-off and Driving119
Using the systemSafetyDriving TipsGeneral MaintenanceBreakdown assistanceTechnical Data
Applying the handbrake
– Pull the handbrake lever up fully.
Releasing the handbrake
– Pull the handbrake lever up slightly and at the same time
press in the locking button ⇒page 118, fig. 109 .
– Hold the button pressed and push the handbrake lever down fully ⇒ .
The handbrake warning light lights up when the handbrake is applied,
provided the ignition is on.
A warning signal (buzzer) sounds and the following text appears in the
display* if you have inadvertently driven off with the handbrake applied:
"Handbrake on"
The handbrake warning is activated if you drive at a speed of more than 5
km/h for more than 3 seconds.
Caution
After the car has come to a stop, always first of all apply the handbrake
firmly before then additionally engaging a gear (manual gearbox) or
moving the selector lever into position P (automatic gearbox).
Parking aid*
The parking aid provides a warning of obstacles behind
the vehicle.
The audible parking aid at the rear determines the distance to an obstacle
behind the car with the aid of ultrasound sensors. The sensors are inte-
grated in the rear bumper.
The parking aid is activated automatically when reverse gear is engaged
and the ignition is turned on. This is confirmed by a brief signal.
The clearance warning begins at a distance of about 160 cm from the
obstacle. The interval between the warning signals becomes shorter as
the clearance is reduced.
A continuous tone sounds from a clearance of just 30 cm - danger area.
You should not reverse any further after this signal sounds.
WARNING
•Please note that the handbrake must be fully released. A hand-
brake which is only partially released can result in the rear brakes
overheating which will have a negative effect on the operation of
the brake system - risk of accident!
•Never leave children unattended in the vehicle. The children
might, for example, release the ha ndbrake or take the vehicle out
of gear. The vehicle might then move off - risk of accident!WARNING
•The parking aid is not a substitute for the driver paying proper
attention. It is always the driver's responsibility to take care when
parking the vehicle or carrying out similar manoeuvres.
Page 124 of 259

Automatic gearbox*123
Using the systemSafetyDriving TipsGeneral MaintenanceBreakdown assistanceTechnical Data
Automatic gearbox*
5-speed automatic gearbox
Information for driving wi th an automatic gearbox
Shifting up and down through the gears is performed auto-
matically.
You can also, however, switch the gearbox over into the
Tiptronic mode . This mode makes it possible for you to also shift
gears manually if you so wish ⇒page 128.
Starting-off and Driving
– Depress the brake pedal and hold it depressed.
– Press the Shiftlock button (button in handle of the selector lever), move the selector lever into the desired position, e.g. D
⇒ page 124, and then release the Shiftlock button.
– Wait a moment until the gearbox has shifted (a slight engage- ment nudge can be felt).
– Release the brake pedal and depress the accelerator ⇒.
Stopping for a short time
– The selector lever position N does not have to be selected
when stopping just for a short time, such as at a cross roads.
It is sufficient to hold the vehicle stationary using the foot
brake. The engine can, however, be allowed just to idle. Parking
– Depress the brake pedal and hold it depressed.
– Apply the handbrake firmly.
– Press and Shiftlock button in the selector lever, move the
selector lever to P and then release the Shiftlock button.The engine can only be started when the selector lever is in position P or
N ⇒ page 115.
It is sufficient to engage selector lever position P when parking on a flat
surface. When parking on a slope you should first apply the handbrake
firmly and then move the selector lever into position P. This is to ensure
that there is no excessive pressure acting on the lock mechanism and that
it is easier to subsequently move the selector lever out of position P.
If the selector lever position N is selected by accident while driving it is first
necessary to release pressure on the accelerator pedal and wait for idling
speed of the engine to be reached before engaging a drive position in the
selector lever.
WARNING
•Do not depress the accelerator when changing the position of
the selector lever if the car is stationary and the engine is running
- risk of accident!
•Never move the selector lever into position R or P when driving
- risk of an accident!
Page 125 of 259

Automatic gearbox*
124
Selector lever positions
The selector lever position you have engaged is shown in the information
display of the instrument cluster with the corresponding gear symbol high-
lighted ⇒ fig. 112.
P - Parklock
The driven wheels are locked mechanically in this position.
The Parklock must only be engaged when the vehicle is stationary ⇒.
If you wish to move the selector lever into or out of this position, you must
press the Shiftlock button in the handle of the selector lever and at the
same time depress the brake pedal.
R - Reverse
Reverse gear must only be engaged when the vehicle is stationary and
the engine idling ⇒.
The brake pedal must be depressed and at the same time the Shiftlock
must be pressed, if you wish to obtain the selector lever positions R, P or
N .
WARNING (continued)
•When the engine is running and the vehicle is stationary, it is
necessary to hold the car with the brake pedal in all the positions
of the selector lever (except P and N) since the power transmission
is never completely interrupted, also not when the engine is idling
- the vehicle "creeps".
Fig. 111 Selector lever
Fig. 112 Information
display: Selector lever
positions