ignition SKODA SUPERB 2003 1.G / (B5/3U) Workshop Manual
[x] Cancel search | Manufacturer: SKODA, Model Year: 2003, Model line: SUPERB, Model: SKODA SUPERB 2003 1.G / (B5/3U)Pages: 259
Page 118 of 259
Starting-off and Driving117
Using the systemSafetyDriving TipsGeneral MaintenanceBreakdown assistanceTechnical Data
You should not switch on any major electrical components during
the heating period otherwise the ve
hicle battery will be drained
unnecessarily.
•You should start the engine immediately after the glow plug warning
light has gone out.
•The glow plug warning light will come on for about one second if the
engine is at a normal operating temperature or if the outside temperature
is above +5°C. This means that you can start the engine right away.
•Interrupt the attempt at starting after 10 seconds if the engine does not
start right awayand wait for about 30 seconds before repeating the
attempt.
•It is possible that the fuse on the diesel preglow system is defect if the
engine still does not start ⇒page 241.
•Contact the nearest Škoda dealer to obtain professional assistance.
Starting the engine after the fuel tank has run dry
It may take longer than normal to start the engine after refuelling if the fuel
tank has run completely dry - up to one minute. This is because the fuel
system must first of all be filled while the attempting to start the engine.
Switching the engine off
– Turn the ignition key into position ⇒page 114.
Caution
you should not switch the engine off right away at the end of your journey
after the engine has been operated for a lengthy period at high loads but
should be allowed it to run at idling speed for about 2 minutes. This
prevents any accumulation of heat when the engine is switched off.
Note
•The radiator fan may continue running for a further 10 minutes or so
after the engine and the ignition have been switched off. The coolant fan
may, however, also switch on again after some time if the coolant temper-
ature rises because of an accumulation of heat in the engine or if the
engine is warm and the engine compartment is additionally heated by
strong sunlight.
•This is why particular care is required when carrying out any work in
the engine compartment ⇒page 203.
A1
Page 119 of 259

Starting-off and Driving
118
Shifting gears
The shift pattern
Shift into reverse only when the car is stationary. Depress the clutch pedal
and hold it fully depressed. Wait a moment before engaging reverse gear
in order to avoid any shift noises.
The reversing lights will come on once reverse gear is engaged, provided
the ignition is on.
Note
One should not lay the hand on the shift lever while driving the vehicle.
The pressure of the hand will be transferred to the gearshift forks in the
gearbox. This can, over a period of time, lead to early wear of the gearshift
forks.
Handbrake
Handbrake
Fig. 107 Shift pattern
on models fitted with 5-
speed manual gearbox
Fig. 108 Shift pattern
on models fitted with 6-
speed manual gearbox
Fig. 109 Centre
console: Handbrake
Page 120 of 259

Starting-off and Driving119
Using the systemSafetyDriving TipsGeneral MaintenanceBreakdown assistanceTechnical Data
Applying the handbrake
– Pull the handbrake lever up fully.
Releasing the handbrake
– Pull the handbrake lever up slightly and at the same time
press in the locking button ⇒page 118, fig. 109 .
– Hold the button pressed and push the handbrake lever down fully ⇒ .
The handbrake warning light lights up when the handbrake is applied,
provided the ignition is on.
A warning signal (buzzer) sounds and the following text appears in the
display* if you have inadvertently driven off with the handbrake applied:
"Handbrake on"
The handbrake warning is activated if you drive at a speed of more than 5
km/h for more than 3 seconds.
Caution
After the car has come to a stop, always first of all apply the handbrake
firmly before then additionally engaging a gear (manual gearbox) or
moving the selector lever into position P (automatic gearbox).
Parking aid*
The parking aid provides a warning of obstacles behind
the vehicle.
The audible parking aid at the rear determines the distance to an obstacle
behind the car with the aid of ultrasound sensors. The sensors are inte-
grated in the rear bumper.
The parking aid is activated automatically when reverse gear is engaged
and the ignition is turned on. This is confirmed by a brief signal.
The clearance warning begins at a distance of about 160 cm from the
obstacle. The interval between the warning signals becomes shorter as
the clearance is reduced.
A continuous tone sounds from a clearance of just 30 cm - danger area.
You should not reverse any further after this signal sounds.
WARNING
•Please note that the handbrake must be fully released. A hand-
brake which is only partially released can result in the rear brakes
overheating which will have a negative effect on the operation of
the brake system - risk of accident!
•Never leave children unattended in the vehicle. The children
might, for example, release the ha ndbrake or take the vehicle out
of gear. The vehicle might then move off - risk of accident!WARNING
•The parking aid is not a substitute for the driver paying proper
attention. It is always the driver's responsibility to take care when
parking the vehicle or carrying out similar manoeuvres.
Page 121 of 259
Starting-off and Driving
120
Note
•The parking aid does not operate if you are towing a trailer (applies to
models which feature a factory-fitted towing device*).
•A system fault is indicated if a warning signal sounds for about 5
seconds after switching the ignition on and engaging reverse gear and
there is no obstacle close to your vehicle. Have the fault rectified by a
Škoda dealer.
•The sensors must be kept clean and free of ice to enable the parking
aid to operate properly.
Cruise control system (CCS)*
Introduction
The cruise control system makes it possible for the driver to maintain a
constant speed of his choosing from a speed of 30 km/h (20 mph) or
higher. This, of course, is only possible within the range which is permitted
by the power output and braking power of the engine. Using the cruise
control system - particularly on long journeys - makes it possible for you
to rest your “accelerator foot”.
Caution
Models fitted with a manual gearbox: Always depress the clutch pedal if
you switch on the cruise control system when the gearbox is in Neutral.
The engine will rev up and may even be damaged under certain circum-
stances.
Note
•The cruise control system is not able to maintain a constant speed
when driving on steep downhill sections. The weight of the vehicle
increases the speed at which it travels. One should shift down in good time
to a lower gear or slow the vehicle down by applying the foot brake.
•It is not possible on vehicles fitted with an automatic gearbox to switch
on the cruise control system if the selector lever is in the position P, N , R
or 2.
WARNING (continued)
•You should therefore satisfy yourself, before reversing, that
there is no small obstacle, such as a rock, thin post, trailer drawbar
etc., behind your vehicle. Such an obstacle might not be within the
range detected by the sensors.WARNING
For safety reasons the cruise control system must not be used in
dense traffic or on difficult road surfaces (such as road chips, or
slippery roads) - risk of accident!
Page 126 of 259
Automatic gearbox*125
Using the systemSafetyDriving TipsGeneral MaintenanceBreakdown assistanceTechnical Data
The reversing lights come on when the selector lever is moved into posi-
tion
R when the ignition is also on.
N - Neutral
The transmission is in Neutral in this position.
The brake pedal must be depressed and the Shiftlock in the selector lever
grip must be pressed (if the selector lever is in its position for longer than
2 seconds) in order to move the selector lever out of the N position, with
the ignition switched on, on a vehicle travelling at less than 5 km/hour or
on a stationary vehicle.
D - Drive, position for driving forward
When the selector lever is in this position, the forward gears are shifted up
and down automatically in line with engine load, vehicle speed and the
dynamic shift programme (DSP).
You must depress the brake pedal ⇒ if you wish to move the selector
lever into position D from N when the vehicle is travelling at less than
5 km/hour or is stationary.
In certain circumstances (e.g. when driving in mountainous regions or
when towing a trailer) it may be beneficial to select the manual shift
programme ⇒page 128 for a short time in order to adapt the gearbox
ratios manually to the driving situations.
4 - Position when driving in hilly areas
We recommend this position if driving with the selector lever in position D
would, in certain circumstances, result in the gearbox frequently shifting
between fourth and fifth gears.
The gearbox then shifts up and down automatically into the first, second,
third and fourth gears in line with engine load and vehicle speed. Fifth gear
is not engaged in this case. This makes it possible to exploit greater
engine braking power when the accelerator is released ⇒.
The Shiftlock on the selector lever grip must be pressed when moving out
of position 4 into position D. 3 - Position when drivin
g in mountainous regions
This position of the selector lever is suitable for long sloping sections.
The gearbox shifts up and down automatically into first, second and third
gear in line with engine load and vehicle speed. The fourth and fifth gears
remain locked out in order to avoid unnecessary gear changes. Enhanced
engine braking power is thus available.
The Shiftlock on the selector lever grip must be pressed when moving out
of position 4 into position 3.
2 - Position for extreme mountainous sections
This position of selector lever is suitable for very steep downhill sections.
The gearbox shifts up and down automatically into first and second gear
in line with engine load and vehicle speed. Third, fourth and fifth gears are
not engaged. This position offers you the maximum possible engine
braking power.
The Shiftlock on the selector lever grip must be pressed when moving out
of position 2 into position 3.
The cruise control system is locked in position 2.
WARNING
•Never move the selector lever into position R or P when driving
- risk of an accident!
•When the engine is running and the vehicle is stationary, it is
necessary to hold the car with the brake pedal in all the positions
of the selector lever (except P and N) since the power transmission
is never completely interrupted, also not when the engine is idling
- the vehicle "creeps".
Page 127 of 259

Automatic gearbox*
126
Note
•Take your foot off the accelerator if you inadvertently shift into N when
driving and wait until the engine speed has dropped to the idling speed
range before shifting into D.
•If you shift gear manually it is possible to select positions 4, 3 and 2 ,
but the automatic gearbox will not shift down until there is no risk of the
engine overrevving.
Selector lever lock
Automatic selector lever lock
With the ignition on, the selector lever is locked when it is in the positions
P and N . You must first of all depress the brake pedal in order to move the
selector lever out of this position. The following text appears in the display
* as a reminder for the driver when the selector lever is in position P and N :
"Apply foot brake when selecting gear with vehicle stationary"
In addition, the symbol
for the automatic selector lever lock in the shift
gate lights up. A time delay element ensures that the selector lever is not blocked when
rapidly switching over the position
N (e.g. from R to D). This does, for
example, allow one to seesaw out a stuck vehicle. The selector lever lock
will click into place if the lever is in the N position for more than 2 seconds
without the brake pedal being pressed.
The selector lever lock is only active if the vehicle is stationary or moving
at speed of less than 5 km/hour. The lock is switched off automatically into
position N when the car is travelling at a higher speed.
Shiftlock button
The Shiftlock button in the handle of selector lever prevents certain
selector lever positions being engaged inadvertently. The selector lever
lock is cancelled when you press the Shiftlock button.
Keylock - Ignition key withdrawal lock
You can only withdraw the ignition key after switching off the ignition if the
selector lever is in position P . As long as the ignition key is withdrawn, the
selector lever is locked in position P.
Kickdown function
The kickdown function provides you with maximum accel-
eration power.
Depressing the accelerator pedal beyond the pressure point casues the
automatic gearbox to shift down into a lower gear (in line with vehicle
speed and engine speed). The gearbox shifts up into the next higher gear
when the engine has reached its maximum revolations.
WARNING (continued)
•You must on no account unintentionally operate the throttle
(e.g. by hand from the engine compartment) if a drive position is
engaged when the car is stationary. The vehicle would otherwise
immediately start off - also when the handbrake is firmly applied -
risk of an accident!
•You must move the selector lever into position P and firmly
apply the handbrake first before you or any other person opens the
bonnet and starts working on the engine when it is running - risk
of accident! It is also essential to observe all warnings ⇒page 203.
Page 134 of 259
Communicating and Navigating133
Using the systemSafetyDriving TipsGeneral MaintenanceBreakdown assistanceTechnical Data
Initialisation
– Withdraw the ignition key.
– First insert the adapter without the mobile phone into the
mount in the direction of arrow ⇒page 132, fig. 117
until the adapter is touching the stop. Press the adapter
slightly in the direction of arrow until it locks into position.
– Plug the adapter cable into the mobile phone socket. The socket is located on the mobile phone mount below.
– Switch on the ignition.
– Wait approximately 20 seconds, switch off the ignition and pull the ignition key out of the ignition lock.
– Insert the mobile phone into the adapter (as specified in manufacturer's instructions) and switch on the ignition.
Removing the mobile phone and adapter
– Press the button and remove the mobile telephone.
An initialisation must be carried out:
•after the first connection of the adapter
•after reconnecting the battery
•after pulling out the adapter cable from the power socket for the mobile
phone
This enables you to make full use of the advantages of a normal carphone
(“handsfree system” using a microphone integrated in the vehicle, optimal
transmission of signals using an external aerial etc.). The battery of the
mobile phone is also constantly charged. Please contact your Škoda dealer If there are any points which are not
clear.
Please also refer to the additional instructions
⇒page 135.
ABA1
A2
AA
AC
Page 135 of 259
Communicating and Navigating
134
Telephone pre-installation at the front or rear*
(GSM III)
Initialisation of the adapter
– Withdraw the ignition key.
– Insert the adapter into the mount (the mobile phone
must not be inserted in the adapter).
– Plug the adapter cable into the mobile phone socket.
– Switch on the ignition.
– Wait approximately 20 seconds, switch off the ignition and pull the ignition key out of the ignition lock.
– Insert the mobile phone into the adapter (as specified in manufacturer's instructions) and switch on the ignition.
An initialisation must be carried out:
•after the first connection of the adapter
•after reconnecting the battery
•after pulling out the adapter cable from the power socket for the mobile
phone
This enables you to make full use of the advantages of a normal carphone
(“handsfree system” using a microphone integrated in the vehicle, optimal
transmission of signals using an external aerial etc.). The battery of the
mobile phone is also constantly charged.
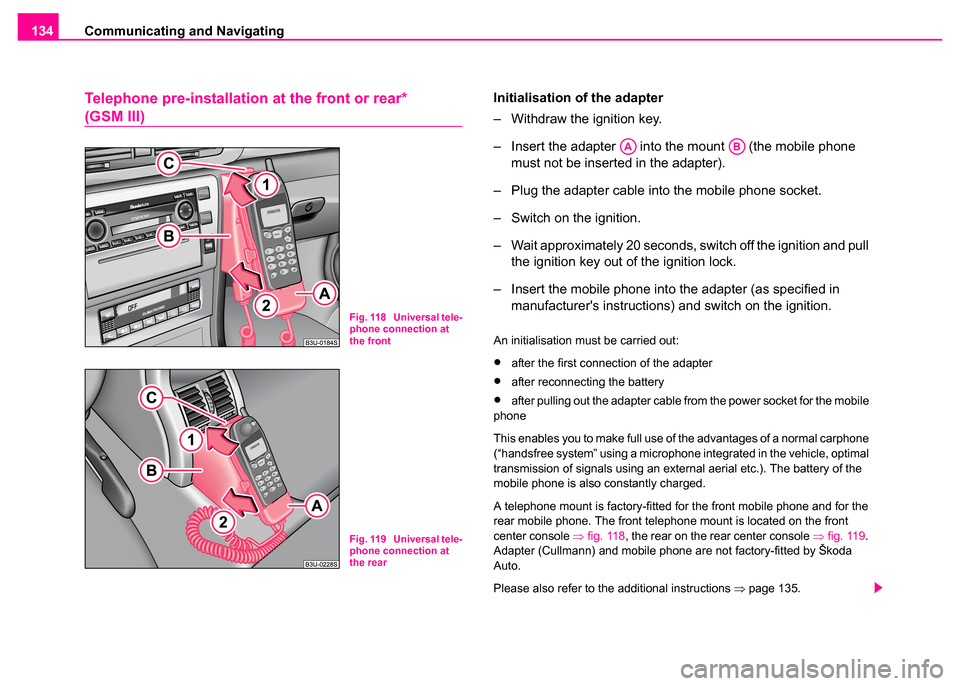
A telephone mount is factory-fitted for the front mobile phone and for the
rear mobile phone. The front telephone mount is located on the front
center console ⇒fig. 118 , the rear on the rear center console ⇒fig. 119 .
Adapter (Cullmann) and mobile phone are not factory-fitted by Škoda
Auto.
Please also refer to the additional instructions ⇒page 135.
Fig. 118 Universal tele-
phone connection at
the front
Fig. 119 Universal tele-
phone connection at
the rear
AAAB
Page 146 of 259

Airbag system145
Using the systemSafetyDriving TipsGeneral MaintenanceBreakdown assistanceTechnical Data
Airbag system
Description of the airbag system
General information on the airbag system
The front airbag system is complementary to the three-point seat belts
and offers additional protection for the head and chest area of the driver
and passenger in the event of a frontal collision.
In the case of a violent side crash, the side and head airbags reduce the
risk of injuries to the occupants on the part of the body facing the side of
the accident ⇒.
The airbag system is only functional after the ignition has been switched
on.
The operational readiness of the airbag system is monitored electroni-
cally. The airbag warning light comes on for a few seconds each time the
ignition is switched on.
The airbag system (according to vehicle equipment) essentially
consists of:
•an electronic control unit
•the two front airbags
•the side airbags
•Head airbags*
•an airbag warning light in the instrument cluster
•a front passenger airbag switch* ⇒page 155
•an indicator light showing a switched-off front passenger airbag* in the
middle of the dash panel ⇒page 155 A fault in the airbag system exists if:
•the airbag indicator light does not light up when the ignition is switched
on
•the warning light does not go out after about 3 seconds after the igni-
tion is switched on
•the airbag indicator light goes out and comes on again after the ignition
is switched on
•the airbag indicator light comes on or flickers when driving
•an airbag indicator light showing a switched-off front passenger
airbag* in the middle of the dash panel flashes
WARNING
•To enable the occupants of a car to be protected with the
greatest possible effect when the airbag is deployed, the front
seats must be ⇒page 69, “Front seats”correctly adjusted to
match the body size of the occupant.
•If you do not fasten the seat belts when driving, lean too far
forward or adopt an incorrect seated position, you are exposing
yourself to increased risk of injury in the event of an accident.
•Have the airbag system checked immediately by a Škoda Dealer
if a fault exists. Otherwise, there is a risk of the airbag not being
activated in the event of an accident.
•No modifications of any kind may be made to parts of the airbag
system.
•It is prohibited to manipulate individual parts of the airbag
system as this might result in the airbag being deployed.
Page 147 of 259
Airbag system
146
When are the airbags deployed?
The airbag system is designed in such a way that the driver and the front
passenger airbag are activated in the event of a frontal collision of major
severity.
In the case of a violent side crash , the side airbags on the side of the car
at which the collision occurs, are deployed together with the relevant head
airbag*.
In certain accident situations it is possible that both the front as well as the
side airbags and the relevant head airbag are deployed at the same time. The airbags
are not deployed in the case of minor frontal and side colli-
sions, in the case of rear-end collisions and vehicle rollover.
Deployment factors
It is not possible to state globally which deployment conditions apply to the
airbag system in every situation as the circumstances which exist in the
case of accidents vary greatly. An important role in this case, for example,
is played by factors such as the type of object against which the vehicle
impacts (hard, soft), the angle of impact, the vehicle speed etc.
A decisive factor for the deployment of the airbags is the deceleration
which occurs during a collision. The control unit analyses the nature of the
collision and activates the relevant restraint system. If the vehicle decel-
eration which occurs and is measured during the collision remains below
the prescribed reference values specified in the control unit, the airbags
are not deployed although the vehicle may well suffer severe damage to
the bodywork as a consequence of the accident.
The airbags are not deployed if:
•ignition off
•a minor frontal collision
•a minor side collision
•a rear-end collision
•rollover
Note
•A fine dust is produced when airbag inflated. This is perfectly normal
and is not an indication of a fire in the vehicle.
•The dash panel must be replaced after the front passenger airbag has
been deployed.
WARNING (continued)
•The protective function of the airbag system is sufficient for
only one accident. The airbag system must then be replaced if the
airbag has been deployed.
•The airbag system needs no maintenance during its working
life.
•The service life of the airbag system is 15 years from the date of
manufacture of the vehicle. Have the airbag system replaced by a
Škoda Dealer after this period.
•If you sell your car, please hand over the complete vehicle
documentation to the new owener. Please note that the documents
relating to the possibility of deactivating the front passenger
airbag are also part of the vehicle documents!
•If the vehicle or individual parts of the airbag system are
scrapped, it is essential to observe the relevant safety precautions.
Škoda dealers are familiar with these regulations.
•When disposing of vehicle or parts of the airbag system, it is
important to comply with th e national legal requirements.