ignition SKODA SUPERB 2003 1.G / (B5/3U) Manual PDF
[x] Cancel search | Manufacturer: SKODA, Model Year: 2003, Model line: SUPERB, Model: SKODA SUPERB 2003 1.G / (B5/3U)Pages: 259
Page 214 of 259
Inspecting and Replenishing213
Using the systemSafetyDriving TipsGeneral MaintenanceBreakdown assistanceTechnical Data
Caution
•You must only disconnect the battery if the ignition is switched on,
otherwise the electrical system (electronic components) of the vehicle
may be damaged. When disconnecting the battery from the electrical
system of the vehicle, first disconnect the negative terminal (-) of the
battery. Then disconnect the positive terminal (+).
•When reconnecting the battery, first connect the positive terminal (+)
and only then the negative terminal (-) of the battery. You must on no
account connect the cables wrongly - risk of a cable fire.
•Ensure that battery acid does not come into contact with the vehicle
body otherwise damage could occur to the paintwork.
•Do not place the battery in direct daylight in order to protect the battery
housing from the effects of ultra-violet light.
For the sake of the environment
A removed battery is a special type of waste which is harmful to the envi-
ronment - contact your Škoda dealer regarding disposing of the battery.
Note
Please also refer to the guidelines ⇒page 216, also after connecting the
battery.
Battery with a charge level indicator, the so-called
magic eye
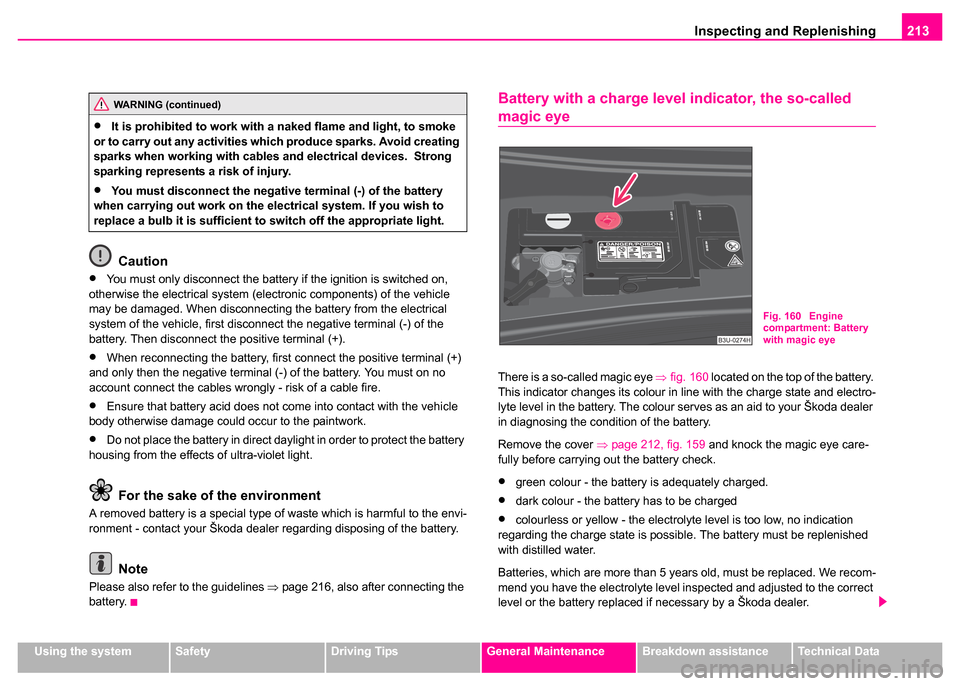
There is a so-called magic eye ⇒fig. 160 located on the top of the battery.
This indicator changes its colour in line with the charge state and electro-
lyte level in the battery. The colour serves as an aid to your Škoda dealer
in diagnosing the condition of the battery.
Remove the cover ⇒page 212, fig. 159 and knock the magic eye care-
fully before carrying out the battery check.
•green colour - the battery is adequately charged.
•dark colour - the battery has to be charged
•colourless or yellow - the electrolyte level is too low, no indication
regarding the charge state is possible. The battery must be replenished
with distilled water.
Batteries, which are more than 5 years old, must be replaced. We recom-
mend you have the electrolyte level inspected and adjusted to the correct
level or the battery replaced if necessary by a Škoda dealer.
WARNING (continued)
•It is prohibited to work with a naked flame and light, to smoke
or to carry out any activities which produce sparks. Avoid creating
sparks when working with cables and electrical devices. Strong
sparking represents a risk of injury.
•You must disconnect the negative terminal (-) of the battery
when carrying out work on the electrical system. If you wish to
replace a bulb it is sufficient to switch off the appropriate light.
Fig. 160 Engine
compartment: Battery
with magic eye
Page 215 of 259
Inspecting and Replenishing
214
Caution
If the vehicle has not been driven for more than 4 weeks, the battery will
discharge gradually as a result from electrical components such as the
control units which were not switched off. You can prevent the discharging
of the battery by disconnecting the negative terminal or charging the
battery constantly with a very low charging current. Please also refer to
the notes when working on the battery ⇒page 212, “Working on the
battery”.
Inspecting the electrolyte level
The battery is practically maintenance-free under normal operating
conditions. We do, however, recommend that you have the electrolyte
level inspected from time to time by a Škoda dealer when outside temper-
atures are high or when driving on long trips. You should also check the
electrolyte level ⇒page 214 each time the battery is charged.
The battery acid level will also be checked as part of the Inspection
Service.
Caution
Do not expose the battery to direct sunlight for lengthy periods in order to
protect it from UV rays.
Operation in winter
The battery has to provide greater amounts of electricity during the winter.
It also has only part of the initial power output at low temperatures that it
has at normal temperatures. A discharged battery may already freeze at temperatures just below
0°C.
We therefore recommend that you have the battery checked by a Škoda
dealer before the start of the winter, and recharged if necessary.
Note
If the vehicle is not going to be driven for a period of some weeks when
there is very severe frost one should remove
⇒page 215 the battery and
store it in a place which is protected from frost. This prevents the battery
from freezing up and thereby being destroyed.
Charging the battery
A properly charged battery is essential for reliably starting
the engine.
– Read the warning notes ⇒ in “Working on the battery” on
page 212 and ⇒.
– Switch the ignition and all electrical components off.
– Only for “quick-charging”: disconnect both battery cables (first of all “negative”, then “positive”) .
– Carefully attach the terminal clamps of the charger to the battery terminals (red = “positive”, black = “negative”).
– You can now plug the mains cable of the charger into the power socket and switch on the charger.
– When charging is completed: switch the charger off and unplug the mains cable from the power socket.
Page 217 of 259
Inspecting and Replenishing
216
Removing and installing the battery
– Please also refer to the notes when working on the battery ⇒page 212.
– Switched off all electrical components and remove the ignition key.
– Pull off gasket and take out the cover of the plenum chamber in the direction of the arrow ⇒fig. 161 .
– Unclamp the battery negative terminal (-).
– Unclamp the battery positive terminal (+).
– Unscrew the screw ⇒fig. 162 completely and remove the
locking plate.
– Move the battery in the direction of the arrow and pull it out in an upward direction.
– Installation takes place in the reverse order.
Please also refer to the following notes when connecting up the battery
⇒ page 216.
Note
We do not recommend that you remove and install the battery yourself
(even when you are following the instructions given in this manual) since
a battery can be heavily damaged in the process under certain circum-
stances. Please contact your Škoda dealer.
Disconnecting and reconnecting the battery
On disconnecting and reconnecting the battery the following functions are
initially deactivated or are no longer able to operate fault-free.
We recommend having the vehicle checked by a Škoda dealer to ensure
full functionality of all electrical systems.
Replacing the battery
You should only replace a battery with a new battery of the same capacity,
voltage (12 V), amperage and of the same size. Škoda dealers have a
range of suitable batteries available.
We recommend that you only have an old battery disposed of by your
Skoda dealer since it does require special disposal.
For the sake of the environment
Batteries contain poisonous substances such as sulphuric acid and lead.
They must be disposed of in accordance with local environmental protec-
tion regulations and on no account as domestic waste.
AA
AB
AC
OperationOperating measure
Power windows⇒page 52
Enter radio code numbersee Radio Operating Instruc-
tions
Setting clock⇒page 15
Data in the multi-functional indicator are
deleted.⇒page 18
Page 218 of 259
Inspecting and Replenishing217
Using the systemSafetyDriving TipsGeneral MaintenanceBreakdown assistanceTechnical Data
Windscreen Wiper and Washer System
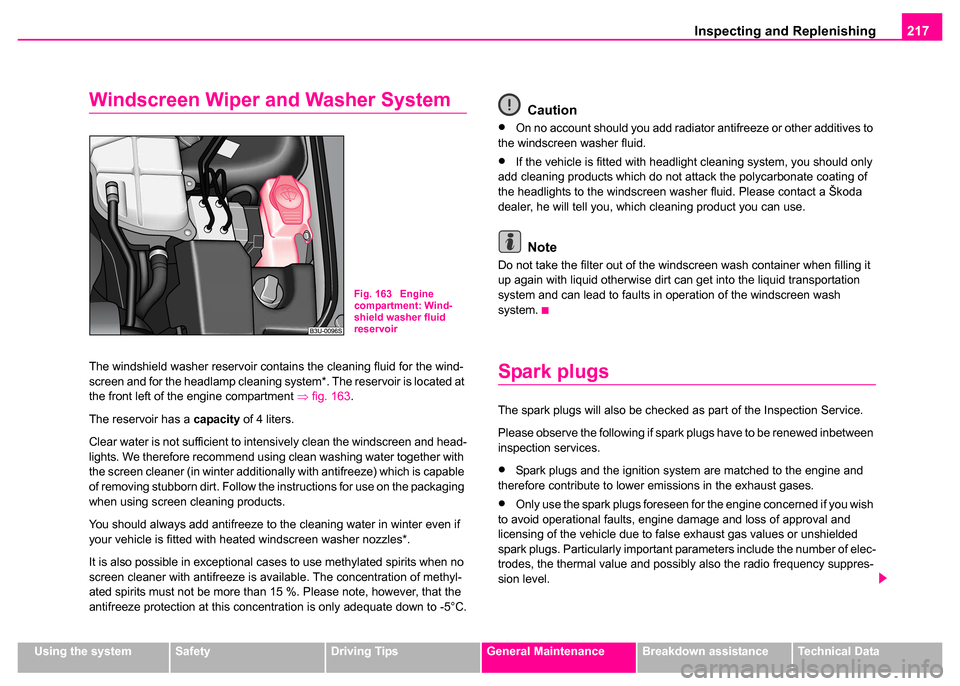
The windshield washer reservoir contains the cleaning fluid for the wind-
screen and for the headlamp cleaning system*. The reservoir is located at
the front left of the engine compartment ⇒fig. 163 .
The reservoir has a capacity of 4 liters.
Clear water is not sufficient to intensively clean the windscreen and head-
lights. We therefore recommend using clean washing water together with
the screen cleaner (in winter additionally with antifreeze) which is capable
of removing stubborn dirt. Follow the instructions for use on the packaging
when using screen cleaning products.
You should always add antifreeze to the cleaning water in winter even if
your vehicle is fitted with heated windscreen washer nozzles*.
It is also possible in exceptional cases to use methylated spirits when no
screen cleaner with antifreeze is available. The concentration of methyl-
ated spirits must not be more than 15 %. Please note, however, that the
antifreeze protection at this concentration is only adequate down to -5°C.
Caution
•On no account should you add radiator antifreeze or other additives to
the windscreen washer fluid.
•If the vehicle is fitted with headlight cleaning system, you should only
add cleaning products which do not attack the polycarbonate coating of
the headlights to the windscreen washer fluid. Please contact a Škoda
dealer, he will tell you, which cleaning product you can use.
Note
Do not take the filter out of the windscreen wash container when filling it
up again with liquid otherwise dirt can get into the liquid transportation
system and can lead to faults in operation of the windscreen wash
system.
Spark plugs
The spark plugs will also be checked as part of the Inspection Service.
Please observe the following if spark plugs have to be renewed inbetween
inspection services.
•Spark plugs and the ignition system are matched to the engine and
therefore contribute to lower emissions in the exhaust gases.
•Only use the spark plugs foreseen for the engine concerned if you wish
to avoid operational faults, engine damage and loss of approval and
licensing of the vehicle due to false exhaust gas values or unshielded
spark plugs. Particularly important parameters include the number of elec-
trodes, the thermal value and possibly also the radio frequency suppres-
sion level.
Fig. 163 Engine
compartment: Wind-
shield washer fluid
reservoir
Page 238 of 259

Breakdown assistance237
Using the systemSafetyDriving TipsGeneral MaintenanceBreakdown assistanceTechnical Data
Starting engine
It is important to connect the jump-start cables in the correct
order.
Connecting positive terminals
– Attach one end to the positive terminal ⇒fig. 180 of the
discharged battery .
– Attach the other end to the positive terminal of the battery supplying the power .
Connecting negative terminal and engine block
– Attach one end to the negative terminal of the battery supplying the power .
– Attach the other end to a solid metal part which is connected firmly to the engine block, or to the engine block
itself. Starting engine
– Start the engine of the vehicle providing current and run the
engine at idling speed.
– Now start the engine of the vehicle with the discharged battery.
– Interrupt the attempt at starting an engine after 10 seconds if it does not start right away and wait for about 30 seconds
before repeating the attempt.
– Disconnect the cables on the engine in exactly the reverse
order they were connected up.
Fig. 180 Jump-starting
using the battery from
another vehicle: A - flat
vehicle battery, B -
battery providing
current
A1
AA
A2
AB
A3
AB
A4
WARNING
•The non-insulated parts of the terminal clamps must never
make contact with each other. Furthermore, the cable connected to
the positive terminal of the battery must not come into contact with
electrically conducting parts of the vehicle - risk of a short circuit!
•Do not affix the jump starting cables to the negative terminal of
the discharged battery. There is the risk of detonating gas seeping
out the battery being ignited by the strong spark which results
from the engine being started.
•Run the jump-start cables so that they cannot be caught by any
rotating parts in the engine compartment.
•Do not bend over the batteries - risk of caustic burns!
•The vent screws of the battery cells must be tightened firmly.
•Keep any sources of ignition (naked flame, smouldering ciga-
rettes etc.) away from the battery - risk of an explosion!
Page 239 of 259

Breakdown assistance
238
Tow-starting and towing vehicle
General
Please pay attention to the following instructions if you are going
to use a tow rope:
Driver of the towing vehicle
– Do not drive off until the tow rope is taught.
– Release the clutch particularly gently when starting off or depress the accelerator particularly gently if your vehicle is
fitted with an automatic gearbox.
Driver of th e towed vehicle
– Switch the ignition on so that the steering wheel is not blocked and you can also operate the turn signal lights, the headlight
flasher, the windscreen wipers and windscreen washer
system.
– Take the vehicle out of gear or move the selector lever into position N if your vehicle is fitted with an automatic gearbox.
– Note that the brake servo unit and power steering only operate if the engine is running. You will require significantly greater
physical force to depress the brake pedal and to steer the
vehicle if the engine is not running.
– Ensure that the tow rope is always kept taught.
Tow rope or tow bar
A tow bar is safest way of towing a vehicle and also minimizes any
shocks. You can use a tow rope only if a suitable tow bar is not available.
The tow rope must be elastic to protect the vehicle. Thus one should only
use plastic fibre rope or a rope made out of a similarly elastic material.
Attach the tow rope or the tow bar only to the towing eyes provided for
this purpose ⇒ page 239, “Towing eye” and ⇒page 239, “Rear towing
eye”.
Driving style
Towing another vehicle requires a certain amount of practice. Both drivers
should be familiar with the particular points about towing a vehicle.
Unskilled drivers should not attempt to tow-start or tow in another vehicle.
One should be constantly vigilant not to allow impermissibly high towing
forces or jerky loadings. There is always a risk of excessive stresses and
damage resulting at the points to which you attach the tow rope or tow bar
when you attempt to tow a vehicle which is not standing on a paved road.
Caution
If the gearbox of your vehicle no longer contains any oil because of a
defect, your vehicle must only be towed in with the driven wheels raised
clear of the ground, or on a special vehicle transporter or trailer.
Note
Please comply with any legal requirements particularly regarding the
switched on signal systems, when towing in or tow-starting another
vehicle.
Page 240 of 259

Breakdown assistance239
Using the systemSafetyDriving TipsGeneral MaintenanceBreakdown assistanceTechnical Data
Towing eye
The front towing eye is welded on behind the bumper on the right.
– Carefully pull the protective grille ⇒fig. 181 off in the right-
hand area of the bumper.
Rear towing eye
The rear towing eye is welded on below the rear bumper on the right.
Tow-starting a vehicle
If the engine does not start, we generally do not recommend to
tow-start your vehicle. One should attempt to start the engine using jump start cables
⇒page 236 or call on the services of the
SERVICE mobile.
If your vehicle has to be towed:
– Engage 2nd or 3rd gear with the vehicle stationary.
– Depress the clutch pedal fully and keep it depressed.
– Switch on the ignition.
– Wait until both vehicles are moving then release the clutch pedal slowly.
– Depress the clutch pedal fully when the engine fires and take the vehicle out of gear.
For technical reasons it is not possible to tow-start a car fitted with an
automatic gearbox .
Caution
Vehicles which are fitted with a catalytic converter should not be tow-
started over a distance of more than 50 metres. Unburnt fuel may get into
the catalytic converter and damage it.
Fig. 181 Front
bumper: Protective
grille for the towing eye
WARNING
There is high risk of having an accident when tow-starting a
vehicle, when for example the towed vehicle runs into the towing
vehicle.
Page 242 of 259
Fuses and light bulbs241
Using the systemSafetyDriving TipsGeneral MaintenanceBreakdown assistanceTechnical Data
Fuses and light bulbs
Electric fuses
Replacing fuses
Defect fuses must be replaced.
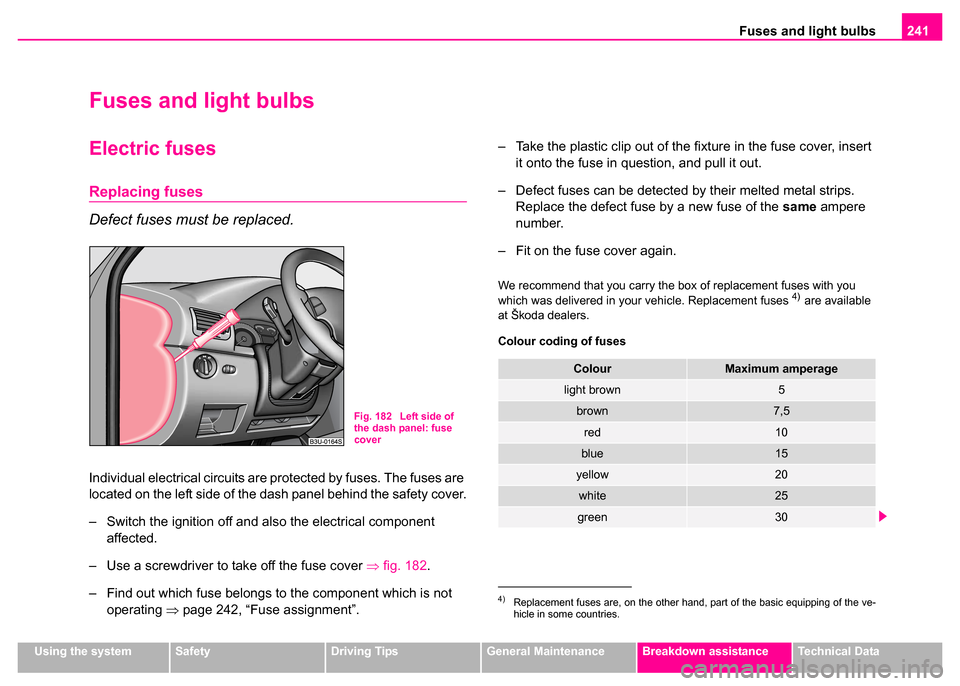
Individual electrical circuits are protected by fuses. The fuses are
located on the left side of the dash panel behind the safety cover.
– Switch the ignition off and also the electrical component
affected.
– Use a screwdriver to take off the fuse cover ⇒fig. 182.
– Find out which fuse belongs to the component which is not operating ⇒page 242, “Fuse assignment”. – Take the plastic clip out of the fixture in the fuse cover, insert
it onto the fuse in question, and pull it out.
– Defect fuses can be detected by their melted metal strips. Replace the defect fuse by a new fuse of the same ampere
number.
– Fit on the fuse cover again.
We recommend that you carry the box of replacement fuses with you
which was delivered in your vehicle. Replacement fuses 4) are available
at Škoda dealers.
Colour coding of fuses
Fig. 182 Left side of
the dash panel: fuse
cover
4)Replacement fuses are, on the other hand, part of the basic equipping of the ve-
hicle in some countries.
ColourMaximum amperage
light brown5
brown7,5
red10
blue15
yellow20
white25
green30
Page 254 of 259
Index253
Fuel . . . . . . . . . . . . . . . . . . . . . . . . . . . . . . . 198
Diesel . . . . . . . . . . . . . . . . . . . . . . . . . . . 198
Fuel gauge . . . . . . . . . . . . . . . . . . . . . . . . 15
Petrol . . . . . . . . . . . . . . . . . . . . . . . . . . . 198
saving . . . . . . . . . . . . . . . . . . . . . . . . . . . 179
Fuel consumption . . . . . . . . . . . . . . . . . . . . . 21
Fuel gauge . . . . . . . . . . . . . . . . . . . . . . . . . . 15
Fuel reserve Warning light . . . . . . . . . . . . . . . . . . . . . . 32
Fuse . . . . . . . . . . . . . . . . . . . . . . . . . . . . . . 241 Assignment . . . . . . . . . . . . . . . . . . . . . . 242
G
Glow plug system . . . . . . . . . . . . . . . . . . . . 116Warning light . . . . . . . . . . . . . . . . . . . . . . 31
H
Handbrake . . . . . . . . . . . . . . . . . . . . . . . . . . 118
Hazard warning light system . . . . . . . . . . . . . 58Warning light . . . . . . . . . . . . . . . . . . . . . . 29
Head restraint . . . . . . . . . . . . . . . . . . . . . . . . 74
Headlight flasher . . . . . . . . . . . . . . . . . . . . . . 59
Headlights Fog lights . . . . . . . . . . . . . . . . . . . . . . . . . 57
Headlight cleaning system . . . . . . . . . . . . 65
Heated windscreen washer nozzles . . . . . . . 64
Heating . . . . . . . . . . . . . . . . . . . . . . . . . . . . 102
Heating of the external mirror . . . . . . . . . . . . 67
Horn . . . . . . . . . . . . . . . . . . . . . . . . . . . . . . . . 11
I
Ignition lock . . . . . . . . . . . . . . . . . . . . . . . . . 114
Information display . . . . . . . . . . . . . . . . . . . . . 22
Instrument cluster . . . . . . . . . . . . . . . . . . . . . 13
Instrument lighting . . . . . . . . . . . . . . . . . . . . . 57
Instruments . . . . . . . . . . . . . . . . . . . . . . . . . . 13
Interior lighting at the front . . . . . . . . . . . . . . . . . . . . . . . . 60
at the rear . . . . . . . . . . . . . . . . . . . . . . . . . 61
Luggage compartment . . . . . . . . . . . . . . . 62
Interior monitoring . . . . . . . . . . . . . . . . . . . . . 49
Intermittent wipe . . . . . . . . . . . . . . . . . . . . . . 64
Isofix . . . . . . . . . . . . . . . . . . . . . . . . . . . . . . 166
ISOFIX system . . . . . . . . . . . . . . . . . . . . . . . 166
J
Jacking points . . . . . . . . . . . . . . . . . . . . . . . 233
Jump-starting . . . . . . . . . . . . . . . . . . . . 236, 237
K
Keeping windows demisted The air conditioning system . . . . . . . . . . 104
Keys . . . . . . . . . . . . . . . . . . . . . . . . . . . . . . . . 37
L
Leather care . . . . . . . . . . . . . . . . . . . . . . . . . 195
Lighting of the interior of the vehicle . . . . . . . 60 Lights
switching them on and off . . . . . . . . . . . . . 56
Lights and Visibility . . . . . . . . . . . . . . . . . . . . 58
Locking . . . . . . . . . . . . . . . . . . . . . . . . . . . . . . 39 Central locking system . . . . . . . . . . . . . . . 41
Remote control . . . . . . . . . . . . . . . . . . . . . 46
Locking and unlocking from inside . . . . . . . . . 42
Low beam . . . . . . . . . . . . . . . . . . . . . . . . . . . 56 Warning light . . . . . . . . . . . . . . . . . . . . . . . 30
Luggage compartment . . . . . . . . . . . . . . . . . . 78 CD-ROM player . . . . . . . . . . . . . . . . . . . . 80
Folding double hooks . . . . . . . . . . . . . . . . 80
Lashing eyes . . . . . . . . . . . . . . . . . . . . . . 79
Luggage compartment opening . . . . . . . . 81
Luggage compartment door Lighting . . . . . . . . . . . . . . . . . . . . . . . . . . . 62
Lumbar support . . . . . . . . . . . . . . . . . . . . . . . 70
M
Main beam . . . . . . . . . . . . . . . . . . . . . . . . 56, 59 Warning light . . . . . . . . . . . . . . . . . . . . . . . 29
Manual gearbox . . . . . . . . . . . . . . . . . . . . . . 118
Memory for the on-board computer . . . . . . . . 19
Mirror Storing and retrieving settings . . . . . . . . . 72
Mobile phone . . . . . . . . . . . . . . . . . . . . 132, 135
Motoring abroad . . . . . . . . . . . . . . . . . . . . . . 178 Headlights . . . . . . . . . . . . . . . . . . . . . . . . 178