heater SKODA SUPERB 2003 1.G / (B5/3U) Owner's Manual
[x] Cancel search | Manufacturer: SKODA, Model Year: 2003, Model line: SUPERB, Model: SKODA SUPERB 2003 1.G / (B5/3U)Pages: 259
Page 4 of 259
Contents3
Contents
Layout of this Owner's
Manual
. . . . . . . . . . . . . . . . . . . . . . . . . . . . .
Using the system . . . . . . . . . . . . . . .
Cockpit . . . . . . . . . . . . . . . . . . . . . . . . . . . . . . .
An overview . . . . . . . . . . . . . . . . . . . . . . . . . .
Instruments and Indicator/Warning LightsGeneral view of the instrument cluster . . . . . .
Engine revolutions counter . . . . . . . . . . . . . . .
Coolant temperature gauge . . . . . . . . . . . . . .
Fuel gauge . . . . . . . . . . . . . . . . . . . . . . . . . . .
Digital clock . . . . . . . . . . . . . . . . . . . . . . . . . .
Speedometer with counter for distance driven
Service Interval Display . . . . . . . . . . . . . . . . .
Multi-functional indicator* . . . . . . . . . . . . . . . .
Information display* . . . . . . . . . . . . . . . . . . . .
Auto Check Control . . . . . . . . . . . . . . . . . . . .
Warning lights . . . . . . . . . . . . . . . . . . . . . . . . .
Unlocking and locking . . . . . . . . . . . . . . . . . .
Keys . . . . . . . . . . . . . . . . . . . . . . . . . . . . . . . .
Central locking system . . . . . . . . . . . . . . . . . .
Child safety locks . . . . . . . . . . . . . . . . . . . . . .
Remote control . . . . . . . . . . . . . . . . . . . . . . . .
Anti-theft alarm system . . . . . . . . . . . . . . . . . .
Power windows . . . . . . . . . . . . . . . . . . . . . . .
Electric sliding/tilting roof* . . . . . . . . . . . . . . .
Lights and Visibility. . . . . . . . . . . . . . . . . . . . .
Lights . . . . . . . . . . . . . . . . . . . . . . . . . . . . . . .
Interior lighting . . . . . . . . . . . . . . . . . . . . . . . .
Visibility . . . . . . . . . . . . . . . . . . . . . . . . . . . . . The windscreen wiper and washing system .
Rear-view mirror . . . . . . . . . . . . . . . . . . . . . .
Seats and Stowage . . . . . . . . . . . . . . . . . . . .
Front seats . . . . . . . . . . . . . . . . . . . . . . . . . . .
Adjusting front seats manually . . . . . . . . . . . .
Adjusting front seats electrically* . . . . . . . . . .
Front passenger seat with a folding central back
rest* . . . . . . . . . . . . . . . . . . . . . . . . . . . . . . . .
Footrest at the rear* . . . . . . . . . . . . . . . . . . . .
Seat heaters* . . . . . . . . . . . . . . . . . . . . . . . . .
Pedals . . . . . . . . . . . . . . . . . . . . . . . . . . . . . .
Luggage compartment . . . . . . . . . . . . . . . . . .
The cool box in the armrest of rear seats* . . .
CargoFlex folding box* . . . . . . . . . . . . . . . . . .
The roof luggage rack system . . . . . . . . . . . .
Drinks can holder . . . . . . . . . . . . . . . . . . . . . .
Ashtray . . . . . . . . . . . . . . . . . . . . . . . . . . . . . .
Cigarette lighters and power sockets . . . . . . .
Storage facilities . . . . . . . . . . . . . . . . . . . . . . .
Heating and air conditioning system . . . . .
The air conditioning system . . . . . . . . . . . . . .
Climatronic* (automatic air conditioning) . . . .
Starting-off and Driving. . . . . . . . . . . . . . . . .
Setting steering wheel position . . . . . . . . . . .
Ignition lock . . . . . . . . . . . . . . . . . . . . . . . . . .
Starting engine . . . . . . . . . . . . . . . . . . . . . . . .
Switching the engine off . . . . . . . . . . . . . . . . .
Shifting gears . . . . . . . . . . . . . . . . . . . . . . . . .
Handbrake . . . . . . . . . . . . . . . . . . . . . . . . . . .
Parking aid* . . . . . . . . . . . . . . . . . . . . . . . . . .
Cruise control system (CCS)* . . . . . . . . . . . .
Automatic gearbox*. . . . . . . . . . . . . . . . . . . .
5-speed automatic gearbox . . . . . . . . . . . . . .
Communicating and Navigating . . . . . . . . .
Multifunction steering wheel* . . . . . . . . . . . . .
Mobile phone, two-way radio system and
navigation system . . . . . . . . . . . . . . . . . . . . .
Safety. . . . . . . . . . . . . . . . . . . . . . . . . . . . . .
Passive Safety . . . . . . . . . . . . . . . . . . . . . . . .
Driving the safe way . . . . . . . . . . . . . . . . . . .
Requirements for maximum safety . . . . . . . .
Seat belts. . . . . . . . . . . . . . . . . . . . . . . . . . . . .
Why seat belts? . . . . . . . . . . . . . . . . . . . . . . .
The physical principle of a frontal collision . .
Important safety information regarding the use
of seat belts . . . . . . . . . . . . . . . . . . . . . . . . . .
How are seat belts correctly fastened? . . . . .
Belt tensioners . . . . . . . . . . . . . . . . . . . . . . . .
Airbag system. . . . . . . . . . . . . . . . . . . . . . . . .
Description of the airbag system . . . . . . . . . .
Front airbags . . . . . . . . . . . . . . . . . . . . . . . . .
Side airbags . . . . . . . . . . . . . . . . . . . . . . . . . .
Head airbags* . . . . . . . . . . . . . . . . . . . . . . . .
Deactivating an airbag . . . . . . . . . . . . . . . . . .
Transporting children safely . . . . . . . . . . . .
What you should know about transporting
children! . . . . . . . . . . . . . . . . . . . . . . . . . . . . .
Child seat . . . . . . . . . . . . . . . . . . . . . . . . . . . .
Attaching child safety seat . . . . . . . . . . . . . . .
7
9
11
11
13
13
14
14
15
15
16
17
18
22
25
28
37
37
39
45
46
47
49
52
56
56
60
62 64
66
69
69
69
70
75
77
77
78
78
82
85
88
90
91
93
95
102
102
107 11 4
11 4
11 4
11 5
11 7
11 8
11 8
11 9
120
123
123 130
130
132
137
137
137
137
138
138
139
140
141
143
145
145
147
149
152
154
157
157
161
164
Page 12 of 259
Cockpit11
Using the systemSafetyDriving TipsGeneral MaintenanceBreakdown assistanceTechnical Data
Cockpit
An overview
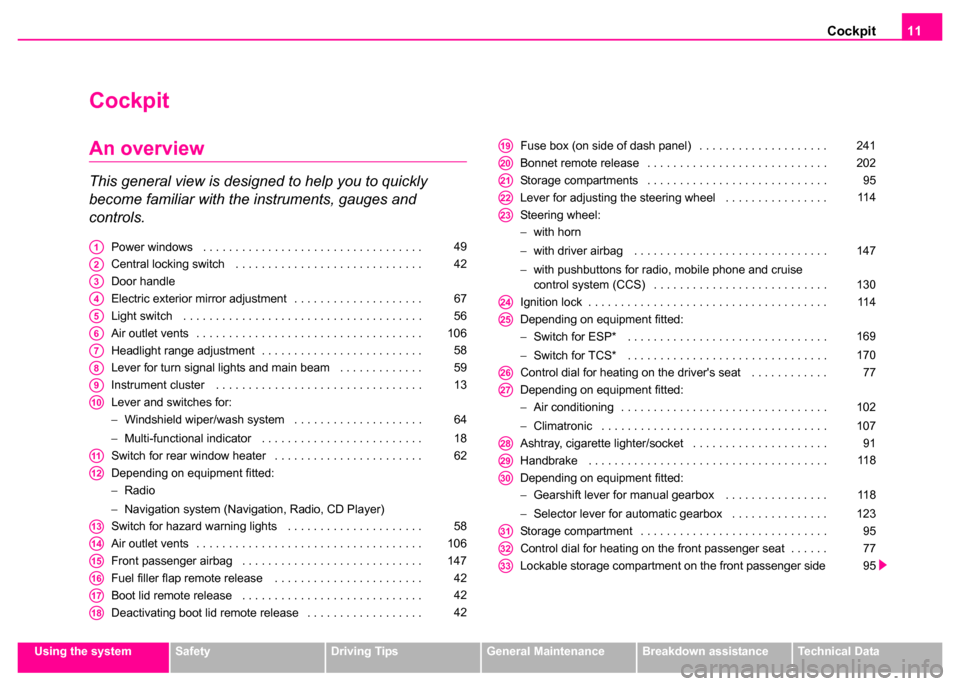
This general view is designed to help you to quickly
become familiar with the instruments, gauges and
controls.
Power windows . . . . . . . . . . . . . . . . . . . . . . . . . . . . . . . . . .
Central locking switch . . . . . . . . . . . . . . . . . . . . . . . . . . . . .
Door handle
Electric exterior mirror adjustment . . . . . . . . . . . . . . . . . . . .
Light switch . . . . . . . . . . . . . . . . . . . . . . . . . . . . . . . . . . . . .
Air outlet vents . . . . . . . . . . . . . . . . . . . . . . . . . . . . . . . . . . .
Headlight range adjustment . . . . . . . . . . . . . . . . . . . . . . . . .
Lever for turn signal lights and main beam . . . . . . . . . . . . .
Instrument cluster . . . . . . . . . . . . . . . . . . . . . . . . . . . . . . . .
Lever and switches for:
−Windshield wiper/wash system . . . . . . . . . . . . . . . . . . . .
− Multi-functional indicator . . . . . . . . . . . . . . . . . . . . . . . . .
Switch for rear window heater . . . . . . . . . . . . . . . . . . . . . . .
Depending on equipment fitted:
− Radio
− Navigation system (Navigation, Radio, CD Player)
Switch for hazard warning lights . . . . . . . . . . . . . . . . . . . . .
Air outlet vents . . . . . . . . . . . . . . . . . . . . . . . . . . . . . . . . . . .
Front passenger airbag . . . . . . . . . . . . . . . . . . . . . . . . . . . .
Fuel filler flap remote release . . . . . . . . . . . . . . . . . . . . . . .
Boot lid remote release . . . . . . . . . . . . . . . . . . . . . . . . . . . .
Deactivating boot lid remote release . . . . . . . . . . . . . . . . . . Fuse box (on side of dash panel) . . . . . . . . . . . . . . . . . . . .
Bonnet remote release . . . . . . . . . . . . . . . . . . . . . . . . . . . .
Storage compartments . . . . . . . . . . . . . . . . . . . . . . . . . . . .
Lever for adjusting the steering wheel . . . . . . . . . . . . . . . .
Steering wheel:
−
with horn
− with driver airbag . . . . . . . . . . . . . . . . . . . . . . . . . . . . . .
− with pushbuttons for radio, mobile phone and cruise
control system (CCS) . . . . . . . . . . . . . . . . . . . . . . . . . . .
Ignition lock . . . . . . . . . . . . . . . . . . . . . . . . . . . . . . . . . . . . .
Depending on equipment fitted:
− Switch for ESP* . . . . . . . . . . . . . . . . . . . . . . . . . . . . . . .
− Switch for TCS* . . . . . . . . . . . . . . . . . . . . . . . . . . . . . . .
Control dial for heating on the driver's seat . . . . . . . . . . . .
Depending on equipment fitted:
− Air conditioning . . . . . . . . . . . . . . . . . . . . . . . . . . . . . . . .
− Climatronic . . . . . . . . . . . . . . . . . . . . . . . . . . . . . . . . . . .
Ashtray, cigarette lighter/socket . . . . . . . . . . . . . . . . . . . . .
Handbrake . . . . . . . . . . . . . . . . . . . . . . . . . . . . . . . . . . . . .
Depending on equipment fitted:
− Gearshift lever for manual gearbox . . . . . . . . . . . . . . . .
− Selector lever for automatic gearbox . . . . . . . . . . . . . . .
Storage compartment . . . . . . . . . . . . . . . . . . . . . . . . . . . . .
Control dial for heating on the front passenger seat . . . . . .
Lockable storage compartment on the front passenger sideA149
A242
A3
A467
A556
A6106
A758
A859
A913
A10
64
18
A1162
A12
A1358
A14106
A15147
A1642
A1742
A1842
A19241
A20202
A2195
A2211 4
A23
147
130
A2411 4
A25
169
170
A2677
A27
102
107
A2891
A2911 8
A30
11 8
123
A3195
A3277
A3395
Page 63 of 259
Lights and Visibility
62
The lights without interior monitoring sensors ⇒ page 61, fig. 42 are actu-
ated by pressing the glass on the symbol O or by switching to the
middle position .
The functions are the same as for the interior lighting at the front of the car
⇒ page 60.
Luggage compartment light
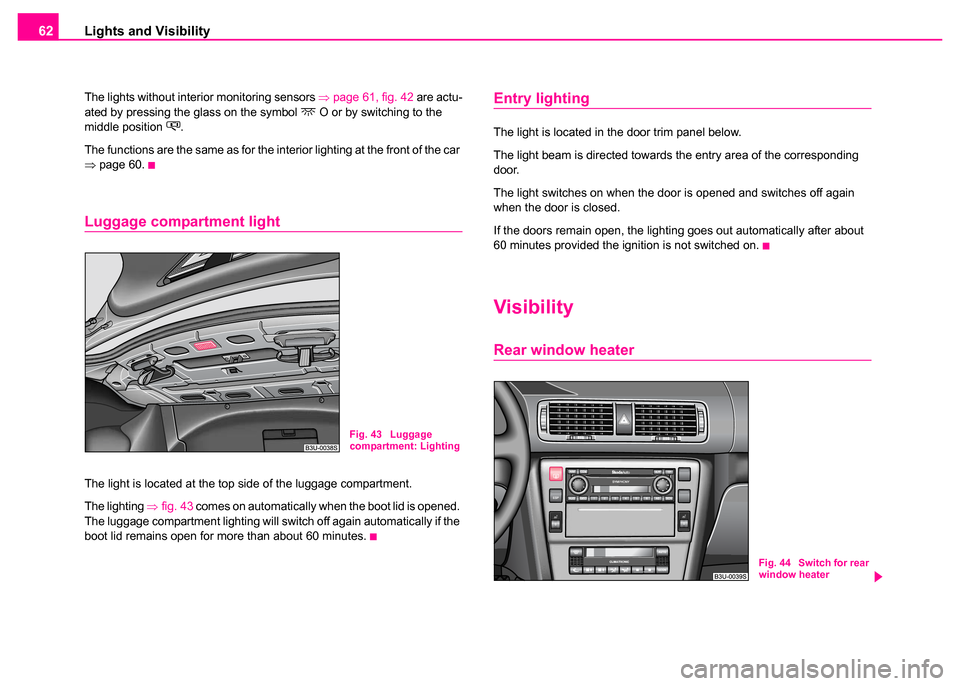
The light is located at the top side of the luggage compartment.
The lighting ⇒ fig. 43 comes on automatically when the boot lid is opened.
The luggage compartment lighting will switch off again automatically if the
boot lid remains open for more than about 60 minutes.
Entry lighting
The light is located in the door trim panel below.
The light beam is directed towards the entry area of the corresponding
door.
The light switches on when the door is opened and switches off again
when the door is closed.
If the doors remain open, the lighting goes out automatically after about
60 minutes provided the ignition is not switched on.
Visibility
Rear window heater
Fig. 43 Luggage
compartment: Lighting
Fig. 44 Switch for rear
window heater
Page 64 of 259
Lights and Visibility63
Using the systemSafetyDriving TipsGeneral MaintenanceBreakdown assistanceTechnical Data
– Press switch ⇒page 62, fig. 44 to switch on the rear window
heater.
The rear window heater operates only if the ignition is switched on. An
indicator light in the switch is illuminated when the rear window heater is
switched on.
The rear window heater switches off automatically after a few minutes.
For the sake of the environment
You should switch off the rear window heater as soon as the rear window
is clear. The reduced current consumption will have a favourable effect on
fuel economy ⇒page 183.
Sun visors
Using the sun visors can contribute to increasing road
safety.
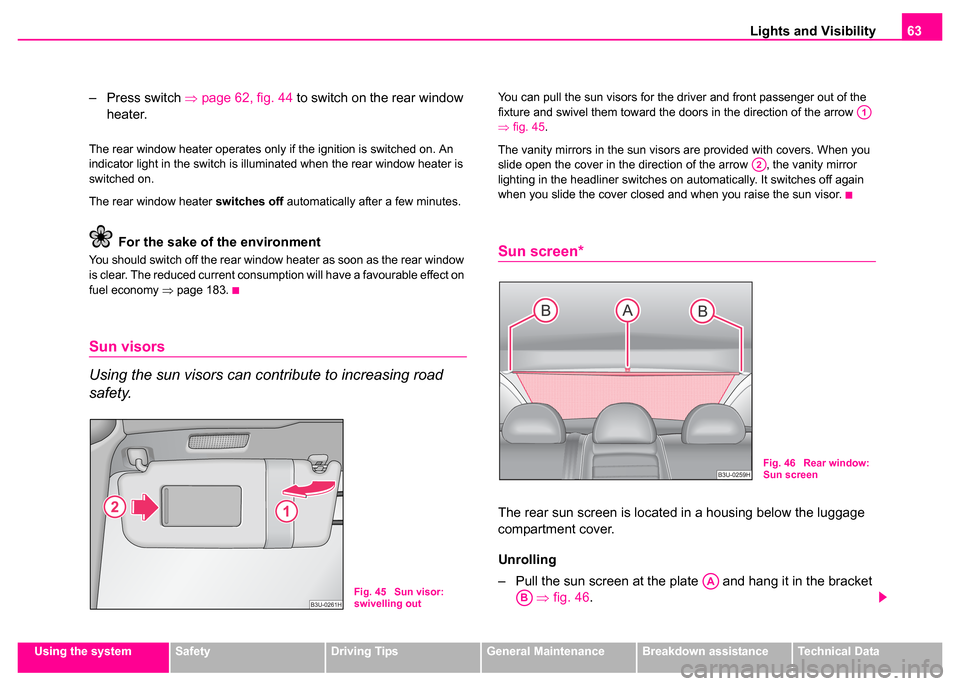
You can pull the sun visors for the driver and front passenger out of the
fixture and swivel them toward the doors in the direction of the arrow
⇒fig. 45 .
The vanity mirrors in the sun visors are provided with covers. When you
slide open the cover in the direction of the arrow , the vanity mirror
lighting in the headliner switches on automatically. It switches off again
when you slide the cover closed and when you raise the sun visor.
Sun screen*
The rear sun screen is located in a housing below the luggage
compartment cover.
Unrolling
– Pull the sun screen at the plate and hang it in the bracket ⇒ fig. 46 .
Fig. 45 Sun visor:
swivelling out
A1
A2
Fig. 46 Rear window:
Sun screen
AA
AB
Page 69 of 259
Lights and Visibility
68
Folding in both exterior mirrors*
– Turn the rotary knob to position
.
Tilting surface of front passenger exterior mirror*
When the rotary knob is in position
⇒ page 67, fig. 50 and the reverse
gear is engaged, the surface of the mirror tilts down slightly. This provides
an aid in seeing the kerb of the pavement when parking the car.
If you shift out of reverse gear, or switch over to the driver exterior mirror
in position
, the mirror surface on the passenger side moves back into the
original position.
Memory for exterior mirrors*
On vehicles fitted with a memory for the driver seat, the relevant setting of
the exterior mirror is also stored automatically when the seat position is
stored ⇒page 71.
Caution
If the mirror housing has been shifted out of position as a result of external
force (e.g. striking an object when parking), the mirror must then be folded
in fully with the electric motor. On no account attempt to move the mirror
housing back by hand otherwise proper operation of the mirror mecha-
nism will be affected. This applies only to models fitted with the fold-in
function for both exterior mirrors*.
Note
•Do not touch the surface of the exterior mirrors if the exterior mirror
heater is switched on.
•You can set the exterior mirrors by hand, if the power setting function
fails at any time, by pressing on the edge of the mirror surface.
•Contact your Škoda dealer if a fault exists with the power setting of the
exterior mirrors.
WARNING
Convex (curved outward) or aspherical exterior mirrors increase
the vision field. They do, however, make objects appear smaller in
the mirror. These mirrors are only of limited use, therefore, for esti-
mating distances to the following vehicles.
Page 78 of 259

Seats and Stowage77
Using the systemSafetyDriving TipsGeneral MaintenanceBreakdown assistanceTechnical Data
The protective sack has zip on the upper side to release air. It allows the
upper side to be opened out.
You can also use the protective sack as a luggage bag.
Footrest at the rear*
The passengers sitting in the rear of the car can use
⇒fig. 59 the
foot rest for increased comfort. The foot rest is attached to the
carpet by a velcro fastener.
Seat heaters*
You can heat the surfaces of the seats and of the backrests of the
front seats and the two outer rear seats.
Fig. 59 The floor
behind the front seat:
Footrest at the rear
Fig. 60 Dash panel:
Control dial for heating
the front seats
Fig. 61 Centre console
at rear: Rotary controls
for heaters of rear seats
Page 79 of 259
Seats and Stowage
78
Front seats
– You can switch on and adjust the heaters of the driver and front passenger seats by turning the rotary controls and
⇒page 77, fig. 60 , respectively.
Rear seats
– You can switch on and adjust the heaters of the left and right rear seats by turning the rotary controls and
⇒page 77, fig. 61 , respectively.
If the rotary controls are in the 0 position, the seat heater is switched off.
When the seat heater is switched on, the numerical marking of the rotary
control is illuminated. The control range extends from 1 to 5.
Caution
•You should not kneel on the seats and avoid applying pressure at
specific points in order to avoid damaging the heating elements of the seat
heaters.
•Do not clean the seats moist ⇒page 194.
Note
The seat heating should only be switched on when the engine is running.
This has a significant effect of saving on the battery capacity.
Pedals
You should use only footmats which do not obstruct the movement of the
pedals and have an anti-slip protection. Operation of the pedals must not be hindered!
Luggage compartment
Loading the luggage compartment
Please observe the following in the interest of having good
handling characteristics of your vehicle:
– Distribute the items of luggage as evenly as possible.
– Place heavy objects as far forward as possible.
– Attach the items of luggage with the safety net* or with
tensioning straps attached to the lashing eyes ⇒page 79.
A1A2
AAAB
WARNING
•Greater pedal distances may be needed when there is a fault in
the brake system.
•Do not place any footmats or other additional floor coverings in
the area of the pedals in order to ensure that all the pedals can be
fully depressed and are able to return unobstructed to their initial
position - risk of accident!
•There must be no objects on the floor which could roll under the
pedals. You would then no longer be able to apply the brakes,
operate the clutch or accelerator - risk of accident!
Page 82 of 259

Seats and Stowage81
Using the systemSafetyDriving TipsGeneral MaintenanceBreakdown assistanceTechnical Data
Caution
Please ensure that the heating elements of the rear window heater are not
damaged as a result of objects placed in this area.
Through-loading bag*
The through-loading bag enables you to conveniently
transport long objects (such as skis) without damaging the
interior of the car.
Loading
– Fold down the armrest of the rear seats to the front.
– Press the unlock button for the cover of the through-loading
bag in the interior of the car and swivel it down.
– Pull the bag out and unfold it.
– Open the boot lid/luggage compartment door.
– Press the unlock button for the cover of the through-loading bag ⇒fig. 65 and swivel it down.
– Push the objects into the through-loading bag from the boot ⇒ .
Securing
– Insert the belt ⇒fig. 66 into the middle seat belt buckle .
WARNING
No objects should be placed on the luggage compartment cover,
the vehicle occupants could be endangered if there is sudden
braking or the vehicle collides with something.
Fig. 65 Luggage
compartment: cover for
through-loading bag
Fig. 66 Attaching
through-loading bag to
middle seat belt buckle
of rear seats
AAAB
Page 193 of 259
Care and cleaning
192
Paint damage
Slight damage to paintwork such as scratches, scuffs or traces of chip
damage must be touched up immediately with paint (Skoda painting pen)
before any corrosion can result. You can of course have this work carried
out by a Škoda dealer.
Škoda dealers have a range of matching touch-up pens or spray cans
available for your vehicle.
The paint number of the original paintwork of your vehicle is indicated on
the vehicle data sticker ⇒page 249.
Any corrosion which has already have formed must be removed thor-
oughly. Apply a corrosion protection primer and then the paint to the
affected point. You can of course have this work carried out by a Škoda
dealer.
Plastic parts
External plastic parts are cleaned by normal washing. Plastic parts and
synthetic leather can also be treated with special solvent-free plastic
cleaning agents if a damp cloth is not sufficient. Paint care products are
not suitable for plastic parts.
Windows
Only use a plastic ice scraper for removing snow and ice from the
windows and mirrors. You should not move the ice scraper forward and
backward but in one direction on the window which you are cleaning in
order to avoid any damage to the surface of the glass. You can best remove residues of rubber, oil, grease, wax or silicone by
using a special window cleaner or a special silicone remover.
You should also clean the windows regularly from the inside.
Do not use window leathers which you have used to polish the vehicle
body to dry off the windows. Residues of preservatives in the window
leather can dirty the window and reduce visibility.
Do not affix any stickers over the inside of the rear window to avoid
damage to the
heating elements of the rear window heater .
We recommend using a preservative from the range of accessories
offered by your Skoda dealer.
The headlight lenses
Please do not use any aggressive cleaning or chemical solvent products
- risk of damage to the plastic lenses Please use soap and clean warm
water.
Caution
Never wipe the headlights dry and do not use any sharp objects for
cleaning the plastic lenses, this may result in damage to the protective
paintwork and consequently in formation of cracks on the headlight
lenses, e.g through effect of chemical products.
Door and window seals
The rubber seals on the doors, boot lid, bonnet, sliding roof and windows
remain supple and last longer if you treat them from time to time with a
rubber care product (e.g. silicone spray). You also avoid premature wear
Page 219 of 259
Inspecting and Replenishing
218
Spark plugs are constantly being further developed. It is therefore advis-
able to just obtain spark plugs from Skoda dealers since they are informed
about latest developments.
V-ribbed belts
The V-ribbed is one of the most highly loaded components on a vehicle.
This is why there are high demands on quality made on the V-ribbed belt.
It not sufficient when replacing the V-ribbed belt to choose just any one of
the same size. One should only use the V-ribbed belt foreseen for use
on that vehicle for safety reason.
V-ribbed belts are constantly being further developed. It is therefore advis-
able to just obtain them from Skoda dealers since they are informed about
latest developments.
The dust and pollen filter*
The dust and pollen filter for the heating and ventilation system is located
in the heater. The filter is replaced according to directions given in the
Service Plan. The filter should be replaced even earlier when the air flow
is reduced significantly.
Changing of the filter is undertaken by a Skoda dealer as part of the
inspection service.