ECU SKODA SUPERB 2004 1.G / (B5/3U) User Guide
[x] Cancel search | Manufacturer: SKODA, Model Year: 2004, Model line: SUPERB, Model: SKODA SUPERB 2004 1.G / (B5/3U)Pages: 270
Page 88 of 270
Seats and Stowage87
Using the systemSafetyDriving TipsGeneral MaintenanceBreakdown assistanceTechnical Data
CargoFlex folding box*
Lowering and securing folding box
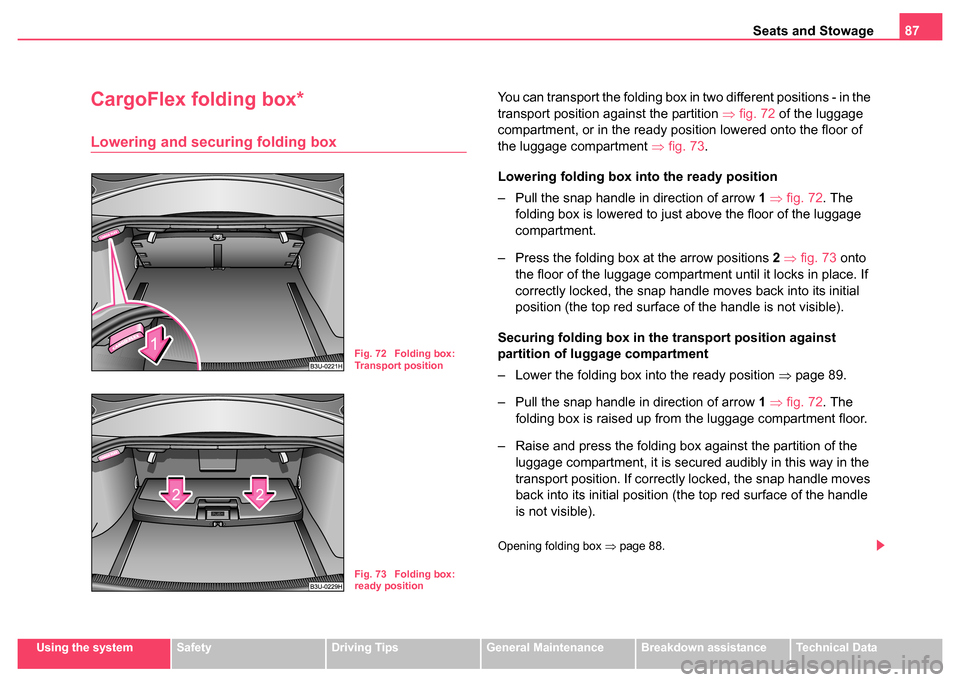
You can transport the folding box in two different positions - in the
transport position against the partition ⇒fig. 72 of the luggage
compartment, or in the ready position lowered onto the floor of
the luggage compartment ⇒ fig. 73.
Lowering folding box in to the ready position
– Pull the snap handle in direction of arrow 1 ⇒ fig. 72 . The
folding box is lowered to just above the floor of the luggage
compartment.
– Press the folding box at the arrow positions 2 ⇒ fig. 73 onto
the floor of the luggage compartment until it locks in place. If
correctly locked, the snap handle moves back into its initial
position (the top red surface of the handle is not visible).
Securing folding box in the transport position against
partition of luggage compartment
– Lower the folding box into the ready position ⇒page 89.
– Pull the snap handle in direction of arrow 1 ⇒ fig. 72 . The
folding box is raised up from the luggage compartment floor.
– Raise and press the folding box against the partition of the luggage compartment, it is secured audibly in this way in the
transport position. If correctly locked, the snap handle moves
back into its initial position (the top red surface of the handle
is not visible).
Opening folding box ⇒page 88.
Fig. 72 Folding box:
Transport position
Fig. 73 Folding box:
ready position
Page 89 of 270

Seats and Stowage
88
Caution
The parts of the folding box can be damaged if handled roughly or in an
unprofessional way.
Opening folding box
You can transport the opened folding box in the secured end or
middle position against the partition of the luggage compartment.
Opening folding box
– Lower the folding box into the ready position ⇒page 87.
– Press the button marked “PUSH” ⇒fig. 74 .
– Grasp the folding box at the handle and push it in direction of arrow 1 against the partition of the luggage compartment
into the secured position. The lock below the button must be
heard to engage. If correctly locked, the button marked
“PUSH” moves back into its initial position.
– Raise the lid in direction of arrow 2 ⇒ fig. 75 .
Fig. 74 Luggage
compartment: folding
box
Fig. 75 Opening
folding box
AB
AA
AB
Page 90 of 270

Seats and Stowage89
Using the systemSafetyDriving TipsGeneral MaintenanceBreakdown assistanceTechnical Data
– Press on the bottom part of the handle and open the
compartments in the direction of arrow 3. The compartment
wall must be heard to engage in the slot in the bottom part of
the box.
Moving folding box into secured middle position
– Press on the button marked “PUSH” ⇒page 88, fig. 75
and carefully push the folding box into the secured middle
position. If correctly locked, the button marked “PUSH” is
moved back into its initial position. You can now use the space
which has become available for stowing further items of
luggage.
Caution
•The parts of the folding box can be damaged if handled roughly or in
an unprofessional way.
•The maximum weight of goods to be loaded should not exceed 25
kg.
Lowering folding box
– Press the bottom part of the handle ⇒fig. 76 and fold the
compartments in direction of arrow 1. The compartments must
be heard to engage in the lid.
AC
AD
AD
Fig. 76 Lowering
folding box
Fig. 77 Securing
folding box
AA
Page 91 of 270
Seats and Stowage
90
– Close the lid in direction of arrow 2.
– Press on the button marked “PUSH” ⇒page 89, fig. 77
and push the folding box into the secured middle position.
– Once again press on the button marked “PUSH” and push the folding box carefully into the secured position against the
partition of the luggage compartment in direction of arrow
(ready position). If correctly locked, the button marked “PUSH” is moved back into its initial position.
You can leave the folding box in the ready position for use, or lower it into
the transport position ⇒page 87.
Caution
•The parts of the folding box can be damaged if handled roughly or in
an unprofessional way.
•First check for yourself whether the cover for the through-loading bag*
is closed before you lower the folding box into the ready position on the
partition of the luggage compartment ⇒page 83.
The roof luggage rack system
Description
Pay attention to the following points if you wish to transport luggage or
other items on the roof of your vehicle:
•Your car has streamlined rain channels integrated into the roof. For
this reason, it is not possible to use conventional roof racks. We therefore recommend that you only use base roof bars from the Škoda Genuine
Accessories.
•These base roof bars are the supporting elements for a complete roof
bar system. Separate additional components are required for safety
reasons for transporting luggage, bikes, surfboards, skis and boats. All
these system components are available from Škoda Dealers.
Caution
•If you use other roof rack systems or if the roof bars are not properly
fitted, then any damage which may result to your car is not covered by the
warranty agreements. It is therefore essential to pay attention to the fitting
instructions supplied with the roof luggage rack system.
•On models fitted with a power sliding/tilting roof, ensure that the
opened sliding/tilting roof does not strike any items of luggage transported
on the roof.
For the sake of the environment
The increased aerodynamic drag results in a higher fuel consumption.
One should therefore take off the roof bar system after use.
AB
AB
A3
AB
Page 165 of 270
Transporting children safely
164
Transporting children safely
What you should know about
transporting children!
An introduction to the subject
Accident statistics have revealed that children are gener-
ally more safely transported on the rear seats than on the
front passenger seat.
Children younger than 12 years of age should normally travel on the rear
seat of the vehicle (take note of any national legal provisions which differ
from this). They should be secured there by means of a child restraint
system or by using the existing seat belts depending on their age, body
size and weight. The child seat should be mounted behind the front
passenger seat for safety reasons.
The physical principle of an accident does, of course, also apply to chil-
dren ⇒page 146, “The physical principle of a frontal collision”. They differ
from adults in that their muscles and bone structure of children are not yet
fully developed. Thus children are exposed to increased risk of injury.
Children should be transported by using special child safety seats in order
to reduce this risk of injury.
Use only child safety seats which are officially approved and are suitable
for children and which comply with the ECE-R 44 Standard, which classi-
fies child safety seats into 5 groups ⇒page 168, “Classification of child
seats into groups”. Child restraint systems which have been tested for
conformity with ECE-R 44 have a non-detachable test seal (a large E
within a circle and below this the test number) attached to the seat. We recommend that you use child safety seats from the Škoda genuine
accessories. These child seats were developed and also tested for use in
Škoda vehicles. They fulfil the standard ECE-R 44.
WARNING
Always comply with national le
gal provisions and instructions
from the relevant child safety seat manufacturer when installing
and using a child seat ⇒ in “Important safety information on
using child safety seats”.
Note
Any national legal provisions which vary from the information contained in
this Owner's Manual take precedence over the information contained
herein.
Important safety informati on on using child safety
seats
Correct use of child safety seats considerably reduces the
risk of injury!
WARNING
•All the occupants of the car - in particular children - must wear
a seat belt when the car is moving!
•Children less than 1.50 m in height or younger than 12 years
must not use a normal seat belt without a child restraint system
Page 191 of 270
Towing a trailer
190
Towing a trailer
Towing a trailer
Technical requirements
The towing device must satisfy certain technical require-
ments.
Your vehicle is designed primarily for transporting persons and luggage.
It can, however, also be used for towing a trailer - provided certain tech-
nical equipment is fitted.
If your vehicle has already been supplied with a factory-fitted towing
device then everything that is necessary for towing a trailer in technical
terms, and in terms of the law, has already been taken into account.
Your vehicle is fitted with a 13-pin power socket for the electrical connec-
tion between the vehicle and trailer. If the trailer which you wish to tow has
a 7-pin connector , you can use a suitable adapter cable. You can obtain
such an adapter from a Škoda dealer.
This work must be carried out in accordance with the manufacturer's
specifications if a towing device is retrofitted.
Škoda dealers are familiar with details relating to retrofitting a towing
device and for any necessary modifications to the cooling system.
WARNING
We recommend that you have the towing device installed by a
Škoda dealer. He is familiar with all the relevant details relating to
retrofitting such equipment. There is a risk of an accident if the
towing device is not properly fitted!
General Maintenance
There are a number of points to pay attention to when
towing a trailer.
Trailer load
The permissible trailer load must on no account be exceeded.
You can negotiate appropriately steeper inclines and descents if you do
not make full use of the permissible trailer load.
The trailer loads specified only apply for altitudes up to 1 000 metres
above mean sea level. The fact that the engine power output drops with
increasing height due to a lowering of air pressure and thus the ability to
climb, means that the towed weight must be reduced by 10% for every
further increase of 1 000 metres in height above sea level. The towed
weight is the weight of the (laden) vehicle and the (laden) trailer together.
One should take this into account before driving up to higher altitudes.
The trailer and drawbar load information on the type plate of the
towing device are merely test data for the towing device The data
relating to your vehicle, which is often less than this test data, can
be found in your vehicle registration documents or in the brochure -
Technical Data .
Distribution of the load
Distribute the load in the trailer in such a way that any heavy items are
located as close as possible to the axle. Secure the items to prevent them
slipping.
Page 207 of 270
Fuel
206
Prewarming fuel
The vehicle is fitted with a fuel filter prewarming system. This secures
operation of a vehicle using diesel fuel down to an environmental temper-
ature of -25°C.
Biofuel
We recommend refuelling with diesel fuel at temperatures below -10°C.
Caution
It is not permitted to add the various fuel additives on the market, including
petrol, to diesel fuel in order to improve its flow properties.
Refuelling
Refuelling procedure
Opening the fuel filler cap
– Unlock the fuel filler flap with the switch in the driver door
⇒page 44.
– Open the fuel filler flap fully.
– Unscrew the cap by turning it to the left.
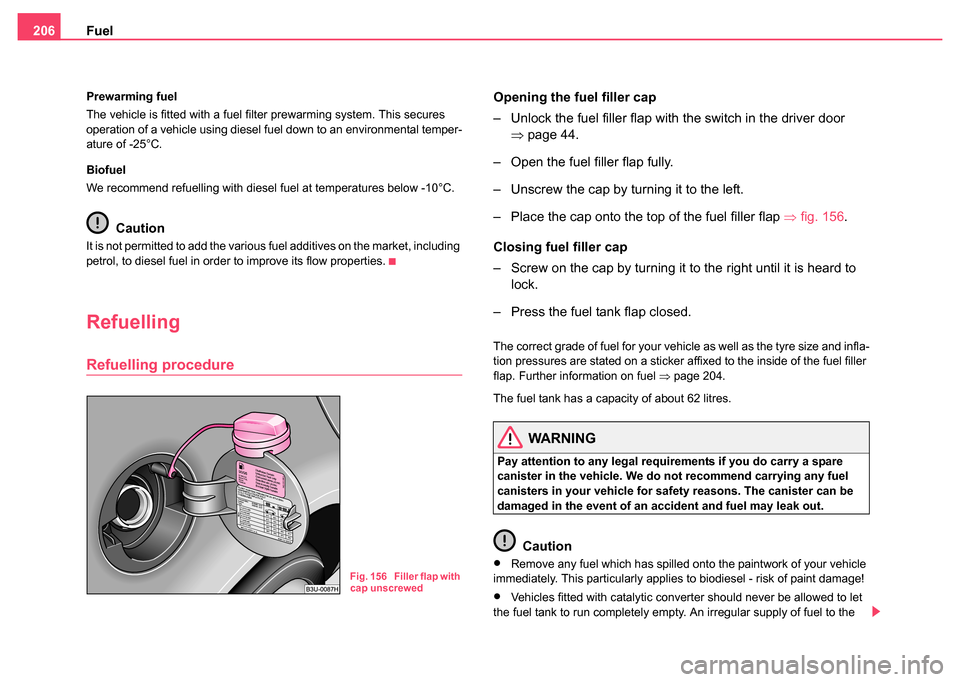
– Place the cap onto the top of the fuel filler flap ⇒fig. 156 .
Closing fuel filler cap
– Screw on the cap by turning it to the right until it is heard to lock.
– Press the fuel tank flap closed.
The correct grade of fuel for your vehicle as well as the tyre size and infla-
tion pressures are stated on a sticker affixed to the inside of the fuel filler
flap. Further information on fuel ⇒page 204.
The fuel tank has a capacity of about 62 litres.
WARNING
Pay attention to any legal requirements if you do carry a spare
canister in the vehicle. We do not recommend carrying any fuel
canisters in your vehicle for safety reasons. The canister can be
damaged in the event of an accident and fuel may leak out.
Caution
•Remove any fuel which has spilled onto the paintwork of your vehicle
immediately. This particularly applies to biodiesel - risk of paint damage!
•Vehicles fitted with catalytic converter should never be allowed to let
the fuel tank to run completely empty. An irregular supply of fuel to the
Fig. 156 Filler flap with
cap unscrewed
Page 211 of 270
Inspecting and Replenishing
210
•If you wish to work under the vehicle, you must secure the
vehicle from rolling away and support it with suitable supporting
blocks: the car jack is not sufficient for this - risk of injury!
•In cases where it be necessary to carry out inspection work
when the engine is running there is an additional risk from rotating
parts (e.g. the V-ribbed belt, alternator, radiator fan) and from the
high-voltage ignition system. Pl ease observe in addition the
following:
−Never touch the electrical cables of the ignition system.
− Absolutely avoid any jewellery, loose items of clothing or
long hair from getting into the rotating parts of the engine -
Hazard! Therefore remove any jewellery beforehand, tie up your
hair and wear tight fitting clothing.
•Please also comply with the warning instructions stated below
when carrying out any essential work on the fuel system or on the
electrical system:
−Always separate the car battery from the electrical system.
− Do not smoke.
− Never carry out any work close to naked flames.
− Always keep a working fire extinguisher at hand.
Caution
When replenishing fluids in the engine, always ensure that the fluids are
on no account mixed up. This may result in major operating problems and
also vehicle damage!
Overview of the engine compartment
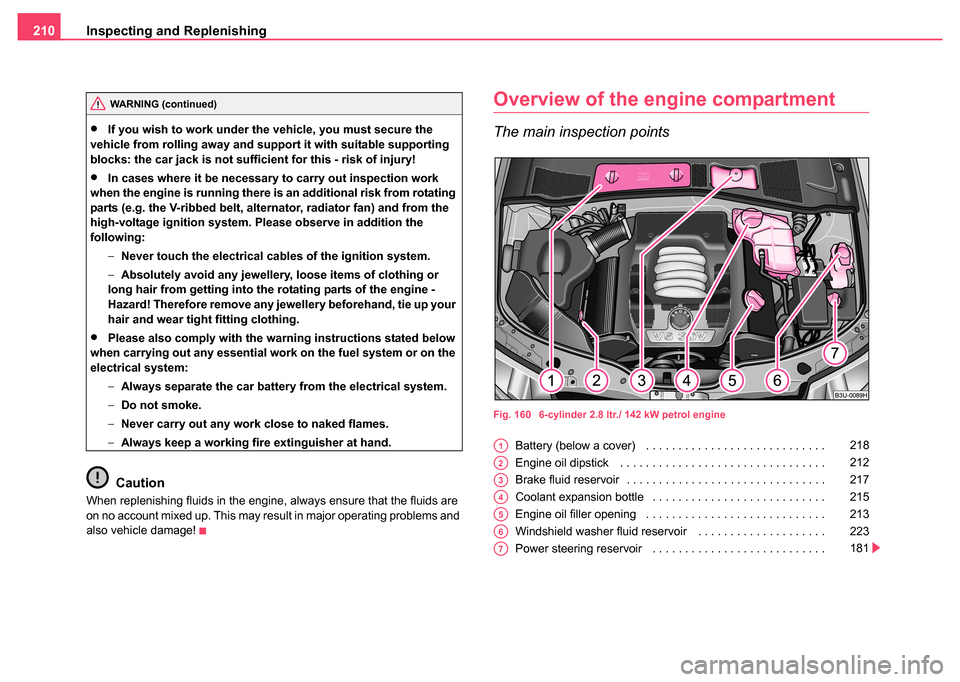
The main inspection points
Fig. 160 6-cylinder 2.8 ltr./ 142 kW petrol engine
Battery (below a cover) . . . . . . . . . . . . . . . . . . . . . . . . . . . .
Engine oil dipstick . . . . . . . . . . . . . . . . . . . . . . . . . . . . . . . .
Brake fluid reservoir . . . . . . . . . . . . . . . . . . . . . . . . . . . . . . .
Coolant expansion bottle . . . . . . . . . . . . . . . . . . . . . . . . . . .
Engine oil filler opening . . . . . . . . . . . . . . . . . . . . . . . . . . . .
Windshield washer fluid reservoir . . . . . . . . . . . . . . . . . . . .
Power steering reservoir . . . . . . . . . . . . . . . . . . . . . . . . . . .
WARNING (continued)
A1218
A2212
A3217
A4215
A5213
A6223
A7181
Page 239 of 270

Breakdown assistance
238
•Do not drive with this spare wheel at more than 80 km/h - risk of acci-
dent. Avoid accelerating at full throttle, sharp braking and fast cornering.
•The inflation pressure for this spare wheel is identical to the inflation
pressure of the standard tyres.
•Use this spare wheel only to reach the nearest service station as it is
not intended for continuous use.
Changing a wheel
Preliminary work
The following steps should be carried out before actually
changing the wheel.
– If it is necessary to change a wheel, park the vehicle as far away as possible from the traffic flow. The place you choose
should be level.
– Have all the occupants get out. While changing a wheel, the
occupants of the vehicle should not stand on the road (it is
better behind a crash barrier).
– Apply the handbrake firmly.
– Engage 1st gear or if your vehicle is fitted with an automatic
gearbox, position the selector lever into position P .
– If a trailer is coupled, uncouple it.
– Take the vehicle tool kit and the spare wheel ⇒ page 237
out of the luggage compartment.
WARNING
•If you find yourself in flowing traffic switch on the hazard
warning lights system and place the warning triangle on the side of
the road at the prescribed distance from your vehicle while
observing all national legal provisions. In this way you are
protecting not only yourself but also other road users.
•Never start the engine with the vehicle sitting on the raised jack
- danger of suffering injury!
Caution
If you have to change a wheel on a slope first block the opposite wheel
with a stone or similar object in order to secure the vehicle from unexpect-
edly rolling away.
Note
Comply with the national legal regulations.
Changing a wheel
Always change a wheel on a level surface as far as possible.
– Take off the full wheel trim* ⇒page 239 or the caps
⇒ page 241.
– In the case of light alloy wheels remove the wheel trim cap ⇒page 240.
– Slacken the wheel bolts ⇒page 241.
Page 241 of 270

Breakdown assistance
240
Installing
– First press the full wheel trim onto the wheel at the valve opening provided. Then press the full wheel trim into the
wheel in such a way that its entire circumference locks
correctly in place.
Caution
•Use the pressure of your hand, do not knock on the full wheel trim!
Heavy knocks mainly on the points where the full wheel trim has not been
inserted into the wheel, can result in damage to the guide and centering
elements of the full wheel trim.
•First check for yourself that the theft-deterrent wheel bolt is located
⇒ page 244, “Securing wheels against being stolen” in the hole in the
area of the valve before fitting the full wheel trim onto a steel wheel which
is attached with a theft-deterrent wheel bolt.
Wheel trim caps*
Removing
– Carefully ⇒fig. 178 lever off the wheel trim cap using the
removal hook .
Fig. 178 Changing a
wheel: Pulling off the
wheel trim cap