cooling SKODA SUPERB 2004 1.G / (B5/3U) Owner's Guide
[x] Cancel search | Manufacturer: SKODA, Model Year: 2004, Model line: SUPERB, Model: SKODA SUPERB 2004 1.G / (B5/3U)Pages: 270
Page 216 of 270

Inspecting and Replenishing215
Using the systemSafetyDriving TipsGeneral MaintenanceBreakdown assistanceTechnical Data
Your Škoda dealer can also supply you with the correct coolant additives.
Caution
•Other coolant additives may cause operational problems which,
in particular, involves significantly reducing the anticorrosion effect.
•Any faults or problems resulting from corrosion may cause a loss
of coolant and, as a consequence of this, result in major engine
damage.
Inspecting the coolant level
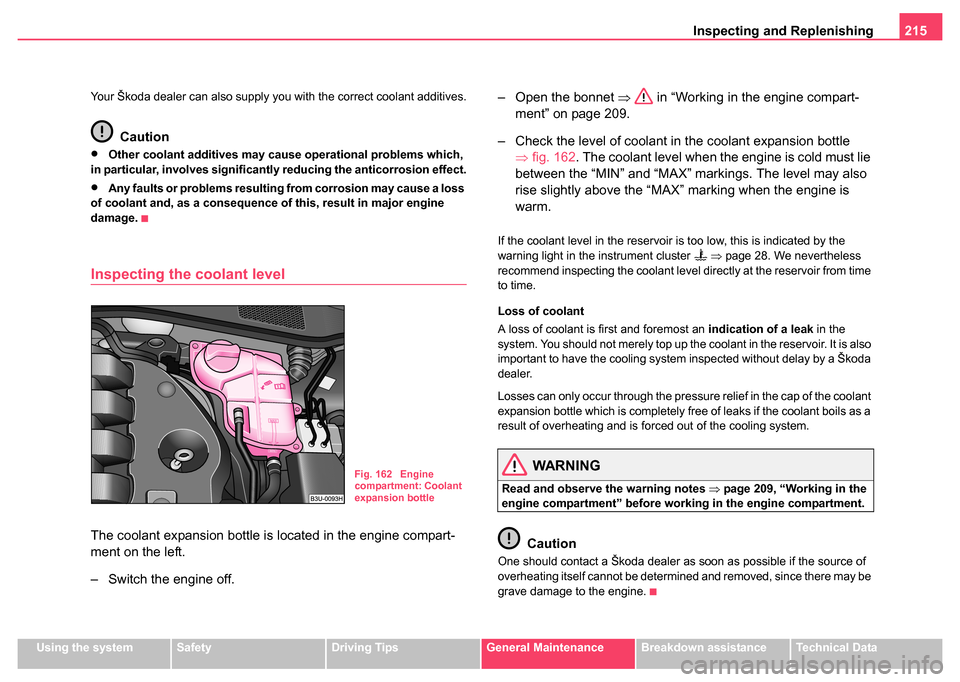
The coolant expansion bottle is located in the engine compart-
ment on the left.
– Switch the engine off. – Open the bonnet
⇒ in “Working in the engine compart-
ment” on page 209.
– Check the level of coolant in the coolant expansion bottle ⇒fig. 162. The coolant level when the engine is cold must lie
between the “MIN” and “MAX” markings. The level may also
rise slightly above the “MAX” marking when the engine is
warm.
If the coolant level in the reservoir is too low, this is indicated by the
warning light in the instrument cluster ⇒ page 28. We nevertheless
recommend inspecting the coolant level directly at the reservoir from time
to time.
Loss of coolant
A loss of coolant is first and foremost an indication of a leak in the
system. You should not merely top up the coolant in the reservoir. It is also
important to have the cooling system inspected without delay by a Škoda
dealer.
Losses can only occur through the pressure relief in the cap of the coolant
expansion bottle which is completely free of leaks if the coolant boils as a
result of overheating and is forced out of the cooling system.
WARNING
Read and observe the warning notes ⇒page 209, “Working in the
engine compartment” before working in the engine compartment.
Caution
One should contact a Škoda dealer as soon as possible if the source of
overheating itself cannot be determined and removed, since there may be
grave damage to the engine.
Fig. 162 Engine
compartment: Coolant
expansion bottle
Page 217 of 270

Inspecting and Replenishing
216
Replenishing the coolant
– Switch the engine off.
– Allow the engine to cool down.
– Place a cloth over the cap of the coolant expansion reservoir
⇒page 215, fig. 162 and unscrew the cap carefully by
turning it to the left ⇒.
– Top up the coolant.
– Screw on the cap tight until it is heard to lock.
The coolant which you use for replenishing the system, must comply with
one specific specification ⇒page 214, “Coolant”. Do not use an alterna-
tive additive if the coolant additive G12 PLUS is not available in excep-
tional cases. Just top up the system with water and as soon as possible
arrange adjustment to correct the mixing ratio of water and coolant addi-
tive again by a Škoda dealer.
Only use fresh coolant for topping up the system.
Do not fill up over the “MAX” marking! Excess coolant which is heated up
is forced out of the cooling system through the pressure relief valve in the
cap of the coolant compensation bottle.
Wait until the engine has cooled down for a system which has suffered a
major loss of coolant before pouring in coolant. This is necessary to avoid
engine damage.
Do not continue your journey if for some reason it is not possible
under the conditions prevailing to top up with coolant. Switch off the
engine and obtain professional assistance from a Škoda dealer.
WARNING
•The cooling system is pressurized! Do not open the cap of the
coolant expansion bottle if the engi ne is still hot - risk of scalding!
•The coolant additive and thus all of the coolant is harmful to
your health. Avoid contact with the coolant. Coolant vapours are
also harmful to the health. It is important, therefore, to always
safely store any coolant additive in its original container out of the
reach of children - risk of poisoning!
•If any splashes of coolant get into your eyes, rinse out your eyes
immediately with clear water and contact a doctor as soon as
possible.
•You should also consult a doctor without delay if you have inad-
vertently swallowed coolant.
For the sake of the environment
Do not re-use coolant if it is necessary to drain the coolant in the system.
It should be collected and disposed of in compliance with environmental
protection regulations.
The radiator fan
The radiator fan may switch on suddenly.
The radiator fan is driven by an electric motor and controlled by a thermo-
stat according to the coolant temperature.
The radiator fan may continue running for up to 10 minutes after the
engine has been switched off - even if the ignition is also off. It may also
switch on suddenly after a certain time, if
•the coolant temperature has risen because of an accumulation of heat
or
Page 231 of 270

Wheels and Tyres
230
Wheel bolts
Wheels and wheel bolts are matched to each other in terms of design.
Each time you fit other wheels - e.g. light alloy wheels or wheels with
winter tyres - you must therefore also use the matching wheel bolts of the
correct length and shape of spherical cap. This is essential to ensure that
the wheels are tightly fitted and that the brake system operates properly.
If you retrofit wheel trims (or have this done), please also ensure that an
adequate flow of air remains assured for cooling the brake system.
Škoda dealers are instructed in the technical possibilities which exist
regarding converting or retrofitting wheels, tyres and wheel trim.
WARNING
•In case of incorrect treatment of the wheel bolts, the wheel can
loosen when the car is moving - risk of accident!
•The wheel bolts must be clean and must turn easily. However,
they must never be treated with grease or oil.
•If the wheel bolts are tightened to a too low tightening torque,
the rim can lossen when the car is moving - risk of accident! A tight-
ening torque which is too high can damage the bolts and threads
and this can result in perman ent deformation of the contact
surfaces on the rims.
Caution
The prescribed tightening torque of the wheel bolts for steel and light alloy
wheels is 120 Nm.
Winter tyres
The handling of your vehicle will be significantly improved when driving on
wintry roads and at temperatures below 7 °C if you fit winter tyres.
Summer tyres do not offer the same grip on ice and snow because of their
construction (width, rubber blend, tread pattern). This applies in particular
to vehicles which are equipped with low-profile tyres or high-speed
tyres (code index V, W or Y on wall of tyre).
Winter tyres must be mounted on all four wheels to obtain the best
handling characteristics.
Only use radial winter tyres.
You must only fit those types of winter tyre which are approved for your
vehicle. The permissible sizes of winter tyres are stated in your vehicle
documents. Approvals may differ because of national legislation.
Please remember that the tyres should be inflated to 20 kPa (0.2 bar)
more than is the case for summer tyres ⇒page 226.
Winter tyres no longer offer the same winter performance once the tyre
tread has worn down to a depth of about 4 mm.
Ageing also causes winter tyres to lose most of their winter performance
properties - even in cases where the remaining tread depth is still clearly
more than 4 mm.
Speed restrictions apply to winter tyres as well as to summer tyres
⇒ .
You can fit winter tyres of a lower speed category to your vehicle provided
that you also do not drive faster than the permissible maximum speed for
such tyres, even if the possible maximum speed of your vehicle is higher.
The corresponding tyre category can damage the tyres when exceeding
the permissible maximum speed.
Please pay attention to the notes if you decide to fit winter tyres
⇒ page 225.
Page 263 of 270

Index
262
Child safety seats
ISOFIX system . . . . . . . . . . . . . . . . . . . 173
Child seat . . . . . . . . . . . . . . . . . . . . . . . . . . 168 attach . . . . . . . . . . . . . . . . . . . . . . . . . . 171
Child seat protection . . . . . . . . . . . . . . . 171
Classification into groups . . . . . . . . . . . 168
on the front passenger seat . . . . . . . . . 166
Safety instructions . . . . . . . . . . . . . . . . . 164
Use of child seats . . . . . . . . . . . . . . . . . 168
Children and safety . . . . . . . . . . . . . . . . . . . 164
Chrome parts . . . . . . . . . . . . . . . . . . . . . . . 198
Cigarette lighter . . . . . . . . . . . . . . . . . . . . . . 95
Cleaning . . . . . . . . . . . . . . . . . . . . . . . . . . . 195
Climatronic Air outlet vents . . . . . . . . . . . . . . . . . . . 114
Blower . . . . . . . . . . . . . . . . . . . . . . . . . . 113
Defrosting windows . . . . . . . . . . . . . . . . 110
economic use . . . . . . . . . . . . . . . . . . . . 110
Keeping windows demisted . . . . . . . . . . 111
Operational problems . . . . . . . . . . . . . . 110
Recirculated air mode . . . . . . . . . . . . . . 112
Setting temperature . . . . . . . . . . . . . . . . 113
Climatronic (automatic air conditioning) . . . 109
Clock . . . . . . . . . . . . . . . . . . . . . . . . . . . . . . . 15
Clothes hooks . . . . . . . . . . . . . . . . . . . . . . . 103
Cockpit An overview . . . . . . . . . . . . . . . . . . . . . . . 11
Coming Home . . . . . . . . . . . . . . . . . . . . . . . . 60
Compartments . . . . . . . . . . . . . . . . . . . . . . . 97
Computer . . . . . . . . . . . . . . . . . . . . . . . . . . . 18
Convenience operation . . . . . . . . . . . . . . . . . 52 Converting/masking over headlights . . . . . . 184
Cool box . . . . . . . . . . . . . . . . . . . . . . . . . . . . 84
Coolant . . . . . . . . . . . . . . . . . . . . . . . . . . . . 214
replenishing . . . . . . . . . . . . . . . . . . . . . . 216
Warning light . . . . . . . . . . . . . . . . . . . . . . 31
Coolant level Warning light . . . . . . . . . . . . . . . . . . . . . . 31
Coolant temperature gauge . . . . . . . . . . . . . 14
Coolant temperature/coolant level Warning light . . . . . . . . . . . . . . . . . . . . . . 31
Cooling Climatronic . . . . . . . . . . . . . . . . . . . . . . . 109
The air conditioning system . . . . . . . . . . 104
Correct seated position . . . . . . . . . . . . . . . . 141
Counter for distance driven . . . . . . . . . . . . . . 16
Cruise control . . . . . . . . . . . . . . . . . . . . . . . 123
Cruise control system . . . . . . . . . . . . . . . . . 123
D
Deactivating an airbag . . . . . . . . . . . . . . . . 161
Defrosting rear window . . . . . . . . . . . . . . . . . 62
Defrosting windows The air conditioning system . . . . . . . . . . 106
De-icing windows . . . . . . . . . . . . . . . . . . . . 198
Detachable towing device . . . . . . . . . . . . . . 192
Diesel . . . . . . . . . . . . . . . . . . . . . . . . . . . . . 204
Diesel engines Starting engine . . . . . . . . . . . . . . . . . . . 119
Differential Lock (EDL) . . . . . . . . . . . . . . . . 177 Digital clock . . . . . . . . . . . . . . . . . . . . . . . . . . 15
Dipstick . . . . . . . . . . . . . . . . . . . . . . . . . . . . 212
Direction indicators . . . . . . . . . . . . . . . . . . . . 59
Warning light . . . . . . . . . . . . . . . . . . . . . . 29
Display . . . . . . . . . . . . . . . . . . . . . . . . . . . . . . 22
Distance driven . . . . . . . . . . . . . . . . . . . . . . . 21
distance driven . . . . . . . . . . . . . . . . . . . . . . . 16
Door Child safety locks . . . . . . . . . . . . . . . . . . . 41
Warning light . . . . . . . . . . . . . . . . . . . . . . 33
Drinks can holder at the front . . . . . . . . . . . . . . . . . . . . . . . . 92
at the rear . . . . . . . . . . . . . . . . . . . . . . . . . 92
Driving economically . . . . . . . . . . . . . . . . . . 185
Driving time . . . . . . . . . . . . . . . . . . . . . . . . . . 21
Dynamo Warning light . . . . . . . . . . . . . . . . . . . . . . 36
E
EDL . . . . . . . . . . . . . . . . . . . . . . . . . . . . . . . 177
Electric sliding/tilting roof . . . . . . . . . . . . . . . . 53
Electrically adjustable rear mirror . . . . . . . . . 67
Electrically adjustable seats . . . . . . . . . . . . . 71
Electronic Differential LockWarning light . . . . . . . . . . . . . . . . . . . . . . 34
Electronic Differential Lock (EDL) . . . . . . . . 177
Electronic immobiliser Warning light . . . . . . . . . . . . . . . . . . . . . . 35
Electronic stability programme (ESP) . . . . . 175 Warning light . . . . . . . . . . . . . . . . . . . . . . 34