fuel type SKODA SUPERB 2004 1.G / (B5/3U) Owner's Manual
[x] Cancel search | Manufacturer: SKODA, Model Year: 2004, Model line: SUPERB, Model: SKODA SUPERB 2004 1.G / (B5/3U)Pages: 270
Page 226 of 270

Wheels and Tyres225
Using the systemSafetyDriving TipsGeneral MaintenanceBreakdown assistanceTechnical Data
Wheels and Tyres
Wheels
General comments
•New tyres do not offer optimal grip at first and should therefore be run
in for about 500 km at a moderate speed and an appropriately cautious
style of driving. You will also profit from longer tyre life.
•The tread depth of new tyres may differ because of design features
and the configuration of the tread (depending on the type of tyre and the
manufacturer).
•Drive over curbs on the side of the road and other such obstacles
slowly and, where possible, at a right angles in order to avoid damage to
tyres and wheel trims.
•Inspect your tyres from time to time for damage (punctures, cuts, splits
and bulges). Remove foreign bodies from the tyre profile.
•Damage to tyres and wheels is frequently not visible. Unusual vibra-
tions or pulling of the vehicle to one side could be a sign of tyre damage.
Please reduce your speed immediately and stop if you suspect that
a wheel is damaged. Inspect the tyres for signs of damage (bulges,
splits, etc.) If no visible damage is present, please drive at an appropri-
ately slow speed and carefully to the nearest Škoda dealer in order to
have your vehicle inspected.
•Also protect your tyres from contact with oil, grease and fuel.
•Immediately replace any dust caps of the valves which have got lost.
•Mark wheels before removing them so that their previous direction of
running can be maintained when mounted them again.
•Always store wheels or tyres which been removed in a cool, dry and,
where possible, dark place. Tyres which are not fixed to a wheel trim
should be stored upright. Unidirectional tyres*
The direction of rotation of the tyres is marked by arrows on the wall of the
tyre. This indicates the direction of rotation of the tyre, and it is essential
that the tyres are fitted on to run in this direction. Only then are the tyres
able to provide the optimal properties in terms of grip, low noise, wear-
and-tear and aquaplaning.
Further information concerning the use of unidirectional tyres
⇒
page 231.
WARNING
•New tyres during the first 500 km do not offer optimal grip and
should therefore be run approp riately - risk of accident!
•Never drive with damaged tyres - risk of accident!
Note
Please observe the various differing legal requirements regarding tyres.
Page 253 of 270

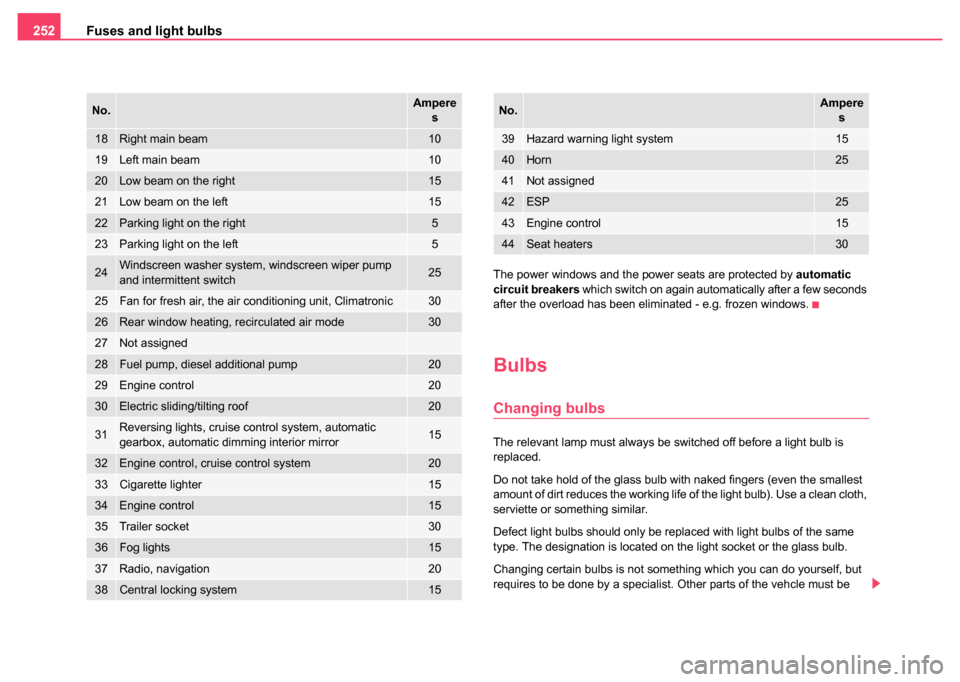
Fuses and light bulbs
252
The power windows and the power seats are protected by automatic
circuit breakers which switch on again automatically after a few seconds
after the overload has been eliminated - e.g. frozen windows.
Bulbs
Changing bulbs
The relevant lamp must always be switched off before a light bulb is
replaced.
Do not take hold of the glass bulb with naked fingers (even the smallest
amount of dirt reduces the working life of the light bulb). Use a clean cloth,
serviette or something similar.
Defect light bulbs should only be replaced with light bulbs of the same
type. The designation is located on the light socket or the glass bulb.
Changing certain bulbs is not something which you can do yourself, but
requires to be done by a specialist. Other parts of the vehcle must be
18Right main beam10
19Left main beam10
20Low beam on the right15
21Low beam on the left15
22Parking light on the right5
23Parking light on the left5
24Windscreen washer system, windscreen wiper pump
and intermittent switch25
25Fan for fresh air, the air conditioning unit, Climatronic30
26Rear window heating, recirculated air mode30
27Not assigned
28Fuel pump, diesel additional pump20
29Engine control20
30Electric sliding/tilting roof20
31Reversing lights, cruise control system, automatic
gearbox, automatic dimming interior mirror15
32Engine control, cruise control system20
33Cigarette lighter15
34Engine control15
35Trailer socket30
36Fog lights15
37Radio, navigation 20
38Central locking system15
No.Ampere
s
39Hazard warning light system15
40Horn25
41Not assigned
42ESP25
43Engine control15
44Seat heaters30
No.Amperes
Page 260 of 270

General259
Using the systemSafetyDriving TipsGeneral MaintenanceBreakdown assistanceTechnical Data
Technical Data
General
Identification data
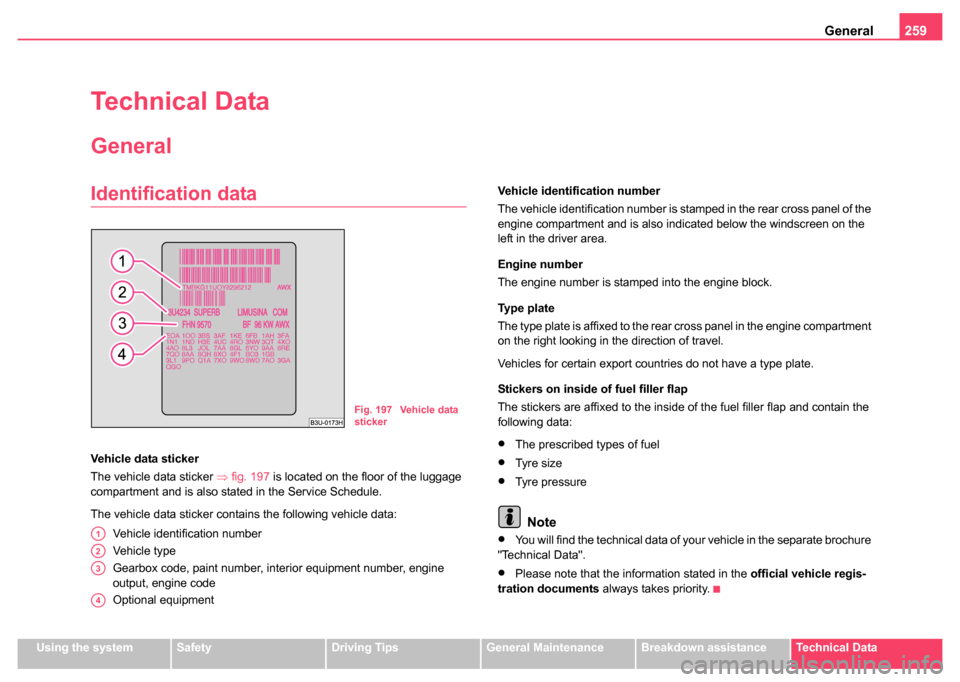
Vehicle data sticker
The vehicle data sticker ⇒fig. 197 is located on the floor of the luggage
compartment and is also stated in the Service Schedule.
The vehicle data sticker contains the following vehicle data:
Vehicle identification number
Vehicle type
Gearbox code, paint number, interior equipment number, engine
output, engine code
Optional equipment Vehicle identification number
The vehicle identification number is stamped in the rear cross panel of the
engine compartment and is also indicated below the windscreen on the
left in the driver area.
Engine number
The engine number is stamped into the engine block.
Ty p e p l a t e
The type plate is affixed to the rear cross panel in the engine compartment
on the right looking in the direction of travel.
Vehicles for certain export countries do not have a type plate.
Stickers on inside of fuel filler flap
The stickers are affixed to the inside of the fuel filler flap and contain the
following data:•The prescribed types of fuel
•Tyre size
•Tyre pressure
Note
•You will find the technical data of your vehicle in the separate brochure
"Technical Data".
•Please note that the information stated in the official vehicle regis-
tration documents always takes priority.
Fig. 197 Vehicle data
sticker
A1
A2
A3
A4