length SKODA SUPERB 2005 1.G / (B5/3U) Owner's Manual
[x] Cancel search | Manufacturer: SKODA, Model Year: 2005, Model line: SUPERB, Model: SKODA SUPERB 2005 1.G / (B5/3U)Pages: 281
Page 58 of 281
Lights and Visibility57
Using the systemSafetyDriving TipsGeneral MaintenanceBreakdown assistanceTechnical Data
Lights and Visibility
Lights
Switching lights on and off
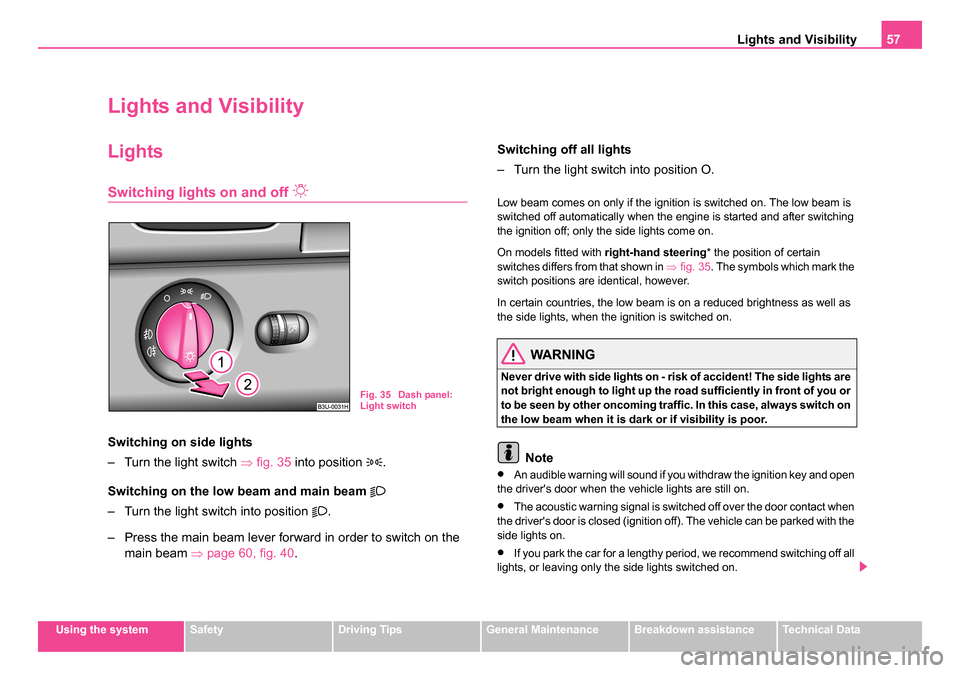
Switching on side lights
– Turn the light switch ⇒fig. 35 into position
.
Switching on the low beam and main beam
– Turn the light switch into position .
– Press the main beam lever forward in order to switch on the main beam ⇒page 60, fig. 40 . Switching off all lights
– Turn the light switch into position O.
Low beam comes on only if the ignition is switched on. The low beam is
switched off automatically when the engine is started and after switching
the ignition off; only the side lights come on.
On models fitted with
right-hand steering* the position of certain
switches differs from that shown in ⇒fig. 35 . The symbols which mark the
switch positions are identical, however.
In certain countries, the low beam is on a reduced brightness as well as
the side lights, when the ignition is switched on.
WARNING
Never drive with side lights on - risk of accident! The side lights are
not bright enough to light up the road sufficiently in front of you or
to be seen by other oncoming traffic. In this case, always switch on
the low beam when it is dark or if visibility is poor.
Note
•An audible warning will sound if you withdraw the ignition key and open
the driver's door when the vehicle lights are still on.
•The acoustic warning signal is switched off over the door contact when
the driver's door is closed (ignition off). The vehicle can be parked with the
side lights on.
•If you park the car for a lengthy period, we recommend switching off all
lights, or leaving only the side lights switched on.
Fig. 35 Dash panel:
Light switch
s3ec.book Seite 57 Montag, 2. Mai 2005 3:42 15
Page 89 of 281

Seats and Stowage
88
Through-loading bag*
The through-loading bag enables you to conveniently
transport long objects (such as skis) without damaging the
interior of the car.Loading
– Fold down the armrest of the rear seats to the front.
– Press the unlock button for the cover of the through-loading
bag in the interior of the car and swivel it down.
– Pull the bag out and unfold it.
– Open the boot lid/luggage compartment door.
– Press the unlock button for the cover of the through-loading bag ⇒fig. 73 and swivel it down.
– Push the objects into the through-loading bag from the boot ⇒ .
Securing
– Insert the belt ⇒fig. 74 into the middle seat belt buckle .
– Pull the seat belt tight in direction of arrow ⇒fig. 74.
Stowing
– Close the cover for the through-loading bag in the boot.
– Carefully fold the through-loading bag together in segments of approx 11 cm in length.
– Close the cover in the interior of the car.
– Move the armrest back into its original position.
Fig. 73 Luggage
compartment: cover for
through-loading bag
Fig. 74 Attaching
through-loading bag to
middle seat belt buckle
of rear seats
AAAB
AC
s3ec.book Seite 88 Montag, 2. Mai 2005 3:42 15
Page 108 of 281
Seats and Stowage107
Using the systemSafetyDriving TipsGeneral MaintenanceBreakdown assistanceTechnical Data
Armrest with stowage compartment
You can use the cover of the compartment as an armrest.
The armrest is adjustable for height and length.Opening stowage compartment
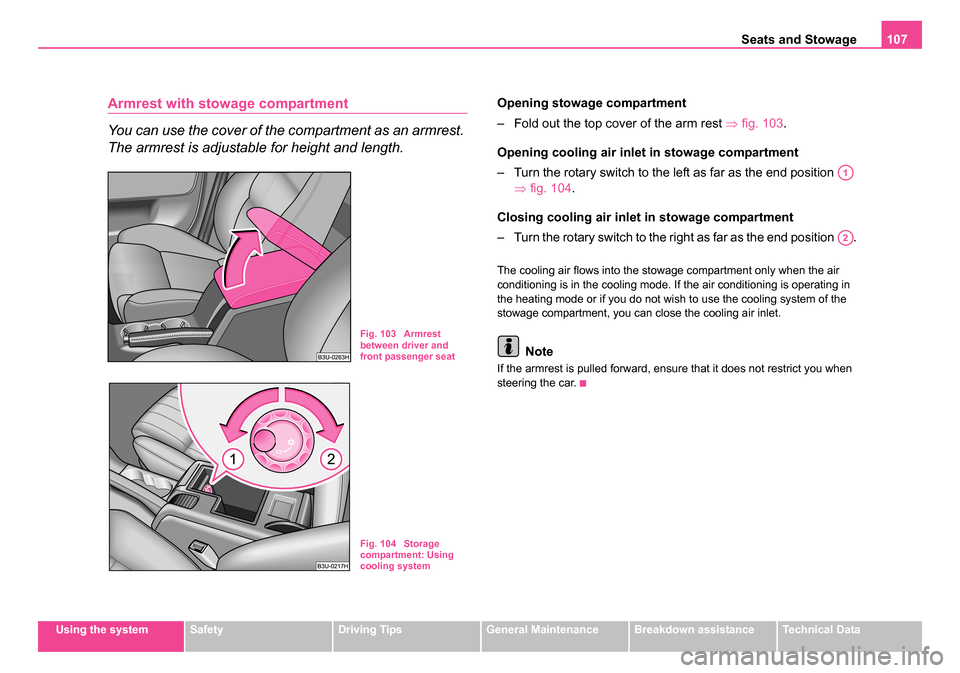
– Fold out the top cover of the arm rest ⇒fig. 103.
Opening cooling air inlet in stowage compartment
– Turn the rotary switch to the left as far as the end position ⇒fig. 104.
Closing cooling air inlet in stowage compartment
– Turn the rotary switch to the right as far as the end position .
The cooling air flows into the stowage compartment only when the air
conditioning is in the cooling mode. If the air conditioning is operating in
the heating mode or if you do not wish to use the cooling system of the
stowage compartment, you can close the cooling air inlet.
Note
If the armrest is pulled forward, ensure that it does not restrict you when
steering the car.
Fig. 103 Armrest
between driver and
front passenger seat
Fig. 104 Storage
compartment: Using
cooling system
A1
A2
s3ec.book Seite 107 Montag, 2. Mai 2005 3:42 15
Page 110 of 281
Heating and air conditioning system 109
Using the systemSafetyDriving TipsGeneral MaintenanceBreakdown assistanceTechnical Data
Heating and air conditioning system
The air conditioning system
Description
The air conditioning system is a combined cooling and
heating system. It makes it possible to optimally control
the air temperature at any season of the year.
Description of the air conditioning system
It is important for your safety and for your driving comfort that the air condi-
tioning system is operating properly.
The air conditioning system operates when switch ⇒page 110,
fig. 107 is pressed and the following conditions are met:
•engine running,
•outside temperature above +5 °C,
•blower switch switched on (positions 1 to 4).
If the cooling system is switched on, the temperature and air humidity
drops in the vehicle. The wellbeing of the occupants of the car is enhanced
as a result of this particularly at high outside temperatures and a high air
humidity. The system prevents the windows misting up during the cold
season of the year.
The heating effect is dependent upon the coolant temperature, thus full
heat output only occurs when the engine has reached its operating
temperature.
It is possible to briefly activate recirculated air mode in order to enhance
the cooling effect ⇒. Air at a temperature of about 5°C may flow out of the vents under certain
circumstances when the cooling system is operating. Lengthy and uneven
distribution of the air flow out of the vents (in particular at the leg area) and
large differences in temperature, for example when getting out of the
vehicle, can result in chills in sensitive persons.
The air inlet in front of the windscreen must be free of ice, snow or leaves
in order to ensure that the heating and ventilation systems operate prop-
erly.
After switching on the cooling
Condensation from the evaporator of the
air conditioning may drip down and form a puddle below the vehicle. This
is quite normal and not an indication of a leak!
Aeration of the vehicle when ignition is switched off*
On models fitted with power sliding/tilting roof with sollar cells, the fresh
air blower is automatically switched over to “solar mode ” if the sun ray's
are sufficient after switching off the ignition. The solar cells on the
sliding/tilting roof deliver power for the fresh air blower. This supplies the
interior of the car with fresh air.
For an optimum ventilation, the air outlet vents 3 and 4 must be opened
⇒ page 113.
The ventilation functions only when the sliding/tilting roof is closed.
WARNING
•For your own safety and that of other road users, ensure that all
the windows are free of ice, snow and misting. Please familiarize
yourself about how to correctly operate the heating and ventilation
systems, how to demist and defrost the windows, as well as with
the cooling mode.
ACAE
s3ec.book Seite 109 Montag, 2. Mai 2005 3:42 15
Page 112 of 281
Heating and air conditioning system 111
Using the systemSafetyDriving TipsGeneral MaintenanceBreakdown assistanceTechnical Data
Note
•The whole heat output will be needed to unfrost the windscreen and
side windows. No warm air will be fed to the footwell. This can lead to
restriction of the heating comfort.
•If the cooling system has not been switched on for a lengthy period,
odours may be produced at the evaporator because of deposits. Switch
the air conditioning system on at least once a month for approximately 5
minutes at the highest blower stage - also during the cold season of the
year - in order to remove such odours. Also open a window for a short
time.
•Please refer to the information regarding recirculated air mode
⇒ page 112.
Setting air conditioning system
Recommended settings of air conditioning controls:
Defrosting the windscreen and side windows
•Turn control dial ⇒page 110, fig. 107 to the right up to the stop,*
•Blower switch in position 4,*
•Turn the air distribution control into the position ,*
•Close the air outlet vents 3,*
•Open air outlet vents 4 ⇒ page 113, fig. 108 and point towards the
side window.
Keeping windscreen and side windows demisted
We recommend that you use the following setting in cases where the
windows are misted up more than usual (e.g. when it is raining):
•Blower switch in position 2,*
•Turn the air distribution control into the position between and ,*
•Close the air outlet vents 3,*
•Open air outlet vents 4 and point towards the side window,*
•Switch on the cooling system by pressing button .
Warming up the inside of the vehicle as rapidly as possible
•Turn control dial to the right up to the stop,*
•Blower switch in position 3 or 4,*
•Turn the air distribution control into the position ,*
•Open the air outlet vents 3 and 4 ,*
•We recommend pressing button air recirculation mode. The
windows can steam up in this position however.
Heating the vehicle to a comfortable temperature
We recommend the following setting once the windows are no longer
misted up and the desired temperature has been reached:
•Control dial at the desired heat output,*
•Blower switch in position 1 or 2,*
•Turn the air distribution control into the position ,*
•Close the air outlet vents 3,*
•Open the air outlet vents 4,*
•Set the air distribution regulator between positions and , if the
windscreen gets misted up again, as required.
Cooling down the inside of the vehicle as rapidly as possible
•close all windows and the sliding/tilting roof,*
•Turn the control dial to the left up to the stop,*
•Blower switch in position 4,*
•Turn the air distribution control into the position ,
•Open the air outlet vents 3 and 4 ,*
AA
AB
AC
AB
AC
AE
AA
AB
AC
AD
AA
AB
AC
AC
AA
AB
AC
s3ec.book Seite 111 Montag, 2. Mai 2005 3:42 15
Page 116 of 281
Heating and air conditioning system 115
Using the systemSafetyDriving TipsGeneral MaintenanceBreakdown assistanceTechnical Data
An acoustic signal for depressed buttons
Simultaneous pressing of buttons and can be used to de-acti-
vate or activate this function.
A higher tone is heard when switching on this function, when increasing
the blower speed or when increasing the temperature.
A lower tone is heard when switching off this function, when decreasing
the blower speed or when decreasing the temperature.
Aeration of the vehicle when
ignition is switched off*
On models fitted with power sliding/tilting roof with sollar cells, the fresh
air blower is automatically switched over to “solar mode ” if the sun ray's
are sufficient after switching off the ignition. The solar cells on the
sliding/tilting roof deliver power for the fresh air blower. This supplies the
interior of the car with fresh air.
For an optimum ventilation, the air outlet vents 3 and 4 must be opened
⇒ page 119.
The ventilation functions only when the sliding/tilting roof is closed.
WARNING
•For your own safety and that of other road users, ensure that all
the windows are free of ice, snow and misting. Please familiarize
yourself about how to correctly operate the heating and ventilation
systems, how to demist and defrost the windows, as well as with
the cooling mode.
•You should not leave recirculated air mode on over a longer
period of time. “Stale air” may result in fatigue in the driver and
occupants, reduce attention levels and also cause the windows to
mist up. The risk of having an accident increases. Switch recircu-
lated air mode off as soon as the windows begin misting up.
Note
•If the cooling system has not been switched on for a lengthy period,
odours may be produced at the evaporator because of deposits. Switch
the air conditioning system on at least once a month for approximately 5
minutes at the highest blower stage - also during the cold season of the
year - in order to remove such odours. Also open a window for a short
time.
•We recommend that you do not smoke in the vehicle when the recir-
culating air mode is operating since the smoke which is drawn at the evap-
orator from the interior of the vehicle forms deposits in the evaporator of
the air conditioning system. This produces a permanent odour when the
air conditioning system is operating which can only be eliminated through
considerable effort and expense (replacement of compressor).
•Using the air conditioning economically ⇒page 113.
•Operational problems ⇒page 114.
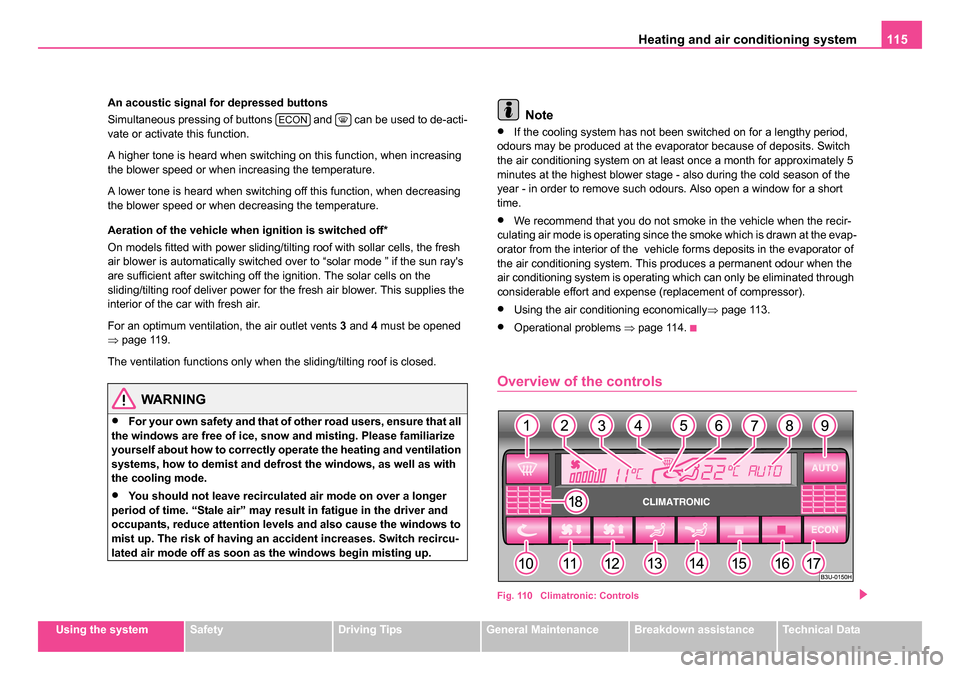
Overview of the controls
Fig. 110 Climatronic: Controls
ECON
s3ec.book Seite 115 Montag, 2. Mai 2005 3:42 15
Page 119 of 281

Heating and air conditioning system
118
Setting temperature
– Press the button or ⇒page 115, fig. 110 and continue
pressing until the desired temperature is set.
You can set the interior temperature between +18 °C (64 °F) and +29 °C
(86 °F). The interior temperature is regulated automatically within this
range. If you select the temperature below 18 °C (64 °F), “LO” appears in
the display. If you select the temperature higher than 29 °C (86 °F), “HI”
appears in the display. In both limit positions the Climatronic operates at
maximum cooling or heating capacity, respectively. The temperature is not
controlled in this case.
Lengthy and uneven distribution of the air flow out of the vents (in partic-
ular at the leg area) and large differences in temperature, for example
when getting out of the vehicle, can result in chills in sensitive persons.
Controlling blower
There are a total of seven blower stages available.
The Climatronic system controls the blower stages automatically
in line with the interior temperature. You can also, however, adapt
the blower stages manually to suit your particular needs.
Setting blower stages
– Press the button or the button to set the blower stage.
The number of dashes in the display ⇒page 115, fig. 110 indicates
the blower stage.
If OFF is shown in the display, this indicates that the Climatronic system
is switched off ⇒page 119.
WARNING
•“Stale air” may result in fatigue in the driver and occupants,
reduce attention levels and also cause the windows to mist up. The
risk of having an accident increases.
•Do not switch the Climatronic system off for longer than neces-
sary.
•Switch the Climatronic system on as soon as the windows mist
up.
A15A16
A2
s3ec.book Seite 118 Montag, 2. Mai 2005 3:42 15
Page 126 of 281

Starting-off and Driving125
Using the systemSafetyDriving TipsGeneral MaintenanceBreakdown assistanceTechnical Data
WARNING
•Never switch off the engine before the vehicle is stationary - risk
of accident!
•The brake booster only operates when the engine is running.
Greater physical effort for brakin g is required when engine is
switched off. Because if you do not stop as normal, this can cause
an accident and severe injuries.
Caution
you should not switch the engine off right away at the end of your journey
after the engine has been operated for a lengthy period at high loads but
should be allowed it to run at idling speed for about 2 minutes. This
prevents any accumulation of heat when the engine is switched off.
Note
•The radiator fan may continue running for a further 10 minutes or so
after the engine and the ignition have been switched off. The coolant fan
may, however, also switch on again after some time if the coolant temper-
ature rises because of an accumulation of heat in the engine or if the
engine is warm and the engine compartment is additionally heated by
strong sunlight.
•This is why particular care is required when carrying out any work in
the engine compartment ⇒page 219, “Working in the engine
compartment”.
Shifting (manual gearbox)
Fig. 116 Shift pattern
on models fitted with 5-
speed manual gearbox
Fig. 117 Shift pattern
on models fitted with 6-
speed manual gearbox
s3ec.book Seite 125 Montag, 2. Mai 2005 3:42 15
Page 196 of 281

Driving and the Environment195
Using the systemSafetyDriving TipsGeneral MaintenanceBreakdown assistanceTechnical Data
Shifting gears and saving energy
Shifting up early saves on fuel.
Manual gearbox
– Drive no more than about one length of your vehicle in first
gear. Always shift up into the next higher gear at approx. 2 000
to 2 500 revs.
Automatic gearbox
– Depress the accelerator pedal slowly. Do not depress it
beyond the kickdown position, however.
An effective way of achieving good fuel economy is to shift up early. You
will consume more fuel if you drive at unnecessarily high revolutions in
any given gear. The
⇒fig. 162 shows the ratio of fuel consumption to the speed of your
vehicle for the individual gears. Fuel consumption in 1st gear is the
highest, while that in 5th or the 6th gear is the lowest.
Only depress the accelerator pedal slowly if your vehicle is fitted with an
automatic gearbox in order to automatically select an economic driving
programme. You will achieve good fuel economy by shifting up early and
shifting down late. This applies in particular if you make use of the manual
mode (Tiptronic) for shifting gears.
Note
Also use the information supplied by the multi-functional indicator
⇒ page 18.
Avoiding full throttle
Driving more slowly means saving fuel.
Fig. 162 Fuel
consumption in
litres/100 km. and
speed in km/h.
Fig. 163 Fuel
consumption in
litres/100 km. and
speed in km/h.
s3ec.book Seite 195 Montag, 2. Mai 2005 3:42 15
Page 197 of 281

Driving and the Environment
196
Sensitive use of the accelerator will not only significantly reduce fuel
consumption but also positively influence environmental pollution and
wear of your vehicle.
You should avoid fully exploiting the top speed of your vehicle wherever
possible. Fuel consumption, pollutant emissions and vehicle noises
increase disproportionally at high speeds.
The ⇒page 195, fig. 163 shows the ratio of fuel consumption to the
speed of your vehicle. You will cut your fuel consumption by half if you only
make use three-quarters of the possible top speed of your vehicle.
Reducing idling
Idling also costs fuel.
It is worthwhile switching off the engine in a traffic jam or when waiting at
a level crossing or at traffic lights with a lengthy red phase. Even after just
30 - 40 seconds you will have saved more fuel than that is needed when
you start the engine up again.
If an engine is only idling it takes much longer for it to reach its normal
operating temperature. Wear-and-tear and pollutant emissions, though,
are particularly high in the warming-up phase. This is why you should
drive off right after starting the engine. Do avoid high engine revolutions
at this time, however.
Regular servicing
A poorly tuned engine consumes an unnecessarily high
amount of fuel.
Having your vehicle serviced regularly at a specialist garge enables you
to satisfy one of the requirements for economical motoring even before
you set off on your journey. Keeping your vehicle properly serviced not
only has a positive effect on the safety of your vehicle and maintaining its
value, but also saves on fuel.
A poorly tuned engine can result in a fuel consumption which is 10%
higher than normal.
The foreseen maintenance work should be undertaken exactly according
to the Service schedule by a specialist garage.
Also check the oil level after refueling. Oil consumption is dependent to
a considerable extent on the load and speed of the engine. Oil consump-
tion could be as high as 0.5 litres/1 000 km depending on your style of
driving.
It is quite normal that a new engine has a higher oil consumption at first,
and reaches its lowest level only after a certain running in time. It is there-
fore not possible to correctly assess the oil consumption of a new vehicle
until after you have driven about 5 000 km.
For the sake of the environment
•You can achieve additional improvements in your fuel economy by
using high-lubricity oils.
•Check the ground below your car at regular intervals to detect any
leakages in good time. Please have your vehicle inspected by a specialist
garge if you find any stains caused by oil or other fluids on the floor.
s3ec.book Seite 196 Montag, 2. Mai 2005 3:42 15