buttons SKODA SUPERB 2005 1.G / (B5/3U) Rhapsody Car Radio Manual
[x] Cancel search | Manufacturer: SKODA, Model Year: 2005, Model line: SUPERB, Model: SKODA SUPERB 2005 1.G / (B5/3U)Pages: 27, PDF Size: 1.37 MB
Page 3 of 27
2
OVERVIEW
Quick Reference Guide
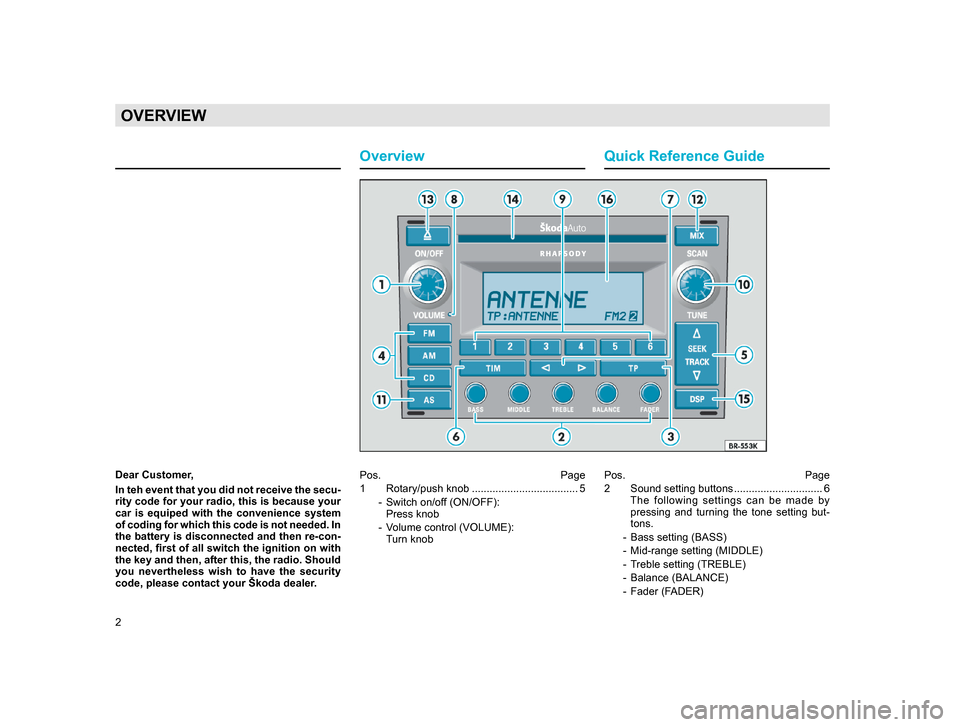
Pos. Page
1 Rotary/push knob .................................... 5
- Switch on/of
f (ON/OFF):
Press knob
- V
olume control (VOLUME): Turn knob Pos. Page
2 Sound setting buttons .............................. 6
T
he following settings can be made by
pressing and turning the tone setting but-
tons.
- Bass setting (BASS)
- Mid-range setting (MIDDLE)
- T
reble setting (TREBLE)
- Balance (BALANCE)
- Fader (F
ADER)
Overview
Dear Customer,
In teh event that you did not receive the secu-
rity code for your radio, this is because your
car is equiped with the convenience system
of coding for which this code is not needed. In
the battery is disconnected and then re-con-
nected, first of all switch the ignition on with
the key and then, after this, the radio. Should
you nevertheless wish to have the security
code, please contact your Škoda dealer.
20.indd 27.6.2003, 14:32
2
Page 4 of 27
3
QUICK REFERENCE GUIDE
Pos. Page
3 TP
button ................................................. 7
The traffic information function can be switched on by pressing briefly.
4 Source selection buttons ....................... 10
T
he programme source or memory level can be selected by briefly pressing the button:
- FM button (VHF)
- AM button (MW)
- CD button (CD operation)
5 Search function...................................... 10
A
station search can be started in in AM mode. The memory list can be viewed in
FM or TP mode.
I
n CD operation, you can jump from one track to the next in order by briefly pressing
the rocker switch. A track can be audibly
fast-forwarded and reversed using this
rocker switch.
6 TIM button ............................................. 12
The
TIM function is used to replay all traf- fic
information notices. The replay can be
started by pressing the TIM button.
- All
traffic notices will be recorded when the radio is switched on
- W
hen the radio is switched off, the recording mode can be activated by pressing the TIM
button Pos. Page
7 T
raffic radio announcement
rocker switch.......................................... 12
T
raffic announcements stored in TIM mode can be selected by briefly pressing the
rocker switch.
T
he traffic radio announcement function (TP) can be switched on or off by briefly
pressing this rocker switch. It can also be
used to select the individual traffic radio
stations.
8 Flashing diode ....................................... 13
W
hen the unit has been switched off and the
ignition key has been removed, this flashing
diode indicates that the anti-theft coding on
the car radio has been activated.
9 Station buttons....................................... 13
- for 12 FM and 12
AM stations.
The
station buttons are used to select CDs 1 - 6 in CD changer mode.
10 SCAN button
- Stations
can be tuned in manually by turn- ing .......................................................... 14
- All
stations that can be received will briefly be played ............................................... 14
- Special
settings can be made in the set-up menu by pressing and holding............... 14
- The
tracks on a CD can be scrolled through in order by turning the button in CD
mode...................................................... 15 Pos. Page
1
1 AS button ............................................... 15
T
he AS button can be used to store the 6 sta- tions with the best reception automatically
.
12 MIX button ............................................. 15
I
n CD mode, all tracks on a CD will be played in random order. All the CDs in a CD player
will be used in one is connected.
13 CD eject ................................................. 16
14 CD slot ................................................... 16
15 DSP
button ............................................ 18
Various tone settings can be selected by pressing the DSP button (e.g. CONCERT,
ARENA).
16 Displays ................................................. 19
Note
The
radio features an anti-theft coding system.
If the radio does not emit any sound when it is
switched on and the word „SAFE“ is displayed, it
has been electronically locked. See page 20 for
instructions!
20.indd 27.6.2003, 14:32
3
Page 11 of 27
10
CONTROLS AND EQUIPMENT
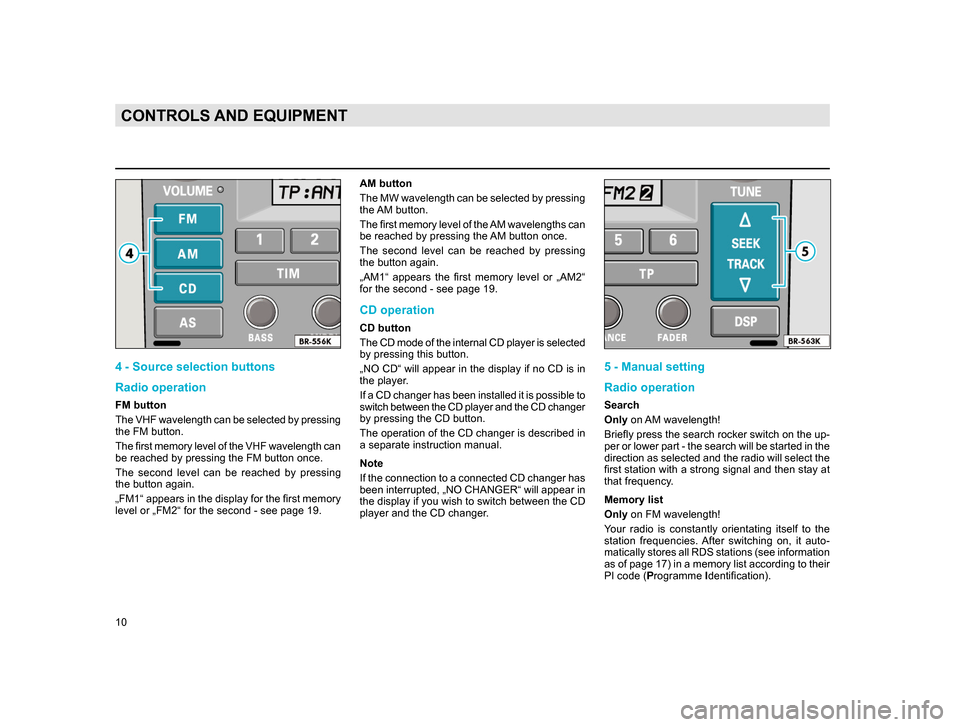
4 - Source selection buttons
Radio operation
FM button
The VHF wavelength can be selected by pressing
the FM button.
The first memory level of the VHF wavelength can
be reached by pressing the FM button once.
The second level can be reached by pressing
the button again.
„FM1“ appears in the display for the first memory
level or „FM2“ for the second - see page 19.AM button
The MW wavelength can be selected by pressing
the AM button.
The first memory level of the AM wavelengths can
be reached by pressing the AM button once.
The second level can be reached by pressing
the button again.
„AM1“ appears the first memory level or „AM2“
for the second - see page 19.
CD operation
CD button
The CD mode of the internal CD player is selected
by pressing this button.
„NO CD“ will appear in the display if no CD is in
the player.
If a CD changer has been installed it is possible to
switch between the CD player and the CD changer
by pressing the CD button.
The operation of the CD changer is described in
a separate instruction manual.
Note
If the connection to a connected CD changer has
been interrupted, „NO CHANGER“ will appear in
the display if you wish to switch between the CD
player and the CD changer.
5 - Manual setting
Radio operation
Search
Only
on AM wavelength!
Briefly press the search rocker switch on the up-
per or lower part - the search will be started in the
direction as selected and the radio will select the
first station with a strong signal and then stay at
that frequency.
Memory list
Only on FM wavelength!
Your radio is constantly orientating itself to the
station frequencies. After switching on, it auto-
matically stores all RDS stations (see information
as of page 17) in a memory list according to their
PI code (Programme Identification).
20.indd 27.6.2003, 14:32
10
Page 14 of 27
13
CONTROLS AND EQUIPMENT
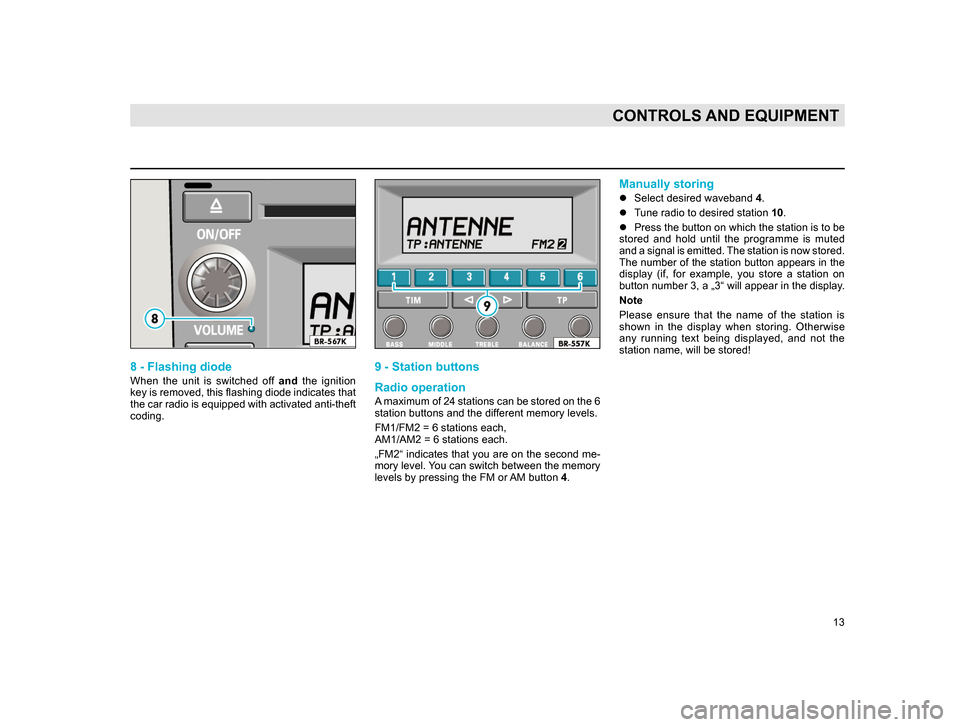
8 - Flashing diode
When the unit is switched off and the ignition
key is removed, this flashing diode indicates that
the car radio is equipped with activated anti-theft
coding.
9 - Station buttons
Radio operation
A maximum of 24 stations can be stored on the 6
station buttons and the different memory levels.
FM1/FM2 = 6 stations each,
AM1/AM2 = 6 stations each.
„FM2“ indicates that you are on the second me-
mory level. You can switch between the memory
levels by pressing the FM or AM button 4.
Manually storing
l Select desired waveband 4.
l T
une radio to desired station 10.
l Press
the button on which the station is to be
stored and hold until the programme is muted
and a signal is emitted. The station is now stored.
The number of the station button appears in the
display (if, for example, you store a station on
button number 3, a „3“ will appear in the display.
Note
P
lease ensure that the name of the station is
shown in the display when storing. Otherwise
any running text being displayed, and not the
station name, will be stored!
20.indd 27.6.2003, 14:32
13
Page 15 of 27
14
CONTROLS AND EQUIPMENT
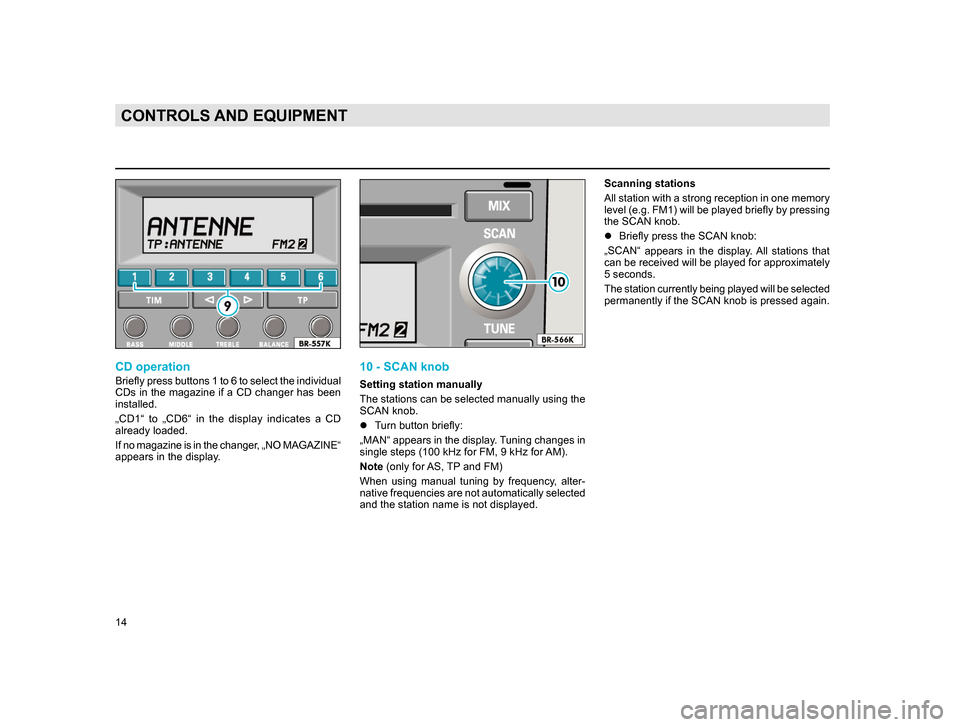
CD operation
Briefly press buttons 1 to 6 to select the individual
CDs in the magazine if a CD changer has been
installed.
„CD1“ to „CD6“ in the display indicates a CD
already loaded.
If no magazine is in the changer, „NO MAGAZINE“
appears in the display.
10 - SCAN knob
Setting station manually
The stations can be selected manually using the
SCAN knob.
lTurn button briefly:
„MAN“
appears in the display. Tuning changes in
single steps (100 kHz for FM, 9 kHz for AM).
Note (only for AS, TP and FM)
When
using manual tuning by frequency, alter-
native frequencies are not automatically selected
and the station name is not displayed. Scanning stations
All station with a strong reception in one memory
level (e.g. FM1) will be played briefly by pressing
the SCAN knob.
l
Briefly press the SCAN knob:
„SCAN“
appears in the display. All stations that
can be received will be played for approximately
5 seconds.
T
he station currently being played will be selected
permanently if the SCAN knob is pressed again.
20.indd 27.6.2003, 14:32
14
Page 20 of 27
19
CONTROLS AND EQUIPMENT
l Press the DSP button to select a certain sound
field. The chosen sound field (e.g. DRIVER) will
be shown in the display with a settings bar.
l T
he sound field can be further defined by turn-
ing
the SCAN button 10. The alteration made can
be seen on the settings bar.
The chosen sound field (e.g. „DRIVER“) will be
shown permanently in the display.
TALK
The sound field „TALK“ is particularly suited for
the spoken word.
LIVE
The
sound field „LIVE“ alters the sound presen-
tation of the spoken word and music so that you
feel as if you are in a small club.
CONCERT
T
he sound field „CONCERT“ alters the sound
presentation of the spoken word and music so
that you feel as if you are in a concert hall.
ARENA
T
he sound field „ARENA“ alters the sound presen-
tation of the spoken word and music so that you
feel as if you are at an open air concert. DRIVER
The sound field „DRIVER“ places the acoustic
centre of the music at the driver’s position.
Activating headphones
A set of headphones can be used to listen to
spoken word and music. The loudspeakers are
muted when in use.
l
To activate the headphones, press the DSP
button for approximately 2 seconds.
The
radio is muted. „HEADSET“ appears in the
display.
l Briefly
press the DSP button to deactivate the
headphones. The radio will return to loudspeaker
mode.
Note
lThe
headphones connection is located on the
rear side of the unit. Please go to a qualified deal-
ership to have a set of headphones in
stalled.
l The
sound fields are not available once the
headphones have been activated.
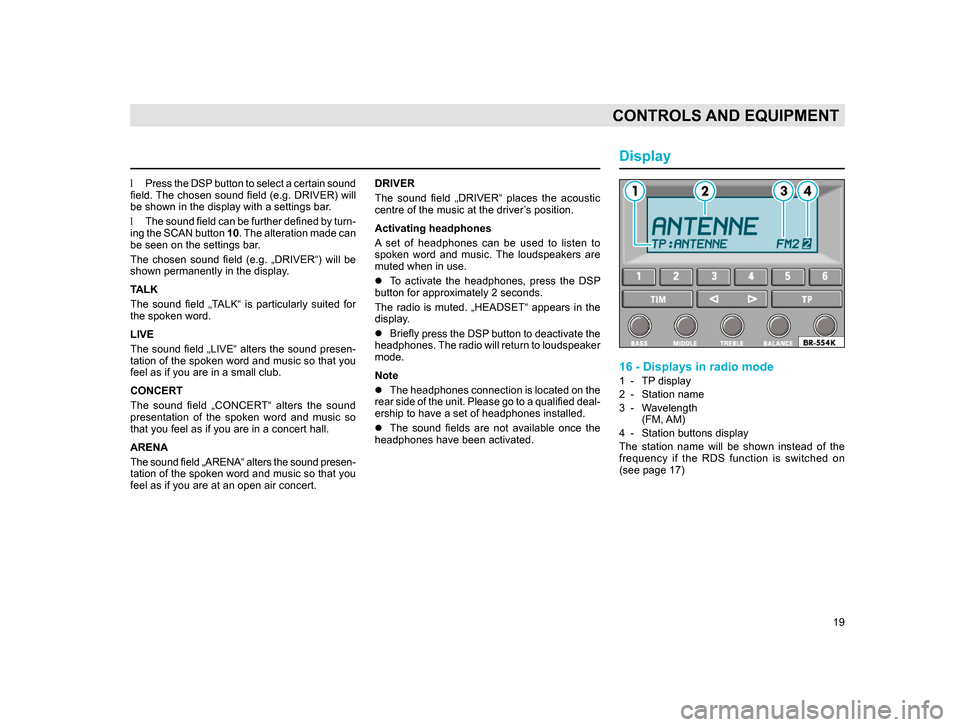
Display
16 - Displays in radio mode
1 - TP display
2 - Station name
3 - W
avelength (FM, AM)
4 - Station buttons display
T
he station name will be shown instead of the
frequency if the RDS function is switched on
(see page 17)
20.indd 27.6.2003, 14:32
19
Page 21 of 27
20
CONTROLS AND EQUIPMENT
Anti-theft coding
When the unit is switched off and the ignition key
has been removed, the flashing diode 8 will show
that the radio has anti-theft coding.
The anti-theft coding will electronically prevent
unauthorized persons from operating the unit if it
has been removed from the vehicle.
Convenience radio coding
For technical reasons, the convenience radio cod-
ing is not available for all vehicle models.
In the past one had to recode the radio manually
every time the unit was removed or when the
vehicle battery had been disengaged.
That has all changed with the new convenience
radio coding function: Once the code number
has been input in the radio it will then be stored
in the vehicle!
If the current supply has been interrupted the radio
will automatically compare „its“ code number with
the one stored in the vehicle. If the code numbers
are identical the radio will be ready for use after
just a few seconds.
It is therefore no longer necessary to disengage
the electronic lock manually!
If the code numbers are not identical, however,
because the radio has been fitted to another ve-
hicle, for example, the electronic lock will have to
be disengaged manually.In teh event that you did not receive the secu-
rity code for your radio, this is because your
car is equiped with the convenience system
of coding for which this code is not needed. In
the battery is disconnected and then re-con-
nected, first of all switch the ignition on with
the key and then, after this, the radio. Should
you nevertheless wish to have the security
code, please contact your Škoda dealer.
Cancelling the electronic lock
If the radio was installed in another vehicle,
„SAFE“ will appear in the display after the radio
is switched on.
To cancel the electronic lock, you must enter the
correct
code number.
It is essential that the following steps be carried
out in the correct order:
l Turn on the radio - the word „SAFE“ appears
in the display
.
l „1000“
will appear in the display after approxi-
mately 3 seconds.
If, however, „SAFE“ is still shown - together
with a small „2“ - in the left of the display,
the radio is blocked! The radio must remain
switched on for 1 hour to lift this block.
lInput
the code number attached to the code
card using the station buttons (9).
Use button 1 to input the first digit of
the code
number, button 2 to input the second digit ,
and so on. l
Then press either the search or the manual
setting
rocker switch for longer than 2 seconds.
Release button!
l A
frequency will be shown automatically shortly
after the correct code has been input.
The radio can now be used again!
Incorrect Code Number
Should
you inadvertently input the incorrect code
number in attempting to release the electronic
lock, the word „SAFE“ will appear in the display
- first flashing and then permanently.
You can now repeat the entire cancelling proce-
dure once . The number of attempts will be shown
in the display.
If you input another incorrect number, your ra-
dio will be blocked for approximately one hour,
i.e. the radio cannot be turned on. This will be
indicated through the small „2“ in the bottom
left of the display. After an hour, the radio must
remain switched on, the display with the number
of attempts goes out and you can cancel the
electronic lock as described above.
T
his cycle - two attempts, one hour lock - will
remain the same.
20.indd 27.6.2003, 14:32
20
Page 23 of 27
22
TECHNICAL DATA
Technical Quick Reference Guide
Connection options
Electronic aerial, CD changer, headphones, mo-
bile telephone, muting, output circuit for antenna
diversity system. Information is available from
Škoda dealers.
Displays
Frequency, station name, RDS, wavelength, sta-
tion button, TP (traffic radio) with station name
for TP batch station, CD functions, display for
CD slot content for connected CD changer, DSP,
headphones.
Max. output
4 x 20 Watt (max),
4 x 17 Watt (DIN measurement at 4 Ohm).
Illumination
Non-dazzle illumination of controls from within
(night design), brightness controlled with in-
strument lighting.
Waveband selection
Touch buttons
Anti-theft coding
Radio is electronically locked up if current supply
is interrupted.
Frequency ranges
FM (VHF) AM (MW), additional FM tuner for TP
batch reception.
Suppression
Automatic suppression in radio largely eliminates
interference in FM and in AM mode.
Specially tuned suppressors largely eliminates all
interference impulses from the engine and other
parts of the electrical system e.g. heater blowers,
windscreen wipers, cooler fan etc.
Station selection
In radio mode, automatic selection of last station
tuned in before radio switched off (last station
memory).
Six station buttons for AM1/AM2 and FM1/FM2
stations. Manual tuning up-band and down-band.
Microcomputer-controlled frequency stabilization
(PLL quartz tuning).Traffic radio batch receiver for individual TP sta-
tion selection independent of the station being
listened to. Permanent and automatic updates
of the RDS direct synchronisation with a special
display of the last selected station, current station
and the station to be expected.
Traffic news feature
Traffic radio batch receiver for individual TP sta-
tion selection independent of the station being
listened to.
Switch from MONO and DSP menu „Talk“ when
the traffic announcement function is active (TA:
Traffic Announcement).
Traffic radio announcement store (TIM) with a
4 minute memory and 2 individually selectable
recording times for parked vehicle.
Automatic station finder, automatic traffic news
announcement function, switch to „mono“ for
traffic news announcements.
Stereo (radio and CD), active sound settings,
fader integrated into radio, speed-dependent
volume control (GALA), multi-speaker system.
Active sound settings for BASS, MIDDLE, TRE-
BLE which can be set individually for every source
(AM, FM, CD and telephone).
20.indd
27.6.2003, 14:32
22
Page 25 of 27
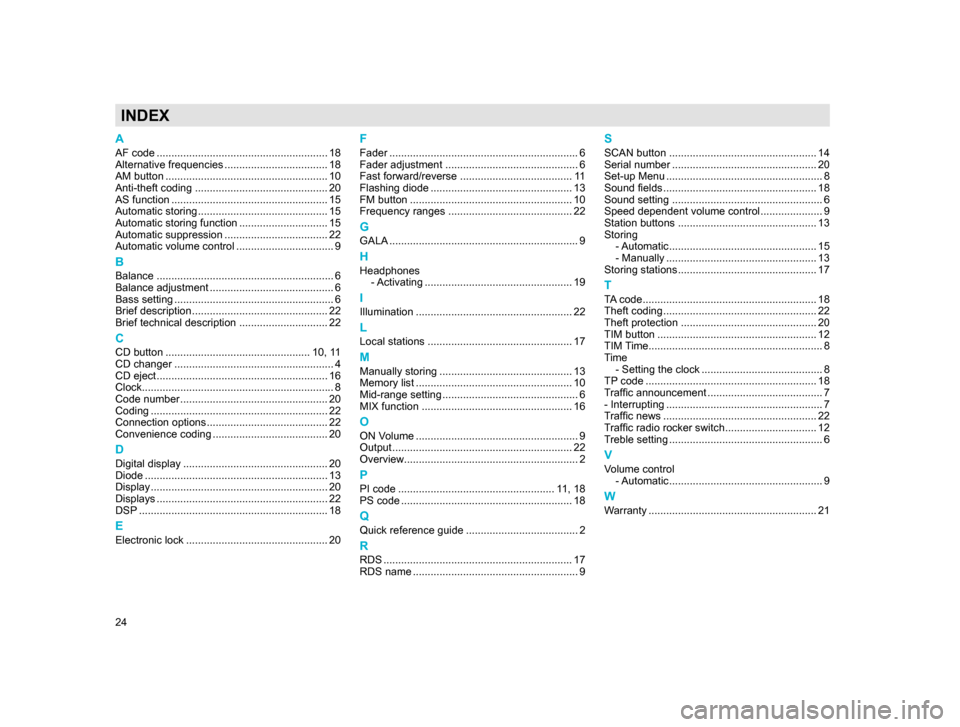
24
INDEX
A
AF code .......................................................... 18
Alternative frequencies ................................... 18
AM button ....................................................... 10
Anti-theft coding ............................................. 20
AS function ..................................................... 15
Automatic storing ............................................ 15
Automatic storing function .............................. 15
Automatic suppression ................................... 22
Automatic volume control ................................. 9
B
Balance ............................................................ 6
Balance adjustment .......................................... 6
Bass setting ...................................................... 6
Brief description .............................................. 22
Brief technical description .............................. 22
C
CD button ................................................. 10, 11
CD changer ...................................................... 4
CD eject .......................................................... 16
Clock................................................................. 8
Code number .................................................. 20
Coding ............................................................ 22
Connection options ......................................... 22
Convenience coding ....................................... 20
D
Digital display ................................................. 20
Diode .............................................................. 13
Display ............................................................ 20
Displays .......................................................... 22
DSP ................................................................ 18
E
Electronic lock ................................................ 20
F
Fader ................................................................ 6
Fader adjustment ............................................. 6
Fast forward/reverse ...................................... 1
1
Flashing diode ................................................ 13
FM button ....................................................... 10
Frequency ranges .......................................... 22
G
GALA ................................................................ 9
H
Headphones - Activating .................................................. 19
I
Illumination ..................................................... 22
L
Local stations ................................................. 17
M
Manually storing ............................................. 13
Memory list ..................................................... 10
Mid-range setting .............................................. 6
MIX function ................................................... 16
O
ON Volume ....................................................... 9
Output ............................................................. 22
Overview........................................................... 2
P
PI code ..................................................... 1 1, 18
PS code .......................................................... 18
Q
Quick reference guide ...................................... 2
R
RDS ................................................................ 17
RDS name ........................................................ 9
S
SCAN button .................................................. 14
Serial number ................................................. 20
Set-up Menu ..................................................... 8
Sound fields .................................................... 18
Sound setting ................................................... 6
Speed dependent volume control ..................... 9
Station buttons ............................................... 13
Storing -
Automatic.................................................. 15
- Manually ................................................... 13
Storing stations ............................................... 17
T
TA code........................................................... 18
Theft coding .................................................... 22
Theft protection .............................................. 20
TIM button ...................................................... 12
TIM
Time........................................................... 8
T
ime - Setting the clock ......................................... 8
TP
code .......................................................... 18
T
raffic announcement ....................................... 7
- Interrupting ..................................................... 7
T
raffic news .................................................... 22
T
raffic radio rocker switch............................... 12
T
reble setting .................................................... 6
V
Volume control - Automatic.................................................... 9
W
Warranty ......................................................... 21
20.indd 27.6.2003, 14:32
24