service SKODA SUPERB 2006 1.G / (B5/3U) User Guide
[x] Cancel search | Manufacturer: SKODA, Model Year: 2006, Model line: SUPERB, Model: SKODA SUPERB 2006 1.G / (B5/3U)Pages: 281, PDF Size: 12.67 MB
Page 33 of 281
Instruments and Indicator/Warning Lights
32
Coolant temperature, Coolant quantity
The warning light comes on for a few seconds 1) when the ignition is
switched on.
The coolant temperature is too high or the coolant level too low if the
warning light
does not go out after the engine is started or flashes while
driving.
3 peeps sound as an additional warning signal.
In this case stop and switch the engine off and check the coolant level;
top up the coolant as necessary. Please also refer to the additional
instructions ⇒page 226, “Replenishing the coolant”.
Do not continue your journey if for some reason it is not possible under
the conditions prevailing to top up with coolant. Keep the engine
switched off and obtain professional assistance from a specialist garage,
otherwise it could lead to severe engine damage.
If the coolant is within the specified range, the increased temperature may
be caused by an operating problem at the coolant fan. Check the fuse for
the coolant fan, replace it if necessary ⇒page 260, “Replacing fuses”.
Do not continue driving if the warning light does not go off although the
fluid is at the correct level and also the fuse of the fan is in proper order.
Contact a specialist garage to obtain assistance.
Please also refer to the additional instructions ⇒page 226, “Replenishing
the coolant”.
The following text will be displayed in the information display*:
STOP CHECK COOLANT SERVICE MANUAL (STOP! CHECK
COOLANT! OWNER'S MANUAL)
WARNING
•If you must stop for technical reasons, then park the vehicle at
a safe distance from the traffic and switch off the engine and switch
on the hazard warning light system ⇒page 59.
•Take care when opening the coolant expansion bottle. If the
engine is hot, the cooling system is pressurized - risk of scalding!
It is best to allow the engine to cool down before removing the cap.
•Do not touch the coolant fan! The coolant fan may switch on
automatically even if the ignition is off.
Thickness of the brake pads
If the warning light comes on, contact a specialist garage immediately
and have the brake pads on all of the wheels inspected.
A peep sounds as an additional warning signal.
The following text will be displayed in the information display*:
CHECK BRAKE PADS
Bonnet
The warning light comes on when the ignition is switched on if the
bonnet is unlocked.
Fuel reserve
The warning light comes on, if the fuel level is still below 8 litres.
1)The warning light on vehicles fitted with information display does not come on
after switching the ignition on, but only if the coolant temperature is too high or the
coolant level is too low.
NKO B5 20.book Page 32 Monday, July 3, 2006 2:09 PM
Page 34 of 281
Instruments and Indicator/Warning Lights33
Using the systemSafetyDriving TipsGeneral MaintenanceBreakdown assistanceTechnical Data
A peep sounds as an additional warning signal.
The following text will be displayed in the information display*:
PLEASE REFUEL
Engine oil
The warning light lights up red (low oil pressure)
The warning light comes on for a few seconds 2) when the ignition is
switched on.
Stop the vehicle and switch the engine off if the warning light does not
go off after the engine has started or flashes while driving. Check the oil
level and top up with oil as necessary ⇒ page 223.
3 peeps sound as an additional warning signal.
Do not continue your journey if for some reason it is not possible under
the conditions prevailing to top up with oil. Keep the engine switched off
and obtain professional assistance from a specialist garage, otherwise it
could lead to severe engine damage.
Do not drive any further if the warning light remains on even if the oil is
at the correct level. Do not run the engine not at idling speed either.
Contact the nearest specialist garage to obtain professional assistance.
The following text will be displayed in the information display*:
STOP! OIL PRESS. STOP MOTOR! SERVICE MANUAL (STOP! OIL
PRESSURE STOP ENGINE! OWNER'S MANUAL) The warning light
lights up yellow* (oil quantity too low)
If the warning light lights up yellow, there is not the correct quantity of oil
in the engine. Check as soon as possible the oil level or top up
⇒ page 223 with engine oil.
A peep sounds as an additional warning signal.
The following text will be displayed in the information display*:
CHECK OIL LEVEL
The warning light will go out if the bonnet is left open for more than 30
seconds. If no engine oil has been replenished, the warning light will come
on again after driving about 100 km.
The warning light
flashes yellow* (engine oil level sensor faulty)
A fault on the engine oil level sensor is indicated additionally by an audible
signal and the warning light coming on several times after the ignition has
been switched on.
In this case have the engine inspected without delay by a specialist
garage.
The following text will be displayed in the information display*:
OIL SENSOR WORKSHOP!
WARNING
•If you must stop for technical reasons, then park the vehicle at
a safe distance from the traffic and switch off the engine and switch
on the hazard warning light system ⇒page 59.
•The red oil pressure light is not an oil le vel indicator! One
should therefore check the oil level at regular intervals, preferably
after every refueling stop.
2)The warning light on vehicles fitted with information display does not come on
after switching the ignition on, but only if a fault exists or the engine oil level is too
low.
NKO B5 20.book Page 33 Monday, July 3, 2006 2:09 PM
Page 36 of 281
Instruments and Indicator/Warning Lights35
Using the systemSafetyDriving TipsGeneral MaintenanceBreakdown assistanceTechnical Data
The warning light will come on and remains on if the ESP is switched off
or if there is a fault in the system.
The fact that the ESP system operates together with the ABS means that
the ESP warning light will also come on if the ABS system is not operating
properly.
Further information on the ESP
⇒page 185, “Electronic stability
programme (ESP)*”.
Traction control system (TCS) *
The warning light comes on for a few seconds when the ignition is
switched on.
The warning light comes on when driving when a control cycle is acti-
vated.
The warning light will come on and remains on if the TCS is switched off
or if there is a fault in the system.
The fact that the TCS system operates together with the ABS means that
the TCS warning light will also come on if the ABS system is not operating
properly.
Further information about the TCS ⇒page 186, “Traction control system
(TCS)*”.
Antilock brake system (ABS)
The warning light shows the functionality of the ABS and the Electronic
Differential Lock (EDL). The warning light comes on for a few seconds after the ignition has been
switched on or when starting the engine. The warning light goes out after
an automatic check sequence has been completed.
A fault in the ABS
The system is not functioning properly if the warning light
does not go
out within a few seconds after switching on the ignition, does not light up
at all or lights up while driving. The vehicle will only be braked by the
normal brake system. Visit a specialist garage as quickly as possible and
adjust your style of driving in the meantime since you will not know how
great the damage is.
Three additional warning tones will sound if there is a major fault in the
ABS.
Further information about ABS ⇒page 189, “Antilock brake system
(ABS)”.
A fault in the entire brake system
If the ABS warning light
comes on together with the brake system
warning light (handbrake must be released), there is a fault not only in
the ABS but also in another part of the brake system ⇒.
The following text will be displayed in the information display*:
STOP BRAKE FAULT OWNER'S MANUAL
Electronic Differential Lock (EDL)
The EDL is a part of the ABS. A fault in the EDL is indicated by the ABS
warning light
in the instrument cluster. Have the vehicle inspected
without delay by a Škoda Service Partner. Further information on the EDL
⇒ page 187, “Electronic Differential Lock (EDL)”.
WARNING
•If the brake system warning light comes on together with the
ABS warning light stop the vehicle immediately and check the
NKO B5 20.book Page 35 Monday, July 3, 2006 2:09 PM
Page 39 of 281
Unlocking and locking
38
Unlocking and locking
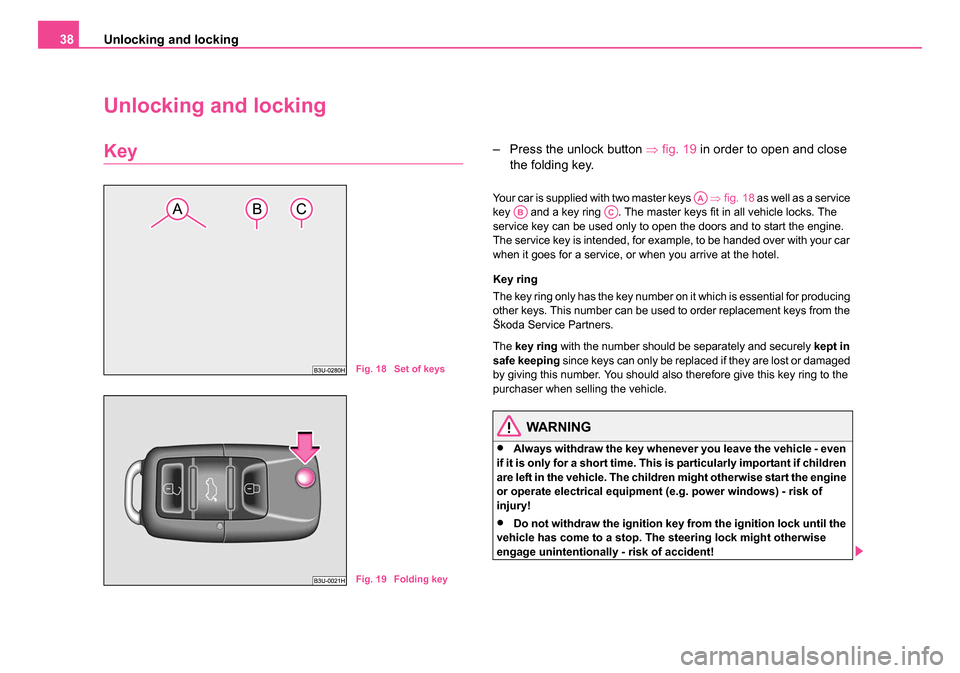
Key– Press the unlock button ⇒fig. 19 in order to open and close
the folding key.
Your car is supplied with two master keys ⇒fig. 18 as well as a service
key and a key ring . The master keys fit in all vehicle locks. The
service key can be used only to open the doors and to start the engine.
The service key is intended, for example, to be handed over with your car
when it goes for a service, or when you arrive at the hotel.
Key ring
The key ring only has the key number on it which is essential for producing
other keys. This number can be used to order replacement keys from the
Škoda Service Partners.
The key ring with the number should be separately and securely kept in
safe keeping since keys can only be replaced if they are lost or damaged
by giving this number. You should also therefore give this key ring to the
purchaser when selling the vehicle.
WARNING
•Always withdraw the key whenever you leave the vehicle - even
if it is only for a short time. This is particularly important if children
are left in the vehicle. The children might otherwise start the engine
or operate electrical equipment (e.g. power windows) - risk of
injury!
•Do not withdraw the ignition key fr om the ignition lock until the
vehicle has come to a stop. The steering lock might otherwise
engage unintentionally - risk of accident!
Fig. 18 Set of keys
Fig. 19 Folding key
AAABAC
NKO B5 20.book Page 38 Monday, July 3, 2006 2:09 PM
Page 40 of 281
Unlocking and locking39
Using the systemSafetyDriving TipsGeneral MaintenanceBreakdown assistanceTechnical Data
Caution
•Each key contains electronic components; therefore protect them
against moisture and severe shocks.
•Keep the groove of the keys absolutely clean as impurities (textile
fibres, dust etc.) have a negative effect on proper operation of the keys
and the ignition lock.
Note
Please approach a Škoda Service Partner if you lose a key since he can
obtain a new one for you.
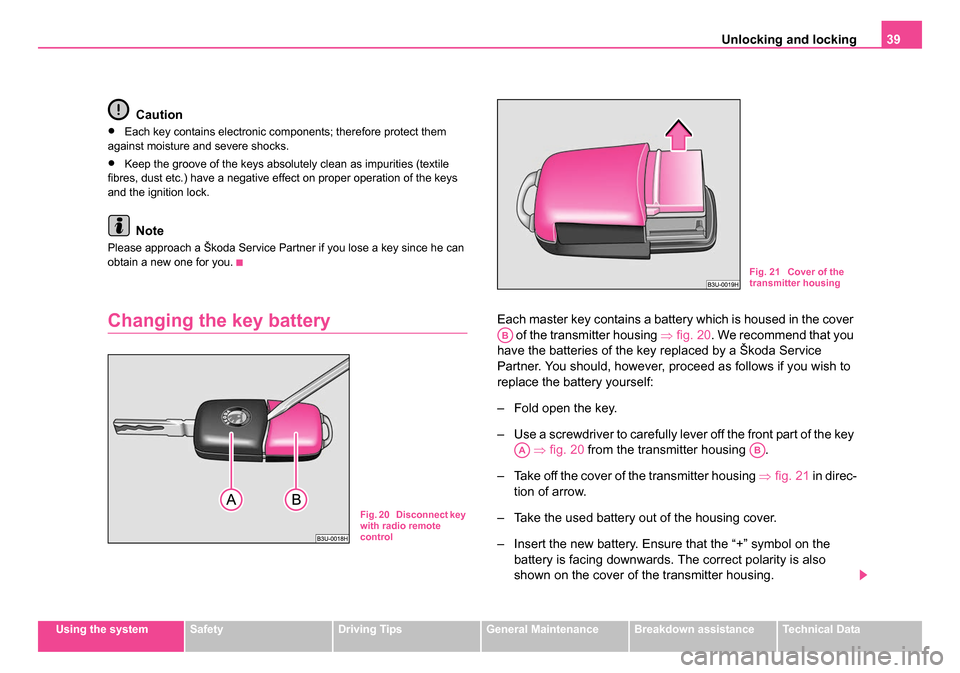
Changing the key batteryEach master key contains a battery which is housed in the cover of the transmitter housing ⇒ fig. 20. We recommend that you
have the batteries of the key replaced by a Škoda Service
Partner. You should, however, proceed as follows if you wish to
replace the battery yourself:
– Fold open the key.
– Use a screwdriver to carefully lever off the front part of the key ⇒ fig. 20 from the transmitter housing .
– Take off the cover of the transmitter housing ⇒fig. 21 in direc-
tion of arrow.
– Take the used battery out of the housing cover.
– Insert the new battery. Ensure that the “+” symbol on the battery is facing downwards. The correct polarity is also
shown on the cover of the transmitter housing.
Fig. 20 Disconnect key
with radio remote
control
Fig. 21 Cover of the
transmitter housing
AB
AAAB
NKO B5 20.book Page 39 Monday, July 3, 2006 2:09 PM
Page 42 of 281
Unlocking and locking41
Using the systemSafetyDriving TipsGeneral MaintenanceBreakdown assistanceTechnical Data
So long as the child safety lock is switched on it is not possible to open the
door from the inside with the door opening lever. In this case the door can
be opened only from the outside.
Central locking system
Description
Unlocking or locking the vehicle causes
all doors to be unlocked or locked
at the same time by the central locking system. The boot lid is unlocked
when opening. It can be opened by pressing the hand grip above the
licence plate.
Operation of the central locking system is possible:
•from the outside using the vehicle key ⇒page 42
•using the buttons for the central locking system ⇒page 43
•by using the radio remote control ⇒page 46
Convenience operation of windows
One can open and close the electrically powered windows when unlocking
and locking the vehicle ⇒page 51, “Window convenience operation”. The
electric sliding/tilting roof* can only be closed by the central locking
system.
Opening a single door*
This function allows one to just unlock the driver's door. The other doors
remain locked and are only unlocked when the command is repeated. The
single door opening function can be first activated by recoding the control
unit of the central locking system. This work is undertaken by a Škoda
Service Partner can give you more information. Automatic locking*
All the doors and the boot lid are locked automatically once the car
reaches a speed of about 15 km/h.
If the ignition key is withdrawn, the car is then automatically unlocked
again. In addition, it is possible for the driver to unlock the car by pressing
the central locking button
or by pulling the door opening lever.
If you wish, your Škoda Service Partner can convert the central locking
system of your car to the automatic locking mode.
WARNING
Locking the doors prevents involuntary opening in an exceptional
situation (an accident). Locked doors prevent unwanted entry into
the vehicle from outside, for example at road crossings. Locked
doors do, however, make it more difficult for rescuers to get into
the vehicle in an emergency - danger to life!
Note
•After unlocking the vehicle see, if the securing knobs are located on all
doors at the bottom.
•In the event of an accident in which the airbags are deployed, the
locked doors are automatically unlocked in order to enable rescuers to
gain access to the vehicle.
•Should the central locking system not operate properly, you can lock
and unlock the front doors and the boot lid with the key. Emergency
unlocking of fuel filler flap ⇒page 217.
NKO B5 20.book Page 41 Monday, July 3, 2006 2:09 PM
Page 47 of 281
Unlocking and locking
46
•Never drive with the tailgate fully opened or slightly ajar other-
wise exhaust gases may get into the interior of the vehicle - risk of
poisoning!
Note
After closing the tailgate, it is au tomatically locked within 5 seconds
and the anti-theft alarm system* is activated. This applies only if the
vehicle was locked before closing the boot lid.
Remote control
Description
You can use the remote control:
•to unlock and lock the car,
•unlocking boot lid,
•opening and closing window.
The transmitter with the battery is housed in the handle of the master key.
The receiver is located in the interior of the car. The operating range of the
remote control is 10 metres but this range can be reduced if the batteries
are weak.
The master key has a fold-open key bit which can be used for unlocking
and locking the car manually and also for starting the engine.
If a lost key is replaced or if the receiver unit has been repaired or a new
unit installed, it is then necessary for a Škoda Service Partner to initialise
the system. Only after this is it possible to again use the remote control.
Note
•The remote control is automatically deactivated when the ignition is
switched on.
•The operation of the remote control may temporarily be affected by
interference from transmitters close to the car and which operate in the
same frequency range (e.g. mobile phone, TV transmitter).
•The battery must be replaced, ideally by a Škoda Service Partner, if
the central locking or anti-theft alarm system does react to the remote
control at less than 3 metres away.
Unlocking and locking car
Unlocking th e vehicle
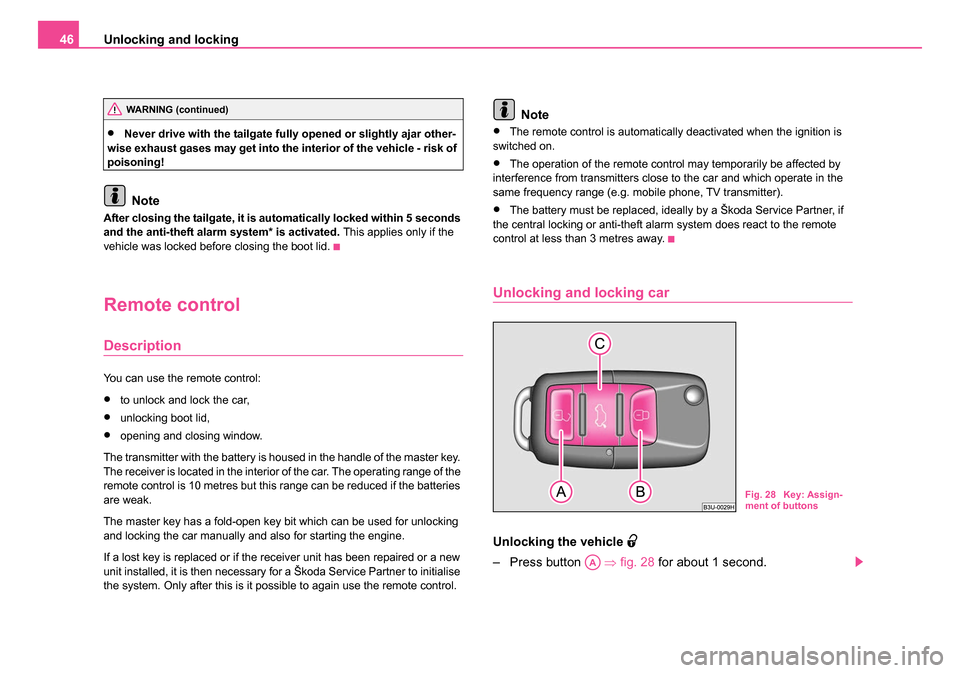
– Press button ⇒fig. 28 for about 1 second.
WARNING (continued)
Fig. 28 Key: Assign-
ment of buttons
AA
NKO B5 20.book Page 46 Monday, July 3, 2006 2:09 PM
Page 49 of 281
Unlocking and locking
48
Anti-theft alarm system*
Description
The anti-theft alarm system increases the level of protection against
people seeking to break into the vehicle. The system triggers audible and
visual warning signals if an attempt is made to break into the vehicle.
How is the alarm system switched on?
The anti-theft alarm system is activated automatically when the vehicle is
locked with the key on the closed driver's door or by using the remote
control. It is activated 30 seconds after closing the door.
How is the alarm system switched off?
The anti-theft alarm system is switched off if the vehicle is unlocked by
only using the remote control. The vehicle is automatically locked again if
the vehicle is not opened within 30 seconds after reactivating the anti-theft
alarm system.
Once you unlock the vehicle by inserting the key into the driver door you
then have to insert the key into the ignition lock and switch the ignition on
within 15 seconds after opening the door in order to deactivate the anti-
theft alarm system. The alarm will be triggered if you do not switch on
the ignition within 15 seconds.
When is the alarm triggered?
The following security areas of the locked vehicle are monitored:
•Bonnet,
•Boot lid,
•Doors,
•Ignition lock,
•Vehicle interior* ⇒page 49,
•A drop in voltage of the on-board power supply. An alarm is immediately triggered if either of the two battery terminals is
disconnected while the anti-theft alarm system is activated.
If you unlock and open the boot lid with the key, the alarm is immediately
triggered.
How is the alarm switched off?
You switch the alarm off if you unlock the car with the radio remote control
in the key or if you switch the ignition on.
Indicator light (LED)
The LED in the top of the door trim on the driver door first of all flashes
rapidly after the car is locked, then slowly. This indicates that the anti-theft
alarm system
including the interior monitor* is activated.
Note
•The working life of the alarm siren is 5 years. More detailed information
is available from your Škoda Service Partner.
•Before leaving the car, check that all the doors, windows and the elec-
tric sliding/tilting roof* are properly closed in order to ensure that the anti-
theft alarm system is fully operational.
•Coding of the radio remote control and the receptor part precludes the
use of the radio remote control from other vehicles.
NKO B5 20.book Page 48 Monday, July 3, 2006 2:09 PM
Page 68 of 281

Lights and Visibility67
Using the systemSafetyDriving TipsGeneral MaintenanceBreakdown assistanceTechnical Data
Replacing the wiper blades
Taking off the wiper blade
– Fold windscreen wiper arm out from the windscreen and posi-
tion the wiper blade at right angles to the wiper arm ⇒fig. 51.
– Press the securing spring in the direction of arrow and press the wiper blade to the windscreen at the same time in
the direction of arrow ⇒.
Attaching a wiper blade
– Push the wiper blade onto the wiper arm. The securing spring must click into place audibly.
Wiper blades in proper condition are essential to obtain good visibility.
Wiper blades should not be allowed to become dirtied by dust, insect
remains and preserving wax. Juddering or smearing of the wiper blades could then be due to wax resi-
dues left on the windscreen by vehicle washing in automatic vehicle wash
systems. It is therefore important to
degrease the lips of the wiper blades
after every pass through an automatic vehicle wash system .
WARNING
•If the windscreen wipers are handled carelessly, there is a risk
of damage to the windscreen.
•You should clean the wiper blades regularly with a windscreen
cleaner in order to avoid any smears. Clean a wiper blade with a
sponge or cloth if it is very dirty, for example from insect residues.
•Replace the wiper blades once or twice a year for safety
reasons. We recommend having the windscreen wiper blades
purchased at a Škoda Service Partner.
Rear-view mirror
Manual dimming interior rear-view mirror
Basic setting
– Pull the lever on the bottom edge of the mirror forward.
Dimming mirror
– Pull the lever on the bottom edge of the mirror back.
Fig. 51 Wiper blade for
the windscreen wiper
AA
AB
NKO B5 20.book Page 67 Monday, July 3, 2006 2:09 PM
Page 76 of 281
Seats and Stowage75
Using the systemSafetyDriving TipsGeneral MaintenanceBreakdown assistanceTechnical Data
Note
•When storing settings with the memory buttons, we recommend that
you begin with the front button and assign a memory button to each addi-
tional driver.
•Each new setting stored with the same button erases the previous
setting.
•Each time you store the seat and exterior mirror settings for driving
forward you also have to re-store the individual setting of the exterior
mirror on the passenger side for reversing.
Assigning remote control to the memory buttons
After storing the settings of the seat and exterior mirrors, you
have 10 seconds in order to assign the remote control to the
appropriate memory button.
– Withdraw the ignition key.
– Press the release button ⇒page 46 and hold it pressed for 1
second until an audible signal confirms that the setting has
been stored. The setting is stored with the memory button
which you have selected.
If you wish to be able to retrieve the settings which are stored in the
memory by also using the remote control, you have to assign the remote
control to a memory button in each case.
We recommend that you assign one of the two remote controls supplied
with your car, to the front memory button, and the other remote control key
to the middle memory button. If you wish, you can obtain an additional key with radio remote control from
a Škoda Service Partner and then assign the radio remote control to the
rear memory button.
Note
•If the remote control had previously been assigned to another memory
button, this setting is then erased by the new assignment.
•If you assign the remote control to a memory button which has already
been assigned to a remote control, the old assignment is also replaced by
a new assignment in this case.
•The assignment of the remote control to a memory button is retained,
however, after reassigning the seats and exterior mirrors.
Retrieving seat and exterior mirror settings for driving
forward
You can retrieve the stored settings either with the
memory buttons or with the remote control*.
Retrieving settings with memory buttons
– For safety reasons, you can only retrieve the seat and mirror
settings if the ignition is switched off. You have a choice of two
different ways of retrieving the settings:
– One-touch automatic memory: with the driver door open,
operate the desired memory button ⇒page 74, fig. 56
with one-touch. The seat and the exterior mirrors now move
automatically into the stored position.
AD
NKO B5 20.book Page 75 Monday, July 3, 2006 2:09 PM