radio SKODA SUPERB 2006 1.G / (B5/3U) Owner's Guide
[x] Cancel search | Manufacturer: SKODA, Model Year: 2006, Model line: SUPERB, Model: SKODA SUPERB 2006 1.G / (B5/3U)Pages: 281, PDF Size: 12.67 MB
Page 144 of 281

Communicating and Navigating143
Using the systemSafetyDriving TipsGeneral MaintenanceBreakdown assistanceTechnical Data
•TR01, TR02 etc. - title of the selected CD.
Note
For more details see Radio Owners Manual.
Fault displays
On the radio display the following fault displays can be displayed:
•NO CD CHANGER - CD-changer is not connected to the magazine.
•NO CD MAGAZINE - no magazine in the CD-changer.
•NO CD - the selected compartment in the magazine of the CD-changer
is empty.
•SURFACE - in the selected compartment the CD with playback side is
inserted upwards.
Tips for operating the CD-changer
Please pay attention to the following notes for operating the CD-
changer.
•Only clean CDs without scratches and damages should be used, in
order to guarantee a proper, high-quality CD-playback.
•Affix no labels to the CDs.
•Always store non-used CDs in the CD-storage from the Škoda
genuine accessories provided for this as well as in the original folding box.
•Never expose CDs to direct sun rays.
•Use a soft, non-fluffy cloth to clean the CDs. Wipe the CD straight-lined
from the middle to the outside. Strong dirt must be eliminated with usual
CD-cleaner.
•Please never use liquids such as gasoline, paint thinner or disk
cleaner, otherwise the surface of the CD could get damaged.
Precaution measures for laser equipment
Laser equipment is classified according to DIN IEC 76 (CO) 6/VDE 0837
in the safety categories 1 - 4.
The Škoda CD-changer corresponds to the safety category 1.
The laser used for equipment of category 1 is to such an extent energy-
poor and/or shielded that there is no risk of danger when used in accord-
ance with the regulation.
WARNING
Please always pay full attention to the traffic situation around you!
Note
Do not remove the equipment cover. The equipment does not contain any
parts, which can be serviced by the user.
Warranty
The same guarantee conditions apply for our factory-fitted radio system
as for new vehicles.
NKO B5 20.book Page 143 Monday, July 3, 2006 2:09 PM
Page 146 of 281

Communicating and Navigating145
Using the systemSafetyDriving TipsGeneral MaintenanceBreakdown assistanceTechnical Data
Mobile phone, two-way radio system and
navigation system
Universal telephone connection at the front* (GSM II)
A telephone mount is factory-fitted. The mount is attached to the
centre console. Adapter (Cullmann) and mobile phone are not
factory-fitted by Škoda Auto.
Initialisation
– Withdraw the ignition key.
– First insert the adapter without the mobile phone into the
mount in the direction of arrow ⇒fig. 133 until the
adapter is touching the stop. Press the adapter slightly in the
direction of arrow until it locks into position. – Plug the adapter cable into the mobile phone socket. The
socket is located on the mobile phone mount below.
– Switch on the ignition.
– Wait approximately 20 seconds, switch off the ignition and pull the ignition key out of the ignition lock.
– Insert the mobile phone into the adapter (as specified in manufacturer's instructions) and switch on the ignition.
Removing the mobile phone and adapter
– Press the button and remove the mobile telephone.
An initialisation must be carried out:
•after the first connection of the adapter,
•after reconnecting the battery,
•after pulling out the adapter cable from the power socket for the mobile
phone.
This enables you to make full use of the advantages of a normal carphone
(“handsfree system” using a microphone integrated in the vehicle, optimal
transmission of signals using an external aerial etc.). The battery of the
mobile phone is also constantly charged.
Please contact your Škoda Service Partner if there are any points which
are not clear.
Please also refer to the additional instructions ⇒page 147, “Mobile
phones and two-way radio systems”.Fig. 133 Universal
telephone connection
at the front
ABA1
A2
AA
AC
NKO B5 20.book Page 145 Monday, July 3, 2006 2:09 PM
Page 147 of 281
Communicating and Navigating
146
Telephone pre-installation at the front or rear* (GSM
III)
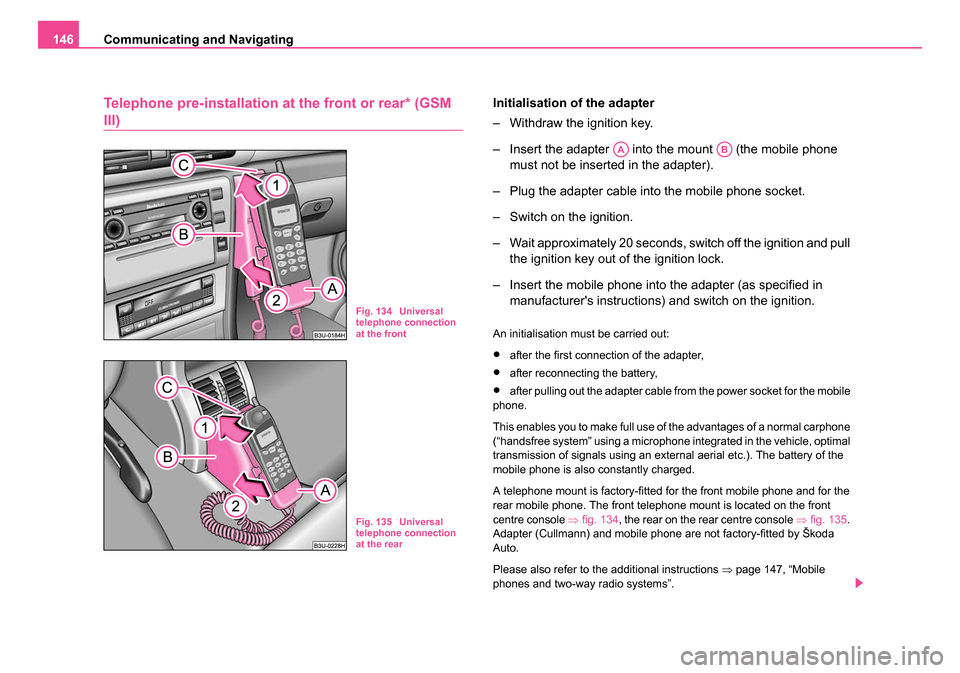
Initialisation of the adapter
– Withdraw the ignition key.
– Insert the adapter into the mount (the mobile phone
must not be inserted in the adapter).
– Plug the adapter cable into the mobile phone socket.
– Switch on the ignition.
– Wait approximately 20 seconds, switch off the ignition and pull the ignition key out of the ignition lock.
– Insert the mobile phone into the adapter (as specified in manufacturer's instructions) and switch on the ignition.
An initialisation must be carried out:
•after the first connection of the adapter,
•after reconnecting the battery,
•after pulling out the adapter cable from the power socket for the mobile
phone.
This enables you to make full use of the advantages of a normal carphone
(“handsfree system” using a microphone integrated in the vehicle, optimal
transmission of signals using an external aerial etc.). The battery of the
mobile phone is also constantly charged.
A telephone mount is factory-fitted for the front mobile phone and for the
rear mobile phone. The front telephone mount is located on the front
centre console ⇒fig. 134 , the rear on the rear centre console ⇒fig. 135 .
Adapter (Cullmann) and mobile phone are not factory-fitted by Škoda
Auto.
Please also refer to the additional instructions ⇒page 147, “Mobile
phones and two-way radio systems”.
Fig. 134 Universal
telephone connection
at the front
Fig. 135 Universal
telephone connection
at the rear
AAAB
NKO B5 20.book Page 146 Monday, July 3, 2006 2:09 PM
Page 148 of 281

Communicating and Navigating147
Using the systemSafetyDriving TipsGeneral MaintenanceBreakdown assistanceTechnical Data
Note
For technical reasons it is not possible to use simultaneously the front and
rear mobile phone. Ensure that the adapter is always inserted only in
the bracket .
Mobile phones and two-way radio systems
The installation of a mobile phone and two-way radio system in a vehicle
should only be carried out by a Škoda Dealer.
Škoda Auto a.s. permits the operation of mobile phones and two-way
radio systems with a professionally installed external aerial and a
maximum transmission power of up to 10 watts.
Our specialist garage is also happy to inform you about the possibilities
available for installing and operating mobile telephones and radio trans-
mitters which have an output greater than 10 watts. The Škoda Service
Partners can provide you with details about the technical possibilities for
retrofitting of mobile telephones and radio transmitters.
The operation of commercially available mobile phones or two-way radio
systems may cause operational problems in the electronic systems of
your car. The reasons for this may be:
•no external aerial,
•external aerial incorrectly installed,
•transmission power greater than 10 watts.
You should therefore not operate a mobile phone or two-way radio
system inside the vehicle without the use of an external aerial, or with
an external aerial which has been incorrectly installed.
You should also be aware of the fact that only an external aerial makes it
possible to achieve the optimal range of such equipment.
WARNING
•If a mobile phone or two-way radio system is operated inside the
vehicle without using an external aerial, or with an external aerial
which has been incorrectly installed, the result can be excessive
electromagnetic fields which may cause harm to your health.
•Please always pay full attention to the traffic situation around
you!
•You must not install two-way radio systems, mobile phones or
mounts on the covers of the airbags or within the immediate
deployment range of airbags. This might result in injuries to the
occupants in the event of an accident!
Note
Please also refer to the operating instructions of the mobile phones and
two-way radio systems.
Navigation system*
The controls for the navigation system, radio, CD player are located in the
centre console on both sides of the monitor screen. Navigation data is
also shown in the information display.
Please refer to the relevant operating instructions for a detailed descrip-
tion of the navigation system.
AAAB
NKO B5 20.book Page 147 Monday, July 3, 2006 2:09 PM
Page 207 of 281

Taking care of your vehicle and cleaning the vehicle
206
WARNING
When washing your vehicle in the winter: Water and ice in the brake
system can affect the braking efficiency - risk of accident!
Automatic vehicle wash systems
The paintwork of the vehicle is sufficiently resistant that the vehicle can be
washed normally in automatic vehicle wash plants without any problem.
The actual stress to which the paintwork is subjected, however, depends
greatly on the design of the vehicle wash system, the filtering of the water
and the type of washing and care products used. If the paintwork of your
vehicle appears mat after being washed or even has scratches, point this
out to the operator of the vehicle wash plant. Use a different vehicle wash
plant, if necessary.
There are no particular points to note before washing your vehicle in such
a plant other than the usual precautionary measures (closing windows
and sliding/tilting roof, moving any factory-fitted aerials down flat against
the bodywork, etc.).
If you have any particular attached parts fitted to your car - such as spoiler,
roof rack system, two-way radio aerial - it is best to first of all consult the
operator of the car wash plant.
It is important to degrease the lips of the windscreen wiper rubbers after
passing through the automatic vehicle wash system.
Caution
Do not screw the swivelling down roof aerial tight before washing the
vehicle in an automatic vehicle wash system - risk of damage!
Washing vehicle by hand
It is important to first soften the dirt with plenty of water and rinse it off as
thoroughly as possible before washing your vehicle by hand.
One should then clean the vehicle using a soft washing sponge,
washing glove or a washing brush and only slight pressure. Work from
the top to the bottom - beginning with the roof. Only place slight pressure
on the vehicle paintwork during cleaning Only use a car shampoo for
stubborn dirt.
Wash out the sponge or washing glove thoroughly at short intervals.
Clean wheels, door sills and similar parts last. Use a second sponge for
such areas.
Rinse off the vehicle well after giving it a wash and dry it off using a
chamois leather.
WARNING
•The ignition should always be switched off when you wash your
vehicle - risk of accident!
•Protect your hands and arms from sharp-edged metal parts
when you are cleaning the underfloor, the inside of the wheel hous-
ings or the wheel trims - risk of cuts.
Caution
•Do not wash your vehicle in bright sunlight - risk of paint damage.
•Ensure that the jet of water is not aimed directly at the locks or at the
door and panel joints if you spray your vehicle in winter down with a hose
- risk of freezing.
•Do not use any insect sponges, rough kitchen sponges or similar
cleaning products - risk of damage to the surface of paintwork.
NKO B5 20.book Page 206 Monday, July 3, 2006 2:09 PM
Page 234 of 281
Inspecting and Replenishing233
Using the systemSafetyDriving TipsGeneral MaintenanceBreakdown assistanceTechnical Data
– Installation takes place in the reverse order.
Please also refer to the following notes when connecting up the battery
⇒page 233.
Note
We do not recommend that you remove and install the battery yourself
(even when you are following the instructions given in this Owner's
manual) since a battery can be heavily damaged in the process under
certain circumstances. Contact a specialist garage.
Disconnecting and reconnecting the battery
On disconnecting and reconnecting the battery the following functions are
initially deactivated or are no longer able to operate fault-free.
We recommend having the vehicle checked by a specialist garage to
ensure full functionality of all electrical systems.
Replacing the battery
You should only replace a battery with a new battery of the same capacity,
voltage (12 V), amperage and of the same size. Specialist garages have
a range of suitable batteries available.
We recommend that you only have an old battery disposed of by a
specialist garage since it does require special disposal.
For the sake of the environment
Batteries contain poisonous substances such as sulphuric acid and lead.
They must be disposed of in accordance with local environmental protec-
tion regulations and on no account as domestic waste.
Windshield washer system
OperationOperating measure
Electrical power window (operational
faults)⇒page 52
Enter radio code numbersee Radio Operating Instruc-
tions
Set hours⇒page 15
Data in the multi-functional indicator are
deleted.⇒page 18
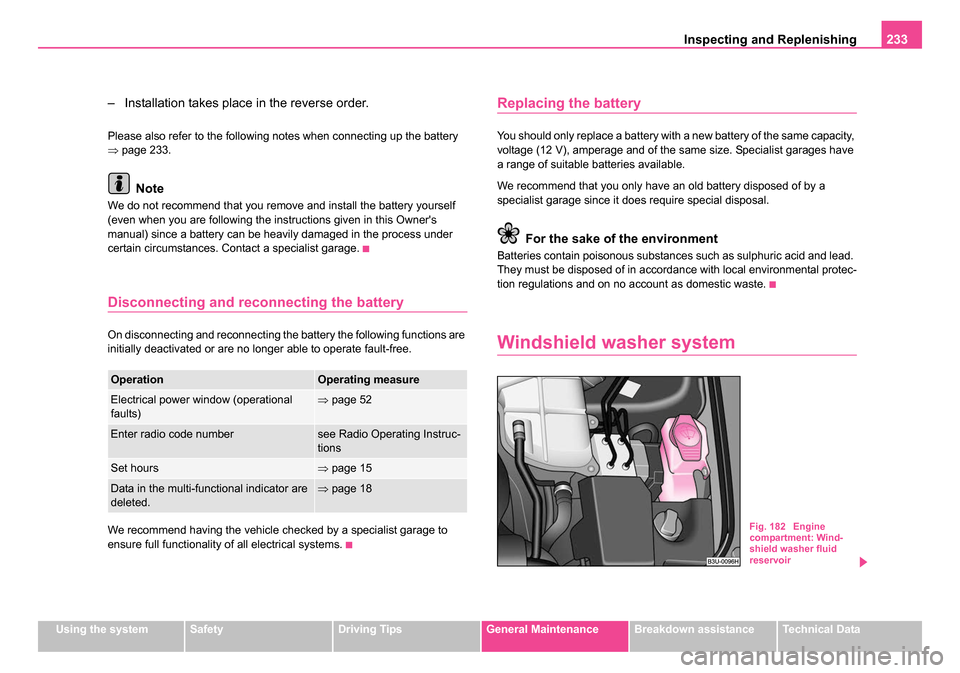
Fig. 182 Engine
compartment: Wind-
shield washer fluid
reservoir
NKO B5 20.book Page 233 Monday, July 3, 2006 2:09 PM
Page 243 of 281
Accessories, changes and replacement of parts
242
Accessories, changes an d replacement of parts
Accessories and replacement parts
Škoda vehicles have been built according to the latest discoveries in
safety engineering. Thus one should not change the condition in which the
vehicle was delivered from the manufacturer without some thought.
The following guidelines should be observed when a vehicle is to be retro-
fitted with accessories, have technical changes made to it or a part has to
be replaced at some time in the future.
•Advise should always be obtained from a Škoda Service Partner
before buying any accessories and before making any technical changes
⇒ .
•This is particularly the case when accessories are bought in a foreign
country.
•Škoda Genuine Accessories which have been released for use and
Skoda original parts can be obtained from Škoda Service Partners. They
will install them professionally and correctly.
•All Škoda original accessory which is listed in the catalogue such as
tilting roofs, spoilers, wheels etc. must have an official stamp of approval.
•Radios, aerials and other electrical accessories should only be
installed by an authorised workshop.
•The guidelines issued by Škoda Auto a.s. must be observed when
making technical changes.
•This is to ensure that no technical damage occurs to the vehicle, that
travelling and operating safety are maintained and that the chnages are
permissible. Škoda Service Partners undertake this work professionally or
refer it to an specialist company in special cases. Any damage which is done caused by technical changes made
without consulting a Skoda a.s. dealer is excluded from the guar-
antee.
WARNING
•We advise you, in your own interest, to only use Škoda Genuine
Accessories and Škoda original parts which have been expressly
approved for use on your Škoda. Reliability, safety and suitabiliity
have been established for these Škoda original parts.
•We cannot guarantee suitability of installation into your vehicle
of other products despite keeping a constant eye on market devel-
opments (also not in the case where there is an attestation or
permission can be produced).
Technical changes
Interference on the electronic components and their software can lead to
operational faults. This interference can also impair not directly affected
systems because of the networking of the electronic components. This
means that the operating safety of your vehicle can be considerably jeop-
ardized, a greater wear of vehicle parts can occur and finally the vehicle
registration documents expire.
We trust that you will understand that your Škoda Service Partner cannot
be liable for damage resulting from unprofessional work.
We therefore recommend that you have all work carried out with Škoda
original parts at your authorised Škoda Service Partners.
NKO B5 20.book Page 242 Monday, July 3, 2006 2:09 PM
Page 262 of 281
Fuses and light bulbs261
Using the systemSafetyDriving TipsGeneral MaintenanceBreakdown assistanceTechnical Data
Caution
•Never attempt to “repair” fuses and also do not replace them with a
fuse of a higher amperage - risk of fire! This may also cause damage at
another part of the electrical system.
•Have the electrical system checked as quickly as possible by a
specialist garage if a newly inserted fuse blows again after a short time.
Note
We recommend that you have these fuses replaced by a specialist
garage.
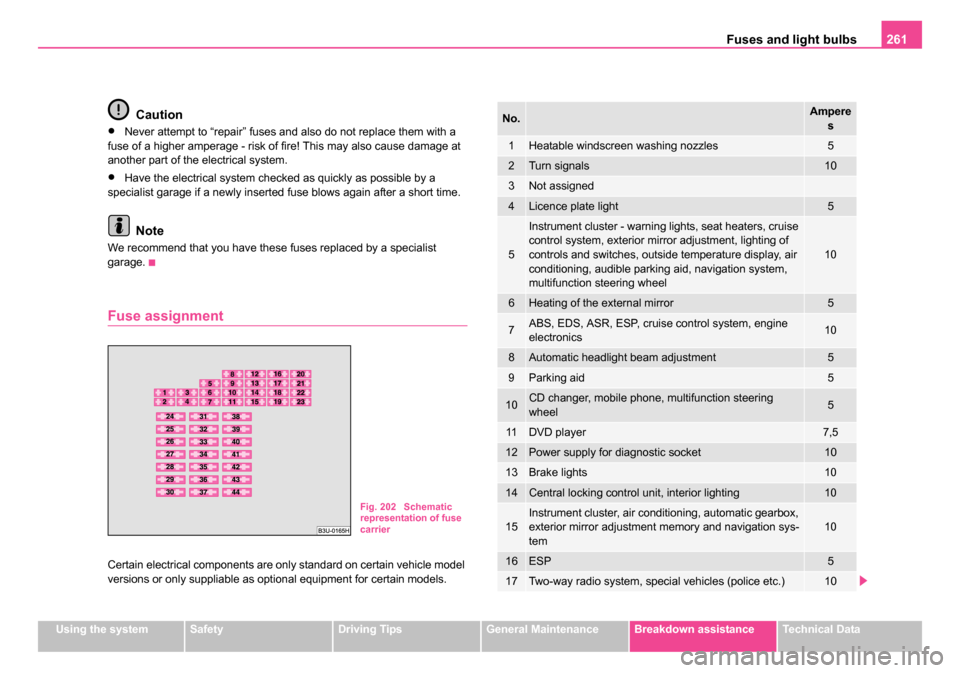
Fuse assignment
Certain electrical components are only standard on certain vehicle model
versions or only suppliable as optional equipment for certain models.
Fig. 202 Schematic
representation of fuse
carrier
No.Ampere
s
1Heatable windscreen washing nozzles5
2Turn signals10
3Not assigned
4Licence plate light5
5
Instrument cluster - warning lights, seat heaters, cruise
control system, exterior mirror adjustment, lighting of
controls and switches, outside temperature display, air
conditioning, audible parking aid, navigation system,
multifunction steering wheel
10
6Heating of the external mirror5
7ABS, EDS, ASR, ESP, cruise control system, engine
electronics10
8Automatic headlight beam adjustment5
9Parking aid5
10CD changer, mobile phone, multifunction steering
wheel5
11DVD player7,5
12Power supply for diagnostic socket10
13Brake lights10
14Central locking control unit, interior lighting10
15Instrument cluster, air conditioning, automatic gearbox,
exterior mirror adjustment memory and navigation sys-
tem10
16ESP5
17Two-way radio system, special vehicles (police etc.)10
NKO B5 20.book Page 261 Monday, July 3, 2006 2:09 PM
Page 263 of 281
Fuses and light bulbs
262
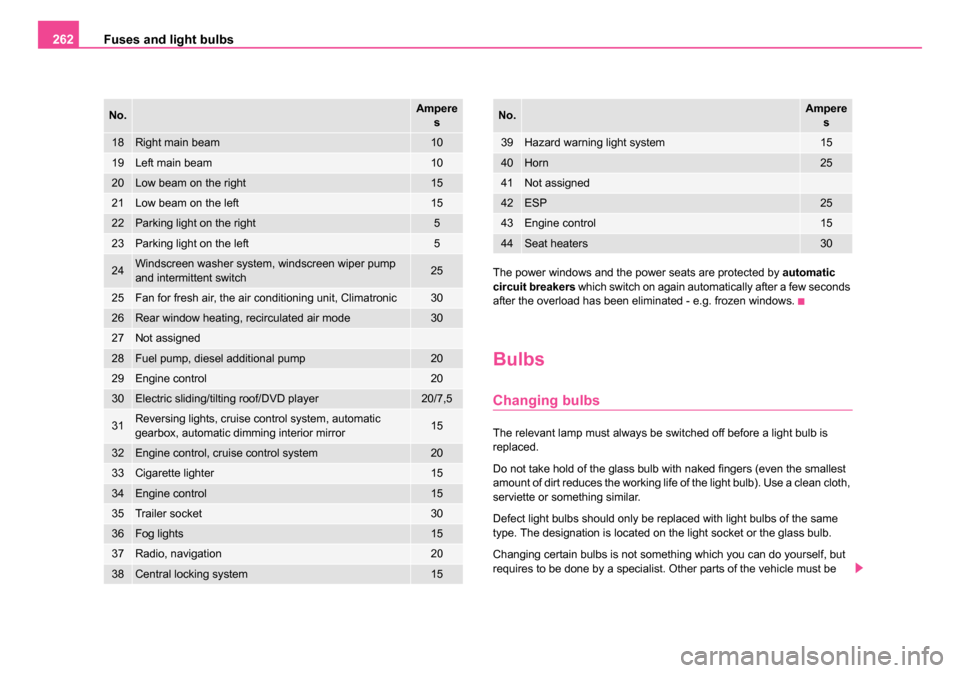
The power windows and the power seats are protected by automatic
circuit breakers which switch on again automatically after a few seconds
after the overload has been eliminated - e.g. frozen windows.
Bulbs
Changing bulbs
The relevant lamp must always be switched off before a light bulb is
replaced.
Do not take hold of the glass bulb with naked fingers (even the smallest
amount of dirt reduces the working life of the light bulb). Use a clean cloth,
serviette or something similar.
Defect light bulbs should only be replaced with light bulbs of the same
type. The designation is located on the light socket or the glass bulb.
Changing certain bulbs is not something which you can do yourself, but
requires to be done by a specialist. Other parts of the vehicle must be
18Right main beam10
19Left main beam10
20Low beam on the right15
21Low beam on the left15
22Parking light on the right5
23Parking light on the left5
24Windscreen washer system, windscreen wiper pump
and intermittent switch25
25Fan for fresh air, the air conditioning unit, Climatronic30
26Rear window heating, recirculated air mode30
27Not assigned
28Fuel pump, diesel additional pump20
29Engine control20
30Electric sliding/tilting roof/DVD player20/7,5
31Reversing lights, cruise control system, automatic
gearbox, automatic dimming interior mirror15
32Engine control, cruise control system20
33Cigarette lighter15
34Engine control15
35Trailer socket30
36Fog lights15
37Radio, navigation20
38Central locking system15
No.Ampere s
39Hazard warning light system15
40Horn25
41Not assigned
42ESP25
43Engine control15
44Seat heaters30
No.Amperes
NKO B5 20.book Page 262 Monday, July 3, 2006 2:09 PM
Page 276 of 281
Index275
Multifunction steering wheel . . . . . . . . . . . . 137
Operating cruise control system . . . . . . 137
Operating mobile phone . . . . . . . . . . . . . 139
Operation of radio . . . . . . . . . . . . . . . . . 138
Multi-functional indicator . . . . . . . . . . . . . . . . 18
N
Navigation system . . . . . . . . . . . . . . . . . 26, 147
New tyres . . . . . . . . . . . . . . . . . . . . . . . . . . 192
O
Oil . . . . . . . . . . . . . . . . . . . . . . . . . . . . . . . . 221 Change . . . . . . . . . . . . . . . . . . . . . . . . . 223
Warning light . . . . . . . . . . . . . . . . . . . . . . 33
Oil dipstick . . . . . . . . . . . . . . . . . . . . . . . . . . 222
Onboard computer . . . . . . . . . . . . . . . . . . . . 18
Open door Open door . . . . . . . . . . . . . . . . . . . . . . . . 34
Opening a single door . . . . . . . . . . . . . . . . . . 41
Operating cruise control system Multifunction steering wheel . . . . . . . . . . 137
Operating mobile phone Multifunction steering wheel . . . . . . . . . . 139
Operating the radio Multifunction steering wheel . . . . . . . . . . 138
Operation in winter Battery . . . . . . . . . . . . . . . . . . . . . . . . . . 231
Biodiesel . . . . . . . . . . . . . . . . . . . . . . . . 215
De-icing windows . . . . . . . . . . . . . . . . . . 208 Snow chains . . . . . . . . . . . . . . . . . . . . . . 241
Tyres . . . . . . . . . . . . . . . . . . . . . . . . . . . 240
Outside temperature . . . . . . . . . . . . . . . . . . . 20
Overview of the engine compartment . . . . . 220
P
Paint . . . . . . . . . . . . . . . . . . . . . . . . . . . . . . . 208
Paint damage . . . . . . . . . . . . . . . . . . . . . . . . 208
Parking . . . . . . . . . . . . . . . . . . . . . . . . . . . . . 126
Parking aid . . . . . . . . . . . . . . . . . . . . . . . . . . 126
Parking light . . . . . . . . . . . . . . . . . . . . . . . . . . 60
Passive Safety . . . . . . . . . . . . . . . . . . . . . . . 149
Pedals . . . . . . . . . . . . . . . . . . . . . . . . . . . . . . 81
Petrol . . . . . . . . . . . . . . . . . . . . . . . . . . . . . . 214
Petrol engines Starting the engine . . . . . . . . . . . . . . . . . 123
Polishing . . . . . . . . . . . . . . . . . . . . . . . . . . . 207
Power socket . . . . . . . . . . . . . . . . . . . . . 99, 100
Power steering . . . . . . . . . . . . . . . . . . . . . . . 191
Power window . . . . . . . . . . . . . . . . . . . . . . . . 49
Power windows Button in front passenger door and in rear doors . . . . . . . . . . . . . . . . . . . . . . . . . . . 51
Buttons on the driver's door . . . . . . . . . . . 49
Central locking system . . . . . . . . . . . . . . . 51
R
Radiator fan . . . . . . . . . . . . . . . . . . . . . . . . . 226
Raise vehicle . . . . . . . . . . . . . . . . . . . . . . . . 252 Range . . . . . . . . . . . . . . . . . . . . . . . . . . . . . . 20
Rear
drinks can holder . . . . . . . . . . . . . . . . . . . 96
Rear armrest . . . . . . . . . . . . . . . . . . . . . . . . 107
Rear fog light . . . . . . . . . . . . . . . . . . . . . . . . . 57
Rear seats . . . . . . . . . . . . . . . . . . . . . . . . . . . 85
Rear window heater . . . . . . . . . . . . . . . . . . . . . . . . . . . . 63
Rear window heater . . . . . . . . . . . . . . . . . . . . 63
Rear-view mirror Exterior mirror . . . . . . . . . . . . . . . . . . . . . . 69
Interior mirror . . . . . . . . . . . . . . . . . . . . . . 67
Recirculated air mode Heating and ventilation . . . . . . . . . . . . . . 111
Refrigerator . . . . . . . . . . . . . . . . . . . . . . . . . . 88
Refuelling . . . . . . . . . . . . . . . . . . . . . . . . . . . 216 Emergency release of fuel filler flap . . . . 217
Remote control . . . . . . . . . . . . . . . . . . . . . . . . 46 Synchronisation . . . . . . . . . . . . . . . . . . . . 47
Replacing fuses . . . . . . . . . . . . . . . . . . . . . . 260
Replacing the wiper blades . . . . . . . . . . . . . . 67
Roof aerial . . . . . . . . . . . . . . . . . . . . . . . . . . 206
Running in the car . . . . . . . . . . . . . . . . . . . . 192
S
Safe distance to steering wheel . . . . . . . . . . 120
Safe securing . . . . . . . . . . . . . . . . . . . . . . . . . 42
Safety . . . . . . . . . . . . . . . . . . . . . . . . . . . . . . 149
NKO B5 20.book Page 275 Monday, July 3, 2006 2:09 PM