heater SKODA SUPERB 2006 1.G / (B5/3U) Owner's Manual
[x] Cancel search | Manufacturer: SKODA, Model Year: 2006, Model line: SUPERB, Model: SKODA SUPERB 2006 1.G / (B5/3U)Pages: 281, PDF Size: 12.67 MB
Page 6 of 281
Contents5
Contents
Layout of this Owner's Manual
(explanations)
. . . . . . . . . . . . . . . . . . .
Using the system . . . . . . . . . . . . . . .
Cockpit . . . . . . . . . . . . . . . . . . . . . . . . . . . . . . .
General view . . . . . . . . . . . . . . . . . . . . . . . . .
Instruments and Indicator/Warning LightsGeneral view of the instrument cluster . . . . . .
Engine revolutions counter . . . . . . . . . . . . . . .
Coolant temperature gauge . . . . . . . . . . . . . .
Fuel gauge . . . . . . . . . . . . . . . . . . . . . . . . . . .
Digital clock . . . . . . . . . . . . . . . . . . . . . . . . . .
Speedometer with counter for distance driven
Service Interval Display . . . . . . . . . . . . . . . . .
Multi-functional indicator (onboard computer)
Information display* . . . . . . . . . . . . . . . . . . . .
Auto Check Control . . . . . . . . . . . . . . . . . . . .
Warning lights . . . . . . . . . . . . . . . . . . . . . . . . .
Unlocking and locking . . . . . . . . . . . . . . . . . .
Key . . . . . . . . . . . . . . . . . . . . . . . . . . . . . . . . .
Changing the key battery . . . . . . . . . . . . . . . .
Electronic immobiliser . . . . . . . . . . . . . . .
Child safety lock . . . . . . . . . . . . . . . . . . . . . . .
Central locking system . . . . . . . . . . . . . . . . . .
Remote control . . . . . . . . . . . . . . . . . . . . . . . .
Anti-theft alarm system* . . . . . . . . . . . . . . . . .
Power windows . . . . . . . . . . . . . . . . . . . . . . .
Electric sliding/tilting roof* . . . . . . . . . . . . . . .
Lights and Visibility. . . . . . . . . . . . . . . . . . . . .
Lights . . . . . . . . . . . . . . . . . . . . . . . . . . . . . . .
Interior lighting . . . . . . . . . . . . . . . . . . . . . . . . Visibility . . . . . . . . . . . . . . . . . . . . . . . . . . . . .
Windshield wiper and wash system . . . . . . . .
Rear-view mirror . . . . . . . . . . . . . . . . . . . . . .
Seats and Stowage . . . . . . . . . . . . . . . . . . . .
Front seats . . . . . . . . . . . . . . . . . . . . . . . . . . .
Adjusting front seats manually . . . . . . . . . . . .
Adjusting front seats electrically* . . . . . . . . . .
Front passenger seat with a folding central back
rest* . . . . . . . . . . . . . . . . . . . . . . . . . . . . . . . .
Footrest at the rear* . . . . . . . . . . . . . . . . . . . .
Seat heaters* . . . . . . . . . . . . . . . . . . . . . . . . .
Pedals . . . . . . . . . . . . . . . . . . . . . . . . . . . . . .
Luggage compartment . . . . . . . . . . . . . . . . . .
The cool box behind the armrest of the rear
seats* . . . . . . . . . . . . . . . . . . . . . . . . . . . . . . .
CargoFlex folding box* . . . . . . . . . . . . . . . . . .
The roof luggage rack system . . . . . . . . . . . .
Cup holder . . . . . . . . . . . . . . . . . . . . . . . . . . .
Ashtrays . . . . . . . . . . . . . . . . . . . . . . . . . . . . .
Cigarette lighters and power sockets . . . . . . .
Storage facilities . . . . . . . . . . . . . . . . . . . . . . .
Heating and air conditioning system . . . . .
Air conditioning system . . . . . . . . . . . . . . . . .
Climatronic* (automatic air conditioning) . . . .
Starting-off and Driving. . . . . . . . . . . . . . . . .
Setting steering wheel position . . . . . . . . . . .
Ignition lock . . . . . . . . . . . . . . . . . . . . . . . . . .
Starting the engine . . . . . . . . . . . . . . . . . . . . .
Switching the engine off . . . . . . . . . . . . . . . . .
Shifting (manual gearbox) . . . . . . . . . . . . . . .
Handbrake . . . . . . . . . . . . . . . . . . . . . . . . . . .
Parking aid* . . . . . . . . . . . . . . . . . . . . . . . . . . Front and rear parking aid* . . . . . . . . . . . . . .
Cruise control system (CCS)* . . . . . . . . . . . .
Automatic gearbox*. . . . . . . . . . . . . . . . . . . .
5-speed automatic gearbox . . . . . . . . . . . . . .
Communicating and Navigating . . . . . . . . .
Multifunction steering wheel* . . . . . . . . . . . . .
CD changer* . . . . . . . . . . . . . . . . . . . . . . . . .
Mobile phone, two-way radio system and
navigation system . . . . . . . . . . . . . . . . . . . . .
Safety. . . . . . . . . . . . . . . . . . . . . . . . . . . . . .
Passive Safety . . . . . . . . . . . . . . . . . . . . . . . .
Basic information . . . . . . . . . . . . . . . . . . . . . .
Correct seated position . . . . . . . . . . . . . . . . .
Seat belts. . . . . . . . . . . . . . . . . . . . . . . . . . . . .
Why seat belts? . . . . . . . . . . . . . . . . . . . . . . .
The physical principle of a frontal collision . .
Important safety information regarding the use
of seat belts . . . . . . . . . . . . . . . . . . . . . . . . . .
How are seat belts correctly fastened? . . . . .
Belt tensioners . . . . . . . . . . . . . . . . . . . . . . . .
Airbag system. . . . . . . . . . . . . . . . . . . . . . . . .
Description of the airbag system . . . . . . . . . .
Front airbag . . . . . . . . . . . . . . . . . . . . . . . . . .
Side airbag . . . . . . . . . . . . . . . . . . . . . . . . . .
Head airbags* . . . . . . . . . . . . . . . . . . . . . . . .
Deactivating an airbag . . . . . . . . . . . . . . . . . .
8
9
11
11
13
13
14
14
15
15
16
16
18
22
24
27
38
38
39
40
40
41
46
48
49
52
56
56
61 63
65
67
71
71
72
73
78
79
80
81
81
88
91
94
96
97
99
101
108
108 11 3
120
120
121
122
123
124
125
126 127
128
131
131
137
137
141
145
149
149
149
151
155
155
156
157
158
160
162
162
164
166
169
171
NKO B5 20.book Page 5 Monday, July 3, 2006 2:09 PM
Page 12 of 281
Cockpit11
Using the systemSafetyDriving TipsGeneral MaintenanceBreakdown assistanceTechnical Data
Cockpit
General view
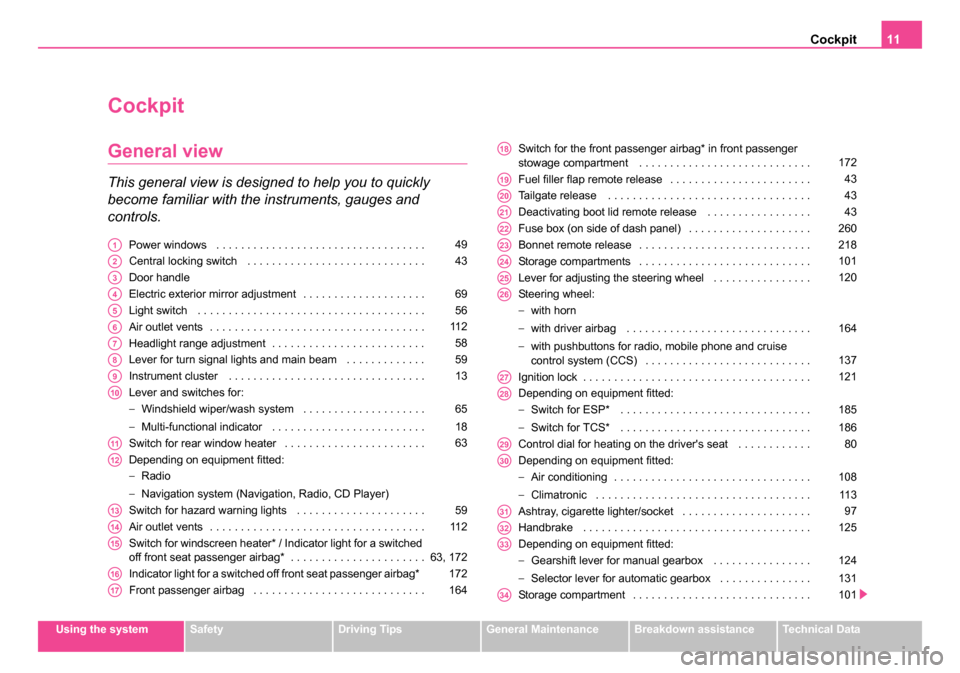
This general view is designed to help you to quickly
become familiar with the instruments, gauges and
controls.
Power windows . . . . . . . . . . . . . . . . . . . . . . . . . . . . . . . . . .
Central locking switch . . . . . . . . . . . . . . . . . . . . . . . . . . . . .
Door handle
Electric exterior mirror adjustment . . . . . . . . . . . . . . . . . . . .
Light switch . . . . . . . . . . . . . . . . . . . . . . . . . . . . . . . . . . . . .
Air outlet vents . . . . . . . . . . . . . . . . . . . . . . . . . . . . . . . . . . .
Headlight range adjustment . . . . . . . . . . . . . . . . . . . . . . . . .
Lever for turn signal lights and main beam . . . . . . . . . . . . .
Instrument cluster . . . . . . . . . . . . . . . . . . . . . . . . . . . . . . . .
Lever and switches for:
−Windshield wiper/wash system . . . . . . . . . . . . . . . . . . . .
− Multi-functional indicator . . . . . . . . . . . . . . . . . . . . . . . . .
Switch for rear window heater . . . . . . . . . . . . . . . . . . . . . . .
Depending on equipment fitted:
− Radio
− Navigation system (Navigation, Radio, CD Player)
Switch for hazard warning lights . . . . . . . . . . . . . . . . . . . . .
Air outlet vents . . . . . . . . . . . . . . . . . . . . . . . . . . . . . . . . . . .
Switch for windscreen heater* / Indicator light for a switched
off front seat passenger airbag* . . . . . . . . . . . . . . . . . . . . . .
Indicator light for a switched off front seat passenger airbag*
Front passenger airbag . . . . . . . . . . . . . . . . . . . . . . . . . . . . Switch for the front passenger airbag* in front passenger
stowage compartment . . . . . . . . . . . . . . . . . . . . . . . . . . . .
Fuel filler flap remote release . . . . . . . . . . . . . . . . . . . . . . .
Tailgate release . . . . . . . . . . . . . . . . . . . . . . . . . . . . . . . . .
Deactivating boot lid remote release . . . . . . . . . . . . . . . . .
Fuse box (on side of dash panel) . . . . . . . . . . . . . . . . . . . .
Bonnet remote release . . . . . . . . . . . . . . . . . . . . . . . . . . . .
Storage compartments . . . . . . . . . . . . . . . . . . . . . . . . . . . .
Lever for adjusting the steering wheel . . . . . . . . . . . . . . . .
Steering wheel:
−
with horn
− with driver airbag . . . . . . . . . . . . . . . . . . . . . . . . . . . . . .
− with pushbuttons for radio, mobile phone and cruise
control system (CCS) . . . . . . . . . . . . . . . . . . . . . . . . . . .
Ignition lock . . . . . . . . . . . . . . . . . . . . . . . . . . . . . . . . . . . . .
Depending on equipment fitted:
− Switch for ESP* . . . . . . . . . . . . . . . . . . . . . . . . . . . . . . .
− Switch for TCS* . . . . . . . . . . . . . . . . . . . . . . . . . . . . . . .
Control dial for heating on the driver's seat . . . . . . . . . . . .
Depending on equipment fitted:
− Air conditioning . . . . . . . . . . . . . . . . . . . . . . . . . . . . . . . .
− Climatronic . . . . . . . . . . . . . . . . . . . . . . . . . . . . . . . . . . .
Ashtray, cigarette lighter/socket . . . . . . . . . . . . . . . . . . . . .
Handbrake . . . . . . . . . . . . . . . . . . . . . . . . . . . . . . . . . . . . .
Depending on equipment fitted:
− Gearshift lever for manual gearbox . . . . . . . . . . . . . . . .
− Selector lever for automatic gearbox . . . . . . . . . . . . . . .
Storage compartment . . . . . . . . . . . . . . . . . . . . . . . . . . . . . A149
A243
A3
A469
A556
A611 2
A758
A859
A913
A10
65
18
A1163
A12
A1359
A1411 2
A1563, 172
A16172
A17164
A18172
A1943
A2043
A2143
A22260
A23218
A24101
A25120
A26
164
137
A27121
A28
185
186
A2980
A30
108
11 3
A3197
A32125
A33
124
131
A34101
NKO B5 20.book Page 11 Monday, July 3, 2006 2:09 PM
Page 64 of 281
Lights and Visibility63
Using the systemSafetyDriving TipsGeneral MaintenanceBreakdown assistanceTechnical Data
Entry lighting
The light is located in the door trim panel below.
The light beam is directed towards the entry area of the corresponding
door.
The light switches on when the door is opened and switches off again
when the door is closed.
If the doors remain open, the lighting goes out automatically after about
60 minutes provided the ignition is not switched on.
Visibility
Windscreen heater*
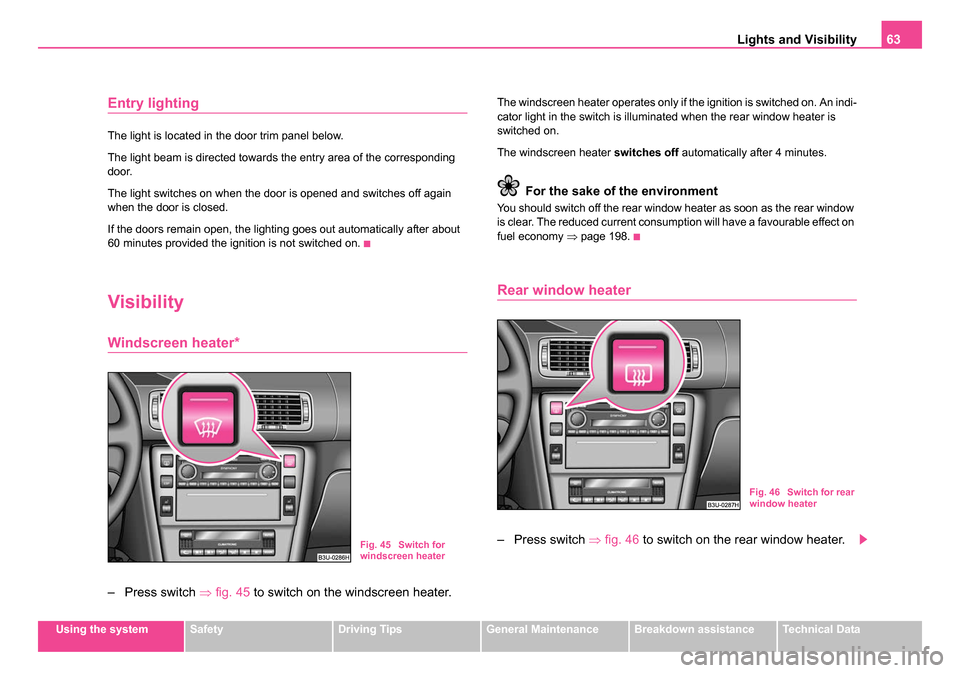
– Press switch ⇒fig. 45 to switch on the windscreen heater.
The windscreen heater operates only if the ignition is switched on. An indi-
cator light in the switch is illuminated when the rear window heater is
switched on.
The windscreen heater switches off automatically after 4 minutes.
For the sake of the environment
You should switch off the rear window heater as soon as the rear window
is clear. The reduced current consumption will have a favourable effect on
fuel economy ⇒page 198.
Rear window heater
– Press switch ⇒ fig. 46 to switch on the rear window heater.Fig. 45 Switch for
windscreen heater
Fig. 46 Switch for rear
window heater
NKO B5 20.book Page 63 Monday, July 3, 2006 2:09 PM
Page 65 of 281
Lights and Visibility
64
The rear window heater operates only if the ignition is switched on. An
indicator light in the switch is illuminated when the rear window heater is
switched on.
The rear window heater switches off automatically after a few minutes.
For the sake of the environment
You should switch off the rear window heater as soon as the rear window
is clear. The reduced current consumption will have a favourable effect on
fuel economy ⇒page 198.
Sun visors
Using the sun visors can contribute to increasing road
safety.
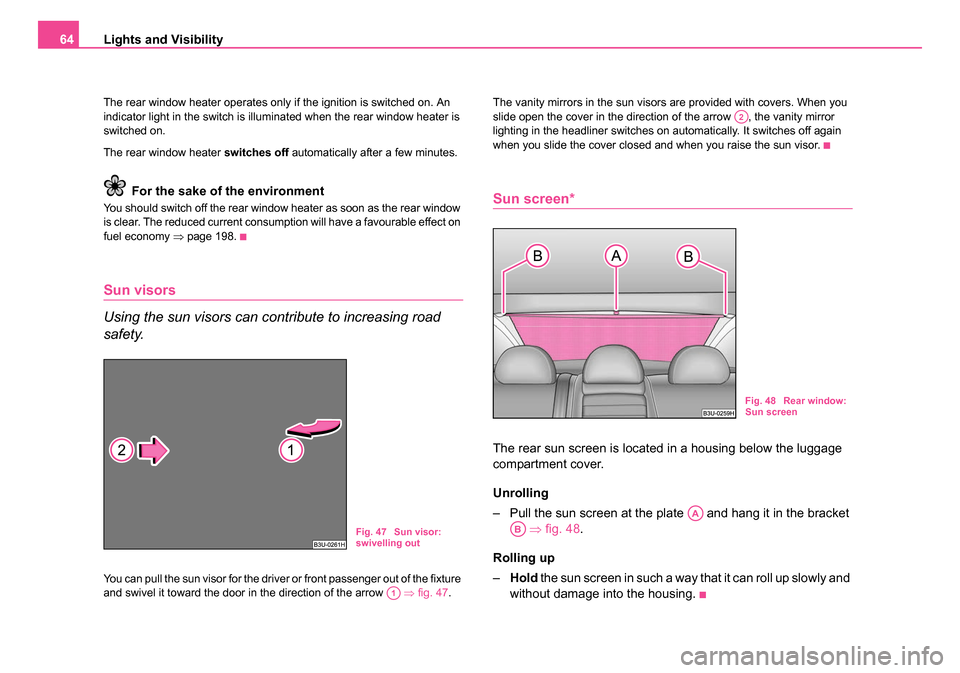
You can pull the sun visor for the driver or front passenger out of the fixture
and swivel it toward the door in the direction of the arrow ⇒fig. 47 . The vanity mirrors in the sun visors are provided with covers. When you
slide open the cover in the direction of the arrow , the vanity mirror
lighting in the headliner switches on automatically. It switches off again
when you slide the cover closed and when you raise the sun visor.
Sun screen*
The rear sun screen is located in a housing below the luggage
compartment cover.
Unrolling
– Pull the sun screen at the plate and hang it in the bracket
⇒ fig. 48.
Rolling up
– Hold the sun screen in such a way that it can roll up slowly and
without damage into the housing.
Fig. 47 Sun visor:
swivelling out
A1
A2
Fig. 48 Rear window:
Sun screen
AA
AB
NKO B5 20.book Page 64 Monday, July 3, 2006 2:09 PM
Page 71 of 281
Lights and Visibility
70
Note
•Do not touch the surfaces of the exterior mirrors if the exterior mirror
heater is switched on.
•You can set the exterior mirrors by hand, if the power setting function
fails at any time, by pressing on the edge of the mirror surface.
•Contact your specialist garage if a fault exists with the power setting of
the exterior mirrors.
NKO B5 20.book Page 70 Monday, July 3, 2006 2:09 PM
Page 81 of 281
Seats and Stowage
80
The occupants sitting in the rear of the car can use ⇒page 79,
fig. 62 the foot rest for increased comfort. The foot rest is
attached to the carpet by a velcro fastener.
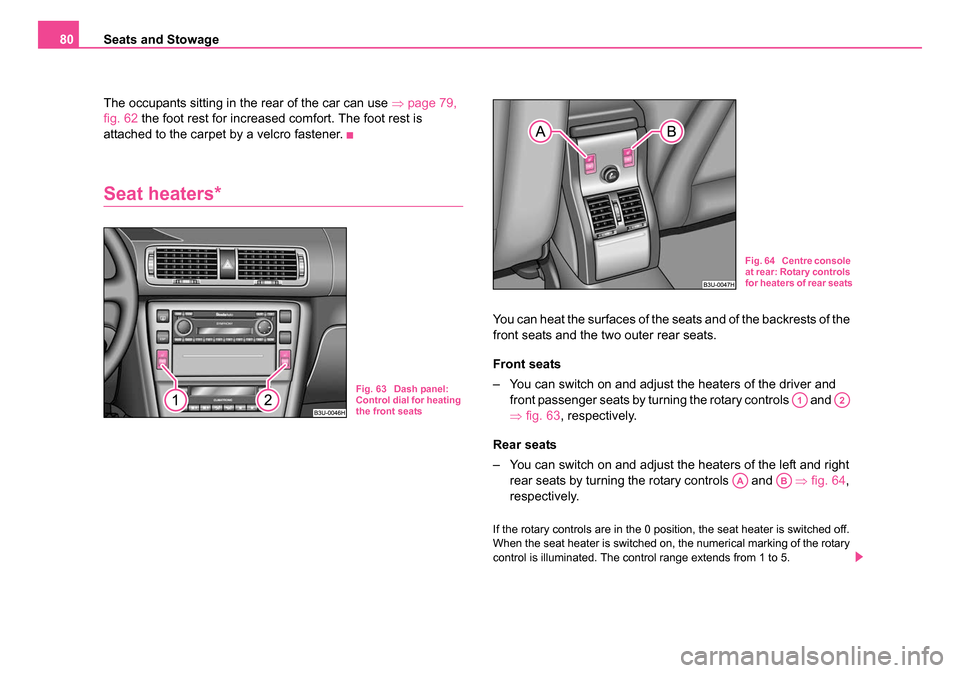
Seat heaters*
You can heat the surfaces of the seats and of the backrests of the
front seats and the two outer rear seats.
Front seats
– You can switch on and adjust the heaters of the driver and front passenger seats by turning the rotary controls and
⇒fig. 63, respectively.
Rear seats
– You can switch on and adjust the heaters of the left and right rear seats by turning the rotary controls and ⇒fig. 64,
respectively.
If the rotary controls are in the 0 position, the seat heater is switched off.
When the seat heater is switched on, the numerical marking of the rotary
control is illuminated. The control range extends from 1 to 5.
Fig. 63 Dash panel:
Control dial for heating
the front seats
Fig. 64 Centre console
at rear: Rotary controls
for heaters of rear seats
A1A2
AAAB
NKO B5 20.book Page 80 Monday, July 3, 2006 2:09 PM
Page 82 of 281
Seats and Stowage81
Using the systemSafetyDriving TipsGeneral MaintenanceBreakdown assistanceTechnical Data
Caution
•You should not kneel on the seats or otherwise apply pressure at
specific points in order to avoid damaging the heating elements of the seat
heaters.
•Do not clean the seats moist ⇒ page 211.
Note
The seat heating should only be switched on when the engine is running.
This has a significant effect of saving on the battery capacity.
Pedals
You should use only footmats which do not obstruct the movement of the
pedals and have an anti-slip protection.
Operation of the pedals must not be hindered!
WARNING
•Greater pedal distances may be needed when there is a fault in
the brake system.
•Do not place any footmats or other additional floor coverings in
the area of the pedals in order to ensure that all the pedals can be
fully depressed and are able to re turn unobstructed to their initial
position - risk of accident!
•There must be no objects on the floor which could roll under the
pedals. You would then no longer be able to apply the brakes,
operate the clutch or accelerator - risk of accident!
Luggage compartment
Loading the luggage compartment
Please observe the following in the interest of having good
handling characteristics of your vehicle:
– Distribute the items of luggage as evenly as possible.
– Place heavy objects as far forward as possible.
– Attach the items of luggage with the safety net* or with tensioning straps attached to the lashing eyes ⇒page 82.
In the event of an accident, there is such a high kinetic energy which is
produced by small and light objects that they can cause severe injuries.
The magnitude of the kinetic energy depends on the speed at which the
vehicle is travelling and on the weight of the object. The speed at which
the vehicle is travelling is in this case the more significant factor.
Example: In the event of a frontal collision at a speed of 50 km/h, an unse-
cured object with a weight of 4.5 kg produces an energy, which corre-
sponds to 20 times its own weight. This means that it results in a weight
of approx. 90 kg. You can imagine the injuries that can occur, if this “bullet”
is flying through the interior compartment and hits an occupant.
WARNING
•Store the objects in the luggage compartment and attach them
to the lashing eyes.
•Loose objects in the passenger compartment can be thrown
forward during a sudden manoeuvre or in case of an accident and
can injure the occupants or other onc oming traffic. This risk is still
increased, if the objects which are flying around are hit by a
NKO B5 20.book Page 81 Monday, July 3, 2006 2:09 PM
Page 87 of 281
Seats and Stowage
86
on the knob is visible. If the seat backrest is correctly locked, the knob is
pushed back and the red surface is not visible.
WARNING
•The belt locks and the pelvic belt must be in their original posi-
tion after folding back the seat backrest - they must be ready to use.
•The seat backrests must be securely interlocked in position so
that no objects in the luggage compartment can slide forward if
there is sudden braking - risk of injury!
•Pay attention that the rear seat backrest is correctly interlocked.
It is only then that the three-point seat belt for the middle seat can
reliably fulfil its function.
•Before folding the seat backrest back into the secure position,
place the rear lateral seat belt behind the edge of the side trim
panel. Take suitable measures to prevent that the seat belt is
jammed between the seat backrest and the side trim panel is thus
damaged.
The luggage compartment cover
You can use the luggage compartment cover behind the head restraints
of the rear seats for storing light and soft items.
WARNING
No objects should be placed on the luggage compartment cover,
the vehicle occupants could be endangered if there is sudden
braking or the vehicle collides with something.
Caution
Please ensure that the heating elements of the rear window heater are not
damaged as a result of objects placed in this area.
NKO B5 20.book Page 86 Monday, July 3, 2006 2:09 PM
Page 174 of 281
Airbag system173
Using the systemSafetyDriving TipsGeneral MaintenanceBreakdown assistanceTechnical Data
There is a system fault present in the airbag switch off
⇒ if the indi-
cator light flashes.
On vehicles without the function windscreen heater* the indicator light
showing a switched-off front passenger airbag* is at the position 15 wind-
screen heater* see ⇒page 10, fig. 1 .
WARNING
•The driver is responsible for whether the airbags are switched
on or switched off.
•Only switch off the airbag when the ignition is switched off!
Otherwise a fault can occur in the airbag deactivation system.
•If the warning light (airbag switched off) flashes:
− Front passenger airbag is not deployed in the event of an
accident!
− It is also important to have the system inspected without
delay by a specialist garage.
NKO B5 20.book Page 173 Monday, July 3, 2006 2:09 PM
Page 209 of 281
Taking care of your vehicle and cleaning the vehicle
208
Chrome parts
First clean the chrome parts with a damp clotch and then polish them with
a soft, dry cloth. If it does not prove to be adequate, use a chrome care
product from Škoda original accessories.
Caution
Do not polish the chrome parts in a dusty environment, otherwise they can
be scratched.
Paint damage
Slight damage to paintwork such as scratches, scuffs or traces of chip
damage must be touched up immediately with paint (Škoda painting pen)
before any corrosion can result. You can of course have this work carried
out by a Škoda Service Partner.
Škoda Service Partners have a range of matching touch-up pens or
spray cans available in the colour of your vehicle.
The paint number of the original paintwork of your vehicle is indicated on
the vehicle data sticker ⇒page 269.
Any corrosion which has already have formed must be removed thor-
oughly. Apply a corrosion protection primer and then the paint to the
affected point. You can of course have this work carried out by a Škoda
Service Partner.
Plastic parts
External plastic parts are cleaned by normal washing. Plastic parts and
synthetic leather can also be treated with special solvent-free plastic
cleaning agents if a damp cloth is not sufficient. Paint care products are
not suitable for plastic parts.
Caution
Solvent-free cleaners attack the material and can damage it.
Windows
Only use a plastic ice scraper for removing snow and ice from the
windows and mirrors. You should not move the ice scraper forward and
backward but in one direction on the window which you are cleaning in
order to avoid any damage to the surface of the glass.
You can best remove residues of rubber, oil, grease, wax or silicone by
using a special window cleaner or a special silicone remover.
You should also clean the windows regularly from the inside.
Do not use window leathers which you have used to polish the vehicle
body to dry off the windows. Residues of preservatives in the window
leather can dirty the window and reduce visibility.
Do not affix any stickers over the inside of the rear window to avoid
damage to the heating elements of the rear window heater .
We recommend using a preservative from Škoda genuine accessories
offered by your Škoda dealer.
NKO B5 20.book Page 208 Monday, July 3, 2006 2:09 PM