torque SKODA SUPERB 2006 1.G / (B5/3U) Owner's Manual
[x] Cancel search | Manufacturer: SKODA, Model Year: 2006, Model line: SUPERB, Model: SKODA SUPERB 2006 1.G / (B5/3U)Pages: 281, PDF Size: 12.67 MB
Page 241 of 281

Wheels and Tyres
240
If you retrofit wheel trims (or have this done), please also ensure that an
adequate flow of air remains assured for cooling the brake system.
The Škoda Service Partners are instructed in the technical possibilities
which exist regarding converting or retrofitting wheels, tyres and wheel
trim.
WARNING
•In case of incorrect treatment of the wheel bolts, the wheel can
loosen when the car is moving - risk of accident!
•The wheel bolts must be clean and must turn easily. However,
they must never be treated with grease or oil.
•If the wheel bolts are tightened to a too low tightening torque,
the rim can lossen when the car is moving - risk of accident! A tight-
ening torque which is too high can damage the bolts and threads
and this can result in perman ent deformation of the contact
surfaces on the rims.
Caution
The prescribed tightening torque of the wheel bolts for steel and light alloy
wheels is 120 Nm.
Winter tyres
The handling of your vehicle will be significantly improved when driving on
wintry roads and at temperatures below 7 °C if you fit winter tyres.
Summer tyres do not offer the same grip on ice and snow at a temperature
below 7 °C because of their construction (width, rubber blend, tread
pattern). This applies in particular to vehicles which are equipped with
low-profile tyres or high-speed tyres (code index V, W or Y on wall of
tyre). Winter tyres must be mounted on all four wheels to obtain the best
handling characteristics.
You must only fit those types of winter tyre which are approved for your
vehicle. The permissible
sizes of winter tyres are stated in your vehicle
documents. Approvals may differ because of national legislation.
Please remember that the tyres should be inflated to 20 kPa (0.2 bar)
more than is the case for summer tyres ⇒page 236.
Winter tyres no longer offer the same winter performance once the tyre
tread has worn down to a depth of about 4 mm.
Ageing also causes winter tyres to lose most of their winter performance
properties - even in cases where the remaining tread depth is still clearly
more than 4 mm.
Speed restrictions apply to winter tyres as well as to summer tyres
⇒ page 238, ⇒ .
You can fit winter tyres of a lower speed category to your vehicle provided
that you also do not drive faster than the permissible maximum speed for
such tyres, even if the possible maximum speed of your vehicle is higher.
The corresponding tyre category can damage the tyres when exceeding
the permissible maximum speed.
Please pay attention to the notes if you decide to fit winter tyres
⇒ page 235.
You can also fit so-called “all-year tyres” instead of winter tyres.
Please contact your specialist garage if there are any points which are not
clear who will be able to provide you with information regarding the
maximum speed fo r your tyres.
NKO B5 20.book Page 240 Monday, July 3, 2006 2:09 PM
Page 248 of 281

Breakdown assistance247
Using the systemSafetyDriving TipsGeneral MaintenanceBreakdown assistanceTechnical Data
•Hook for pulling off a full wheel trim,
•Plastic clip for a wheel bolt cover,
•Wheel wrench,
•Assembly pin for changing wheel,
•Screwdriver with reversible blade,
•Adapter for the wheel bolts lock.
After using the lifting jack, screw in the arm of the lifting jack fully before
placing it back in its stowage area.
WARNING
•The hexagon socket in the handle of the screwdriver should
only be used to fit on the wheel bolts. Never use the hexagon
socket of the screwdriver for tightening the wheel bolts because
you will not be able to achieve the necessary tightening torque with
the hexagon socket - risk of accident!
•The factory-supplied lifting jack is only intended for your model
of vehicle. On no account attempt to lift a heavier vehicle or other
loads - risk of injury!
•Ensure that the vehicle tool kit is safely attached in the luggage
compartment.
Spare wheel
The spare wheel is stowed in the spare wheel well in the
luggage compartment below the floor covering.
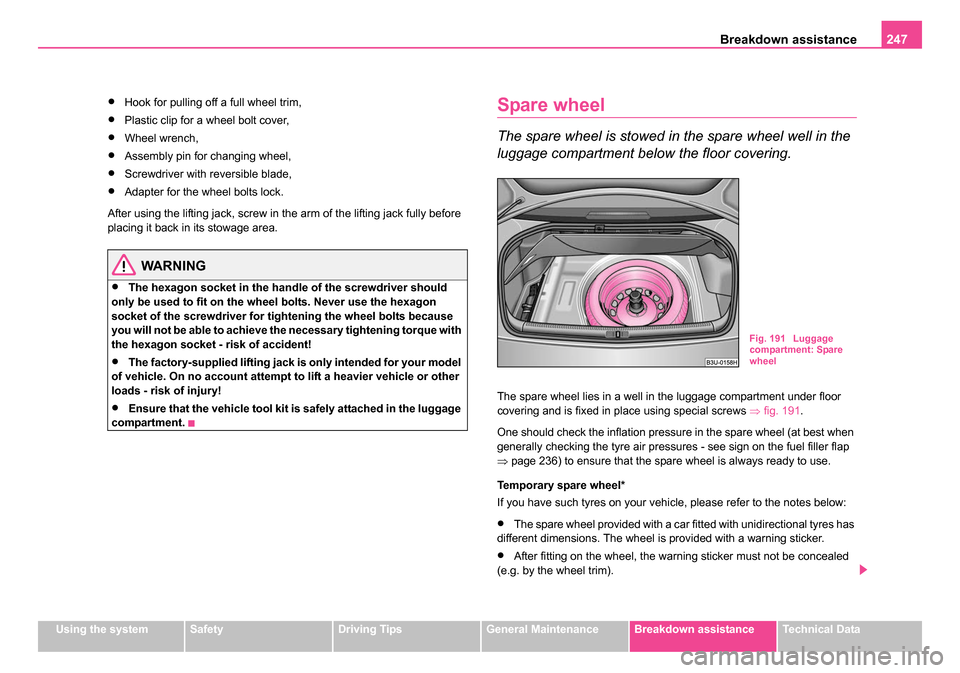
The spare wheel lies in a well in the luggage compartment under floor
covering and is fixed in place using special screws ⇒fig. 191 .
One should check the inflation pressure in the spare wheel (at best when
generally checking the tyre air pressures - see sign on the fuel filler flap
⇒ page 236) to ensure that the spare wheel is always ready to use.
Temporary spare wheel*
If you have such tyres on your vehicle, please refer to the notes below:
•The spare wheel provided with a car fitted with unidirectional tyres has
different dimensions. The wheel is provided with a warning sticker.
•After fitting on the wheel, the warning sticker must not be concealed
(e.g. by the wheel trim).
Fig. 191 Luggage
compartment: Spare
wheel
NKO B5 20.book Page 247 Monday, July 3, 2006 2:09 PM
Page 250 of 281

Breakdown assistance249
Using the systemSafetyDriving TipsGeneral MaintenanceBreakdown assistanceTechnical Data
– Jack up the vehicle until the wheel to be changed is clear of
the ground ⇒page 252.
– Unscrew the wheel bolts and place them on a clean surface (cloth, paper etc.).
– Take off the wheel.
– Fit on the spare wheel and tighten the wheel bolts slightly.
– Lower the car.
– Tighten the wheel bolts firmly, alternately and diagonally using the wheel wrench ⇒page 251.
– Mount the full wheel trim/wheel trim cap or the caps.
Note
•All bolts must be clean and must turn easily.
•You must never grease or oil the wheel bolts!
•When fitting on unidirectional tyres, ensure that the tyres rotate in the
correct direction ⇒page 235.
Subsequent steps
After changing the wheel, you must perform the following steps.
– Stow and attach the replaced wheel in the spare wheel well.
– Stow the vehicle tool kit in the space provided. –
Check the tyre pressure on the spare wheel just mounted as
soon as possible.
– Have the tightening torque of the wheel bolts checked with
a torque wrench as soon as possible. The tightening torque for
steel and light alloy wheels must be 120 Nm.
– Have the defective tyre repaired as soon as possible.
WARNING
It is necessary to observe the guidelines given on ⇒ page 238,
“New tyres and wheels” if the vehicle is subsequently fitted with
tyres which are different to those it was fitted with at the works.
Note
•If you find, when changing the wheel, that the wheel bolts are corroded
and difficult to turn, the bolts must be replaced before checking the tight-
ening torque.
•Drive cautiously and only at a moderate speed to a workshop where
the tightening torque can be checked.
Full wheel trim*
Pulling off
– Hook the clamp (found in the vehicle toolkit) into the reinforced edge of the full wheel trim.
– Push the wheel key through the clamp, support the wheel key at the tyre and pull off the wheel trim.
NKO B5 20.book Page 249 Monday, July 3, 2006 2:09 PM
Page 256 of 281

Breakdown assistance255
Using the systemSafetyDriving TipsGeneral MaintenanceBreakdown assistanceTechnical Data
– Have the tightening torque checked with a torque wrench as
soon as possible. The tightening torque must be 120 Nm.
The safety wheel bolts on vehicles fitted with them (one safety wheel bolt
per wheel) can only be loosened or tighten up by using the adapter
provided.
It is meaningful to note the code number hammered into the rear side of
the adapter or the rear side of the safety wheel bolts. You can obtain a
replacement adapter from a Škoda Service Partner, if necessary, by
quoting this number.
We recommend that you always carry the adapter for the wheel bolts with
you in the vehicle. It should be stowed in the vehicle tool kit.
Caution
•Damage can occur to the adapter and safety wheel bolt if the safety
wheel bolt is tightened up too much.
•On steel wheels, the theft-deterrent wheel bolt must always be
installed in the hole, which is close to the valve. Otherwise the full wheel
trim cannot be mounted and the full wheel trim can be damaged during the
assembly.
Note
The set of safety wheel bolts can be obtained from a Škoda Service
Partner.
Jump-starting
Initial steps
You can use the battery of another vehicle for jump-starting yours if the
engine does not start because the battery on your vehicle is flat. You will
require jump-start cables for this purpose.
Both batteries must have a rated voltage of 12 V. The capacity (Ah) of the
battery supplying the power must not be significantly less than the
capacity of the discharged battery in your vehicle.
Jump-start cables
Only use jump-start cables which have an adequately large cross-section
and insulated terminal clamps. Please pay attention to the manufacturer's
instructions.
Positive cable - colour coding in the majority of cases red.
Negative cable - colour coding in the majority of cases black.
WARNING
•A discharged battery may already freeze at temperatures just
below 0°C. In case of frozen battery carry out no jump-starting - risk
of explosion! Also after thawing of the battery there is a risk of
caustic burns due to leaking acid. Replace the frozen battery.
•Please pay attention to the warning instructions relating to
working in the engine compartment ⇒page 219.
Note
•There must not be any contact between the two vehicles otherwise
current may flow as soon as the negative terminals are connected.
NKO B5 20.book Page 255 Monday, July 3, 2006 2:09 PM