change time SKODA SUPERB 2007 1.G / (B5/3U) DX Navigation System Manual
[x] Cancel search | Manufacturer: SKODA, Model Year: 2007, Model line: SUPERB, Model: SKODA SUPERB 2007 1.G / (B5/3U)Pages: 66, PDF Size: 3.45 MB
Page 10 of 66
General comments9
“AUX ”. More detailed information is available from your Škoda Service
Partner.
Operating the radio navigation system when the
vehicle is moving.
The requirements of today's street traffic demand from the driver that he
always concentrates fully when driving.
The extensive and fastidious equipment details of this system offer -
besides the possibilites of entertainment - also a wide range of information
which will help you reach the trip destination quickly and reliably.
Only if the traffic situation allows it, should you operate the radio
navigation system with its wide range of possibilites.
The volume settings must be selected in such a way that acoustic signals
from the outside, such as e.g. a Martins horn from utility vehicles (police
cars, ambulances and fire brigade), can be heard at any time.
WARNING
Please always pay full attention to the traffic situation around you!
As the driver you are fully responsible for the traffic safety. Only
use the functions in such a way that you always maintain the
control over your vehicle in all traffic situations!
Anti-theft coding
After removing the unit, the anti-theft coding prevents electronically the
use of the unit by an unauthorised person. If the information “
SAFE” appears in the display after switching on the unit,
it can only be operated again by entering the correct code.
Before using the navigation system and the map
display
•Please observe the respective traffic regulations when driving.
•Street and location names can be changed. There are exceptional
cases in which the names stored on the CD might not correspond to the
changed names.
•The route calculated by the navigation system is a recommendation
for reaching the trip destination. While driving please pay attention to stop-
ping restrictions, traffic lights, one-way streets, toe change restrictions,
channels and ferries.
WARNING
The road traffic legislation (StVO) is always applicable, also if a
driving recommendation does not comply with the StVO.
Changing the navigation CD
Description
Press the CD eject button to change the CD. The navigation CD is
ejected.A4
20.book Page 9 Tuesday, December 6, 2005 2:26 PM
Page 12 of 66
General comments11
The menus displayed on the screen result from the following standard
fields:
•If the navigation is active the status of the functions radio or CD
changer is displayed in the status bar . In radio or CD mode, the active
function of the navigation is shown here (e. g. “ Destination entry is
active ”).
•The destination field is designed for four-digit display of the current
destination if the navigation is active. The radio information display shows
the info field in this area. It indicates the name of the set station (including
the identification “TP ” for a radio station) and the tone source.
•Menu fields are intended for calling up the sub-menu or selecting
the displayed functions.
Selecting and confirming the menu fields
Call up and operate the menu functions by using the menu knob :
•Select menu fields: Turn the knob
•Confirm menu fields: Press the knob
Map and symbol displays
Map display
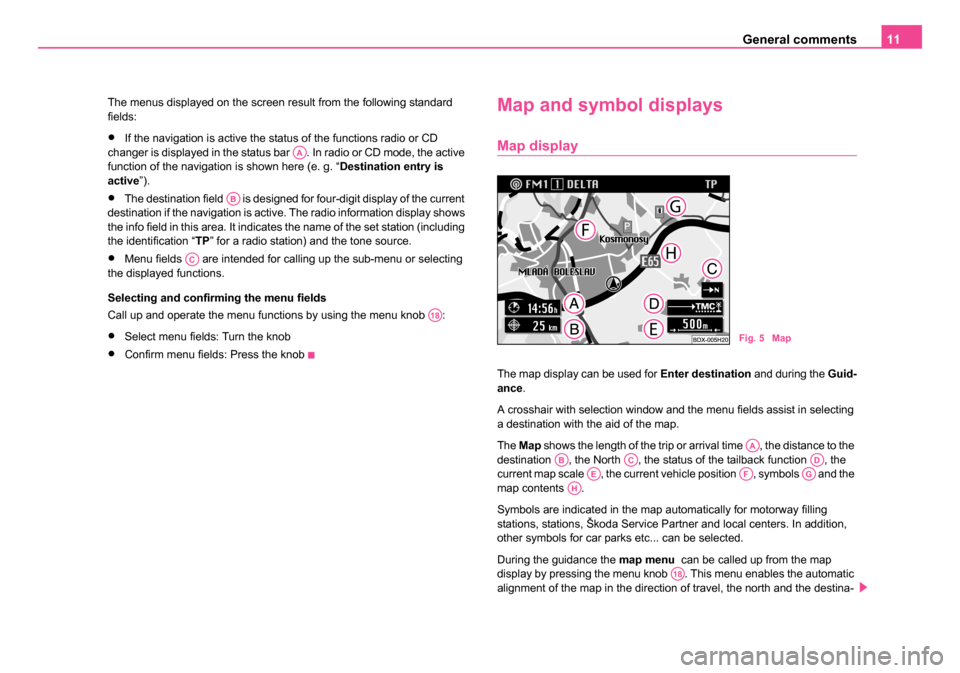
The map display can be used for Enter destination and during the Guid-
ance .
A crosshair with selection window and the menu fields assist in selecting
a destination with the aid of the map.
The Map shows the length of the trip or arrival time , the distance to the
destination , the North , the status of the tailback function , the
current map scale , the current vehicle position , symbols and the
map contents .
Symbols are indicated in the map automatically for motorway filling
stations, stations, Škoda Service Partner and local centers. In addition,
other symbols for car parks etc... can be selected.
During the guidance the map menu can be called up from the map
display by pressing the menu knob . This menu enables the automatic
alignment of the map in the direction of travel, the north and the destina-
AA
AB
AC
A18
Fig. 5 Map
AAABACADAEAFAGAH
A18
20.book Page 11 Tuesday, December 6, 2005 2:26 PM
Page 13 of 66
General comments
12
tion. You can select via the map type if e.g. the current vehicle position
should be shown together with the destination. The move mode makes it
possible to view the neighbouring map details. Other symbols can be
selected via the map content. The segment fields change the map scale.
You can change from the map display to the symbol display with menu
field “Symbol ”.
Symbol display
If the guidance is active, you are being offered the option of a symbol
display with turn information or map display.
The show depends on which display was active during the last guidance.
The symbol display shows the number of GPS satellite receptions and the
status of the tailback function, the estimated arrival time or the length of
the trip and the distance to the destination, the display of the direction of
travel, the distance markings to the intersection/junction with the distance
information and the name of the currently driven road. Before a turn proce-
dure, the display of the direction of travel points in the direction you are
turning into. In addition the name of the street you are turning into is
indicated.
You can switch back and forth at any time between both types of
display . The map is called up from the symbol display by pressing the
menu knob . You can then can change back in the symbol display by
pressing the button .
Switching the unit on and off
– The system is switched on or off by pressing the rotary/push knob . – If the key is pulled out of the ignition lock when the system is
switched on, the system sw itches off autmatically.
If the ignition key is withdrawn the system can be switched on for
approx. one hour via the rotary/push knob . Then the unit switches off
automatically. This process can be repeated as often as desired.
If the unit is switched off and the ignition key is withdrawn, a flashing LED
indicates (below the display button ) that this is a unit with an active
anti-theft coding.
First of all the start screen is indicated with the Škoda logo.
After this, a menu or a display (here radio information display) is indicated
on the screen, which was active at the last switching off of the system.
In addition a message appears on the screen: “ The navigation system
is activated. Please follow the StVO! ”
Note
•If the unit remains mute after switching on and “ SAFE” appears in the
display, please pay attention to the instructions for use.
•A non-conclusive entry is not stored when switching off the unit.
A18A9
A10
A10
A8
20.book Page 12 Tuesday, December 6, 2005 2:26 PM
Page 15 of 66
Audio
14
RDS Name
Setting the RDS station name to “ fixed” or “variable ” (changes in the
displays are indicated on the screen, e.g. weather reports or advertise-
ments).
RDS REG
Certain programs of the broadcasting companies are divided into regional
programs at specific times. That is why in individual regions the regional
programs of a station can broadcast different contents.
The selection possibilities are: “ auto” for automatic reception and “ off” for
the deactivation of the function.
It is meaningful to deactivate this function if you are on the road in the
regions in which ranges of several regional stations override each other
and the set regional station is poorly received.
Music/speech
Certain RDS broadcasting companies differ between music and language
broadcasting.
The selection possibilities are: “auto ” for automatic optimization of the
play function and “ off” for the deactivation of the function.
CD Shuffle
Playing the tracks on a CD or CDs in the magazine in random order.
AUX Source
Selection of the connected audio/video units.
Mark and confirm the menu field “ AUX Source”.
By pressing the menu knob you can switch over between the following
functions: Off, audio, video and video + audio, depending on which signals
the connected unit delivers.
Volume setup
Call up the menu for adjusting the volume basic settings ⇒page 16. TIM standby
Setting the TIM standby time
Mark and confirm the menu field “
TIM standby”.
By pressing the menu knob you can switch over between the following
standby times: Off, 30, 60, 90 and 120 minutes. Further information
⇒ page 20.
A18
A18
20.book Page 14 Tuesday, December 6, 2005 2:26 PM
Page 20 of 66
Audio19
PS-Code (e.g for advertisement purpose ), there is the possibility to
change the RDS station name in the menu “ Audio Settings ” (call up via
menu field “ Settings”).
Alternative frequencies (AF-Code) ; The program of a station , e.g.
radio 21 emits different frequencies based on the limited range of the ultra
short wavebands of several broadcasting stations. The AF-Code commu-
nicates to the unit all possible frequencies for the corresponding station.
RDS ensures that the best receivable frequency of the selected station is
automatically and precisely set not to be heard.
Traffic radio identification (TP-Code = Traffic Program) ; This informa-
tion communicates to the receiver that a traffic radio station is just being
received.
Traffic information identification (TA-Code = Traffic Announcement) ;
The unit detects a traffic information by the TA-Code. If the radio is set
very low or in the CD mode, the unit switches automatically to the traffic
information in the programmed volume. Simultaneously the unit switches
to mono play function.
EON (Enhanced Information Concerning Other Networks) ; EON is a
RDS function, which ensures that all traffic information of a broadcasting
company is transmitted in the TP mode. Large broadcasting companies
(e.g. NDR) emit simultaneously and frequently various stations, e.g.
NDR 1, NDR 2, NDR 3 etc.... Independent of the already set station of a
broadcasting company, traffic information of other stations of this broad-
casting company can also be transmitted.
Catastrophy announcements ; Catastrophy announcements always
take priority over all other functions. The message “ Alarm” is displayed on
the screen.
RDS regional
Certain programs of the broadcasting companies are divided into regional
programs at specific times. Examplewise NDR 1 transmits at certain times
regional programs with different content e.g. for Schleswig-Holstein and
Hamburg. First of all the unit attempts to set only alternative frequencies of the
selected station.
If the quality is however so low, that there is a risk of a “
program loss”,
the unit accepts also frequencies, which are “ related” to the station NDR
1. As these stations emit temporarily different programs and due to such
a change in frequency also the program from one of the related stations
can be heard.
Basically the station change is only intended for stations with exact PI-
Code. In case of poor reception, however an automatic switch over to a
regional “ related” station family can be performed.
In the menu “ Audio Settings ” the function RDS regional can be set via
the menu field “ RDS REG” to “auto ” or “off”. When opting for “ auto” the
change to a regional “ related” station can only be performed if there is a
risk of losing the station.
Anchoring the RDS station name
As some station companies modify the RDS station name via the PS-
Code (e.g. for advertisement purposes) there is the possibility to anchor
the RDS station name in the menu “ Audio Settings”:
•fixed - the RDS station name is anchored as fixed, i.e. the FM and TP
station stored on the station buttons are shown with their RDS station
names (e.g. radio 21).
•variable- allows the display of advertisement texts and weather reports
in the info field.
Note
•After switching on, the unit searches the highest quality receiveable
frequency for the location of the selected station. The unit can remain
mute for several seconds depending on the reception position and the
number of alternative frequencies.
•The evalutation of the RDS information can last several minutes
depending on the power of the receivable signal.
A12
20.book Page 19 Tuesday, December 6, 2005 2:26 PM
Page 22 of 66
Audio21
Replaying the random traffic report
The traffic reports can also be replayed in the random order.
•replaying older traffic report - press the rocker button on the left for
two seconds.
•replaying latest traffic report - press the rocker button on the right
for two seconds.
Fast replay of the traffic reports
If the rocker button on the right is held pressed, the reports are quickly
replayed with time details ( 3 - 5 times faster).
Repeating the traffic report
A traffic report is repeated, if the rocker button on the left is pressed
again (last pressing was carried out more than two seconds ago).
Ending TIM function
The function is ended by pressing again the button and the radio
basic menu is called up.
Erasing the traffic reports
The traffic reports are automatically erased six seconds after ending the
memory standby, which is 24 hours.
Note
•Select a radio station before switching off the unit, otherwise no traffic
reports can be stored.
•The storing can be activated for 24 hours or until the next switching on
by pressing the button if the unit is switched off. In the process
and if it is necessary a radio station is automatically set.
•The oldest announcement will be overwritten if the traffic information
memory is full.
•The beginning is overwritten, if a report lasts more than four minutes.
A signal tone sounds as information that the entire report could not be
stored.
•If a traffic report is stored when the unit is switched on, this action
continues until the end. Then the last selected setting is effective.
•If no traffic reports were stored, the message “ No Messages” appears
in the radio information display after pressing the button and a
signal tone sounds.
CD mode
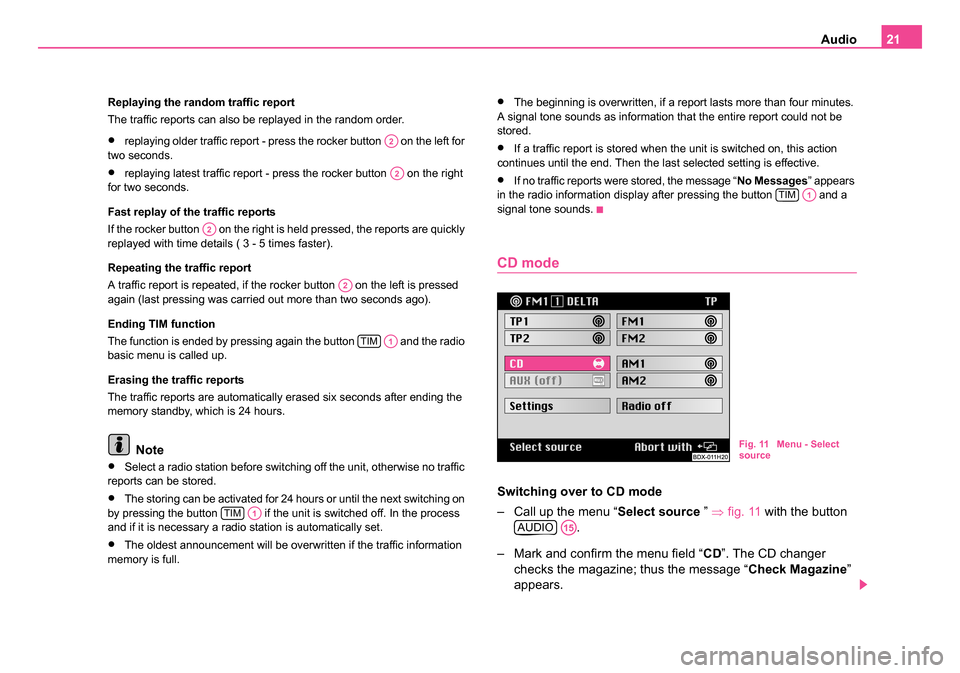
Switching over to CD mode
– Call up the menu “ Select source ” ⇒fig. 11 with the button
.
– Mark and confirm the menu field “ CD”. The CD changer
checks the magazine; thus the message “ Check Magazine”
appears.
A2
A2
A2
A2
TIMA1
TIMA1
TIMA1
Fig. 11 Menu - Select
source
AUDIOA15
20.book Page 21 Tuesday, December 6, 2005 2:26 PM
Page 23 of 66
Audio
22
– Afterwards the play function starts in the order of the CDs inserted in the magazine.
Interrupting the CD play function
The play function of a CD is interrupted in the event of a traffic information.
At the same time the identification “ Info” is indicated in the info field of the
CD menu.
End CD play function
The CD play function is ended when selecting another tone source in the
menu “ Select source ”. The unit changes to radio mode.
Note
•If no music CD is inserted or when driving in difficult regions ⇒page 23
the error message “ CD ERROR” or “CD1 ERROR ” appears in the info
field.
•The selected CD with the current track (“ Tr a c k”) is displayed in the CD
information display. The menu fields besides the station buttons indi-
cate the assignment of the magazine with CDs.
•The message “ CD1 Track1 Play ” appears in the status bar if the
navigation is active.
CD functions
Select CD
– Select the desired CD using the corresponding station button . Select track
– Press the rocker button to se
lect the track. If the rocker
button on the right is pressed, the play function of the following
track starts. The current track starts from the beginning by
pressing the rocker button on the left. Press the rocker button
on the left briefly in succession, in order to reach the previous
track.
Scan
– Press the button for a brief playing of the tracks (ten seconds) of one CD. Press this button once again in order to
abort this function.
Playing track in random sequence
– Press the button in order to play the track of a CD in the random sequence. Press this button once again in order
to abort this function.
CD MIX
– This function makes it possible to play in the random sequence not only the track of a CD but also the CDs inserted
in the CD changer. For this step mark and confirm the menu
field “ CD Shuffle ” in the menu “ Audio Settings ”. Switch back
and forth between the options “ Disc” and “ Magazine ” by
pressing the menu knob .
A12
1
A12
A2
SCANA14
CD MIXA11
A18
20.book Page 22 Tuesday, December 6, 2005 2:26 PM
Page 25 of 66
Navigation
24
Navigation
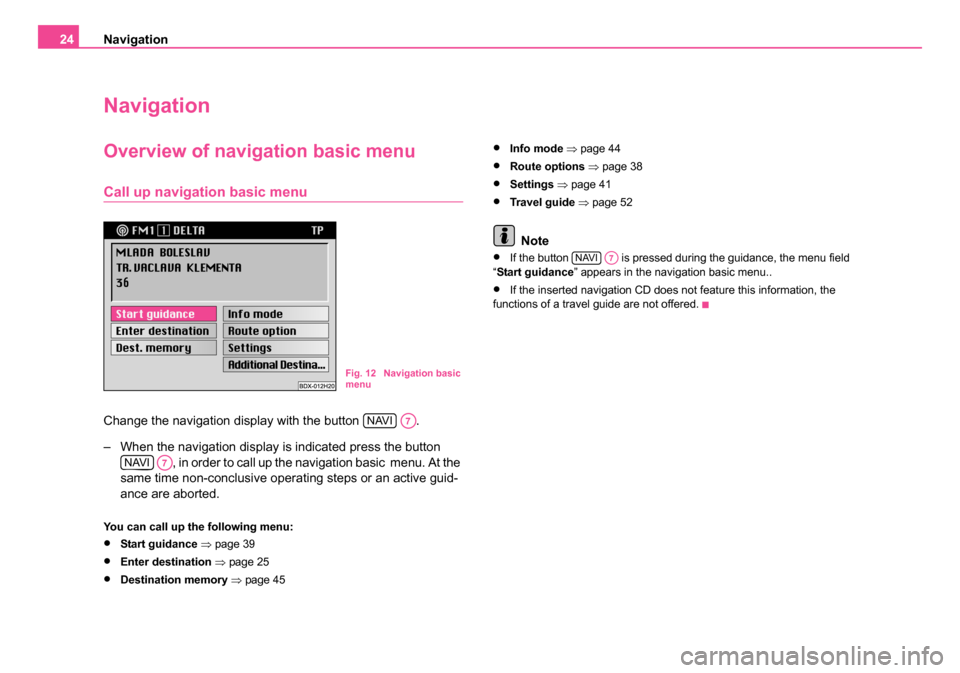
Overview of navigation basic menu
Call up navigation basic menu
Change the navigation display with the button .
– When the navigation display is indicated press the button
, in order to call up the navigation basic menu. At the
same time non-conclusive operating steps or an active guid-
ance are aborted.
You can call up the following menu:
•Start guidance ⇒ page 39
•Enter destination ⇒ page 25
•Destination memory ⇒ page 45
•Info mode ⇒ page 44
•Route options ⇒page 38
•Settings ⇒ page 41
•Travel guide ⇒ page 52
Note
•If the button is pressed during the guidance, the menu field
“ Start guidance ” appears in the navigation basic menu..
•If the inserted navigation CD does not feature this information, the
functions of a travel guide are not offered.
Fig. 12 Navigation basic
menu
NAVIA7
NAVIA7
NAVIA7
20.book Page 24 Tuesday, December 6, 2005 2:26 PM
Page 35 of 66
Navigation
34
Note
•If an already existing short name is changed (highlighted) it is deleted
when entering the first characters.
•If the destination memory is full, one or several destinations must be
overwritten. In this case a menu is called up after entering the short name,
which contains the menu field “ Overwrite destination” . The alphabetical
destination memory is displayed after confirming the menu field. The
destination to be overwritten can be selected using the menu knob .
•If part of a location/town is stored in the memory as a destination, then
the respective town is also stored.
Read a destination out of the destination memory
– Call up the destination entry menu, mark and confirm the
menu field “ Enter destination ” in the navigation basic menu.
– As standard the selection bar is on the menu field “ Destina-
tion memory ”. Confirm the menu field. A sub-menu is called
up
– Mark and confirm the desired memory in the sub-menu.
– In the menu bar there is the name of the selected memory (here: Top 10). The designation “ Alphabet. Memory”
appears when selecting the alphabetical destination memory.
– Confirm your selection; then call up the navigation basic menu.
– The guidance can begin ⇒page 39. Note
•Non-assigned memory spaces are designated in the Top 10 memory
with “ free”.
•The guidance can also be started directly from the memory.
•Mark the desired entry and confirm it by pressing the menu knob
for more than two seconds. The system guides you to selected
destination.
Enter destination - To the flagged
destination
Set current vehicle positi on as flagged destination
The current vehicle position can be kept as the so-called flagged destina-
tion using the button and then store it in the destination memory. This
destination can be e.g. an interesting location, which you wish to visit at a
later time.
Keeping a flagged destination is confirmed with a brief signal tone.
If several flagged destinations are kept in succession, then only the last
one in the memory is kept.
If a flagged destination is stored in the destination memory, then it can be
used for the destination entry.
Note
Make sure that the system shows the street name. Otherwise it is possible
that one cannot drive to the destination because it is not found under a
known street.
A18
A18
A13
20.book Page 34 Tuesday, December 6, 2005 2:26 PM
Page 38 of 66
Navigation37
Select functions
The map is shown with a crosshair and a selection window. The
selection window shows that the current scale is not yet suitable
for the destination entry. Simultaneously it shows the map detail
which you can zoom into.
Change zoom scale (reduce/enlarge)
– Mark one of the segments in the menu field “ Zoom”, in order
to call up the map with the desired zoom scale.
Move crosshair
– Confirm the menu field “ Move”.
– Move the crosshair and thus the selected map detail by turning the menu knob .
– Briefly press the menu knob , in order to switch back and forth between vertical and horizontal movement. At the same
time the highlighted line in the crosshair indicates the respec-
tively active movement direction.
– To end the movement function press the menu knob .
Confirm destination
– Confirm the destination on the smallest zoom scale 1 : 10 000 (in the display 100 m) by marking and confirming the menu
field “ OK” with the menu knob . If another scale is set, then
there is a maximum of three zoom steps in order to change to
the smallest scale. – Press the menu knob as often as it is necessary. After the
destination confirmation, the navigation basic menu is called
up and the name “ Map destination (hh:mm) ” appears in the
destination field.
– The guidance can begin ⇒page 39.
Note
•If the smallest selectable scale 1 : 10 000 (in the display 100 m) is set,
then the map is shown without a selection window.
•If a crosshair can be assigned to a town, a street or a symbol, then the
corresponding information is indicated in the menu bar.
•Symbols for Škoda Service Partner are shown on the map.
•If town and street names are available, the destination with this infor-
mation is stored in the alphabetical destination memory.
A18
A18
A18
A18
A18
20.book Page 37 Tuesday, December 6, 2005 2:26 PM