light SKODA SUPERB 2007 1.G / (B5/3U) DX Navigation System Manual
[x] Cancel search | Manufacturer: SKODA, Model Year: 2007, Model line: SUPERB, Model: SKODA SUPERB 2007 1.G / (B5/3U)Pages: 66, PDF Size: 3.45 MB
Page 10 of 66
General comments9
“AUX ”. More detailed information is available from your Škoda Service
Partner.
Operating the radio navigation system when the
vehicle is moving.
The requirements of today's street traffic demand from the driver that he
always concentrates fully when driving.
The extensive and fastidious equipment details of this system offer -
besides the possibilites of entertainment - also a wide range of information
which will help you reach the trip destination quickly and reliably.
Only if the traffic situation allows it, should you operate the radio
navigation system with its wide range of possibilites.
The volume settings must be selected in such a way that acoustic signals
from the outside, such as e.g. a Martins horn from utility vehicles (police
cars, ambulances and fire brigade), can be heard at any time.
WARNING
Please always pay full attention to the traffic situation around you!
As the driver you are fully responsible for the traffic safety. Only
use the functions in such a way that you always maintain the
control over your vehicle in all traffic situations!
Anti-theft coding
After removing the unit, the anti-theft coding prevents electronically the
use of the unit by an unauthorised person. If the information “
SAFE” appears in the display after switching on the unit,
it can only be operated again by entering the correct code.
Before using the navigation system and the map
display
•Please observe the respective traffic regulations when driving.
•Street and location names can be changed. There are exceptional
cases in which the names stored on the CD might not correspond to the
changed names.
•The route calculated by the navigation system is a recommendation
for reaching the trip destination. While driving please pay attention to stop-
ping restrictions, traffic lights, one-way streets, toe change restrictions,
channels and ferries.
WARNING
The road traffic legislation (StVO) is always applicable, also if a
driving recommendation does not comply with the StVO.
Changing the navigation CD
Description
Press the CD eject button to change the CD. The navigation CD is
ejected.A4
20.book Page 9 Tuesday, December 6, 2005 2:26 PM
Page 11 of 66
General comments
10
Carefully insert the new navigation CD with the inscription upwards as far
as possible into the CD case until it can be drawn in automatically by the
unit.
Caution
Only clean CDs without scratches and damages should be used, in order
to guarantee a proper functioning of the navigation system.
•Always store non-used CDs in the original folding box provided for this.
•Never expose CDs to direct sun rays!
•Please never write or affix the CDs!
Screen
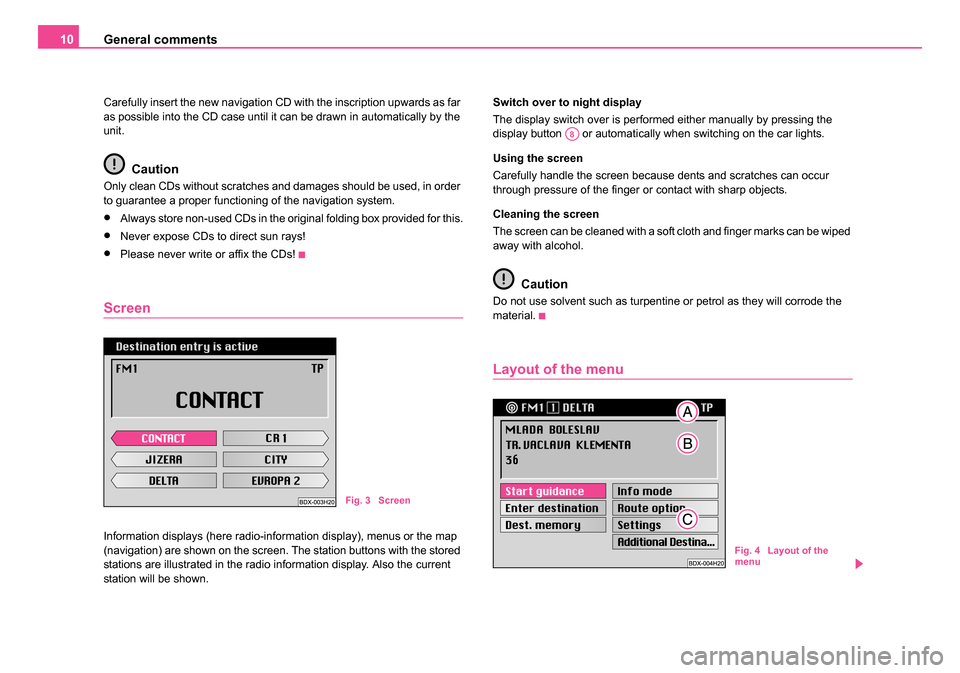
Information displays (here radio-information display), menus or the map
(navigation) are shown on the screen. The station buttons with the stored
stations are illustrated in the radio information display. Also the current
station will be shown. Switch over to night display
The display switch over is performed either manually by pressing the
display button or automatically when switching on the car lights.
Using the screen
Carefully handle the screen because dents and scratches can occur
through pressure of the finger or contact with sharp objects.
Cleaning the screen
The screen can be cleaned with a soft cloth and finger marks can be wiped
away with alcohol.
Caution
Do not use solvent such as turpentine or petrol as they will corrode the
material.
Layout of the menu
Fig. 3 Screen
A8
Fig. 4 Layout of the
menu
20.book Page 10 Tuesday, December 6, 2005 2:26 PM
Page 16 of 66
Audio15
Overview of sound menu
System equipment without digital sound package
(DSP)
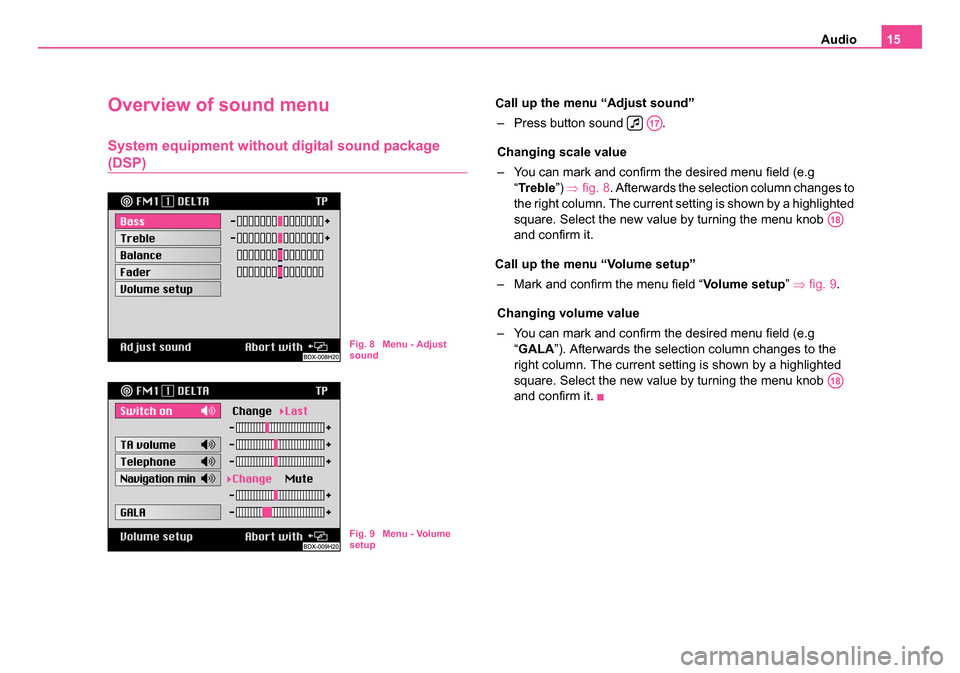
all up the menu “Adjust sound”
– Press button sound .
Changing scale value
– You can mark and confirm the desired menu field (e.g
“Tr e b l e ”) ⇒ fig. 8 . Afterwards the selection column changes to
the right column. The current setting is shown by a highlighted
square. Select the new value by turning the menu knob
and confirm it.
all up the menu “Volume setup”
– Mark and confirm the menu field “ Volume setup” ⇒ fig. 9 .
Changing volume value
– You can mark and confirm the desired menu field (e.g “GALA ”). Afterwards the selection column changes to the
right column. The current setting is shown by a highlighted
square. Select the new value by turning the menu knob
and confirm it.
Fig. 8 Menu - Adjust
sound
Fig. 9 Menu - Volume
setup
A17
A18
A18
20.book Page 15 Tuesday, December 6, 2005 2:26 PM
C
C
Page 17 of 66
Audio
16
System equipment with DSP
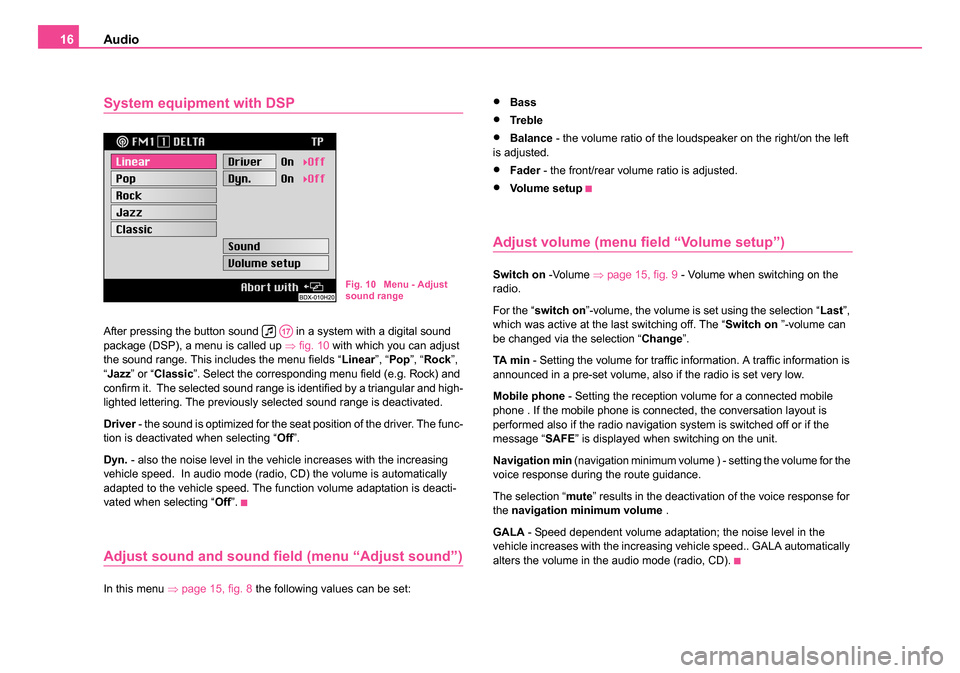
After pressing the button sound in a system with a digital sound
package (DSP), a menu is called up ⇒fig. 10 with which you can adjust
the sound range. This includes the menu fields “ Linear”, “Pop ”, “Rock ”,
“ Jazz ” or “Classic ”. Select the corresponding menu field (e.g. Rock) and
confirm it. The selected sound range is identified by a triangular and high-
lighted lettering. The previously selected sound range is deactivated.
Driver - the sound is optimized for the seat position of the driver. The func-
tion is deactivated when selecting “ Off”.
Dyn. - also the noise level in the vehicle increases with the increasing
vehicle speed. In audio mode (radio, CD) the volume is automatically
adapted to the vehicle speed. The function volume adaptation is deacti-
vated when selecting “ Off”.
Adjust sound and sound field (menu “Adjust sound”)
In this menu ⇒page 15, fig. 8 the following values can be set:
•Bass
•Tre bl e
•Balance - the volume ratio of the loudspeaker on the right/on the left
is adjusted.
•Fader - the front/rear volume ratio is adjusted.
•Vo l u m e s e t u p
Adjust volume (menu field “Volume setup”)
Switch on -Volume ⇒page 15, fig. 9 - Volume when switching on the
radio.
For the “ switch on ”-volume, the volume is set using the selection “ Last”,
which was active at the last switching off. The “ Switch on ”-volume can
be changed via the selection “ Change”.
TA m i n - Setting the volume for traffic information. A traffic information is
announced in a pre-set volume, also if the radio is set very low.
Mobile phone - Setting the reception volume for a connected mobile
phone . If the mobile phone is connected, the conversation layout is
performed also if the radio navigation system is switched off or if the
message “ SAFE” is displayed when switching on the unit.
Navigation min (navigation minimum volume ) - setting the volume for the
voice response during the route guidance.
The selection “ mute” results in the deactivation of the voice response for
the navigation minimum volume .
GALA - Speed dependent volume adaptation; the noise level in the
vehicle increases with the increasing vehicle speed.. GALA automatically
alters the volume in the audio mode (radio, CD).Fig. 10 Menu - Adjust
sound range
A17
20.book Page 16 Tuesday, December 6, 2005 2:26 PM
Page 27 of 66
Navigation
26
Therefore ensure that the destination is detected by the navigation system
and a route is calculated.
Editing menu
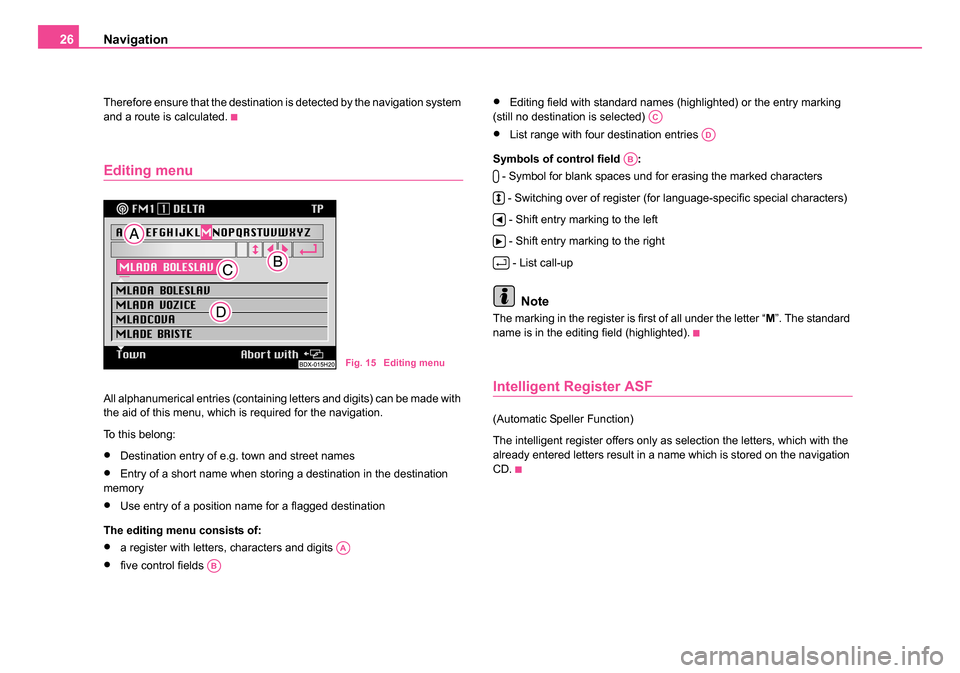
All alphanumerical entries (containing letters and digits) can be made with
the aid of this menu, which is required for the navigation.
To this belong:
•Destination entry of e.g. town and street names
•Entry of a short name when storing a destination in the destination
memory
•Use entry of a position name for a flagged destination
The editing menu consists of:
•a register with letters, characters and digits
•five control fields
•Editing field with standard names (highlighted) or the entry marking
(still no destination is selected)
•List range with four destination entries
Symbols of control field : - Symbol for blank spaces und for erasing the marked characters
- Switching over of register (for language-specific special characters) - Shift entry marking to the left
- Shift entry marking to the right - List call-up
Note
The marking in the register is first of all under the letter “ M”. The standard
name is in the editing field (highlighted).
Intelligent Register ASF
(Automatic Speller Function)
The intelligent register offers only as selection the letters, which with the
already entered letters result in a name which is stored on the navigation
CD.
Fig. 15 Editing menu
AA
AB
AC
AD
AB
20.book Page 26 Tuesday, December 6, 2005 2:26 PM
Page 35 of 66
Navigation
34
Note
•If an already existing short name is changed (highlighted) it is deleted
when entering the first characters.
•If the destination memory is full, one or several destinations must be
overwritten. In this case a menu is called up after entering the short name,
which contains the menu field “ Overwrite destination” . The alphabetical
destination memory is displayed after confirming the menu field. The
destination to be overwritten can be selected using the menu knob .
•If part of a location/town is stored in the memory as a destination, then
the respective town is also stored.
Read a destination out of the destination memory
– Call up the destination entry menu, mark and confirm the
menu field “ Enter destination ” in the navigation basic menu.
– As standard the selection bar is on the menu field “ Destina-
tion memory ”. Confirm the menu field. A sub-menu is called
up
– Mark and confirm the desired memory in the sub-menu.
– In the menu bar there is the name of the selected memory (here: Top 10). The designation “ Alphabet. Memory”
appears when selecting the alphabetical destination memory.
– Confirm your selection; then call up the navigation basic menu.
– The guidance can begin ⇒page 39. Note
•Non-assigned memory spaces are designated in the Top 10 memory
with “ free”.
•The guidance can also be started directly from the memory.
•Mark the desired entry and confirm it by pressing the menu knob
for more than two seconds. The system guides you to selected
destination.
Enter destination - To the flagged
destination
Set current vehicle positi on as flagged destination
The current vehicle position can be kept as the so-called flagged destina-
tion using the button and then store it in the destination memory. This
destination can be e.g. an interesting location, which you wish to visit at a
later time.
Keeping a flagged destination is confirmed with a brief signal tone.
If several flagged destinations are kept in succession, then only the last
one in the memory is kept.
If a flagged destination is stored in the destination memory, then it can be
used for the destination entry.
Note
Make sure that the system shows the street name. Otherwise it is possible
that one cannot drive to the destination because it is not found under a
known street.
A18
A18
A13
20.book Page 34 Tuesday, December 6, 2005 2:26 PM
Page 38 of 66
Navigation37
Select functions
The map is shown with a crosshair and a selection window. The
selection window shows that the current scale is not yet suitable
for the destination entry. Simultaneously it shows the map detail
which you can zoom into.
Change zoom scale (reduce/enlarge)
– Mark one of the segments in the menu field “ Zoom”, in order
to call up the map with the desired zoom scale.
Move crosshair
– Confirm the menu field “ Move”.
– Move the crosshair and thus the selected map detail by turning the menu knob .
– Briefly press the menu knob , in order to switch back and forth between vertical and horizontal movement. At the same
time the highlighted line in the crosshair indicates the respec-
tively active movement direction.
– To end the movement function press the menu knob .
Confirm destination
– Confirm the destination on the smallest zoom scale 1 : 10 000 (in the display 100 m) by marking and confirming the menu
field “ OK” with the menu knob . If another scale is set, then
there is a maximum of three zoom steps in order to change to
the smallest scale. – Press the menu knob as often as it is necessary. After the
destination confirmation, the navigation basic menu is called
up and the name “ Map destination (hh:mm) ” appears in the
destination field.
– The guidance can begin ⇒page 39.
Note
•If the smallest selectable scale 1 : 10 000 (in the display 100 m) is set,
then the map is shown without a selection window.
•If a crosshair can be assigned to a town, a street or a symbol, then the
corresponding information is indicated in the menu bar.
•Symbols for Škoda Service Partner are shown on the map.
•If town and street names are available, the destination with this infor-
mation is stored in the alphabetical destination memory.
A18
A18
A18
A18
A18
20.book Page 37 Tuesday, December 6, 2005 2:26 PM
Page 39 of 66
Navigation
38
Route options
Plan route guidance an d calculate route list
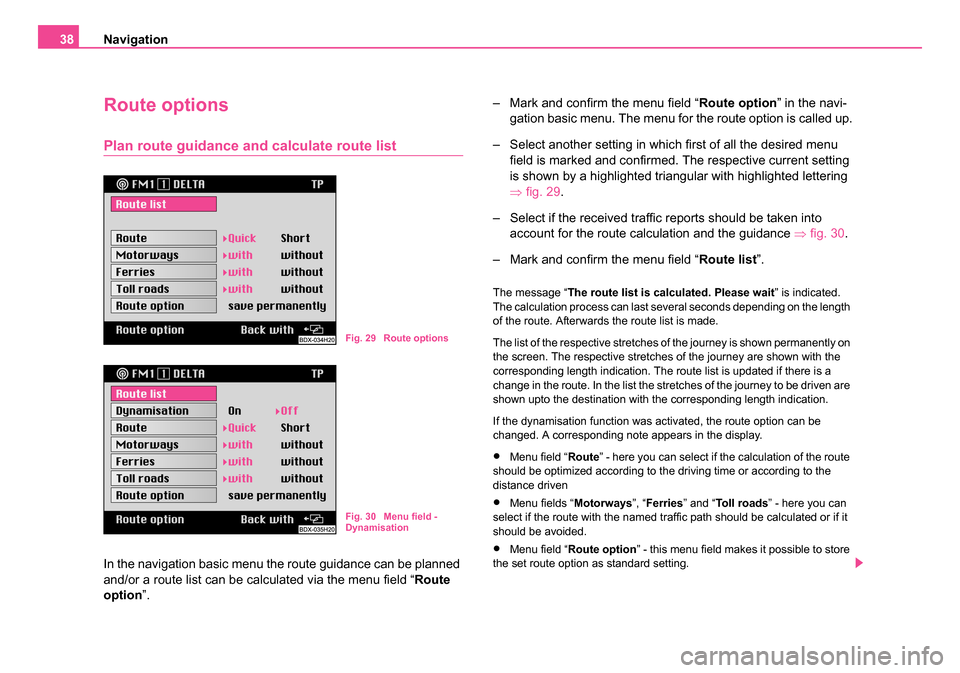
In the navigation basic menu the route guidance can be planned
and/or a route list can be calculated via the menu field “ Route
option ”. – Mark and confirm the menu field “
Route option” in the navi-
gation basic menu. The menu for the route option is called up.
– Select another setting in which first of all the desired menu field is marked and confirmed. The respective current setting
is shown by a highlighted triangular with highlighted lettering
⇒fig. 29.
– Select if the received traffic reports should be taken into account for the route calculation and the guidance ⇒ fig. 30.
– Mark and confirm the menu field “ Route list”.
The message “ The route list is calculated. Please wait ” is indicated.
The calculation process can last several seconds depending on the length
of the route. Afterwards the route list is made.
The list of the respective stretches of the journey is shown permanently on
the screen. The respective stretches of the journey are shown with the
corresponding length indication. The route list is updated if there is a
change in the route. In the list the stretches of the journey to be driven are
shown upto the destination with the corresponding length indication.
If the dynamisation function was activated, the route option can be
changed. A corresponding note appears in the display.
•Menu field “ Route” - here you can select if the calculation of the route
should be optimized according to the driving time or according to the
distance driven
•Menu fields “ Motorways”, “Ferries ” and “To l l r o a d s ” - here you can
select if the route with the named traffic path should be calculated or if it
should be avoided.
•Menu field “ Route option ” - this menu field makes it possible to store
the set route option as standard setting.
Fig. 29 Route options
Fig. 30 Menu field -
Dynamisation
20.book Page 38 Tuesday, December 6, 2005 2:26 PM
Page 44 of 66
Navigation43
Select menu field “Map type”
– Mark and confirm the menu field “ Map type”.
– Mark and confirm the desired map type in the sub-menu called up below. Then the map is displayed.
Location map - Display of the map detail with the current vehicle position.
Scale and alignment of the map are not changed.
Overview map - Display of the current vehicle position and the destina-
tion.
Destination map - Display of the destination. Scale and alignment of the
map are not changed.
Note
•If the overview map is called up in the auto zoom mode, the scale is
constantly adapted when approaching the destination.
•The selection bar is on the last selected setting when calling up the
sub-menu.
Select menu field “Move”
This function is intended for viewing the neighbouring map detail.
– Mark and confirm the menu field “ Move”. Then the map with
the crosshair is displayed.
If the crosshair is moved to the edge of the screen by turning the menu
knob , a neighbouring map detail is called up (see move crosshair
⇒ page 37).
Select menu field“Zoom setting”
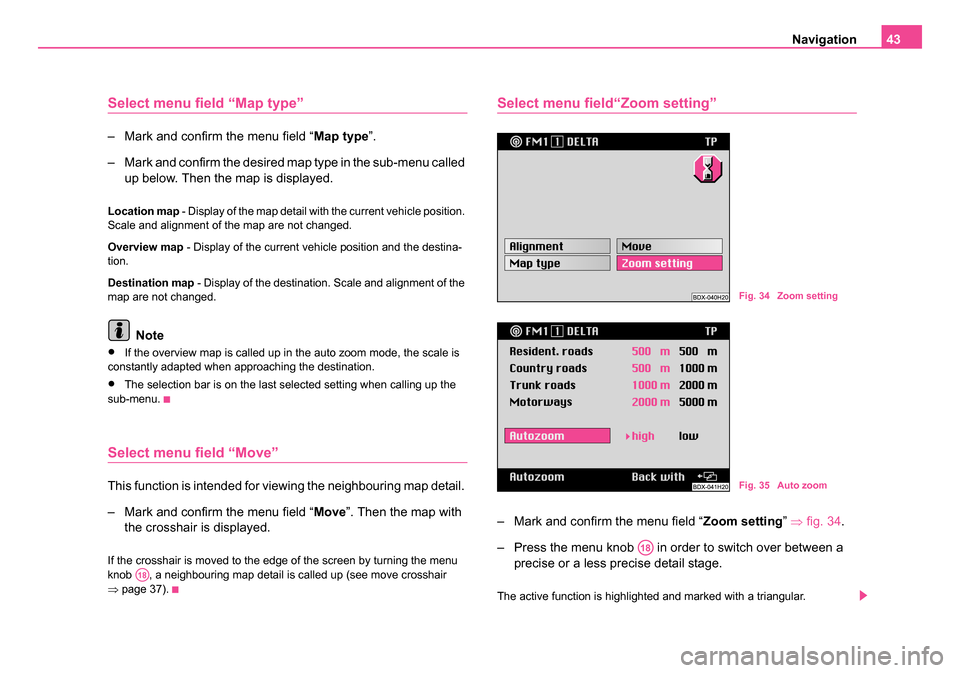
– Mark and confirm the menu field “ Zoom setting” ⇒ fig. 34 .
– Press the menu knob in order to switch over between a precise or a less precise detail stage.
The active function is highlighted and marked with a triangular.
A18
Fig. 34 Zoom setting
Fig. 35 Auto zoom
A18
20.book Page 43 Tuesday, December 6, 2005 2:26 PM
Page 51 of 66
Navigation
50
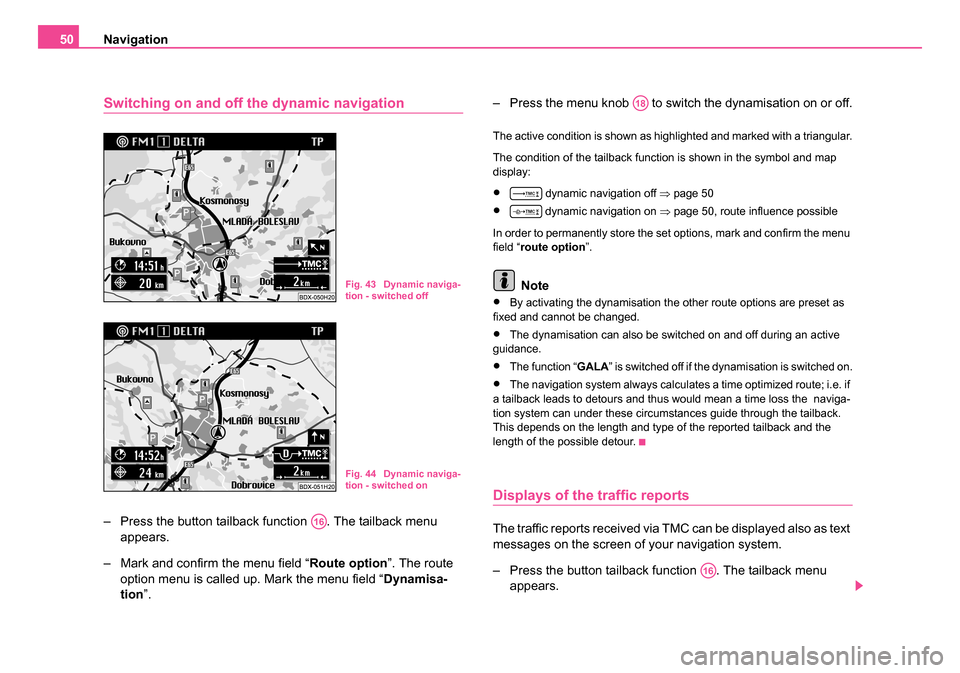
Switching on and off the dynamic navigation
– Press the button tailback function . The tailback menu
appears.
– Mark and confirm the menu field “ Route option”. The route
option menu is called up. Mark the menu field “ Dynamisa-
tion ”. – Press the menu knob to switch the dynamisation on or off.
The active condition is shown as highlighted and marked with a triangular.
The condition of the tailback function is shown in the symbol and map
display:
• dynamic navigation off
⇒page 50
• dynamic navigation on ⇒ page 50, route influence possible
In order to permanently store the set options, mark and confirm the menu
field “ route option ”.
Note
•By activating the dynamisation the other route options are preset as
fixed and cannot be changed.
•The dynamisation can also be switched on and off during an active
guidance.
•The function “GALA ” is switched off if the dynamisation is switched on.
•The navigation system always calculates a time optimized route; i.e. if
a tailback leads to detours and thus would mean a time loss the naviga-
tion system can under these circumstances guide through the tailback.
This depends on the length and type of the reported tailback and the
length of the possible detour.
Displays of the traffic reports
The traffic reports received via TMC can be displayed also as text
messages on the screen of your navigation system.
– Press the button tailback function . The tailback menu appears.
Fig. 43 Dynamic naviga-
tion - switched off
Fig. 44 Dynamic naviga-
tion - switched on
A16
A18
A16
20.book Page 50 Tuesday, December 6, 2005 2:26 PM