height SKODA SUPERB 2007 1.G / (B5/3U) User Guide
[x] Cancel search | Manufacturer: SKODA, Model Year: 2007, Model line: SUPERB, Model: SKODA SUPERB 2007 1.G / (B5/3U)Pages: 259, PDF Size: 14.71 MB
Page 152 of 259
Transporting children safely151
Using the systemSafetyDriving TipsGeneral MaintenanceBreakdown assistanceTechnical Data
travel (in some countries also when the
child is facing the direction of travel)
⇒ page 144.
•In certain countries national legal provisions require that besides the
front airbag also the side or head ai rbags are deactivated. Please comply
with any differing national legal regula tions regarding the use of child safety
seats.
•If this is not done, a child seated on the front passenger seat may suffer
severe or even fatal injuries if the front passenger airbag or airbags are
deployed.
•You should have the front passenger airbag (or airbags) reactivated just
as soon as you no longer use a child sa fety seat on the front passenger seat.
Child safety seats in Group 2
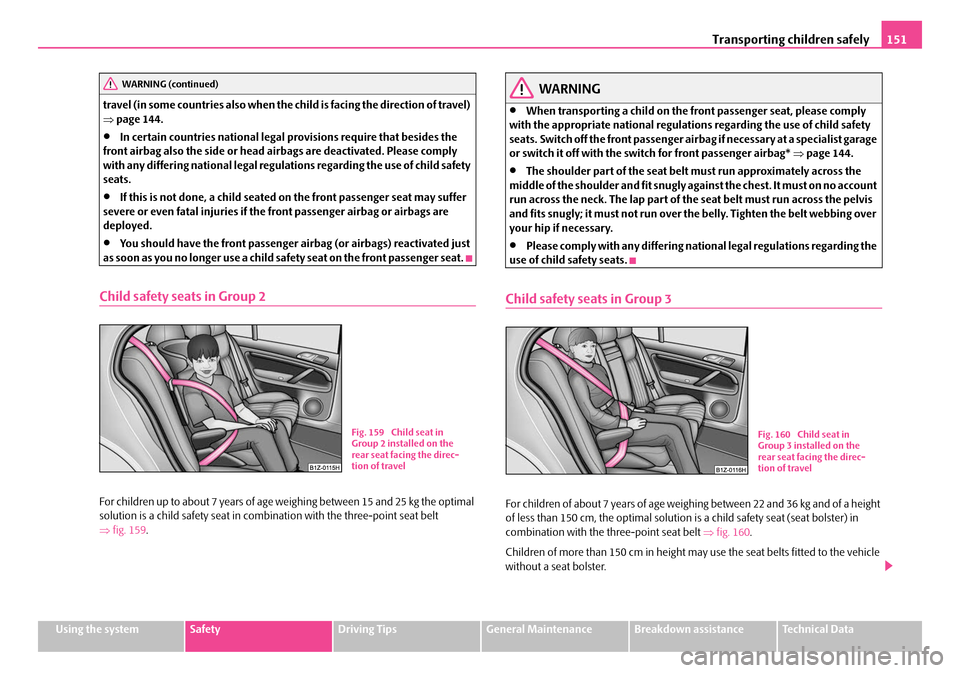
For children up to about 7 years of age weighing between 15 and 25 kg the optimal
solution is a child safety seat in comb ination with the three-point seat belt
⇒ fig. 159 .
WARNING
•When transporting a child on the fr ont passenger seat, please comply
with the appropriate national regulati ons regarding the use of child safety
seats. Switch off the front passenger airb ag if necessary at a specialist garage
or switch it off with the switch for front passenger airbag* ⇒page 144.
•The shoulder part of the seat belt must run approximately across the
middle of the shoulder and fit snugly agai nst the chest. It must on no account
run across the neck. The lap part of the seat belt must run across the pelvis
and fits snugly; it must not run over the belly. Tighten the belt webbing over
your hip if necessary.
•Please comply with any differing nati onal legal regulations regarding the
use of child safety seats.
Child safety seats in Group 3
For children of about 7 years of age weighing between 22 and 36 kg and of a height
of less than 150 cm, the optimal solution is a child safety seat (seat bolster) in
combination with the three-point seat belt ⇒fig. 160 .
Children of more than 150 cm in height may use the seat belts fitted to the vehicle
without a seat bolster.
WARNING (continued)
Fig. 159 Child seat in
Group 2 installed on the
rear seat facing the direc-
tion of travelFig. 160 Child seat in
Group 3 installed on the
rear seat facing the direc-
tion of travel
NKO B5 20.book Page 151 Friday, March 2, 2007 1:46 PM
Page 170 of 259
Towing a trailer169
Using the systemSafetyDriving TipsGeneral MaintenanceBreakdown assistanceTechnical Data
Towing a trailer
Towing a trailer
Technical requirements
The towing device must satisfy certain technical requirements.
Your vehicle is designed primarily for tran sporting persons and luggage. It can,
however, also be used for towing a trailer - provided certain technical equipment is
fitted.
If your vehicle has alre ady been supplied with a factory-fitted towing device then
everything that is necessary for towing a tr ailer in technical terms, and in terms of
the law, has already been taken into account.
Your vehicle is fitted with a 13-pin powe r socket for the electrical connection
between the vehicle and trailer. If the trailer which you wish to tow has a 7-pin
connector , you can use a suitable adapter
4) from Škoda original accessories.
This work must be carried out in accordan ce with the manufacturer's specifications
if a towing device is retrofitted.
Škoda Service Partners are familiar with details relating to retrofitting a towing
device and for any necessary modi fications to the cooling system.
WARNING
We recommend that you have the towing device from Škoda original acces-
sories installed by a Škoda Service Partner. H e is fa m il ia r wit h al l the re le v a nt
details relating to retrofitting such equipment. There is a risk of an accident
if the towing device is not properly fitted!
General Maintenance
There are a number of points to pay attention to when towing a
trailer.
Trailer load
The permissible trailer load must on no account be exceeded.
You can negotiate appropriately steeper incl ines and descents if you do not make
full use of the permissible trailer load.
The trailer loads specified only apply for altitudes up to 1 000 metres above mean
sea level. The fact that the engine power ou tput drops with increasing height due to
a lowering of air pressure and thus the abil ity to climb, means that the towed weight
must be reduced by 10% for every further increase of 1 000 metres in height above
sea level. The towed weight is the weight of the (laden) vehicle and the (laden)
trailer together. One should take this into account before driving up to higher alti-
tudes.
The trailer and drawbar load information on the type plate of the towing
device are merely test data for the towi ng device The data relating to your
vehicle, which is often less than this test data, can be found in your vehicle
registration documents.
Distribution of the load
Distribute the load in the trailer in such a way that any heavy items are located as
close as possible to the axle. Secure the items to prevent them slipping.
Tyre pressure
Select the tyre inflation pressure on yo ur vehicle for that of “fully laden”,
⇒ page 200. The inflation pressure of the tyres fitted to the trailer adjust in accord-
ance with the manufacturer's recommendation.
Exterior mirrors
You have to have additional exterior mirr ors fitted if you are not able to see the
traffic behind the trailer with the standard rear-view mirrors. Both exterior mirrors
4)In some countries the adapter is supplied with the towing device.
NKO B5 20.book Page 169 Friday, March 2, 2007 1:46 PM
Page 185 of 259
Inspecting and Replenishing
184
Inspecting and Replenishing
Engine compartment
Bonnet remote release
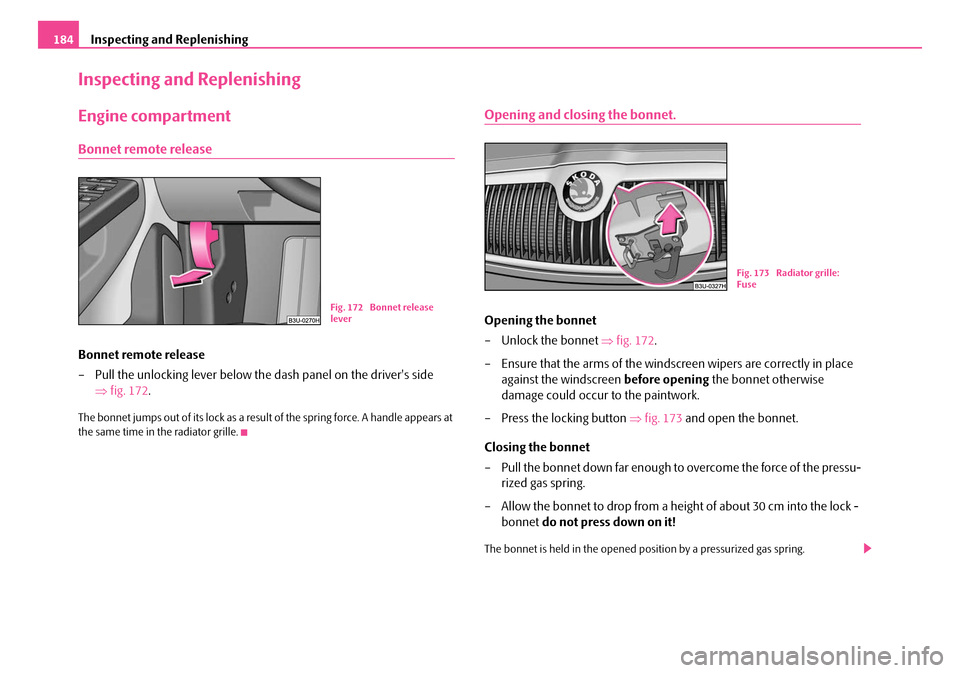
Bonnet remote release
– Pull the unlocking lever below the dash panel on the driver's side
⇒ fig. 172 .
The bonnet jumps out of its lock as a result of the spring force. A handle appears at
the same time in the radiator grille.
Opening and closing the bonnet.
Opening the bonnet
– Unlock the bonnet ⇒fig. 172 .
– Ensure that the arms of the windsc reen wipers are correctly in place
against the windscreen before opening the bonnet otherwise
damage could occur to the paintwork.
– Press the locking button ⇒fig. 173 and open the bonnet.
Closing the bonnet
– Pull the bonnet down far enough to overcome the force of the pressu- rized gas spring.
– Allow the bonnet to drop from a height of about 30 cm into the lock -
bonnet do not press down on it!
The bonnet is held in the opened po sition by a pressurized gas spring.
Fig. 172 Bonnet release
lever
B1Z-0042HB1Z-0042HFig. 173 Radiator grille:
Fuse
NKO B5 20.book Page 184 Friday, March 2, 2007 1:46 PM
Page 203 of 259

Wheels and Tyres
202
We recommend that you have any work rela ting to tyres or wheels carried out by
your Škoda Service Partner . Your dealer has all of the necessary special tools and
replacement parts available plus the required specialist knowledge and is also in a
position to properly dispose of the old tyres. A large number of Škoda Service Part-
ners also have an attractive range of tyres and wheels available.
The tyre/wheel combinations which are appr oved for your vehicle are indicated in
your vehicle documents. Approval and lice nsing may differ according to the legis-
lation prevailing in individual countries.
Proper knowledge of the tyre data makes it easier for you to select the correct type
of tyre. Tyres do, for example, have the following inscription on their walls:
205 / 60 R 15 91 V
What this means is:
The following speed restrictions apply to tyres. The
date of manufacture is also stated on the tyre wall (possibly only on the inside
of wheel):
DOT ... 20 04...
means, for example, that the tyre was manufactured in the 20th week of the year
2004.
Any spare wheel which differs from the tyres fitted to the vehicle (e.g. winter tyres
or low-profile tyres) should only be used only for a short time in the event of a
puncture and when adopting an appropriately cautious style of driving. It should be
replaced as quickly as possible by a normal wheel.
WARNING
•Only use those tyres or wheel rims which have been approved for your
model of Škoda Auto a.s. vehicle. Failure to observe this instruction will
adversely affect the road safety of your vehicle - risk of accident! Approval
and licencing of your vehicle on publ ic roads may also become void as a
result.
•You must on no account drive at a hi gher speed than is permissible for
your tyres - risk of an accident resulting from tyre damage and loss of control
over your vehicle.
•Tyres which are 6 years old or more should only be fitted in exceptional
cases and when adopting an approp riately cautious style of driving.
•Never fit tyres which have already been used without having adequate
knowledge of their previous history. Ty res age even if they have not been
used at all or only very little. A spare tyre must only be used in exceptional
cases and only then when adopting an appropriately cautious style of
driving.
•Do not, where possible, replace indivi dual tyres but at least replace them
on both wheels of a given axle at the same time. Always fit the tyres with the
deeper tread depth to the front wheels.
For the sake of the environment
Old tyres must be disposed of in conf ormity with the appropriate regulations.
205Tyre wid th in mm
60Height/width ratio in %
RCode letter for the type of tyre - Radial
15Diameter of wheel in inches
91Load index
VSpeed symbol
Speed symbolPermissible maximum speed
S180 km/h
T190 km/h
H210 km/h
V240 km/h
W270 km/h
Y300 km/h
NKO B5 20.book Page 202 Friday, March 2, 2007 1:46 PM
Page 230 of 259

Technical Data229
Using the systemSafetyDriving TipsGeneral MaintenanceBreakdown assistanceTechnical Data
Height
1469
1489a)
1449b)
Wheel base2803
Tr a c k g a u g e f r o n t / r e a r1521/1514
a)The value is valid for vehicles with rough road package.b)The value is valid for vehi cles with sport chassis
NKO B5 20.book Page 229 Friday, March 2, 2007 1:46 PM
Page 254 of 259
Index253
O
Oil . . . . . . . . . . . . . . . . . . . . . . . . . . . . . . . . . . . . . . . . . 186
Change . . . . . . . . . . . . . . . . . . . . . . . . . . . . . . . . . 189
Warning light . . . . . . . . . . . . . . . . . . . . . . . . . . . . . . 27
Oil dipstick . . . . . . . . . . . . . . . . . . . . . . . . . . . . . . . . . 187
Onboard computer . . . . . . . . . . . . . . . . . . . . . . . . . . . . 15
Open door Open door . . . . . . . . . . . . . . . . . . . . . . . . . . . . . . . . 28
Opening a single door . . . . . . . . . . . . . . . . . . . . . . . . . 33
Operating cruise control system Multifunction steering wheel . . . . . . . . . . . . . 115
Operating mobile phone Multifunction steering wheel . . . . . . . . . . . . . 116
Operating the radio Multifunction steering wheel . . . . . . . . . . . . . 116
Operation in winter Battery . . . . . . . . . . . . . . . . . . . . . . . . . . . . . . . . . . 195
Biodiesel . . . . . . . . . . . . . . . . . . . . . . . . . . . . . . . . 182
De-icing windows . . . . . . . . . . . . . . . . . . . . . . . 176
Snow chains . . . . . . . . . . . . . . . . . . . . . . . . . . . . . 204
Tyres . . . . . . . . . . . . . . . . . . . . . . . . . . . . . . . . . . . . 203
Outside temperature . . . . . . . . . . . . . . . . . . . . . . . . . . 16
Overview of the engine compartment . . . . . . . . . 186
P
Paint . . . . . . . . . . . . . . . . . . . . . . . . . . . . . . . . . . . . . . . 175
Paint damage . . . . . . . . . . . . . . . . . . . . . . . . . . . . . . . 175
Parking . . . . . . . . . . . . . . . . . . . . . . . . . . . . . . . . . . . . . 104
Parking aid . . . . . . . . . . . . . . . . . . . . . . . . . . . . . . . . . . 104
parking aid Front and rear . . . . . . . . . . . . . . . . . . . . . . . . . . . 105 Parking light . . . . . . . . . . . . . . . . . . . . . . . . . . . . . . . . . . 49
Passive Safety . . . . . . . . . . . . . . . . . . . . . . . . . . . . . . . 125
Pedals . . . . . . . . . . . . . . . . . . . . . . . . . . . . . . . . . . . . . . . 66
Petrol . . . . . . . . . . . . . . . . . . . . . . . . . . . . . . . . . . . . . . . 181
Petrol engines
Starting the engine . . . . . . . . . . . . . . . . . . . . . . . 101
Polishing . . . . . . . . . . . . . . . . . . . . . . . . . . . . . . . . . . . . 175
Power socket . . . . . . . . . . . . . . . . . . . . . . . . . . . . . . 81, 82
Power steering . . . . . . . . . . . . . . . . . . . . . . . . . . . . . . 160
Power window . . . . . . . . . . . . . . . . . . . . . . . . . . . . . . . 40
Power windows Button in front passenger door and in rear doors41
Buttons on the driver's door . . . . . . . . . . . . . . . . 40
Central locking system . . . . . . . . . . . . . . . . . . . . . 42
R
Radiator fan . . . . . . . . . . . . . . . . . . . . . . . . . . . . . . . . . 191
Raise vehicle . . . . . . . . . . . . . . . . . . . . . . . . . . . . . . . . 213
Range . . . . . . . . . . . . . . . . . . . . . . . . . . . . . . . . . . . . . . . . 17
Rear drinks can holder . . . . . . . . . . . . . . . . . . . . . . . . . . 79
Rear armrest . . . . . . . . . . . . . . . . . . . . . . . . . . . . . . . . . 87
Rear fog light . . . . . . . . . . . . . . . . . . . . . . . . . . . . . . . . . 47
Rear seats . . . . . . . . . . . . . . . . . . . . . . . . . . . . . . . . . . . . 70
Rear window heater . . . . . . . . . . . . . . . . . . . . . . . . . . . . . . . . . . . . 52
Rear window heater . . . . . . . . . . . . . . . . . . . . . . . . . . . 52
Rear-view mirror Exterior mirror . . . . . . . . . . . . . . . . . . . . . . . . . . . . 57
Interior mirror . . . . . . . . . . . . . . . . . . . . . . . . . . . . . 56 Recirculated air mode
Heating and ventilation . . . . . . . . . . . . . . . . . . . . 91
Refrigerator . . . . . . . . . . . . . . . . . . . . . . . . . . . . . . . . . . 73
Refuelling . . . . . . . . . . . . . . . . . . . . . . . . . . . . . . . . . . . 182 Emergency release of fuel filler flap . . . . . . . . 183
Remote control . . . . . . . . . . . . . . . . . . . . . . . . . . . . . . . 37 Synchronisation . . . . . . . . . . . . . . . . . . . . . . . . . . . 39
Replacing fuses . . . . . . . . . . . . . . . . . . . . . . . . . . . . . . 220
Replacing the wiper blades . . . . . . . . . . . . . . . . . . . . 55
Roof aerial . . . . . . . . . . . . . . . . . . . . . . . . . . . . . . . . . . 174
Running in the car . . . . . . . . . . . . . . . . . . . . . . . . . . . 162
S
Safe distance to steering wheel . . . . . . . . . . . . . . . . 99
Safe securing . . . . . . . . . . . . . . . . . . . . . . . . . . . . . . . . . 34
Safety . . . . . . . . . . . . . . . . . . . . . . . . . . . . . . . . . . . . . . . 125
Safety information Engine compartment . . . . . . . . . . . . . . . . . . . . . 185
Saving electrical energy . . . . . . . . . . . . . . . . . . . . . . 163
Seat belt height adjuster . . . . . . . . . . . . . . . . . . . . . 133
Seat belt warning light . . . . . . . . . . . . . . . . . . . . . . . 132
Seat belts . . . . . . . . . . . . . . . . . . . . . . . . . . . . . . . . . . . 130 Belt tensioners . . . . . . . . . . . . . . . . . . . . . . . . . . . 134
Cleaning . . . . . . . . . . . . . . . . . . . . . . . . . . . . . . . . 179
fastening . . . . . . . . . . . . . . . . . . . . . . . . . . . . . . . . 132
Height adjustment . . . . . . . . . . . . . . . . . . . . . . . 133
Safety information . . . . . . . . . . . . . . . . . . . . . . . 131
taking off . . . . . . . . . . . . . . . . . . . . . . . . . . . . . . . . 134
Warning light . . . . . . . . . . . . . . . . . . . . . . . . . . . . . 30
Seat heaters . . . . . . . . . . . . . . . . . . . . . . . . . . . . . . . . . . 66
Seats . . . . . . . . . . . . . . . . . . . . . . . . . . . . . . . . . . . . . . . . 59 Heater . . . . . . . . . . . . . . . . . . . . . . . . . . . . . . . . . . . 66
NKO B5 20.book Page 253 Friday, March 2, 2007 1:46 PM