buttons SKODA SUPERB 2007 1.G / (B5/3U) Owner's Manual
[x] Cancel search | Manufacturer: SKODA, Model Year: 2007, Model line: SUPERB, Model: SKODA SUPERB 2007 1.G / (B5/3U)Pages: 259, PDF Size: 14.71 MB
Page 10 of 259
Cockpit9
Using the systemSafetyDriving TipsGeneral MaintenanceBreakdown assistanceTechnical Data
Cockpit
General view
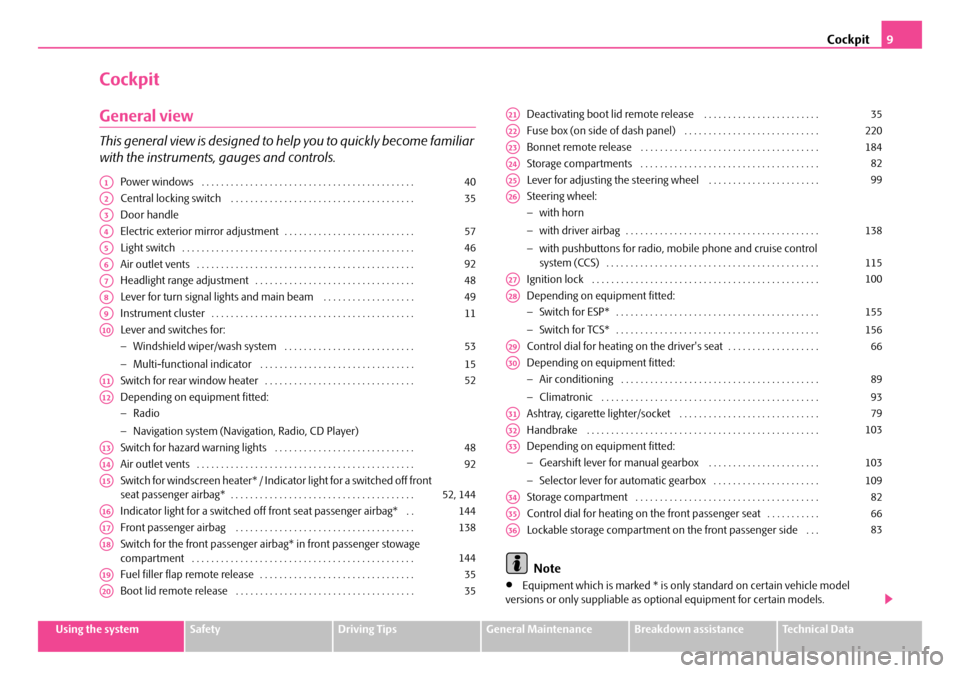
This general view is designed to help you to quickly become familiar
with the instruments, gauges and controls.
Power windows . . . . . . . . . . . . . . . . . . . . . . . . . . . . . . . . . . . . . . . . . . . .
Central locking switch . . . . . . . . . . . . . . . . . . . . . . . . . . . . . . . . . . . . . .
Door handle
Electric exterior mirror adjustment . . . . . . . . . . . . . . . . . . . . . . . . . . .
Light switch . . . . . . . . . . . . . . . . . . . . . . . . . . . . . . . . . . . . . . . . . . . . . . . .
Air outlet vents . . . . . . . . . . . . . . . . . . . . . . . . . . . . . . . . . . . . . . . . . . . . .
Headlight range adjustment . . . . . . . . . . . . . . . . . . . . . . . . . . . . . . . . .
Lever for turn signal lights and main beam . . . . . . . . . . . . . . . . . . .
Instrument cluster . . . . . . . . . . . . . . . . . . . . . . . . . . . . . . . . . . . . . . . . . .
Lever and switches for:
−Windshield wiper/wash system . . . . . . . . . . . . . . . . . . . . . . . . . . .
− Multi-functional indicator . . . . . . . . . . . . . . . . . . . . . . . . . . . . . . . .
Switch for rear window heater . . . . . . . . . . . . . . . . . . . . . . . . . . . . . . .
Depending on equipment fitted:
− Radio
− Navigation system (Navigation, Radio, CD Player)
Switch for hazard warning lights . . . . . . . . . . . . . . . . . . . . . . . . . . . . .
Air outlet vents . . . . . . . . . . . . . . . . . . . . . . . . . . . . . . . . . . . . . . . . . . . . .
Switch for windscreen heater* / Indic ator light for a switched off front
seat passenger airbag* . . . . . . . . . . . . . . . . . . . . . . . . . . . . . . . . . . . . . .
Indicator light for a switched off front seat passenger airbag* . .
Front passenger airbag . . . . . . . . . . . . . . . . . . . . . . . . . . . . . . . . . . . . .
Switch for the front passenger ai rbag* in front passenger stowage
compartment . . . . . . . . . . . . . . . . . . . . . . . . . . . . . . . . . . . . . . . . . . . . . .
Fuel filler flap remote release . . . . . . . . . . . . . . . . . . . . . . . . . . . . . . . .
Boot lid remote release . . . . . . . . . . . . . . . . . . . . . . . . . . . . . . . . . . . . . Deactivating boot lid remote release . . . . . . . . . . . . . . . . . . . . . . . .
Fuse box (on side of dash panel) . . . . . . . . . . . . . . . . . . . . . . . . . . . .
Bonnet remote release . . . . . . . . . . . . . . . . . . . . . . . . . . . . . . . . . . . . .
Storage compartments . . . . . . . . . . . . . . . . . . . . . . . . . . . . . . . . . . . . .
Lever for adjusting the steering wheel . . . . . . . . . . . . . . . . . . . . . . .
Steering wheel:
−
with horn
− with driver airbag . . . . . . . . . . . . . . . . . . . . . . . . . . . . . . . . . . . . . . . .
− with pushbuttons for radio, mobile phone and cruise control
system (CCS) . . . . . . . . . . . . . . . . . . . . . . . . . . . . . . . . . . . . . . . . . . . .
Ignition lock . . . . . . . . . . . . . . . . . . . . . . . . . . . . . . . . . . . . . . . . . . . . . . .
Depending on equipment fitted:
− Switch for ESP* . . . . . . . . . . . . . . . . . . . . . . . . . . . . . . . . . . . . . . . . . .
− Switch for TCS* . . . . . . . . . . . . . . . . . . . . . . . . . . . . . . . . . . . . . . . . . .
Control dial for heating on the driver's seat . . . . . . . . . . . . . . . . . . .
Depending on equipment fitted:
− Air conditioning . . . . . . . . . . . . . . . . . . . . . . . . . . . . . . . . . . . . . . . . .
− Climatronic . . . . . . . . . . . . . . . . . . . . . . . . . . . . . . . . . . . . . . . . . . . . .
Ashtray, cigarette lighter/socket . . . . . . . . . . . . . . . . . . . . . . . . . . . . .
Handbrake . . . . . . . . . . . . . . . . . . . . . . . . . . . . . . . . . . . . . . . . . . . . . . . .
Depending on equipment fitted:
− Gearshift lever for manual gearbox . . . . . . . . . . . . . . . . . . . . . . .
− Selector lever for automatic gearbox . . . . . . . . . . . . . . . . . . . . . .
Storage compartment . . . . . . . . . . . . . . . . . . . . . . . . . . . . . . . . . . . . . .
Control dial for heating on the front passenger seat . . . . . . . . . . .
Lockable storage compartment on the front passenger side . . .
Note
•Equipment which is marked * is only standard on certain vehicle model
versions or only suppliable as op tional equipment for certain models.
A140
A235
A3
A457
A546
A692
A748
A849
A911
A10
53
15
A1152
A12
A1348
A1492
A1552, 144
A16144
A17138
A18144
A1935
A2035
A2135
A22220
A23184
A2482
A2599
A26
138
115
A27100
A28
155
156
A2966
A30
89
93
A3179
A32103
A33
103
109
A3482
A3566
A3683
NKO B5 20.book Page 9 Friday, March 2, 2007 1:46 PM
Page 34 of 259
Unlocking and locking33
Using the systemSafetyDriving TipsGeneral MaintenanceBreakdown assistanceTechnical Data
Note
It is only possible to start the engine of your car with a Genuine Škoda key with the
matching code ⇒page 29.
Child safety lock
The child safety lock prevents the rear door from being opened from
the inside.
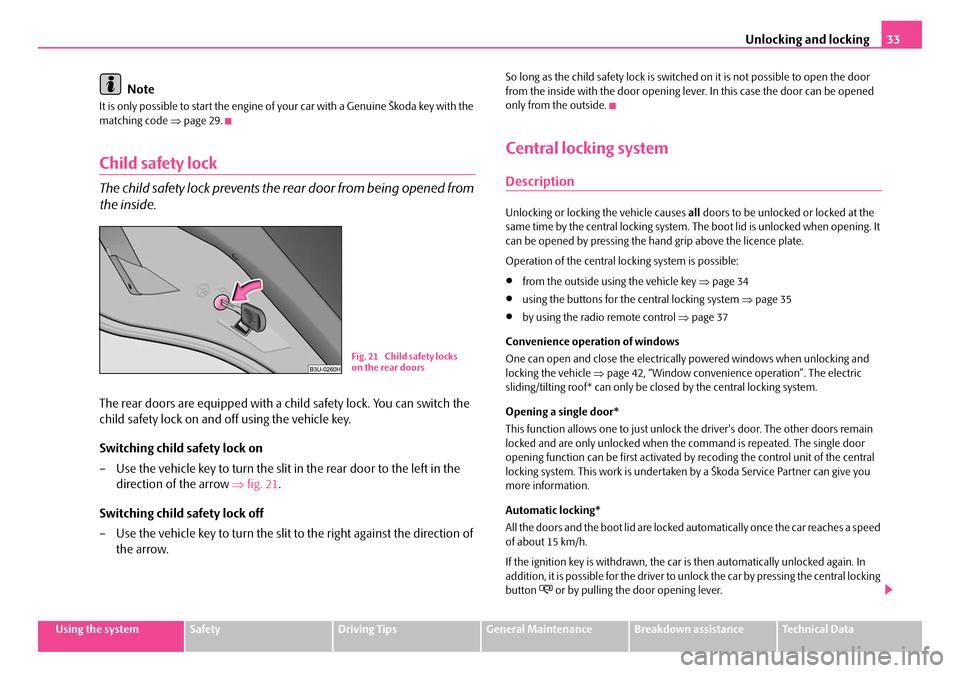
The rear doors are equipped with a child safety lock. You can switch the
child safety lock on and off using the vehicle key.
Switching child safety lock on
– Use the vehicle key to turn the slit in the rear door to the left in the
direction of the arrow ⇒fig. 21 .
Switching child safety lock off
– Use the vehicle key to turn the slit to the right against the direction of
the arrow.
So long as the child safety lock is switched on it is not possible to open the door
from the inside with the door opening leve r. In this case the door can be opened
only from the outside.
Central locking system
Description
Unlocking or locking the vehicle causes all doors to be unlocked or locked at the
same time by the central locking system. Th e boot lid is unlocked when opening. It
can be opened by pressing the hand grip above the licence plate.
Operation of the central locking system is possible:
•from the outside using the vehicle key ⇒page 34
•using the buttons for the central locking system ⇒page 35
•by using the radio remote control ⇒page 37
Convenience operation of windows
One can open and close the electrically powered windows when unlocking and
locking the vehicle ⇒page 42, “Window convenience operation”. The electric
sliding/tilting roof* can only be closed by the central locking system.
Opening a single door*
This function allows one to just unlock the driver's door. The other doors remain
locked and are only unlocked when the command is repeated. The single door
opening function can be first activated by recoding the control unit of the central
locking system. This work is undertaken by a Škoda Service Partner can give you
more information.
Automatic locking*
All the doors and the boot lid are locked automatically once the car reaches a speed
of about 15 km/h.
If the ignition key is withdrawn, the car is then automatically unlocked again. In
addition, it is possible for the driver to unlock the car by pressing the central locking
button
or by pulling the door opening lever.
Fig. 21 Child safety locks
on the rear doors
NKO B5 20.book Page 33 Friday, March 2, 2007 1:46 PM
Page 35 of 259
Unlocking and locking
34
If you wish, your Škoda Service Partner ca n convert the central locking system of
your car to the automatic locking mode.
WARNING
Locking the doors prevents involuntary opening in an exceptional situation
(an accident). Locked doors prevent unwanted entry into the vehicle from
outside, for example at road crossings. Locked doors do, however, make it
more difficult for rescuers to get into the vehicle in an emergency - danger to
life!
Note
•After unlocking the vehicle see, if the se curing knobs are located on all doors at
the bottom.
•In the event of an accident in which the airbags are deployed, the locked doors
are automatically unlocked in order to enable rescuers to gain access to the vehicle.
•Should the central locking system not operate properly, you can lock and unlock
the front doors and the boot lid with the key. Emergency unlocking of fuel filler flap
⇒ page 183.
Safe securing
The central locking system is equipped with a safe securing system. Locking the
vehicle from the outside causes the door lock s to be automatically blocked. It is not
possible to pull out the locking buttons. The indicator light in the driver's door
flashes. It is not possible to open the d oors with the door handle either from the
inside or from the outside. This acts as an effective deterrent for attempts to break
into your vehicle.
You can deactivate the safe securing system. This is done by locking the vehicle with
the key or radio-operated key twice within 2 seconds.
Deactivating the safe securing system means that the warning light next to the
securing knob in the driver's door will not fl ash. This is not the case, however, for an
activated anti-theft alarm system* since the indicator light is showing that the
system is active ⇒page 39. The safe securing system is again activated the next time the vehicle is unlocked and
locked again.
The doors can be opened from the inside
if the vehicle is locked and the safe
securing system is deactivated:
•The door is unlocked by actuating the door-opening lever.
•The door opens upon actuating the door-opening lever again.
WARNING
If the vehicle is locked from the outsid e and the safe securing system is acti-
vated, there must not be any person and animals in the vehicle as it is then
not possible to open either a door or a window from the inside. The locked
doors make it more difficult for rescuers to get into the vehicle in an emer-
gency - hazard!
Note
The anti-theft alarm system is also armed when the car is closed without activating
the safe securing system. In this case, always switch off the interior monitoring
sensor* ⇒page 40 first of all to avoid an alarm being triggered unintentionally.
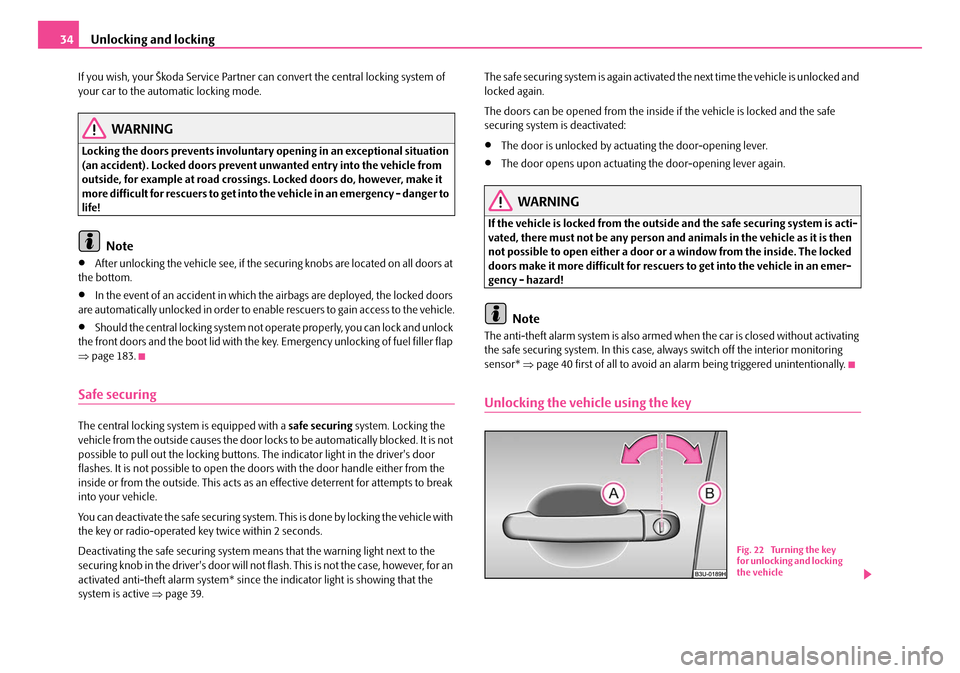
Unlocking the vehicle using the key
B1Z-0042HB1Z-0042H
Fig. 22 Turning the key
for unlocking and locking
the vehicle
NKO B5 20.book Page 34 Friday, March 2, 2007 1:46 PM
Page 36 of 259
Unlocking and locking35
Using the systemSafetyDriving TipsGeneral MaintenanceBreakdown assistanceTechnical Data
– Turn the key in the lock of the driver 's door to the left into the opening
position ⇒page 34, fig. 22 .
– Pull on the door handle and open the door.
•All doors are unlocked (the securi ng knobs must move upwards).
•The boot lid is then unlocked.
•The switched on interior lights come on over the door contact.
•The safe securing system is deactivated.
•The windows are opened provided the key is held in the opening position.
•The indicator light in the driver's door stops flashing if the vehicle is not fitted
with an anti-theft alarm system* ⇒page 39.
Note
If the vehicle is equipped wi th an anti-theft alarm system*, you must unlock the
vehicle by inserting the key into the driver door you then have to insert the key into
the ignition lock and switch the ignition on within 15 seconds after opening the
door. The alarm will be triggered if you do not switch on the ignition within 15
seconds.
Closing the vehicle with the key
– Turn the key in the lock of the driver door to the right into the closing position ⇒page 34, fig. 22 .
•All doors and the boot lid are locked (the securing knobs must move down-
wards).
•The switched on interior lights go out over the door contact.
•The windows and the electric sliding/tilting roof* are closed provided the key is
held in the locking position.
•The safe securing system is activated immediately.
•The indicator light in the driver door begins flashing.
Note
The opened driver door cannot be locked. It must be locked separately after closing
it.
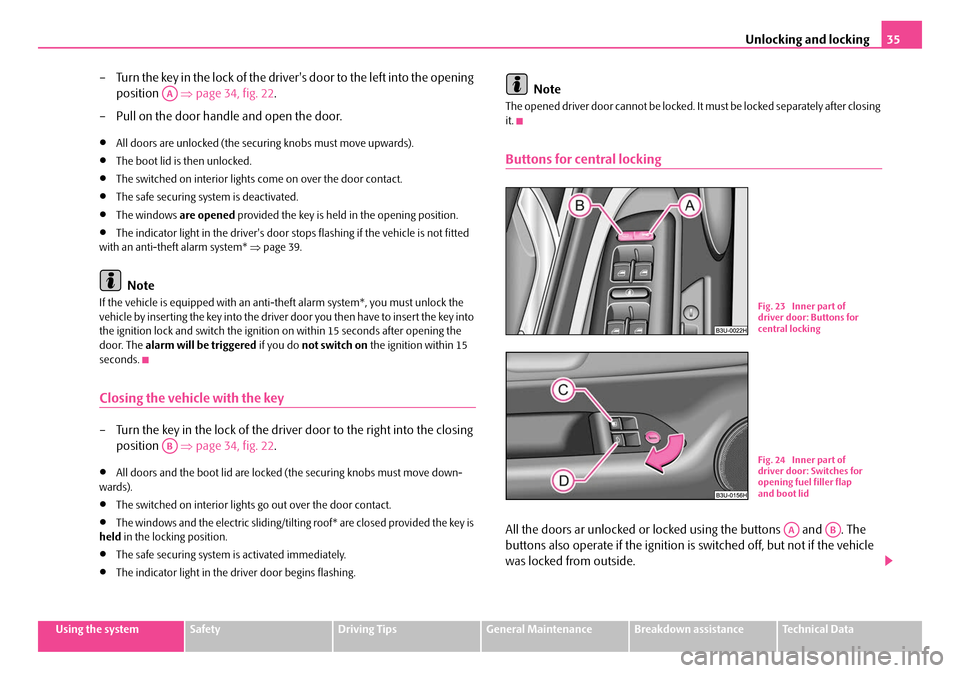
Buttons for central locking
All the doors ar unlocked or locked using the buttons and . The
buttons also operate if the ignition is switched off, but not if the vehicle
was locked from outside.
AA
AB
Fig. 23 Inner part of
driver door: Buttons for
central locking
B1Z-0042HB1Z-0042H
Fig. 24 Inner part of
driver door: Switches for
opening fuel filler flap
and boot lid
AAAB
NKO B5 20.book Page 35 Friday, March 2, 2007 1:46 PM
Page 39 of 259
Unlocking and locking
38
•unlocking boot lid,
•Opening and closing window.
The transmitter with the battery is housed in the handle of the master key. The
receiver is located in the interior of th e car. The operating range of the remote
control is 10 metres but this range can be reduced if the batteries are weak.
The master key has a fold-open key bit whic h can be used for unlocking and locking
the car manually and also for starting the engine.
If a lost key is replaced or if the rece iver unit has been repaired or a new unit
installed, it is then necessary for a Škoda Service Partner to initialise the system.
Only after this is it possible to again use the remote control.
Note
•The remote control is automatically deac tivated when the ignition is switched
on.
•The operation of the remote control may temporarily be affected by interfer-
ence from transmitters close to the car and which operate in the same frequency
range (e.g. mobile phone, TV transmitter).
•The battery must be replaced, ideally by a Škoda Service Partner, if the central
locking or anti-theft alarm system does re act to the remote control at less than 3
metres away.
Unlocking and locking car
Unlocking the vehicle
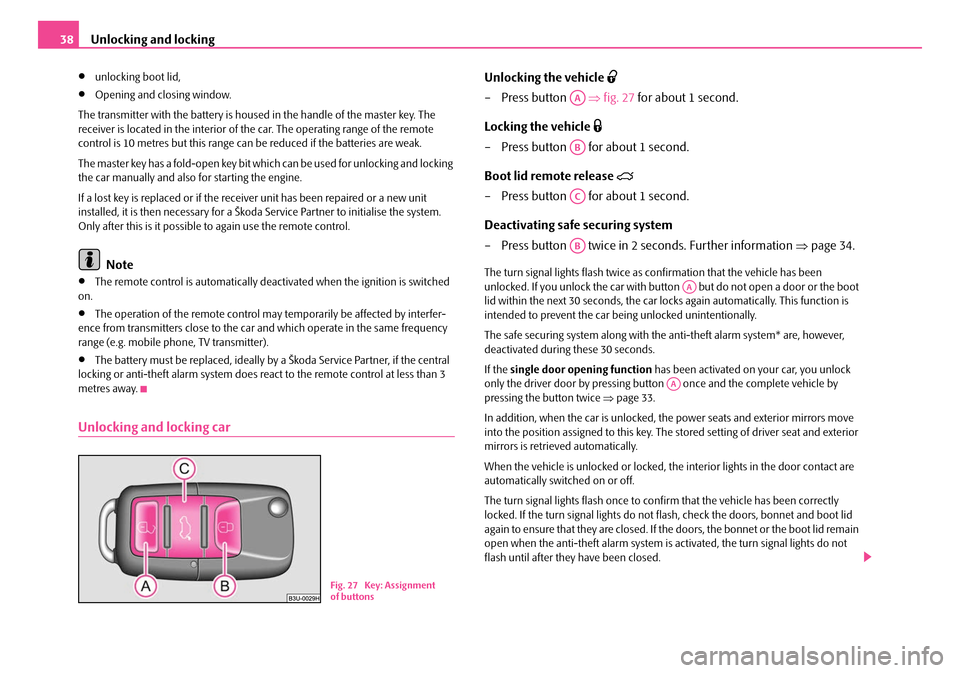
– Press button ⇒fig. 27 for about 1 second.
Locking the vehicle
– Press button for about 1 second.
Boot lid remote release
– Press button for about 1 second.
Deactivating safe securing system
– Press button twice in 2 seconds. Further information ⇒page 34.
The turn signal lights flash twice as confirmation that the vehicle has been
unlocked. If you unlock the car with button but do not open a door or the boot
lid within the next 30 seconds, the car lo cks again automatically. This function is
intended to prevent the car being unlocked unintentionally.
The safe securing system along with the anti-theft alarm system* are, however,
deactivated during these 30 seconds.
If the single door opening function has been activated on your car, you unlock
only the driver door by pressing butto n once and the complete vehicle by
pressing the button twice ⇒page 33.
In addition, when the car is unlocked, the power seats and exterior mirrors move
into the position assigned to this key. The stored setting of driver seat and exterior
mirrors is retrieved automatically.
When the vehicle is unlocked or locked, the interior lights in the door contact are
automatically switched on or off.
The turn signal lights flash once to co nfirm that the vehicle has been correctly
locked. If the turn signal lights do not fl ash, check the doors, bonnet and boot lid
again to ensure that they are closed. If th e doors, the bonnet or the boot lid remain
open when the anti-theft alarm system is activated, the turn signal lights do not
flash until after they have been closed.
B1Z-0042HB1Z-0042HFig. 27 Key: Assignment
of buttons
AA
AB
AC
AB
AA
AA
NKO B5 20.book Page 38 Friday, March 2, 2007 1:46 PM
Page 41 of 259

Unlocking and locking
40
How is the alarm switched off?
You switch the alarm off if you unlock the car with the radio remote control in the
key or if you switch the ignition on.
Indicator light (LED)
The LED in the top of the door trim on the driver door first of all flashes rapidly after
the car is locked, then slowly. This indi cates that the anti-theft alarm system
including the interior monitor* is activated.
Note
•The working life of the alarm siren is 5 years. More detailed information is avail-
able from your Škoda Service Partner.
•Before leaving the car, check that al l the doors, windows and the electric
sliding/tilting roof* are properly closed in order to ensure that the anti-theft alarm
system is fully operational.
•Coding of the radio remote control and the receptor part precludes the use of
the radio remote control from other vehicles.
Interior monitor*
The interior monitor detects moveme nts inside the car and then trig-
gers the alarm.
You can switch the interior monitor off if, for example, an animal or other
moving objects inside the car might trigger the alarm.
Deactivation of interior monitor
– Press the button
on the center column at the driver's side
⇒ fig. 28 .
– Lock the car.
The interior monitor is switched on agai n automatically the next time the car is
locked.
Note
You can switch off the interior mo nitor only after opening the door.
Power windows
Buttons on the driver's door
The power windows operate only when ignition is switched on.B1Z-0042HB1Z-0042HFig. 28 Interior monitor
pushbutton
B1Z-0042HB1Z-0042H
Fig. 29 Armrest on the
driver's door: Control
elements
NKO B5 20.book Page 40 Friday, March 2, 2007 1:46 PM
Page 42 of 259
Unlocking and locking41
Using the systemSafetyDriving TipsGeneral MaintenanceBreakdown assistanceTechnical Data
Opening a window
– A window is opened by pres sing lightly on the respective butto n in the
door. The process stops when one releases the button.
– Pressing of the button in the driver 's door down to the stop will cause
the window to be opened completely, automatically. Renewed
pressing of the button causes the window to stop immediately.
Closing a window
– A window is closed through pulling lightly on the respective button in
the door. The closing process stop s when one releases the button.
– Pulling of the button in the driver 's door to the stop will cause the
window to be closed completey, automatically. Renewed pulling of
the button causes the window to stop immediately.
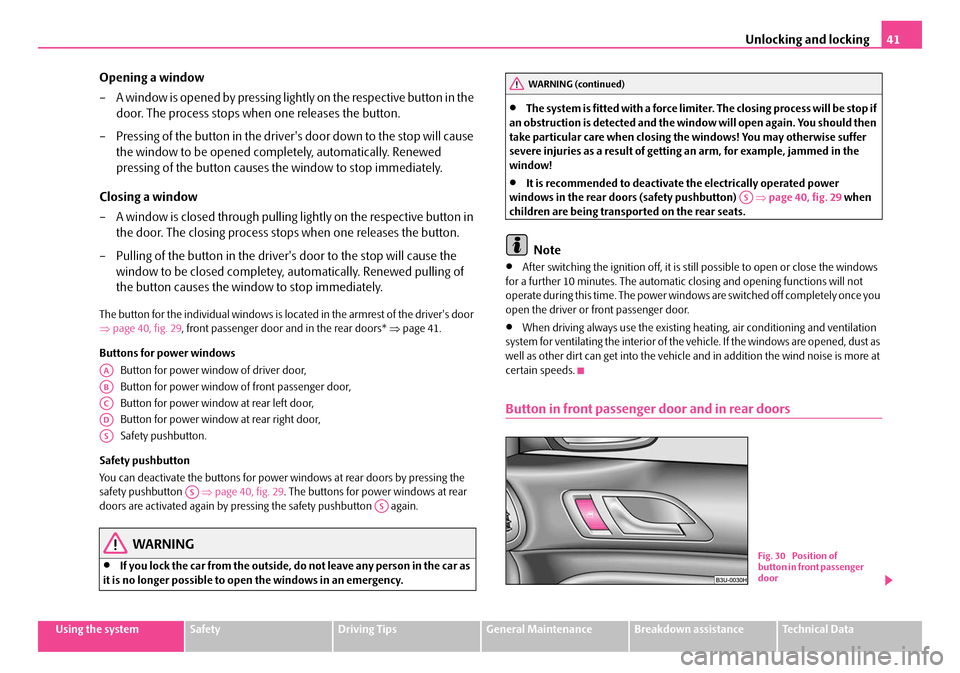
The button for the individual windows is located in the armrest of the driver's door
⇒ page 40, fig. 29 , front passenger door and in the rear doors* ⇒page 41.
Buttons for power windows Button for power window of driver door,
Button for power window of front passenger door,
Button for power window at rear left door,
Button for power window at rear right door,
Safety pushbutton.
Safety pushbutton
You can deactivate the buttons for power windows at rear doors by pressing the
safety pushbutton ⇒page 40, fig. 29 . The buttons for power windows at rear
doors are activated again by pressing the safety pushbutton again.
WARNING
•If you lock the car from the outside, do not leave any person in the car as
it is no longer possible to op en the windows in an emergency.
•The system is fitted with a force limiter. The closin g process will be stop if
an obstruction is detected and the window will open again. You should then
take particular care when closing the windows! You may otherwise suffer
severe injuries as a result of getting an arm, for example, jammed in the
window!
•It is recommended to deactivate the electrically operated power
windows in the rear doors (safety pushbutton) ⇒page 40, fig. 29 when
children are being transported on the rear seats.
Note
•After switching the ignition off, it is still possible to open or close the windows
for a further 10 minutes. The automatic closing and opening functions will not
operate during this time. The power windows are switched off completely once you
open the driver or front passenger door.
•When driving always use the existing he ating, air conditioning and ventilation
system for ventilating the interior of the vehicle. If the windows are opened, dust as
well as other dirt can get into the vehicle an d in addition the wind noise is more at
certain speeds.
Button in front passenger door and in rear doors
AA
AB
AC
AD
AS
ASAS
WARNING (continued)
AS
Fig. 30 Position of
button in front passenger
door
NKO B5 20.book Page 41 Friday, March 2, 2007 1:46 PM
Page 62 of 259
Seats and Stowage61
Using the systemSafetyDriving TipsGeneral MaintenanceBreakdown assistanceTechnical Data
•The backrests must not be angled too far back when driving otherwise
this will affect proper operation of the seat belts and of the airbag system -
risk of injury!
Note
If the movement of the seat is inadvertentl y interrupted during an adjustment, once
again press the switch in the appropriate direction and continue with the adjust-
ment of the seat to the end.
Memory for the seat
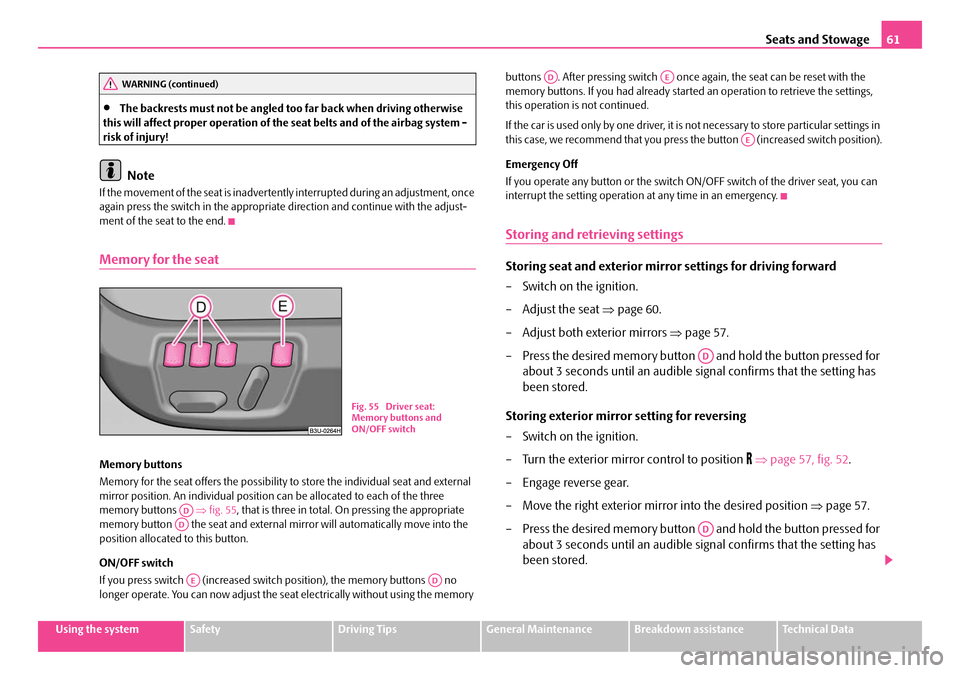
Memory buttons
Memory for the seat offers the possibility to store the individual seat and external
mirror position. An individual position can be allocated to each of the three
memory buttons ⇒fig. 55 , that is three in total. On pressing the appropriate
memory button the seat and external mi rror will automatically move into the
position allocated to this button.
ON/OFF switch
If you press switch (increased switch position), the memory buttons no
longer operate. You can now adjust the seat electrically without using the memory buttons . After pressing switch once
again, the seat can be reset with the
memory buttons. If you had al ready started an operation to retrieve the settings,
this operation is not continued.
If the car is used only by one driver, it is not necessary to store particular settings in
this case, we recommend that you press the button (increased switch position).
Emergency Off
If you operate any button or the switch ON /OFF switch of the driver seat, you can
interrupt the setting operation at any time in an emergency.
Storing and retrieving settings
Storing seat and exterior mirror settings for driving forward
– Switch on the ignition.
– Adjust the seat ⇒page 60.
– Adjust both exterior mirrors ⇒page 57.
– Press the desired memory button and hold the button pressed for about 3 seconds until an audible signal confirms that the setting has
been stored.
Storing exterior mirror setting for reversing
– Switch on the ignition.
– Turn the exterior mirror control to position
⇒ page 57, fig. 52 .
– Engage reverse gear.
– Move the right exterior mirror into the desired position ⇒page 57.
– Press the desired memory button and hold the button pressed for about 3 seconds until an audible signal confirms that the setting has
been stored.
WARNING (continued)
Fig. 55 Driver seat:
Memory buttons and
ON/OFF switch
ADAD
AEAD
ADAE
AE
AD
AD
NKO B5 20.book Page 61 Friday, March 2, 2007 1:46 PM
Page 63 of 259

Seats and Stowage
62
Note
•When storing settings with the memory buttons, we recommend that you begin
with the front button and assign a memory button to each additional driver.
•Each new setting stored with the same button erases the previous setting.
•Each time you store the seat and exterior mirror settings for driving forward you
also have to re-store the individual settin g of the exterior mirror on the passenger
side for reversing.
Assigning remote control to the memory buttons
After storing the settings of the seat and exterior mirrors, you have 10
seconds in order to assign the remote control to the appropriate memory
button.
– Withdraw the ignition key.
– Press the release button ⇒page 38 and hold it pressed for 1 second
until an audible signal confirms th at the setting has been stored. The
setting is stored with the memory button which you have selected.
If you wish to be able to retrieve the settings which are stored in the memory by also
using the remote control, you have to assign the remote control to a memory
button in each case.
We recommend that you assign one of the two remote controls supplied with your
car, to the front memory button, and the other remote control key to the middle
memory button.
If you wish, you can obtain an additional key with radio remote control from a
Škoda Service Partner and then assign the radio remote control to the rear memory
button.
Note
•If the remote control had previously been assigned to another memory button,
this setting is then erased by the new assignment.
•If you assign the remote control to a memory button which has already been
assigned to a remote control, the old assignment is also replaced by a new assign-
ment in this case.
•The assignment of the remote control to a memory button is retained, however,
after reassigning the seats and exterior mirrors.
Retrieving seat and exterior mirror settings for driving forward
You can retrieve the stored settings either with the memory buttons
or with the remote control*.
Retrieving settings with memory buttons
– For safety reasons, you can only retr ieve the seat and mirror settings if
the ignition is switched off. You have a choice of two different ways of
retrieving the settings:
– One-touch automatic memory: with the driver door open, operate
the desired memory button ⇒page 61, fig. 55 with one-touch.
The seat and the exterior mirrors now move automatically into the
stored position.
– Memory keying: with the driver door open or closed, press and hold
the desired memory button until the seat and the exterior mirrors
have moved into the stored position.
Retrieving settings with remote control
– If the driver door is closed and the ignition is switched off, briefly press the unlock button of the remote control ⇒page 38 and then open the
door.
– The seat and exterior mirrors now move automatically into the stored
positions.
AD
AD
NKO B5 20.book Page 62 Friday, March 2, 2007 1:46 PM
Page 95 of 259

Heating and air conditioning system
94
An acoustic signal for depressed buttons
Simultaneous pressing of buttons and can be used to de-activate or
activate this function.
A higher tone is heard when switching on this function, when increasing the blower
speed or when increasing the temperature.
A lower tone is heard when switching off this function, when decreasing the blower
speed or when decreasing the temperature.
Aeration of the vehicle when ignition is switched off*
On models fitted with power sliding/tilting roof with sollar cells, the fresh air blower
is automatically switched over to “solar mode ” if the sun ray's are sufficient after
switching off the ignition. The solar cells on the sliding/tilting roof deliver power for
the fresh air blower. This supplies the interior of the car with fresh air.
For an optimum ventilation, the air outlet vents 3 and 4 must be opened
⇒ page 97.
The ventilation functions only when the sliding/tilting roof is closed.
WARNING
•For your own safety and that of other road users, ensure that all the
windows are free of ice, snow and mistin g. Please familiarize yourself about
how to correctly operate th e heating and ventilation systems, how to demist
and defrost the windows, as well as with the cooling mode.
•You should not leave recirculated air mode on over a longer period of
time, as “stale” air may result in fatigue in the driver and occupants, divert
your attention and also cause the windows to mist up. The risk of having an
accident increases. Switch recirculated air mode off as soon as the windows
begin misting up.
Note
•If the cooling system has not been switched on for a lengthy period, odours may
be produced at the evaporator because of deposits. Switch the air conditioning
system on at least once a month for appr oximately 5 minutes at the highest blower stage - also during the cold season of the year - in order to remove such odours.
Also open a window for a short time.
•We recommend that you do not smoke in the vehicle when the recirculating air
mode is operating since the smoke which is drawn at the evaporator from the inte-
rior of the vehicle forms deposits in the evaporator of the air conditioning system.
This produces a permanent odour when th e air conditioning system is operating
which can only be eliminated through co nsiderable effort and expense (replace-
ment of compressor).
•Using the air conditio ning economically ⇒page 93.
•Operational faults ⇒page 93.
Overview of the control elements
Fig. 109 Climatronic: Control elements
The buttons
Defrosting the windscreen
The displays Display of blower stages
Display of outside temperature, here: +11 °C
Defrosting the windscreen
ECON
A1
A2
A3
A4
NKO B5 20.book Page 94 Friday, March 2, 2007 1:46 PM