run flat SKODA SUPERB 2007 1.G / (B5/3U) Owner's Manual
[x] Cancel search | Manufacturer: SKODA, Model Year: 2007, Model line: SUPERB, Model: SKODA SUPERB 2007 1.G / (B5/3U)Pages: 259, PDF Size: 14.71 MB
Page 110 of 259

Automatic gearbox*109
Using the systemSafetyDriving TipsGeneral MaintenanceBreakdown assistanceTechnical Data
Automatic gearbox*
5-speed automatic gearbox
Information for driving with an automatic gearbox
Shifting up and down through the gears is performed automatically.
You can also, however, switch the gearbox over into the Tiptronic mode.
This mode makes it possible for you to also shift gears manually
⇒ page 113.
Starting-off and Driving
– Depress the brake pedal and hold it depressed.
– Press the Shiftlock button (button in handle of the selector lever),
move the selector lever into the desired position, e.g. D ⇒ page 110,
and then release the Shiftlock button.
– Wait a moment until the gearbox ha s shifted (a slight engagement
nudge can be felt).
– Release the brake pedal and depress the accelerator ⇒.
Stopping for a short time
– The selector lever position N does not have to be selected when stop-
p i n g j u s t fo r a s h o r t t im e, s u c h a s a t a cross roads. It is sufficient to hold
the vehicle stationary using the foot brake. The engine can, however,
be allowed just to idle.
Parking
– Depress the brake pedal and hold it depressed.
– Apply the handbrake firmly. – Press and Shiftlock button in the
selector lever, move the selector
lever to P and then release the Shiftlock button.
The engine can only be started when the selector lever is in position P or N
⇒ page 101.
It is sufficient to engage selector lever position P when parking on a flat surface.
When parking on a slope you should first apply the handbrake firmly and then
move the selector lever into position P. This is to ensure that there is no excessive
pressure acting on the lock mechanism and that it is easier to subsequently move
the selector lever out of position P.
If the selector lever position N is selected by accident while driving it is first neces-
sary to release pressure on the accelerato r pedal and wait for idling speed of the
engine to be reached before engaging a drive position in the selector lever.
WARNING
•Do not depress the accelerator when changing the position of the
selector lever if the car is stationary an d the engine is running - risk of acci-
dent!
•Never move the selector lever into position R or P when driving - risk of
an accident!
•When the engine is running and the ve hicle is stationary, it is necessary
to hold the car with the brake pedal in all the positions of the selector lever
(except P and N) since the power transmission is never completely inter-
rupted, also not when the engine is idling - the vehicle "creeps".
NKO B5 20.book Page 109 Friday, March 2, 2007 1:46 PM
Page 167 of 259

Driving and the Environment
166
Avoid driving short distances
Short distances result in an above-average high fuel consumption.
– Avoid driving a distance of no more than 4 km if the engine is cold.
The engine and catalytic converter mu st first have reached their optimal operating
temperature in order to effectively reduce fu el consumption and pollutant emis-
sions.
The cold engine vehicle consumes approx. 20 - 30 litres/100 km of fuel immediately
after starting. Fuel consumption drops to 15 litres/100 km after just 1 kilometre. The
engine reaches its operating temperat ure (outside temperature and engine
dependent) only after about 4 to 10 kilometres and the fuel consumption then
stabilizes. You should therefore avoid driving short distances whenever possible.
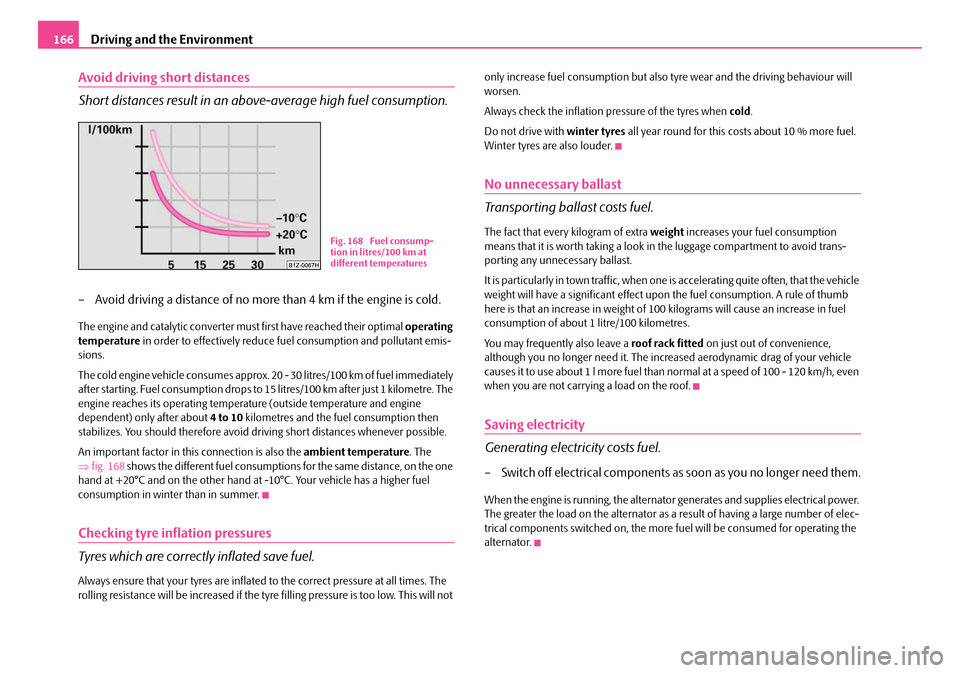
An important factor in this connection is also the ambient temperature. The
⇒ fig. 168 shows the different fuel consumptions for the same distance, on the one
hand at +20°C and on the other hand at -10°C. Your vehicle has a higher fuel
consumption in winter than in summer.
Checking tyre inflation pressures
Tyres which are correctly inflated save fuel.
Always ensure that your tyres are inflated to the correct pressure at all times. The
rolling resistance will be increased if the tyre filling pressure is too low. This will not only increase fuel consumption but also
tyre wear and the driving behaviour will
worsen.
Always check the inflation pressure of the tyres when cold.
Do not drive with winter tyres all year round for this costs about 10 % more fuel.
Winter tyres are also louder.
No unnecessary ballast
Transporting ballast costs fuel.
The fact that every kilogram of extra weight increases your fuel consumption
means that it is worth taking a look in the luggage compartment to avoid trans-
porting any unnecessary ballast.
It i s par ti cula rl y in town traff ic, when one i s accel era ti ng qui te often, tha t the v ehicle
weight will have a significant effect upon the fuel consumption. A rule of thumb
here is that an increase in weight of 100 kilograms will cause an increase in fuel
consumption of about 1 litre/100 kilometres.
You may frequently also leave a roof rack fitted on just out of convenience,
although you no longer need it. The incr eased aerodynamic drag of your vehicle
causes it to use about 1 l more fuel than normal at a speed of 100 - 120 km/h, even
when you are not carrying a load on the roof.
Saving electricity
Gen era ti n g e l ect r icity costs fuel.
– Switch off electrical components as soon as you no longer need them.
When the engine is running, the alternator generates and supplies electrical power.
The greater the load on the alternator as a result of having a large number of elec-
trical components switched on, the more fuel will be consumed for operating the
alternator.
Fig. 168 Fuel consump-
tion in litres/100 km at
different temperatures
NKO B5 20.book Page 166 Friday, March 2, 2007 1:46 PM
Page 202 of 259

Wheels and Tyres201
Using the systemSafetyDriving TipsGeneral MaintenanceBreakdown assistanceTechnical Data
For the sake of the environment
Tyres which are insufficiently inflated increase your fuel consumption.
Wear indicators
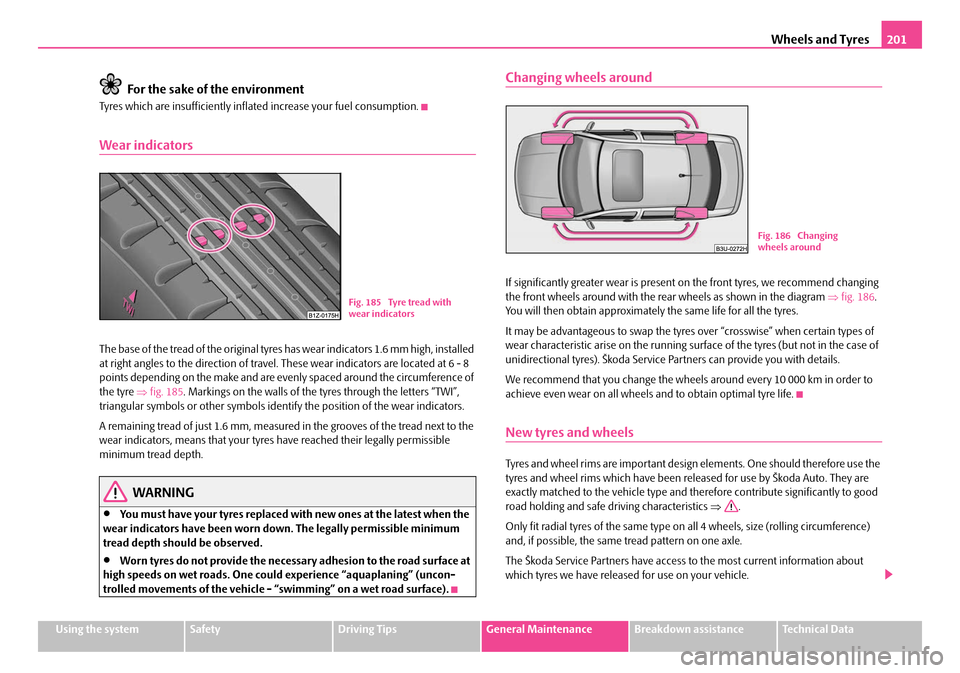
The base of the tread of the original tyres has wear indicators 1.6 mm high, installed
at right angles to the direction of travel. These wear indicators are located at 6 - 8
points depending on the make and are evenly spaced around the circumference of
the tyre ⇒fig. 185 . Markings on the walls of the tyres through the letters “TWI”,
triangular symbols or other symbols identify the position of the wear indicators.
A remaining tread of just 1.6 mm, measured in the grooves of the tread next to the
wear indicators, means that your tyres have reached their legally permissible
minimum tread depth.
WARNING
•You must have your tyres replaced with new ones at the latest when the
wear indicators have been worn do wn. The legally permissible minimum
tread depth should be observed.
•Worn tyres do not provide the necessary adhesion to the road surface at
high speeds on wet roads. One could experience “aquaplaning” (uncon-
trolled movements of the vehicle - “swimming” on a wet road surface).
Changing wheels around
If significantly greater wear is present on the front tyres, we recommend changing
the front wheels around with the rear wheels as shown in the diagram ⇒fig. 186 .
You will then obtain approximately the same life for all the tyres.
It may be advantageous to swap the tyre s over “crosswise” when certain types of
wear characteristic arise on the running surface of the tyres (but not in the case of
unidirectional tyres). Škoda Service Pa rtners can provide you with details.
We recommend that you change the wheels around every 10 000 km in order to
achieve even wear on all wheels and to obtain optimal tyre life.
New tyres and wheels
Tyres and wheel rims are important design elements. One should therefore use the
tyres and wheel rims which have been released for use by Škoda Auto. They are
exactly matched to the vehicl e type and therefore contribu te significantly to good
road holding and safe driving characteristics ⇒ .
Only fit radial tyres of the same type on all 4 wheels, size (rolling circumference)
and, if possible, the same tread pattern on one axle.
The Škoda Service Partners have access to the most current information about
which tyres we have released for use on your vehicle.
Fig. 185 Tyre tread with
wear indicators
Fig. 186 Changing
wheels around
NKO B5 20.book Page 201 Friday, March 2, 2007 1:46 PM
Page 217 of 259

Breakdown assistance
216
•We recommend purchasing jump-start cabl es from Škoda Service Partners as a
Škoda original accessory or from retailers who sell branded batteries.
Start engine
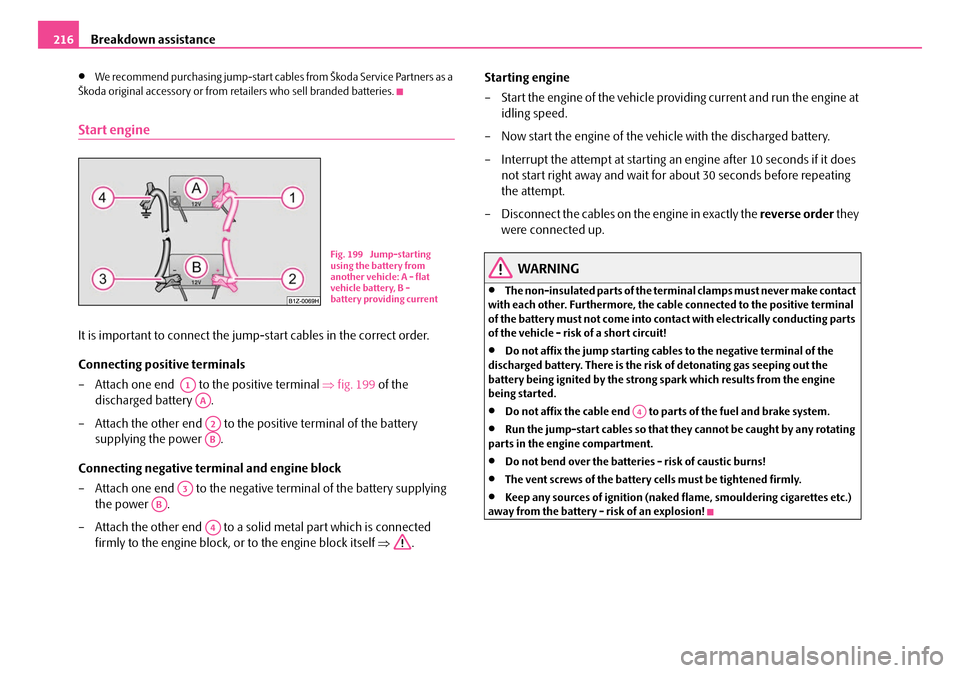
It is important to connect the jump-start cables in the correct order.
Connecting positive terminals
– Attach one end to the positive terminal ⇒fig. 199 of the
discharged battery .
– Attach the other end to the positive terminal of the battery supplying the power .
Connecting negative term inal and engine block
– Attach one end to the negative terminal of the battery supplying
the power .
– Attach the other end to a soli d metal part which is connected
firmly to the engine block, or to the engine block itself ⇒. Starting engine
– Start the engine of the vehicle prov
iding current and run the engine at
idling speed.
– Now start the engine of the vehicle with the discharged battery.
– Interrupt the attempt at starting an engine after 10 seconds if it does
not start right away and wait for about 30 seconds before repeating
the attempt.
– Disconnect the cables on the engine in exactly the reverse order they
were connected up.
WARNING
•The non-insulated parts of the terminal clamps must never make contact
with each other. Furthermore, the cabl e connected to the positive terminal
of the battery must not come into contact with electrically conducting parts
of the vehicle - risk of a short circuit!
•Do not affix the jump starting cables to the negative terminal of the
discharged battery. There is the risk of detonating gas seeping out the
battery being ignited by the strong spark which results from the engine
being started.
•Do not affix the cable end to pa rts of the fuel and brake system.
•Run the jump-start cables so that they cannot be caught by any rotating
parts in the engine compartment.
•Do not bend over the batteries - risk of caustic burns!
•The vent screws of the battery cells must be tightened firmly.
•Keep any sources of ignition (naked flame, smouldering cigarettes etc.)
away from the battery - risk of an explosion!
Fig. 199 Jump-starting
using the battery from
another vehicle: A - flat
vehicle battery, B -
battery providing current
A1
AA
A2
AB
A3
AB
A4
A4
NKO B5 20.book Page 216 Friday, March 2, 2007 1:46 PM