buttons SKODA SUPERB 2009 2.G / (B6/3T) User Guide
[x] Cancel search | Manufacturer: SKODA, Model Year: 2009, Model line: SUPERB, Model: SKODA SUPERB 2009 2.G / (B6/3T)Pages: 294, PDF Size: 21.33 MB
Page 81 of 294
Seats and Stowage
80
Adjust the angle of the seat – Press the switch at the front
⇒
page 79, fig. 79
or at the back
⇒
page 79, fig. 79
.
Adjusting the seat backrest – Press the switch
⇒
page 79, fig. 78
in the direction of the desired
setting.
Adjusting lumbar support – Press the switch front
⇒
page 79, fig. 78
in order to enlarge the
curvature of the lumbar support.
– Press the switch rear in order to reduce the curvature of the lumbar
support.
– Press the switch top in order to adjust the curvature of the lumbar
support higher.
– Press the switch bottom in order to adjust the curvature of the
lumbar support lower.
Switch is operated in order to move the seat up/down and forward/back, while switch is operated in order to move the backrest forward or back.
WARNING
•
Only adjust the driver seat when the ve
hicle is stationary - risk of injury!
•
Caution when adjusting the seat! You ma
y suffer injuries or bruises as a
result of adjusting the seat without paying proper attention.•
In view of the fact that the seats can
also be adjusted when the ignition is
switched off (even when ignition key withdrawn), you should never leave children unattended in the car.•
The seat backrests must not be angl
ed too far back when driving other-
wise this will affect proper operation of the seat belts and of the airbag system - risk of injury!
Note
If the movement of the seat is inadvertently interrupted during an adjustment, once again press the switch in the appropriate
direction and continue with the adjust-
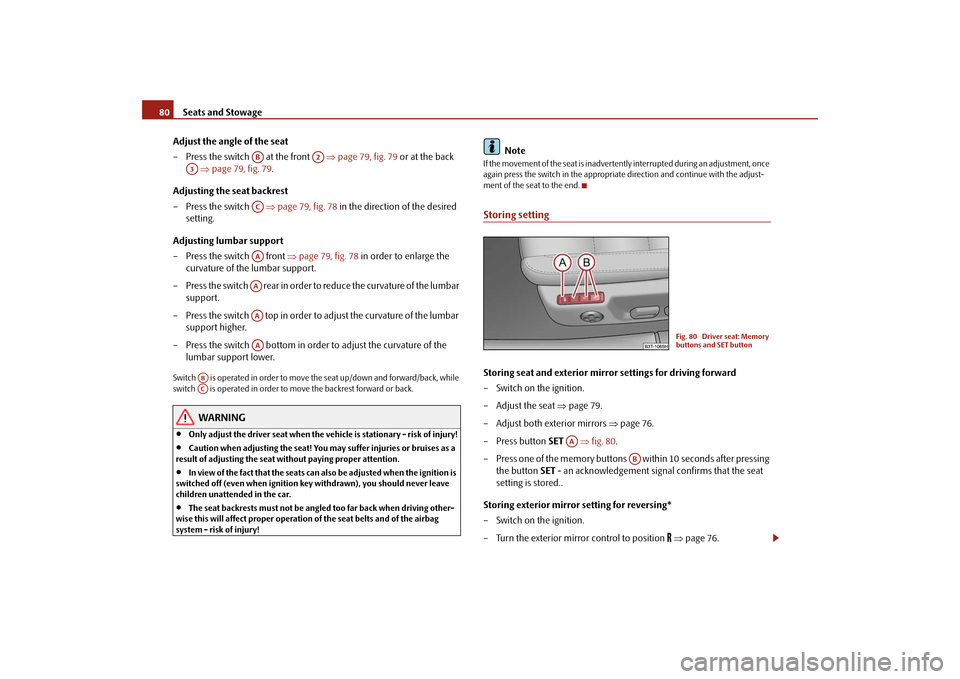
ment of the seat to the end.Storing settingStoring seat and exterior mirror settings for driving forward – Switch on the ignition. – Adjust the seat
⇒
page 79.
– Adjust both exterior mirrors
⇒
page 76.
– Press button
SET
⇒
fig. 80
.
– Press one of the memory buttons within 10 seconds after pressing
the button
SET
- an acknowledgement signal
confirms that the seat
setting is stored..
Storing exterior mirror setting for reversing* – Switch on the ignition. – Turn the exterior mirror control to position
⇒
page 76.
AB
A2
A3
ACAAAAAAAA
ABAC
Fig. 80 Driver seat: Memory buttons and SET button
AA
AB
s2dk.1.book Page 80 Wednesday, April 8, 2009 12:23 PM
Page 82 of 294
Seats and Stowage
81
Using the system
Safety
Driving Tips
General Maintenance
Breakdown assistance
Technical Data
– Engage reverse gear. – Move the right exterior mirror into the desired position
⇒
page 76.
– Take the vehicle out of gear. The set position of the exterior mirror is
stored.
Memory buttons Memory for the seat offers the possibility
to store the individual driver seat and
external mirror position. An individual posi
tion can be allocated to each of the three
memory buttons
⇒page 80, fig. 80
, that is three in tota
l. After pressing the
corresponding memory button , the seat and the exterior mirror are automati-cally moved into the positions which
have been allocated to this button
⇒page 81.
Emergency Off You can interrupt the setting operation at any time, if you operate any button of the driver seat.
Note
•
For safety reasons, it is not possible to store this position if the inclination angle
of the seat backrest is more than 102° in relation to the seat cushion.•
When storing settings with the memory buttons, we recommend that you begin
with the front button and assign a memo
ry button to each additional driver.
•
Each new setting stored with the same
button erases the previous setting.
•
Each time you store the seat and exterior mirror settings for driving forward you
also have to re-store the individual setting
of the exterior mirror on the passenger
side for reversing.Assigning remote control to the memory buttonsAfter storing the settings of the seat
and exterior mirrors, you have 10
seconds in order to assign the radio remote control to the appropriate memory button. – Withdraw the ignition key.
– Press the unlock button
⇒
page 51, after the successful assignment
an audible signal will sound. The setting is stored with the memory button which you have selected.
If you wish to be able to retrieve the settings which are stored in the memory by also using the radio remote control, you have
to assign the radio remote control to a
memory button in each case. If you wish, you can obtain an additional
remote control key from an authorised
Škoda Service partner and then assign th
e remote control key to another memory
button.
Note
•
If the radio remote control had previous
ly been assigned
to another memory
button, this setting is then erased by the new assignment.•
If you assign the radio remote control
to a memory button which has already
been assigned to a radio remote control,
the old assignment is also replaced by a
new assignment in this case.•
The assignment of the radio remote cont
rol to a memory button is retained,
however, after reassigning the seats and exterior mirrors.Retrieving settings of the seat and mirrors You can retrieve the stored settings either with the memory buttons or with the remote control*.Retrieving settings with memory buttons – In order to retrieve the stored setting, you have two possibilities: –
One-touch automatic memory:
Briefly press the desired memory
button
⇒
page 80, fig. 80
. The seat and exterior mirror are moved
automatically into the stored position
s (this applies only if the ignition
is switched on and the speed is less than 5 km/h).
AB
AB
AB
s2dk.1.book Page 81 Wednesday, April 8, 2009 12:23 PM
Page 110 of 294
Air conditioning system
109
Using the system
Safety
Driving Tips
General Maintenance
Breakdown assistance
Technical Data
Climatronic* (automatic air conditioning)Description The Climatronic system is a combin
ation of an automatic heating,
fresh air and cooling system which provides optimal comfort for the occupants of the car.The Climatronic maintains fully automatically a convenience temperature. This is achieved by automatically varying the temperature of the outflowing air, the blower stages and the air distribution. The system also takes into account sunlight which eliminates the need to alte
r the settings manually. The
automatic mode
⇒ page 110 ensures maximum wellbeing of th
e occupants at all times of the year.
Description of Climatronic system The cooling operates only if the following conditions are met:•
engine running,
•
outside temperature above approx. +2°C,
•
switched on.
The AC compressor is switched off at a hi
gh coolant temperature in order to provide
cooling at a high load of the engine. Recommended setting for al
l periods of the year:
•
Set the desired temperature, we recommend 22 °C.
•
Press the button
⇒fig. 128
.
•
Move the air outlet vents
2 and
3 so that the air flow is directed slightly upwards.
Aeration of the vehicle when ignition is switched off* On vehicles fitted with power sliding/tilting roof with solar cells* the fresh air blower is automatically switched over to “solar mode” if the sun rays are sufficient after switching off the ignition. The solar
cells on the sliding/tilting roof deliver
power for the fresh air blower
. This supplies the interior of the car with fresh air.
For an optimum ventilation, the air outlet vents
2 and
3 must be opened
⇒ page 105, fig. 125
.
The ventilation functions only when the sliding/tilting roof is closed.
Note
On vehicles equipped with a
factory-fitted radio* or navi
gation*, the information of
the Climatronic is also shown on the display. This function can be switched off, see operating instructions of the ra
dio* or the navigation system*.
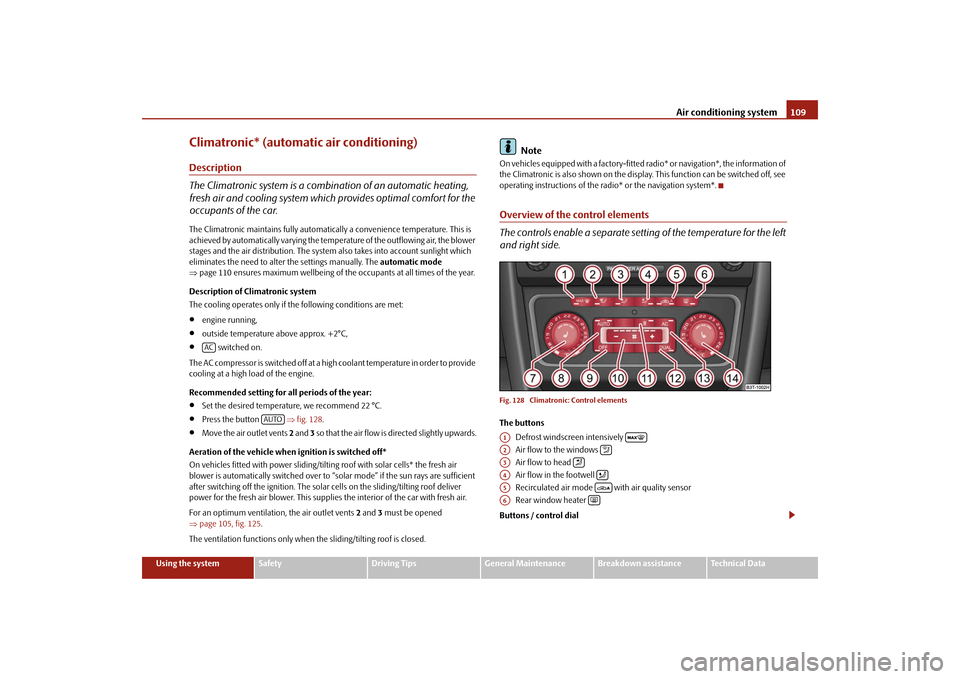
Overview of the control elements The controls enable a separate setting of the temperature for the left and right side.Fig. 128 Climatroni
c: Control elements
The buttons
Defrost windscreen intensively Air flow to the windows Air flow to head Air flow in the footwell Recirculated air mode with air quality sensor Rear window
heater
Buttons / control dial
AC
AUTO
A1
A2
A3
A4
A5
A6
s2dk.1.book Page 109 Wednesday, April 8, 2009 12:23 PM
Page 111 of 294

Air conditioning system
110
Setting of the temperature for the left side. Automatic mode Switching off Climatronic Setting the blower speed Depending on the vehicle equipment: Button for direct switching on/off of auxiliary heating*
⇒page 112, or switching on/off of windscreen heater*
Switching on/off of the temperature setting in dual mode Switching cooling on and off Setting of the temperature for the right side.Note
Below the top row of buttons is located th
e interior temperature sensor. Do not
glue or cover over the sensor, otherwise it
could have an unfavourable effect on the
Climatronic.Automatic mode The automatic mode is used in orde
r to maintain a constant temper-
ature and to demist the windows in the interior of the car.Switching automatic mode on – Set a temperature between +18 °C and +26 °C. – Move the air outlet vents
1 and
2 ⇒
page 105, fig. 125
so that the air
flow is directed slightly upwards.
– Press the button . In the right or left top corner a warning light
lights up, depending on which unit was last selected.
If the warning light in the top right corner of the button lights up, the Climatronic operates in “HIGH” mode. The “HIGH” mode is the standard setting of the Climatronic. When pressing again the button , th
e Climatronic changes into the “LOW”
mode and the warning light in the top left corner lights up. The Climatronic uses
only in this mode the lower blower spee
d. However taking into account the noise
level, this is more comfortable, yet be aware that the effectiveness of the air condi- tioning system is reduced particularly
if the vehicle is
fully occupied.
By pressing again the button , yo
u change into the “HIGH” mode.
The automatic mode is switched off by pres
sing the button for the air distribution
or increasing or decreasing the blower
speed. The temperature is nevertheless
regulated.switching cooling on and offswitching cooling on and off – Press the button . The warning light lights up in the button. – When you again press the switch , the cooling system is switched
off. The warning light in the button goes out. Only the function of the ventilation remains active when no lower temperature than the outside temperature can be reached.
Setting temperatureYou can separate the interior temperature for the left and right side sepa-rately. – You can set the temperature for both sides after switching on the igni-
tion with the control dial .
– If you wish to set the temperature for the right side, turn the control
dial . The warning light in the button lights up, this indicates that differing temperatures for the left and right side can be set.
If the warning light in the button lights up, the temperature for both sides cannot be set with the control dial . You ca
n reinitiate this function by pressing
the button . The warning light in the butt
on which indicates the possibility to
set differing temperatures for the left and right side, goes out.
A7A8
AUTO
A9
OFF
A10
A11
A12
DUAL
A13
AC
A14
AUTO
AUTO
AUTO
AUTO
AC
AC
A7
A14
DUAL
DUALA7
DUAL
s2dk.1.book Page 110 Wednesday, April 8, 2009 12:23 PM
Page 139 of 294

Communication
138
CommunicationMultifunction steering wheel*Operate radio und navigation on the multifunction steering wheelThe driver can set the basic functions of
the radio and navigation by simply oper-
ating the buttons located on the steering
wheel so that he can concentrate on the
traffic situation without being distracted as little as possible by operating the radio and navigation
⇒fig. 152
.
This applies only if your vehicle has been installed with radio and navigation at the factory. You can of course operate the ra
dio and navigation at the appliance. You
will find a description in the operating instructions of your radio system. When the headlights are switched on, the
steering wheel pushbuttons are then also
illuminated. The buttons apply for the respective operating mode of the current radio or naviga- tion. By pressing the buttons, you can
carry out the following functions:
Fig. 152 Multifunction steering wheel: control buttons
s2dk.1.book Page 138 Wednesday, April 8, 2009 12:23 PM
Page 146 of 294

Communication
145
Using the system
Safety
Driving Tips
General Maintenance
Breakdown assistance
Technical Data
Operation of the telephone on the multifunction steering wheel*
The driver can set the basic functions of the telephone by simply operating the buttons located on the steering wheel so th
at he can concentrate on the traffic situ-
ation without being distracted as little
as possible by operating the telephone
⇒ fig. 156
.
This applies only if your
vehicle has been eq
uiped with the telephone preinstalla-
tion at the factory. If the side lights are switched on, the bu
ttons on the multifunction steering wheel
are illuminated. Overview of the different functions in contrast to the multifunction steering wheel without mobile phone operation
⇒page 138.
Fig. 156 Multifunction steering wheel: Control buttons for the telephone
Button
Action
Operation
press briefly
Activation and deactivation of the voice control°
(Button PTT - Push to talk)
turn upwards
Increase volume
turn downwards
Decrease volume
press briefly
Accept call, terminate call, entry in the main me
nu of the telephone, list of selected numbers
press button for a long
time
Reject call, entry in the main menu of the telephone, list of selected numbers
press briefly
Reach one level higher in the menu (according to the current position in the menu)
press button for a long
time
Return in the main menu of the information display
press briefly
Confirm menu selection
press button for a long
period of time
Confirming the selected menu point, the following initial letters in the telephone book
turn upwards
The last chosen menu selection, name
turn downwards
The next menu selection, name
A1A1A1A2A2A3A3A4A4A4A4
s2dk.1.book Page 145 Wednesday, April 8, 2009 12:23 PM
Page 147 of 294

Communication
146
The buttons operate the functions for the operating mode of the current telephone.Operate the telephone via the information display*The display of texts in the menu
Te l e p h o n e
is possible in the following languages:
Czech, English, German, French, Italian, Spanish and Russian.
If you select the menu point
Te l e p h o n e
on the information display with the aid of
the handwheel , you can chan
ge to the following menus:
�„
Phone book
�„
Last calls
�„
Received calls
�„
Missed calls
Phone book In the menu point
Phone book
is the list of the loaded contacts from the telephone
memory and the SIM card of the mobile phone. In the phone phonebook there are 1500 free memory locations available.Voice commands On vehicles which are factory-fitted with a navigation system* with voice control, it is only possible
to operate the voice control via the
navigation system*. The description on how to operate the voice control can be found in the operatin
g instructions of your navigation
system*.The voice control is possible in the following languages:
Czech, English, German, French, Italian and Spanish.
Voice commands for mo
bile phone operation
Voice commands for operat
ing the phone phone book
A4
Voice command
Activity
ENTER PIN/PIN CODE
After this command the PIN code of the mobile phone can be entered
⇒page 147.
DIAL NUMBER
After this command a telephone number can be entered which establishe
s a connection to the
requested partner
⇒page 147.
REDIAL
After this command the last selected telephone number is selected again
⇒page 148.
Voice command
Activity (see chapter phone voice phonebook* in
the operating instructions)
SAVE/STORE
NAMES/NAME/NUMBE
R
After this command a name with its telephone number can be stored in the phone phone book ⇒ page 148.
SELECT NAMES/NAME
After this command a telephone number which was stored under its given name in the phone phone book can be selected
⇒page 149.
DELETE NAMES/NAME
After this command a name in the phone phone book can be erased
⇒page 149.
LISTEN TO/PLAY PHONEBOOK
After this command you can listen-in to the phone phone book
⇒page 150.
DELETE PHONEBOOK
After this command the complete phone book or a name can be erased
⇒page 150.
s2dk.1.book Page 146 Wednesday, April 8, 2009 12:23 PM
Page 152 of 294
Communication
151
Using the system
Safety
Driving Tips
General Maintenance
Breakdown assistance
Technical Data
Universal telephone preinstallation GSM III*IntroductionThis enables you to make full use of the
advantages of a norm
al carphone (“hands-
free system” using a microphone integrated in the vehicle, optimal transmission of signals using an external aerial etc.). The equipment includes also the voice control. The telephone is connected using the
rSAP
profile -
Remote SIM access profile
(telecommunication of the SIM data)
by means of Bluetooth
® technology, if your
telephone supports this profile. The equipment includes the following functions:•
Display of the SMS text in the information display.
•
Free talking in the vehicle interior.
•
MUTE signal to the radio.
•
Voice control (with the set-up possibility for “short and long dialogue”,
depending on the user's knowledg
e of the operating structure).
•
Convenience mode with the multifunction
steering wheel and the display in the
information display.•
Handsfree-system.
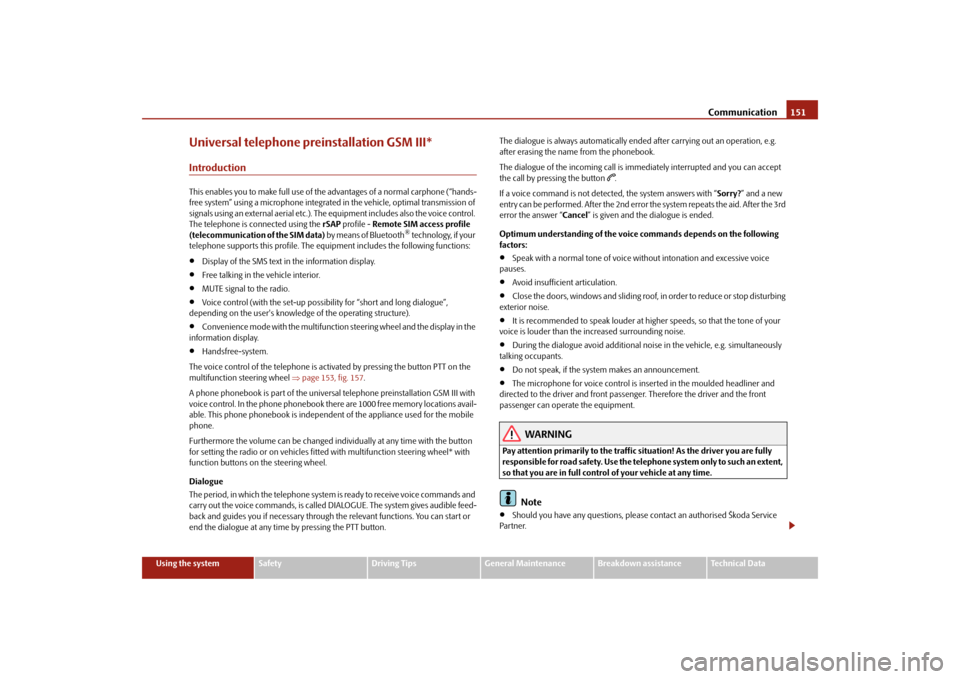
The voice control of the telephone is acti
vated by pressing the button PTT on the
multifunction st
eering wheel
⇒page 153, fig. 157
.
A phone phonebook is part of the univers
al telephone preinstallation GSM III with
voice control. In the phone phonebook ther
e are 1000 free memory locations avail-
able. This phone phonebook is independent of the appliance used for the mobile phone. Furthermore the volume can be changed indi
vidually at any time with the button
for setting the radio or on vehicles fitted with multifunction steering wheel* with function buttons on
the steering wheel.
Dialogue The period, in which the telephone system is ready to receive voice commands and carry out the voice commands, is called DIALOGUE. The system gives audible feed-back and guides you if necessary through
the relevant functions. You can start or
end the dialogue at any time by pressing the PTT button.
The dialogue is always automatically ended after carrying out an operation, e.g. after erasing the name from the phonebook. The dialogue of the incoming call is im
mediately interrupted and you can accept
the call by pressing the button
.
If a voice command is not detected, the system answers with “
Sorry?
” and a new
entry can be performed. After the 2nd error the system repeats the aid. After the 3rd error the answer “
Cancel
” is given and the dialogue is ended.
Optimum understanding of the voice commands depends on the following factors:•
Speak with a normal tone of voice without intonation and excessive voice
pauses.•
Avoid insufficient articulation.
•
Close the doors, windows and sliding roof, in order to reduce or stop disturbing
exterior noise.•
It is recommended to speak louder at higher speeds, so that the tone of your
voice is louder than the increased surrounding noise.•
During the dialogue avoid additional noise in the vehicle, e.g. simultaneously
talking occupants.•
Do not speak, if the system makes an announcement.
•
The microphone for voice control is in
serted in the moulded headliner and
directed to the driver and front passenger. Therefore the driver and the front passenger can operate the equipment.
WARNING
Pay attention primarily to the traffic situation! As the driver you are fully responsible for road safety. Use the tele
phone system only to such an extent,
so that you are in full control of your vehicle at any time.
Note
•
Should you have any questions, please
contact an authorised Škoda Service
Par tner.
s2dk.1.book Page 151 Wednesday, April 8, 2009 12:23 PM
Page 154 of 294
Communication
153
Using the system
Safety
Driving Tips
General Maintenance
Breakdown assistance
Technical Data
Note
In the memory of the control unit, up to
three users can be stored, whereby the
handsfree-system can only communicate ac
tively with one user. In the case of
mutual connection with a fourth mobi
le phone, you must erase one user.
•
If the telephone book of the mobile ph
one contains more than 1 000 entries,
the system announces a
failure while loading the telephone book
.
•
When connecting to the control unit, follow the instructions on your mobile
phone.•
Note that the range of the Bluetooth
® connection to the handsfree-system is
optimized in the vehicle interior. The range is dependent on local factors, e.g. obstacles between the devices and interferences with other devices.
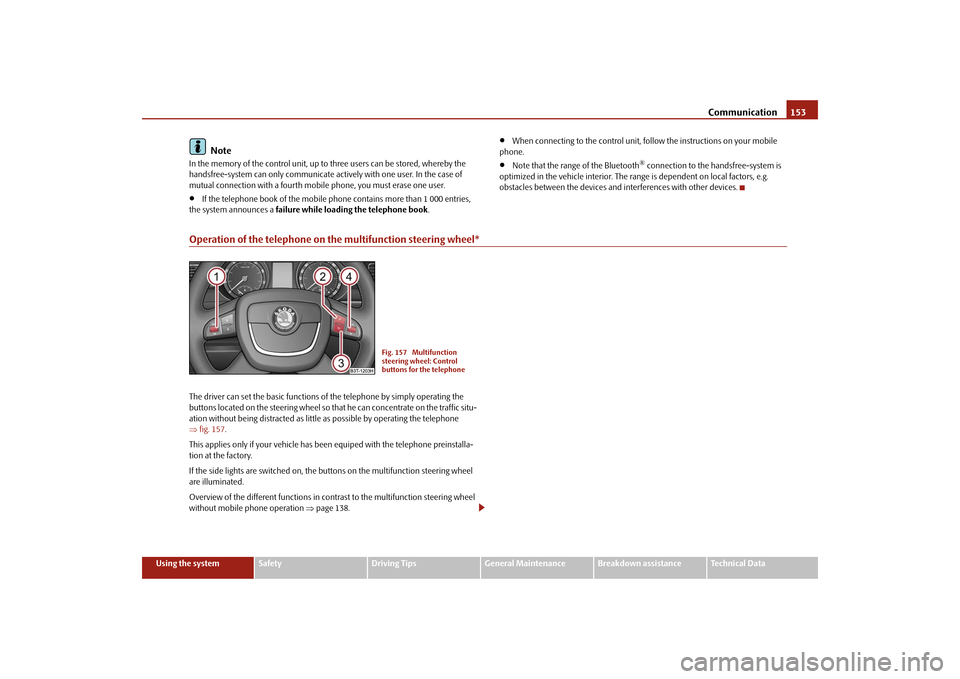
Operation of the telephone on the multifunction steering wheel*The driver can set the basic functions of
the telephone by simply operating the
buttons located on the steering
wheel so that he can concentrate on the traffic situ-
ation without being distracted as little
as possible by operating the telephone
⇒ fig. 157
.
This applies only if your vehicle has b
een equiped with the telephone preinstalla-
tion at the factory. If the side lights are switched on, the
buttons on the multifunction steering wheel
are illuminated. Overview of the different functions in cont
rast to the multifunction steering wheel
without mobile phone operation
⇒page 138.
Fig. 157 Multifunction steering wheel: Control buttons for the telephone
s2dk.1.book Page 153 Wednesday, April 8, 2009 12:23 PM
Page 155 of 294

Communication
154
The buttons operate the functions for the operating mode of the current telephone.
Button
Action
Operation
press briefly
Activation and deactivation of the voice control°
(Button PTT - Push to talk)
press button for a long
period of time
turn upwards
Increase volume
turn downwards
Decrease volume
press briefly
Accept call, terminate call, entry in the main
menu of the telephone, list of selected numbers
press button for a long
time
Reject call, list of the last calls, entry in the ma
in menu of the telephone, list of selected numbers
press briefly
Reach one level higher in the menu (accordi
ng to the current position in the menu)
press button for a long
time
Return in the main menu of the information display
press briefly
Confirm menu selection
press button for a long
period of time
turn upwards
The last chosen me
nu selection, name
turn downwards
The next menu selection, name
quickly turn upwards
To the previous initial letter in the telephone book
quickly turn downwards
To the next initial letter in the telephone book
A1A1A1A1A2A2A3A3A4A4A4A4A4A4
s2dk.1.book Page 154 Wednesday, April 8, 2009 12:23 PM