belt SKODA SUPERB 2009 2.G / (B6/3T) Owner's Manual
[x] Cancel search | Manufacturer: SKODA, Model Year: 2009, Model line: SUPERB, Model: SKODA SUPERB 2009 2.G / (B6/3T)Pages: 294, PDF Size: 21.33 MB
Page 4 of 294
Contents3
Using the system
Safety
Driving Tips
General Maintenance
Breakdown assistance
Technical Data
ContentsLayout of this Owner's Manual
(explanations)
. . . . . . . . . . . . . . . . . . . . . . . . . .
Using the system
. . . . . . . . . . . . . . . . . . . . . .
Cockpit
. . . . . . . . . . . . . . . . . . . . . . . . . . . . . . . . . . . . . . . .
Overview . . . . . . . . . . . . . . . . . . . . . . . . . . . . . . . . . . . .
The brief instruction
. . . . . . . . . . . . . . . . . . . . . . . . . .
Basic functions and important information . . . . .
Instruments and Indicator/Warning Lights
. . .
General view of the instrument cluster . . . . . . . . .
Engine revolutions counter . . . . . . . . . . . . . . . . . . . .
Speedometer . . . . . . . . . . . . . . . . . . . . . . . . . . . . . . . .
Coolant temperature gauge . . . . . . . . . . . . . . . . . . .
Fuel gauge . . . . . . . . . . . . . . . . . . . . . . . . . . . . . . . . . . .
Counter for distance driven . . . . . . . . . . . . . . . . . . .
Service Interval Display . . . . . . . . . . . . . . . . . . . . . . .
Digital clock . . . . . . . . . . . . . . . . . . . . . . . . . . . . . . . . . .
Multi-functional indicator (onboard computer)*
Information display* . . . . . . . . . . . . . . . . . . . . . . . . . .
Auto Check Control* . . . . . . . . . . . . . . . . . . . . . . . . . .
Warning lights . . . . . . . . . . . . . . . . . . . . . . . . . . . . . . . .
Unlocking and locking
. . . . . . . . . . . . . . . . . . . . . . . .
Key . . . . . . . . . . . . . . . . . . . . . . . . . . . . . . . . . . . . . . . . . .
Changing the battery of the radio remote control
Electronic immobiliser . . . . . . . . . . . . . . . . . . . . . . . .
Child safety lock . . . . . . . . . . . . . . . . . . . . . . . . . . . . . .
Central locking system . . . . . . . . . . . . . . . . . . . . . . . .
Remote control . . . . . . . . . . . . . . . . . . . . . . . . . . . . . . .
Description . . . . . . . . . . . . . . . . . . . . . . . . . . . . . . . . . .
Unlocking and locking car . . . . . . . . . . . . . . . . . . . . .
Synchonisation of the remote control . . . . . . . . . . Anti-theft alarm system* . . . . . . . . . . . . . . . . . . . . . .
Power windows . . . . . . . . . . . . . . . . . . . . . . . . . . . . . .
Electric sliding/tilting roof* . . . . . . . . . . . . . . . . . . . .
Lights and Visibility
. . . . . . . . . . . . . . . . . . . . . . . . . . .
Lights . . . . . . . . . . . . . . . . . . . . . . . . . . . . . . . . . . . . . . . .
Interior lighting . . . . . . . . . . . . . . . . . . . . . . . . . . . . . . .
Visibility . . . . . . . . . . . . . . . . . . . . . . . . . . . . . . . . . . . . .
Windshield wiper and wash system . . . . . . . . . . . .
Rear-view mirror . . . . . . . . . . . . . . . . . . . . . . . . . . . . .
Exterior mirror . . . . . . . . . . . . . . . . . . . . . . . . . . . . . . .
Automatic dimming exterior mirror* . . . . . . . . . . .
Seats and Stowage
. . . . . . . . . . . . . . . . . . . . . . . . . . . .
Front seats . . . . . . . . . . . . . . . . . . . . . . . . . . . . . . . . . . .
Adjusting front seats electrically* . . . . . . . . . . . . . .
Head restraints . . . . . . . . . . . . . . . . . . . . . . . . . . . . . . .
Middle rear head restraint . . . . . . . . . . . . . . . . . . . . .
Rear seats . . . . . . . . . . . . . . . . . . . . . . . . . . . . . . . . . . . .
luggage compartment . . . . . . . . . . . . . . . . . . . . . . . .
The roof rack* . . . . . . . . . . . . . . . . . . . . . . . . . . . . . . . .
Cup holder . . . . . . . . . . . . . . . . . . . . . . . . . . . . . . . . . . .
Ashtray . . . . . . . . . . . . . . . . . . . . . . . . . . . . . . . . . . . . . .
Cigarette lighter*, power sockets . . . . . . . . . . . . . . .
Storage compartments . . . . . . . . . . . . . . . . . . . . . . . .
Air conditioning system
. . . . . . . . . . . . . . . . . . . . . .
Introduction . . . . . . . . . . . . . . . . . . . . . . . . . . . . . . . . .
Air outlet vents . . . . . . . . . . . . . . . . . . . . . . . . . . . . . . .
Climatic (semi-automatic air conditioning system)
Climatronic* (automatic air conditioning) . . . . . .
Auxiliary heating (auxiliary heating and
ventilation)* . . . . . . . . . . . . . . . . . . . . . . . . . . . . . . . . .
Starting-off and Driving
. . . . . . . . . . . . . . . . . . . . . . .
Setting steering wheel position . . . . . . . . . . . . . . . .
Ignition lock . . . . . . . . . . . . . . . . . . . . . . . . . . . . . . . . . . Starting the engine . . . . . . . . . . . . . . . . . . . . . . . . . . .
Rear parking aid* . . . . . . . . . . . . . . . . . . . . . . . . . . . . .
Front and rear parking aid* . . . . . . . . . . . . . . . . . . . .
Park Assist* . . . . . . . . . . . . . . . . . . . . . . . . . . . . . . . . . .
Cruise control system (CCS)* . . . . . . . . . . . . . . . . . .
Automatic gearbox DSG*
. . . . . . . . . . . . . . . . . . . . .
Automatic gearbox DSG* . . . . . . . . . . . . . . . . . . . . .
Communication
. . . . . . . . . . . . . . . . . . . . . . . . . . . . . .
Multifunction steering wheel* . . . . . . . . . . . . . . . . .
Mobile phones and two-way radio systems . . . . .
Universal telephone preinstallation GSM II* . . . .
Phone voice phonebook* . . . . . . . . . . . . . . . . . . . . .
Universal telephone preinstallation GSM III* . . . .
Phone voice phonebook* . . . . . . . . . . . . . . . . . . . . .
Inputs AUX-IN* and MDI* . . . . . . . . . . . . . . . . . . . . .
CD changer* . . . . . . . . . . . . . . . . . . . . . . . . . . . . . . . . .
Safety
. . . . . . . . . . . . . . . . . . . . . . . . . . . . . . . . . . . . . .
Passive Safety
. . . . . . . . . . . . . . . . . . . . . . . . . . . . . . . . .
Basic information . . . . . . . . . . . . . . . . . . . . . . . . . . . .
Correct seated position . . . . . . . . . . . . . . . . . . . . . . .
Seat belts
. . . . . . . . . . . . . . . . . . . . . . . . . . . . . . . . . . . . . .
Why seat belts? . . . . . . . . . . . . . . . . . . . . . . . . . . . . . .
The physical principle of a frontal collision . . . . .
Important safety information regarding the use of
seat belts . . . . . . . . . . . . . . . . . . . . . . . . . . . . . . . . . . . .
How are seat belts correctly fastened? . . . . . . . . .
Airbag system
. . . . . . . . . . . . . . . . . . . . . . . . . . . . . . . . .
Description of the airbag system . . . . . . . . . . . . . . .
Front airbag . . . . . . . . . . . . . . . . . . . . . . . . . . . . . . . . . .
Driver's knee airbag* . . . . . . . . . . . . . . . . . . . . . . . . . 6
7
9
9
11
11
17
17
18
18
18
18
19
20
21
21
26
29
33
43
43
43
44
44
45
50
50
51
5252
54
57
60
60
68
70
73
75
76
77
78
78
79
82
83
84
86
91
92
93
94
95
104
104
105
106
109
112
117
117
118119
122
123
124
128
131
131
138
138
141
141
148
151
158
160
160
163
163
163
164
168
168
169
169
170
174
174
176
178
s2dk.1.book Page 3 Wednesday, April 8, 2009 12:23 PM
Page 13 of 294
The brief instruction
12
Further information
⇒page 117, “Setting steering wheel position”.
WARNING
•
Adjust the steering wheel
so that the distance
between the steering
wheel and your chest is at least 25 cm
⇒page 11, fig. 4
. Not maintaining this
minimum distance will mean that the airb
ag system will not be able to prop-
erly protect you - hazard!•
You must not adjust the steering wh
eel when the vehicle is moving!
•
For sa fe t y re as ons the l e ve r m us t a lw ay s b e f irm l y pu she d up t o a vo id th e
steering wheel altering its position uni
ntentionally when driving - risk of
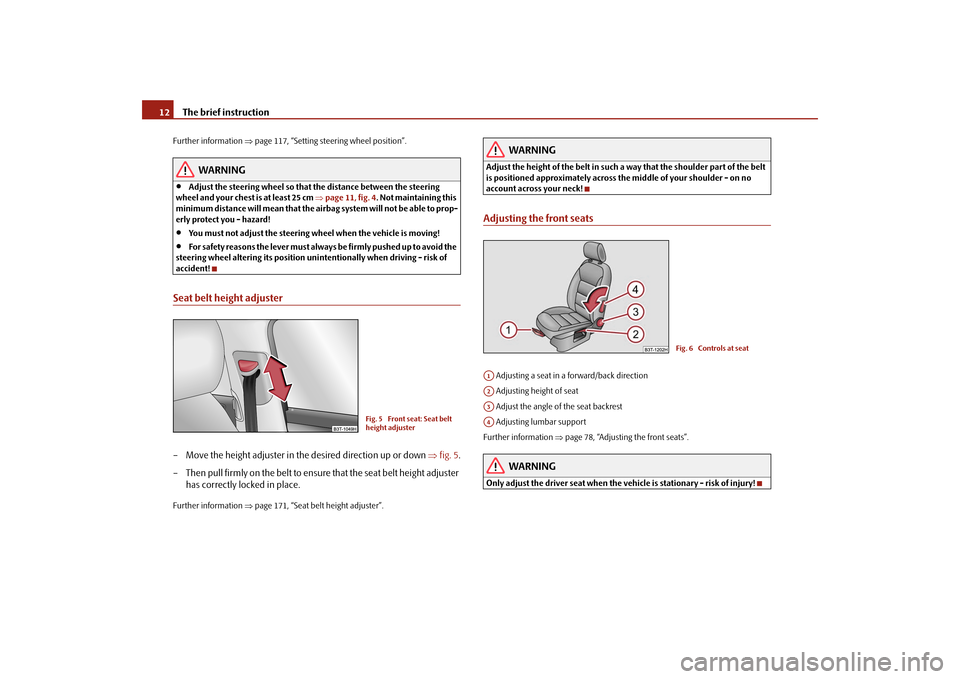
accident!Seat belt height adjuster– Move the height adjuster in the desired direction up or down
⇒
fig. 5
.
– Then pull firmly on the belt to ensure that the seat belt height adjuster
has correctly locked in place.
Further information
⇒page 171, “Seat belt height adjuster”.
WARNING
Adjust the height of the belt in such a way that the shoulder part of the belt is positioned approximately across the middle of your shoulder - on no account across your neck!Adjusting the front seats Adjusting a seat in a forward/back direction Adjusting height of seat Adjust the angle of the seat backrest Adjusting lumbar supportFurther information
⇒page 78, “Adjusting the front seats”.
WARNING
Only adjust the driver seat
when the vehicle is stationary - risk of injury!
Fig. 5 Front seat: Seat belt height adjuster
Fig. 6 Controls at seat
A1A2A3A4
s2dk.1.book Page 12 Wednesday, April 8, 2009 12:23 PM
Page 35 of 294
Instruments and Indicator/Warning Lights
34
WARNING
•
If you do not pay attention to the warning lights coming on and the corre-
sponding descriptions and warning notes, this may result in severe body injuries or majo
r vehicle damage.
•
The engine compartment of your car is
a hazardous area. There is a risk
of injuries, scalding, accidents and fire when working in the engine compartment, e.g. inspecting and replenis
hing oil and other fluids. It is also
essential to obse
rve all warnings
⇒page 223, “Working in the engine
compartment”.
Note
•
The arrangement of the indicator lights
depends on the model version. The
symbols shown in the following functional description are to be found as indicator lights in the instrument cluster.•
Operational faults are shown in the inst
rument cluster as red symbols (priority
1 - danger) or yellow symbols (priority 2 - warning).Turn signal system
Either the left
or right
indicator light flashes depending on the position of the
turn signal lever. The indicator light flashes at twice its normal rate if a turn signal light fails. This does not apply when towing a trailer.
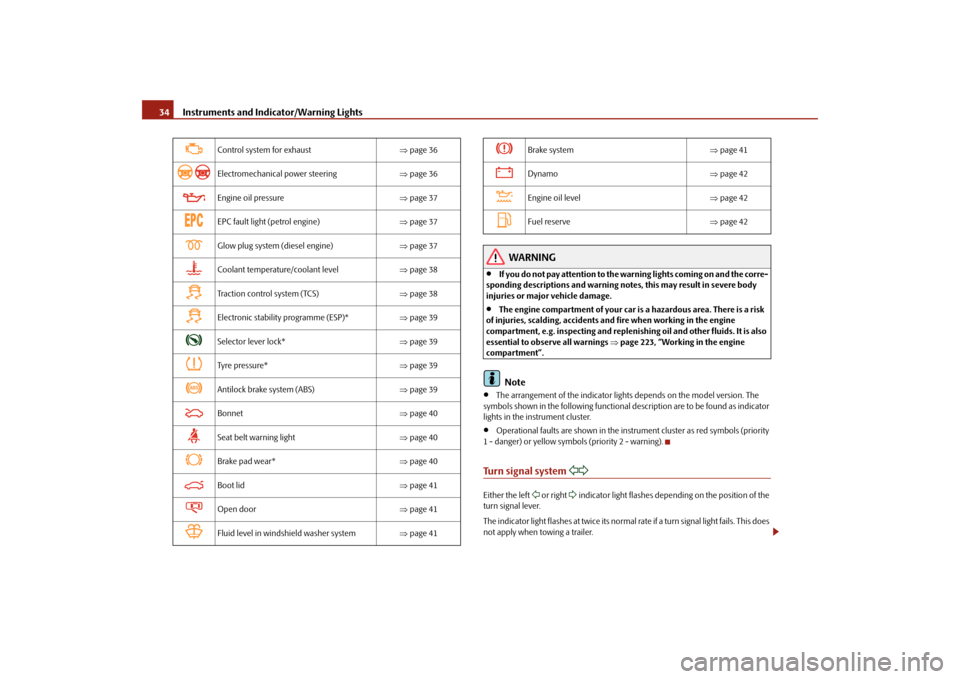
Control system for exhaust
⇒page 36
Electromechanical power steering
⇒page 36
Engine oil pressure
⇒page 37
EPC fault light (petrol engine)
⇒page 37
Glow plug system (diesel engine)
⇒page 37
Coolant temperature/coolant level
⇒page 38
Traction control system (TCS)
⇒page 38
Electronic stability programme (ESP)*
⇒page 39
Selector lever lock*
⇒page 39
Tyre pressure*
⇒page 39
Antilock brake system (ABS)
⇒page 39
Bonnet
⇒page 40
Seat belt warning light
⇒page 40
Brake pad wear*
⇒page 40
Boot lid
⇒page 41
Open door
⇒page 41
Fluid level in windshield washer system
⇒page 41
Brake system
⇒page 41
Dynamo
⇒page 42
Engine oil level
⇒page 42
Fuel reserve
⇒page 42
s2dk.1.book Page 34 Wednesday, April 8, 2009 12:23 PM
Page 37 of 294
Instruments and Indicator/Warning Lights
36
Have the vehicle inspected without delay by your specialist garage.
WARNING
•
If you do not pay attention to the warning light coming on and the corre-
sponding descriptions and warning notes, this may result in injuries or major vehicle damage.•
Always adjust your speed to suit weather, road, region and traffic condi-
tions. The route indicated by the warning light must not tempt you to disre-gard the national regulations for road traffic.
Caution
As long as the warning light
lights up, one must take into account an increased
fuel consumption and in certain circumst
ances a power reduction of the engine.
Note
Further information about
diesel particle filter
⇒page 200.
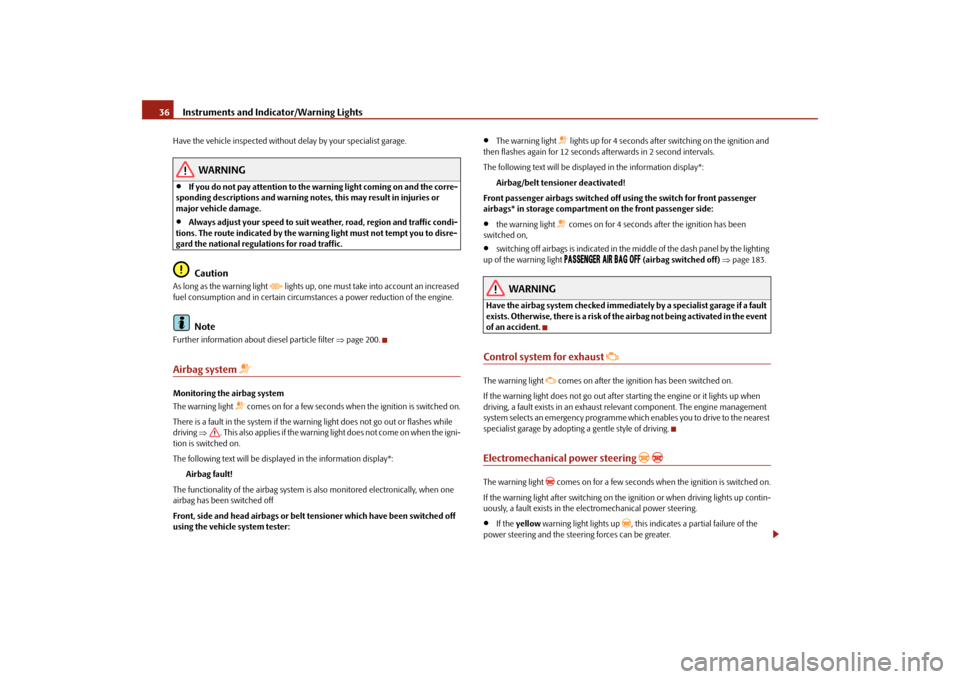
Airbag system
Monitoring the airbag system The warning light
comes on for a few seconds when the ignition is switched on.
There is a fault in the system if the warn
ing light does not go out or flashes while
driving
⇒
. This also applies if the warning light does not come on when the igni-
tion is switched on. The following text will be displayed in the information display*:
Airbag fault!
The functionality of the airbag system is also monitored electronically, when one airbag has been switched off Front, side and head airbags or belt tensioner which have been switched off using the vehicle
system tester:
•
The warning light
lights up for 4 seconds after switching on the ignition and
then flashes again for 12 seconds afterwards in 2 second intervals. The following text will be displayed in the information display*:
Airbag/belt tensio
ner deactivated!
Front passenger airbags switched off
using the switch for front passenger
airbags* in storage compartment on the front passenger side:•
the warning light
comes on for 4 seconds after the ignition has been
switched on,•
switching off airbags is indicated in the middle of the dash panel by the lighting
up of the warning light
(airbag switched off)
⇒page 183.
WARNING
Have the airbag system ch
ecked immediately by a specialist garage if a fault
exists. Otherwise, there is a risk of th
e airbag not being activated in the event
of an accident.Control system for exhaust
The warning light
comes on after the ignition has been switched on.
If the warning light does not go out after starting the engine or it lights up when driving, a fault exists in an exhaust relevant component. The engine management system selects an emergency programme which enables you to drive to the nearest specialist garage by adopting a gentle style of driving.Electromechanical power steering
The warning light
comes on for a few seconds when the ignition is switched on.
If the warning light after switching on the ig
nition or when driving lights up contin-
uously, a fault exists in the el
ectromechanical power steering.
•
If the
yellow
warning light lights up
, this indicates a partial failure of the
power steering and the steering forces can be greater.
s2dk.1.book Page 36 Wednesday, April 8, 2009 12:23 PM
Page 41 of 294
Instruments and Indicator/Warning Lights
40
The warning light comes on for a few second
s after the ignition has been switched
on or when starting the engine. The warning light goes out after an automatic check sequence has been completed. A fault in the ABS The system is not functioning properly if the ABS warning light
does not go out
within a few seconds after switching on the ignition, does not light up at all or lights up while driving. The vehicle will only be
braked by the normal brake system. Visit
a specialist garage as quickly as possible
and adjust your style of driving appropri-
ately as you will not know how great the damage is. Further information about ABS
⇒page 197, “Antilock brake system (ABS)”.
A fault in the entire brake system If the ABS warning light
comes on together with the brake system warning light
(handbrake must be released), there is
a fault not only in the ABS but also in
another part of the brake system
⇒
.
WARNING
•
If the brake system warning light
comes on together with the ABS
warning light
stop the vehicle immediatel
y and check the brake fluid
level in the reservoir
⇒page 228, “Brake fluid”. If the fluid level has dropped
below the MIN marking, do not drive any further - risk of accident! Obtain professional assistance.•
Pay attention to the following instru
ctions before checking the brake
fluid level and opening the bonnet
⇒page 223, “Working in the engine
compartment”.•
If the brake fluid is at the correct level, the ABS control function has
failed. The rear wheels may then block very rapidly when braking. In certain circumstances, this can result in the rear end of the car breaking away - risk of skidding! Drive carefully to the ne
arest specialist garage and have the
fault rectified.
Bonnet
The warning light
comes on if the bonnet is unlocked. If the engine bonnet
unlocks while driving
, the warning light lights up and an audible signal sounds.
The warning light comes on even when the
ignition is switched off. The warning
light lights up for a maximum of 5 minutes. On vehicles with information display* this
warning light is replaced by a vehicle
symbol
⇒page 28, fig. 29
.
Seat belt warning light
The warning light
comes on after the ignition is switched on as a reminder for the
driver and front passenger to fasten the seat belt. The warning light only goes out if the driver or front passenger has fastened his seat belt. If the seat belt has not been fastened by the driver or front passenger, a permanent warning signal sounds at vehicle speeds
greater than 20 km/h and simultaneously
the warning light
flashes.
If the seat belt is not fastened by the dr
iver or front passenger during the next 90
seconds, the warning signal is deactivated and the warning light
lights up perma-
nently. Further information on the seat belts
⇒page 168, “Seat belts”.
Thickness of the brake pads*
The warning light
comes on for a few seconds
5) when the ignition is switched
on. If the warning light
comes on, contact a specialist garage immediately and have
the brake pads on
all of the wheels
inspected.
5)The warning light
on vehicles fitted with information display does not come on after
switching the ignition on, but only if a fault exists.
s2dk.1.book Page 40 Wednesday, April 8, 2009 12:23 PM
Page 79 of 294
Seats and Stowage
78
Seats and StowageFront seatsBasic informationThe front seats have a wide range of different settings and can thus be matched to the physical characteristics of the driver and front passenger. Correct adjustment of the seats is particularly important for:•
safely and quickly reaching the controls,
•
a relaxed, fatigue-free body position,
•
achieving the maximum protection offere
d by the seat belts and the airbag
system.
WARNING
•
Never transport more occupants than the maximum seating in the
vehicle.•
Each occupant must correctly fasten
the seat belt belonging to the seat.
Children must be fastened
⇒page 185, “Transporting children safely” with
a suitable restraint system.•
The front seats and the head restraints must always be adjusted to match
the body size of the seat occupant as well as the seat belts must always be correctly fastened in order to provide an optimal protection for you and your occupants.•
Always keep your feet in the footwell
when the car is being driven - never
place your feet on the instrument panel, out of the window or on the surfaces of the seats. This is particularly important for the front seat passenger. You will be exposed to increased risk of injury if it becomes necessary to apply the brake or in the event of an accident. If an airbag is deployed, you may suffer fatal injuries
when adopting an incorrect seated
position!•
It is important for the driver and front passenger to maintain a distance
of at least 25 cm from the steering wheel
or dash panel. Not maintaining this
minimum distance will mean that the airbag system will not be able to prop- erly protect you - hazard! The front
seats and the head restraints must
always also be correctly adjusted to match the body size of the occupant.•
Ensure that there are no objects in
the footwell as any objects may get
behind the pedals during a driving or
braking manoeuvre. You would then
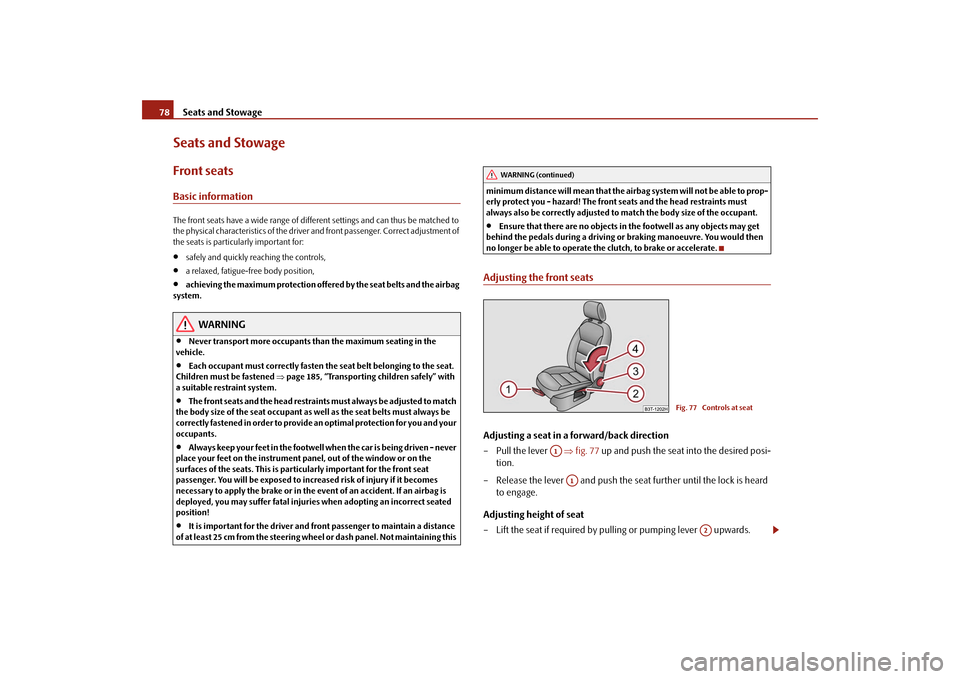
no longer be able to operate the clutch, to brake or accelerate.Adjusting the front seatsAdjusting a seat in a forward/back direction – Pull the lever
⇒
fig. 77
up and push the seat into the desired posi-
tion.
– Release the lever and push the seat further until the lock is heard
to engage.
Adjusting height of seat – Lift the seat if required by pulling or pumping lever upwards.
WARNING (continued)
Fig. 77 Controls at seat
A1
A1
A2
s2dk.1.book Page 78 Wednesday, April 8, 2009 12:23 PM
Page 80 of 294
Seats and Stowage
79
Using the system
Safety
Driving Tips
General Maintenance
Breakdown assistance
Technical Data
– Lower the seat if required by pushing or pumping lever down-
wards.
Adjust the angle of the seat backrest – Relieve any pressure on the seat backrest (do not lean on it) and turn
the handwheel
⇒
page 78, fig. 77
to adjust the desired angle of the
backrest.
Adjusting lumbar support – Turn the lever until you have se
t the most comfortable curvature
of the seat upholstery in the area of your spine.
The driver's seat should be adjusted in
such a way that the pedals can be pressed
to the floor with slightly bent legs. The seat backrest on the driver's seat sh
ould be adjusted in such a way that the
upper point of the steering wheel can be
easily reached with slightly bent arms.
WARNING
•
Only adjust the driver seat when the ve
hicle is stationary - risk of injury!
•
Take care when adjusting the seat! Adjusting the seat without care can
lead to bruises or injuries.•
The seat backrests must not be angled too far back when driving other-
wise this will affect proper operation of the seat belts and of the airbag system - risk of injury!
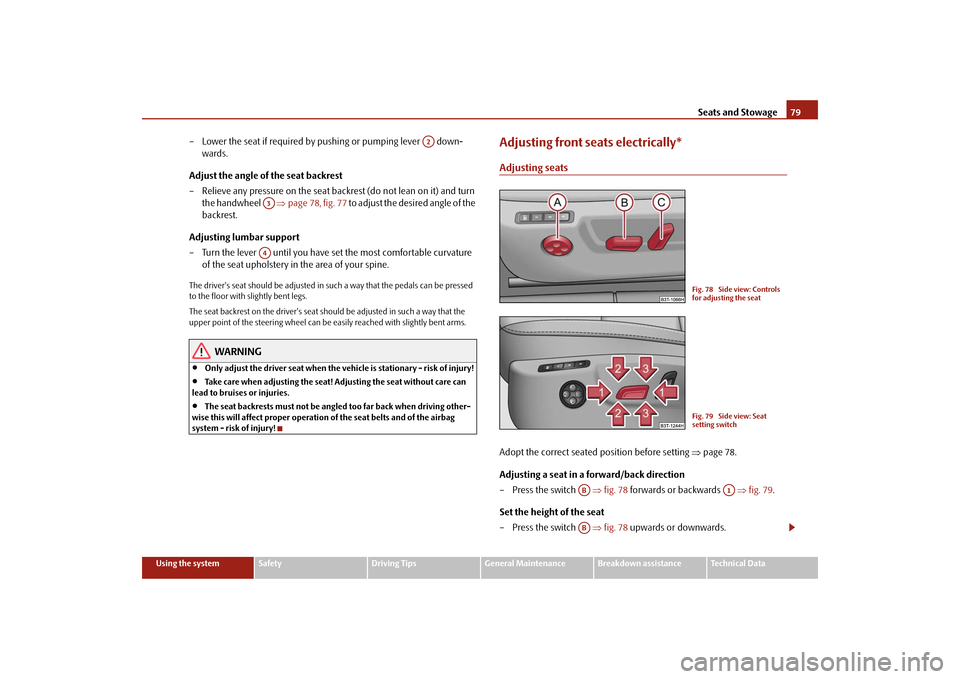
Adjusting front seats electrically*Adjusting seatsAdopt the correct seated position before setting
⇒
page 78.
Adjusting a seat in a forward/back direction – Press the switch
⇒
fig. 78
forwards or backwards
⇒
fig. 79
.
Set the height of the seat – Press the switch
⇒
fig. 78
upwards or downwards.
A2
A3A4
Fig. 78 Side view: Controls for adjusting the seatFig. 79 Side view: Seat setting switch
AB
A1
AB
s2dk.1.book Page 79 Wednesday, April 8, 2009 12:23 PM
Page 81 of 294
Seats and Stowage
80
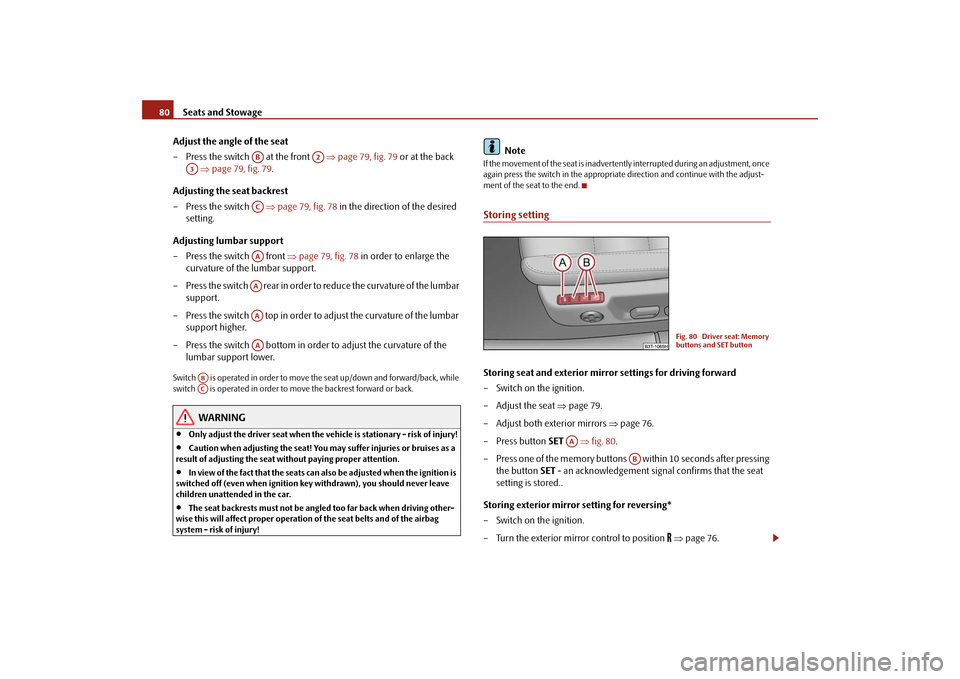
Adjust the angle of the seat – Press the switch at the front
⇒
page 79, fig. 79
or at the back
⇒
page 79, fig. 79
.
Adjusting the seat backrest – Press the switch
⇒
page 79, fig. 78
in the direction of the desired
setting.
Adjusting lumbar support – Press the switch front
⇒
page 79, fig. 78
in order to enlarge the
curvature of the lumbar support.
– Press the switch rear in order to reduce the curvature of the lumbar
support.
– Press the switch top in order to adjust the curvature of the lumbar
support higher.
– Press the switch bottom in order to adjust the curvature of the
lumbar support lower.
Switch is operated in order to move the seat up/down and forward/back, while switch is operated in order to move the backrest forward or back.
WARNING
•
Only adjust the driver seat when the ve
hicle is stationary - risk of injury!
•
Caution when adjusting the seat! You ma
y suffer injuries or bruises as a
result of adjusting the seat without paying proper attention.•
In view of the fact that the seats can
also be adjusted when the ignition is
switched off (even when ignition key withdrawn), you should never leave children unattended in the car.•
The seat backrests must not be angl
ed too far back when driving other-
wise this will affect proper operation of the seat belts and of the airbag system - risk of injury!
Note
If the movement of the seat is inadvertently interrupted during an adjustment, once again press the switch in the appropriate
direction and continue with the adjust-
ment of the seat to the end.Storing settingStoring seat and exterior mirror settings for driving forward – Switch on the ignition. – Adjust the seat
⇒
page 79.
– Adjust both exterior mirrors
⇒
page 76.
– Press button
SET
⇒
fig. 80
.
– Press one of the memory buttons within 10 seconds after pressing
the button
SET
- an acknowledgement signal
confirms that the seat
setting is stored..
Storing exterior mirror setting for reversing* – Switch on the ignition. – Turn the exterior mirror control to position
⇒
page 76.
AB
A2
A3
ACAAAAAAAA
ABAC
Fig. 80 Driver seat: Memory buttons and SET button
AA
AB
s2dk.1.book Page 80 Wednesday, April 8, 2009 12:23 PM
Page 84 of 294
Seats and Stowage
83
Using the system
Safety
Driving Tips
General Maintenance
Breakdown assistance
Technical Data
Removing and installing a head restraint – Pull the head restraint up out of the seat backrest as far as the stop (on
the rear head restraints fold forward the seat backrest).
– Press the locking button in the direction of arrow
⇒
page 82, fig. 82
and pull the head restraint out.
– To re-insert the head restraint, push it down into the seat backrest far
enough until you hear the locking button engage.
The position of the front and rear outer head
restraints is adjustable in height. The
middle rear head restraint is adjustable in two positions. The head restraints must be adjusted to
match the size of the seat occupant.
Correctly adjusted head restraints together with the seat belts offer effective protection for the occupants
⇒page 164, “Correct seated position”.
WARNING
•
The head restraints must be correctly
adjusted in order to offer effective
protection for the occupants in the event of an accident.•
Do not drive under any circumstance with removed head restraints - risk
of injury!•
If the rear seats are occupied, the rear head restraint must not be in the
lower position.
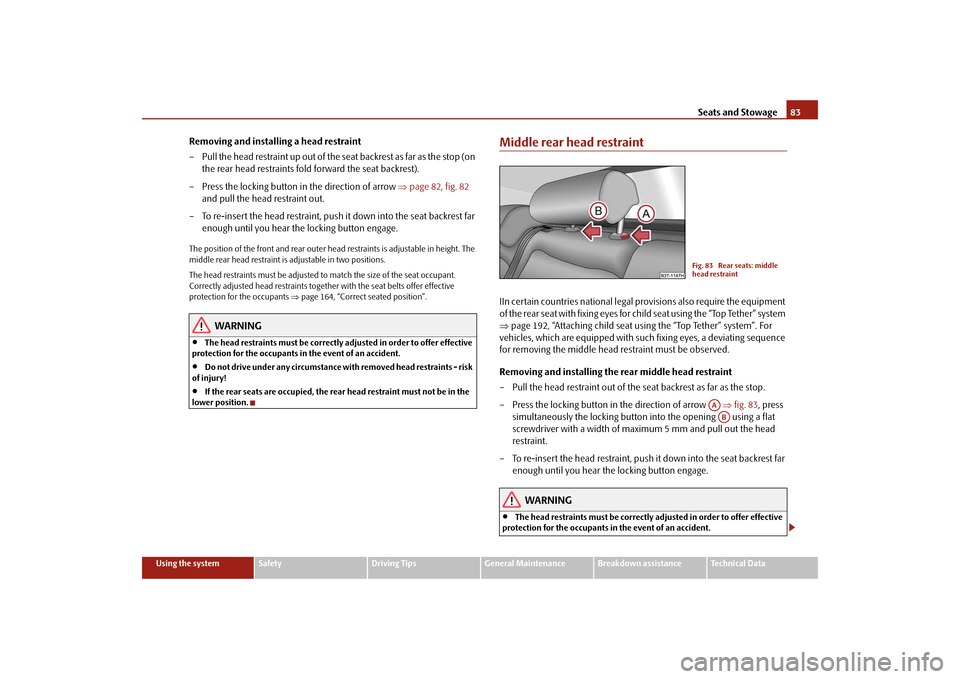
Middle rear head restraintIIn certain countries national legal pr
ovisions also require the equipment
of the rear seat with fixing eyes for child seat using the “Top Tether” system ⇒
page 192, “Attaching child seat using the “Top Tether” system”. For
vehicles, which are equipped with such fixing eyes, a deviating sequence for removing the middle head restraint must be observed. Removing and installing the rear middle head restraint – Pull the head restraint out of the seat backrest as far as the stop. – Press the locking button in the direction of arrow
⇒
fig. 83
, press
simultaneously the locking button into the opening using a flat screwdriver with a width of maximum 5 mm and pull out the head restraint.
– To re-insert the head restraint, push it down into the seat backrest far
enough until you hear the locking button engage.
WARNING
•
The head restraints must be correctly adjusted in order to offer effective
protection for the occupants in the event of an accident.
Fig. 83 Rear seats: middle head restraint
AAAB
s2dk.1.book Page 83 Wednesday, April 8, 2009 12:23 PM
Page 85 of 294

Seats and Stowage
84
•
Do not drive under any circumstance with removed head restraints - risk
of injury!•
If the rear seats are occupied, the rear head restraint must not be in the
lower position.Rear seatsFolding the seat backrest forwards
The luggage compartment can be increased in size by folding the seat backrests forward. Folding the seat backrests forward – Before folding the seat backrests forwards, you must adapt the posi-
tion of the front seats in such a way that they are not damaged by the folded seat backrests.
9)
– Unlock the seat backrest by pressing the unlocking handle
⇒
fig. 84
and fold it completely forwards.
Put the seat backrests into the original position – Install the head restraint in th
e slightly lifted seat backrest.
– Place the rear lateral seat belt
behind the edge of the side trim
panel
⇒
fig. 85
.
– Then push the seat backrest back into the upright position until the
securing knob clicks into place - check by pulling on the seat backrest.
– Make sure that the red pin is covered
⇒
fig. 84
.
WARNING
•
The belts and the belt locks must be in their original position after folding
back the seat backrests - they must be ready to use.•
The seat backrests must be securely interlocked in position so that no
objects in the luggage compartment ca
n slide into the passenger compart-
ment if there is sudden braking - risk of injury!•
Pay attention that the seat backrests are correctly interlocked. It is only
then that the three-point seat belt for the middle seat can reliably fulfil its function.
WARNING (continued)
Fig. 84 Unlock the seat back- restFig. 85 Lock the seat back-rest
9)If the front seats are too far back, we recommend that you have the rear head restraints re-moved before the seat backrests are folded forward. Store the removed head restraints insuch a way that they cannot be damaged or soiled. Please refer to the guidelines
⇒page 86.
AA
AC
AB
s2dk.1.book Page 84 Wednesday, April 8, 2009 12:23 PM