clock SKODA SUPERB 2009 2.G / (B6/3T) Owner's Manual
[x] Cancel search | Manufacturer: SKODA, Model Year: 2009, Model line: SUPERB, Model: SKODA SUPERB 2009 2.G / (B6/3T)Pages: 294, PDF Size: 21.33 MB
Page 4 of 294
Contents3
Using the system
Safety
Driving Tips
General Maintenance
Breakdown assistance
Technical Data
ContentsLayout of this Owner's Manual
(explanations)
. . . . . . . . . . . . . . . . . . . . . . . . . .
Using the system
. . . . . . . . . . . . . . . . . . . . . .
Cockpit
. . . . . . . . . . . . . . . . . . . . . . . . . . . . . . . . . . . . . . . .
Overview . . . . . . . . . . . . . . . . . . . . . . . . . . . . . . . . . . . .
The brief instruction
. . . . . . . . . . . . . . . . . . . . . . . . . .
Basic functions and important information . . . . .
Instruments and Indicator/Warning Lights
. . .
General view of the instrument cluster . . . . . . . . .
Engine revolutions counter . . . . . . . . . . . . . . . . . . . .
Speedometer . . . . . . . . . . . . . . . . . . . . . . . . . . . . . . . .
Coolant temperature gauge . . . . . . . . . . . . . . . . . . .
Fuel gauge . . . . . . . . . . . . . . . . . . . . . . . . . . . . . . . . . . .
Counter for distance driven . . . . . . . . . . . . . . . . . . .
Service Interval Display . . . . . . . . . . . . . . . . . . . . . . .
Digital clock . . . . . . . . . . . . . . . . . . . . . . . . . . . . . . . . . .
Multi-functional indicator (onboard computer)*
Information display* . . . . . . . . . . . . . . . . . . . . . . . . . .
Auto Check Control* . . . . . . . . . . . . . . . . . . . . . . . . . .
Warning lights . . . . . . . . . . . . . . . . . . . . . . . . . . . . . . . .
Unlocking and locking
. . . . . . . . . . . . . . . . . . . . . . . .
Key . . . . . . . . . . . . . . . . . . . . . . . . . . . . . . . . . . . . . . . . . .
Changing the battery of the radio remote control
Electronic immobiliser . . . . . . . . . . . . . . . . . . . . . . . .
Child safety lock . . . . . . . . . . . . . . . . . . . . . . . . . . . . . .
Central locking system . . . . . . . . . . . . . . . . . . . . . . . .
Remote control . . . . . . . . . . . . . . . . . . . . . . . . . . . . . . .
Description . . . . . . . . . . . . . . . . . . . . . . . . . . . . . . . . . .
Unlocking and locking car . . . . . . . . . . . . . . . . . . . . .
Synchonisation of the remote control . . . . . . . . . . Anti-theft alarm system* . . . . . . . . . . . . . . . . . . . . . .
Power windows . . . . . . . . . . . . . . . . . . . . . . . . . . . . . .
Electric sliding/tilting roof* . . . . . . . . . . . . . . . . . . . .
Lights and Visibility
. . . . . . . . . . . . . . . . . . . . . . . . . . .
Lights . . . . . . . . . . . . . . . . . . . . . . . . . . . . . . . . . . . . . . . .
Interior lighting . . . . . . . . . . . . . . . . . . . . . . . . . . . . . . .
Visibility . . . . . . . . . . . . . . . . . . . . . . . . . . . . . . . . . . . . .
Windshield wiper and wash system . . . . . . . . . . . .
Rear-view mirror . . . . . . . . . . . . . . . . . . . . . . . . . . . . .
Exterior mirror . . . . . . . . . . . . . . . . . . . . . . . . . . . . . . .
Automatic dimming exterior mirror* . . . . . . . . . . .
Seats and Stowage
. . . . . . . . . . . . . . . . . . . . . . . . . . . .
Front seats . . . . . . . . . . . . . . . . . . . . . . . . . . . . . . . . . . .
Adjusting front seats electrically* . . . . . . . . . . . . . .
Head restraints . . . . . . . . . . . . . . . . . . . . . . . . . . . . . . .
Middle rear head restraint . . . . . . . . . . . . . . . . . . . . .
Rear seats . . . . . . . . . . . . . . . . . . . . . . . . . . . . . . . . . . . .
luggage compartment . . . . . . . . . . . . . . . . . . . . . . . .
The roof rack* . . . . . . . . . . . . . . . . . . . . . . . . . . . . . . . .
Cup holder . . . . . . . . . . . . . . . . . . . . . . . . . . . . . . . . . . .
Ashtray . . . . . . . . . . . . . . . . . . . . . . . . . . . . . . . . . . . . . .
Cigarette lighter*, power sockets . . . . . . . . . . . . . . .
Storage compartments . . . . . . . . . . . . . . . . . . . . . . . .
Air conditioning system
. . . . . . . . . . . . . . . . . . . . . .
Introduction . . . . . . . . . . . . . . . . . . . . . . . . . . . . . . . . .
Air outlet vents . . . . . . . . . . . . . . . . . . . . . . . . . . . . . . .
Climatic (semi-automatic air conditioning system)
Climatronic* (automatic air conditioning) . . . . . .
Auxiliary heating (auxiliary heating and
ventilation)* . . . . . . . . . . . . . . . . . . . . . . . . . . . . . . . . .
Starting-off and Driving
. . . . . . . . . . . . . . . . . . . . . . .
Setting steering wheel position . . . . . . . . . . . . . . . .
Ignition lock . . . . . . . . . . . . . . . . . . . . . . . . . . . . . . . . . . Starting the engine . . . . . . . . . . . . . . . . . . . . . . . . . . .
Rear parking aid* . . . . . . . . . . . . . . . . . . . . . . . . . . . . .
Front and rear parking aid* . . . . . . . . . . . . . . . . . . . .
Park Assist* . . . . . . . . . . . . . . . . . . . . . . . . . . . . . . . . . .
Cruise control system (CCS)* . . . . . . . . . . . . . . . . . .
Automatic gearbox DSG*
. . . . . . . . . . . . . . . . . . . . .
Automatic gearbox DSG* . . . . . . . . . . . . . . . . . . . . .
Communication
. . . . . . . . . . . . . . . . . . . . . . . . . . . . . .
Multifunction steering wheel* . . . . . . . . . . . . . . . . .
Mobile phones and two-way radio systems . . . . .
Universal telephone preinstallation GSM II* . . . .
Phone voice phonebook* . . . . . . . . . . . . . . . . . . . . .
Universal telephone preinstallation GSM III* . . . .
Phone voice phonebook* . . . . . . . . . . . . . . . . . . . . .
Inputs AUX-IN* and MDI* . . . . . . . . . . . . . . . . . . . . .
CD changer* . . . . . . . . . . . . . . . . . . . . . . . . . . . . . . . . .
Safety
. . . . . . . . . . . . . . . . . . . . . . . . . . . . . . . . . . . . . .
Passive Safety
. . . . . . . . . . . . . . . . . . . . . . . . . . . . . . . . .
Basic information . . . . . . . . . . . . . . . . . . . . . . . . . . . .
Correct seated position . . . . . . . . . . . . . . . . . . . . . . .
Seat belts
. . . . . . . . . . . . . . . . . . . . . . . . . . . . . . . . . . . . . .
Why seat belts? . . . . . . . . . . . . . . . . . . . . . . . . . . . . . .
The physical principle of a frontal collision . . . . .
Important safety information regarding the use of
seat belts . . . . . . . . . . . . . . . . . . . . . . . . . . . . . . . . . . . .
How are seat belts correctly fastened? . . . . . . . . .
Airbag system
. . . . . . . . . . . . . . . . . . . . . . . . . . . . . . . . .
Description of the airbag system . . . . . . . . . . . . . . .
Front airbag . . . . . . . . . . . . . . . . . . . . . . . . . . . . . . . . . .
Driver's knee airbag* . . . . . . . . . . . . . . . . . . . . . . . . . 6
7
9
9
11
11
17
17
18
18
18
18
19
20
21
21
26
29
33
43
43
43
44
44
45
50
50
51
5252
54
57
60
60
68
70
73
75
76
77
78
78
79
82
83
84
86
91
92
93
94
95
104
104
105
106
109
112
117
117
118119
122
123
124
128
131
131
138
138
141
141
148
151
158
160
160
163
163
163
164
168
168
169
169
170
174
174
176
178
s2dk.1.book Page 3 Wednesday, April 8, 2009 12:23 PM
Page 18 of 294
Instruments and Indicator/Warning Lights
17
Using the system
Safety
Driving Tips
General Maintenance
Breakdown assistance
Technical Data
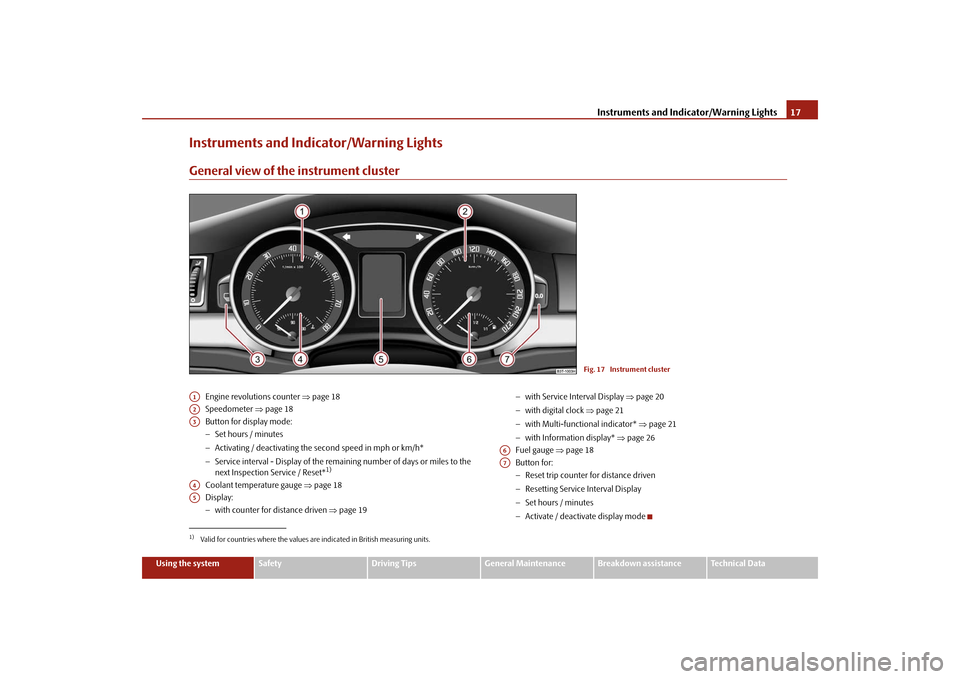
Instruments and Indicator/Warning LightsGeneral view of the instrument cluster
Engine revolutions counter
⇒page 18
Speedometer
⇒page 18
Button for display mode: − Set hours / minutes − Activating / deactivating the
second speed in mph or km/h*
− Service interval - Display of the remaining number of days or miles to the next Inspection Service / Reset*
1)
Coolant temperature gauge
⇒page 18
Display:− with counter for distance driven
⇒page 19
− with Service Interval Display
⇒page 20
− with digital clock
⇒page 21
− with Multi-functional indicator*
⇒page 21
− with Information display*
⇒page 26
Fuel gauge
⇒page 18
Button for: − Reset trip counter for distance driven − Resetting Service Interval Display − Set hours / minutes − Activate / deactivate display mode
Fig. 17 Instrument cluster
1)Valid for countries where the values are indicated in British measuring units.A1A2A3A4A5
A6A7
s2dk.1.book Page 17 Wednesday, April 8, 2009 12:23 PM
Page 22 of 294
Instruments and Indicator/Warning Lights
21
Using the system
Safety
Driving Tips
General Maintenance
Breakdown assistance
Technical Data
Caution
We recommend that you do not reset the
Service Interval Disp
lay yourself other-
wise this can result in the service interval display being incorrectly set, which may also result in problems with operation of your vehicle.
Note
•
Never reset the display between service intervals otherwise this may result in
incorrect readouts.•
information is retained in the Service Interval Display also after the battery of
the vehicle is disconnected.•
If the instrument cluster is exchanged af
ter a repair, the correct values must be
entered in the counter for the Service Interval Display. This work is carried out by a specialist garage.•
The data displayed is the same after resetting the display with flexible service
intervals (QG1) using the reset button as that for a vehicle with fixed service inter- vals (QG2). We therefore recommend having
the Service Interval Display reset only
by an authorised Škoda Service Partner who is familiar with the procedure for reset-ting the display with a vehicle system tester.•
Please refer to the brochure Service sc
hedule for extensive information about
the service intervals.Digital clockThe time is set with the buttons and
⇒page 17, fig. 17
.
Select the display which you wish to chan
ge with the button and carry out the
change with the button . On vehicles which are fitted out with the information display*, it is possible to set the time in the menu
Time
⇒page 30.
WARNING
The clock should not be adjusted while driving for safety reasons but only when the vehicle is stationary!Multi-functional indicator (onboard computer)*IntroductionThe multi-functional indicator appears in the display
⇒page 22, fig. 20
or in the
information display
⇒page 26 depending on the equipment fitted to your vehicle.
The multi-functional indicator offers
you a range of useful information.
On vehicles which are fitted out with inform
ation display*, it is possible to switch
off the display of some information.
Caution
Pull out the ignition key while having contact with the display (for example when cleaning) in order to
prevent any damage.
A3
A7
A3
A7
The outside temperature
⇒page 24
Driving time
⇒page 24
Current fuel consumption
⇒page 24
Average fuel consumption
⇒page 24
Range
⇒page 25
Distance driven
⇒page 25
Average speed
⇒page 25
Current speed*
⇒page 25
Warning against excessive speeds*
⇒page 25
s2dk.1.book Page 21 Wednesday, April 8, 2009 12:23 PM
Page 31 of 294
Instruments and Indicator/Warning Lights
30
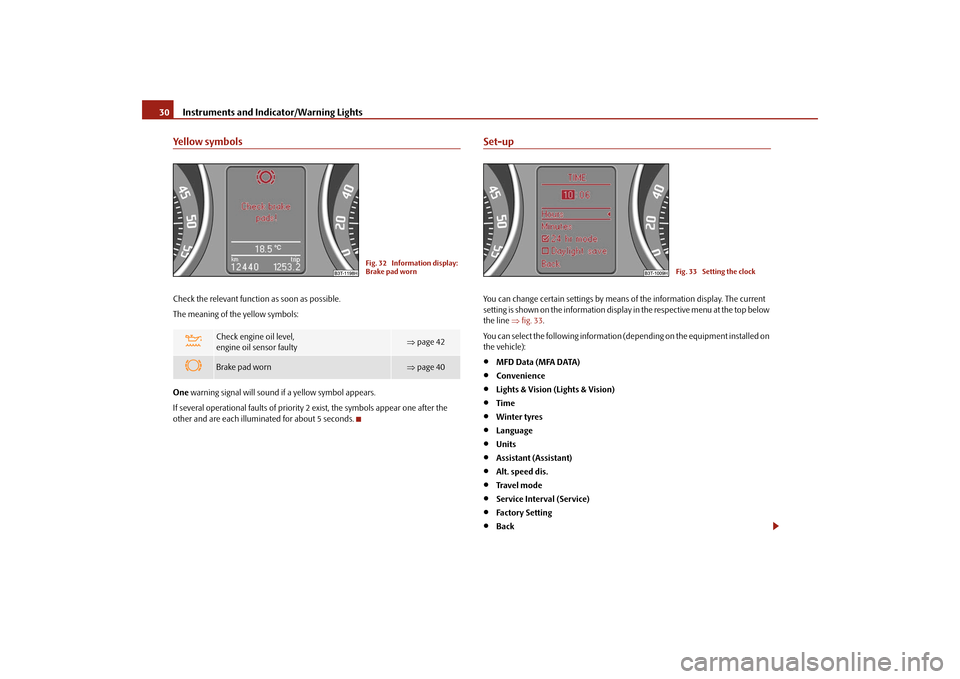
Yellow symbolsCheck the relevant function as soon as possible. The meaning of the yellow symbols: One
warning signal will sound if a yellow symbol appears.
If several operational faults of priority 2 exist, the symbols appear one after the other and are each illuminated for about 5 seconds.
Set-upYou can change certain settings by means of the information display. The current setting is shown on the information display
in the respective menu at the top below
the line
⇒fig. 33
.
You can select the following information (d
epending on the equipment installed on
the vehicle):•
MFD Data (MFA DATA)
•
Convenience
•
Lights & Vision (Lights & Vision)
•
Time
•
Winter tyres
•
Language
•
Units
•
Assistant (Assistant)
•
Alt. speed dis.
•
Tra v e l m o d e
•
Service Interval (Service)
•
Factory Setting
•
Back
Check engine oil level, engine oil sensor faulty
⇒ page 42
Brake pad worn
⇒page 40
Fig. 32 Information display: Brake pad worn
Fig. 33 Setting the clock
s2dk.1.book Page 30 Wednesday, April 8, 2009 12:23 PM
Page 118 of 294
Starting-off and Driving
117
Using the system
Safety
Driving Tips
General Maintenance
Breakdown assistance
Technical Data
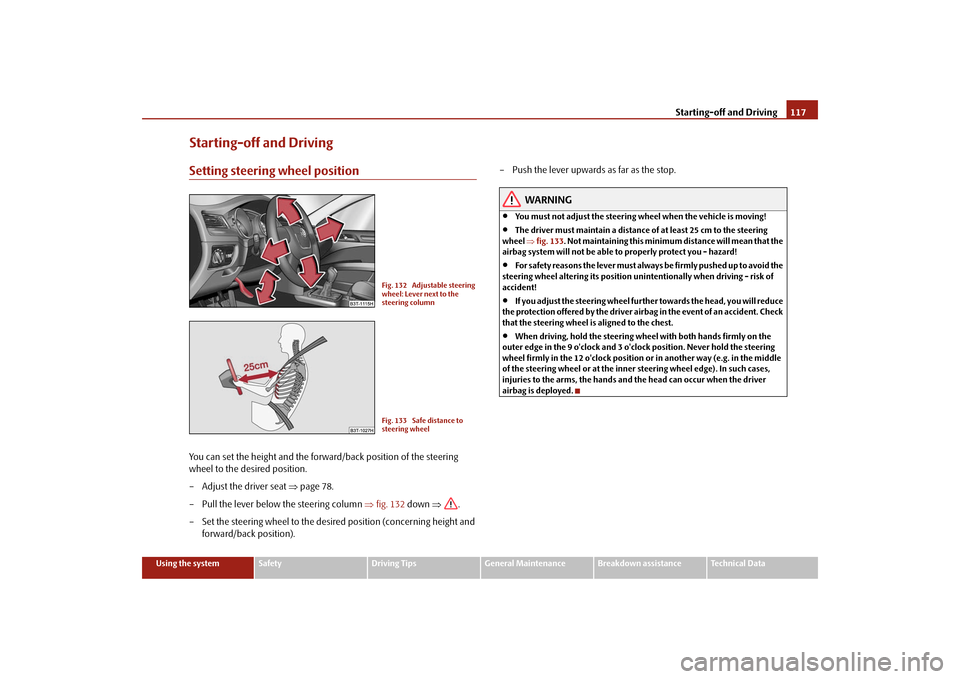
Starting-off and DrivingSetting steering wheel positionYou can set the height and the forw
ard/back position of the steering
wheel to the desired position. – Adjust the driver seat
⇒
page 78.
– Pull the lever below the steering column
⇒
fig. 132
down
⇒
.
– Set the steering wheel to the desired position (concerning height and
forward/back position).
– Push the lever upwards as far as the stop.
WARNING
•
You must not adjust the steering wh
eel when the vehicle is moving!
•
The driver must maintain a distance of at least 25 cm to the steering
wheel
⇒fig. 133
. Not maintaining this minimum distance will mean that the
airbag system will not be able to properly protect you - hazard!•
For s a fe t y re a s ons the le v e r m ust a lwa y s b e fi rm l y pus he d up t o a vo id the
steering wheel altering its position unintentionally when driving - risk of accident!•
If you adjust the steering wheel furthe
r towards the head, you will reduce
the protection offered by the driver airb
ag in the event of an accident. Check
that the steering wheel is aligned to the chest.•
When driving, hold the steering wheel
with both hands firmly on the
outer edge in the 9 o'clock and 3 o'clock position. Never hold the steering wheel firmly in the 12 o'clock position or in another way (e.g. in the middle of the steering wheel or
at the inner steering wheel edge). In such cases,
injuries to the arms, the hands and
the head can occur when the driver
airbag is deployed.
Fig. 132 Adjustable steering wheel: Lever next to the steering columnFig. 133 Safe distance to steering wheel
s2dk.1.book Page 117 Wednesday, April 8, 2009 12:23 PM
Page 166 of 294
Passive Safety
165
Using the system
Safety
Driving Tips
General Maintenance
Breakdown assistance
Technical Data
For your own safety and to reduce the risk of injury in the event of an accident, we recommend the following setting.•
Adjust the steering wheel so that the distance between the steering wheel and
your chest is at least 25 cm
⇒page 164, fig. 160
.
•
Position the driver seat in the forward/back direction so that you are able to
press the pedals with your
legs at a slight angle .
•
Adjust the backrest so that you are able
to reach the highest point of the steering
wheel with your arms at a slight angle.•
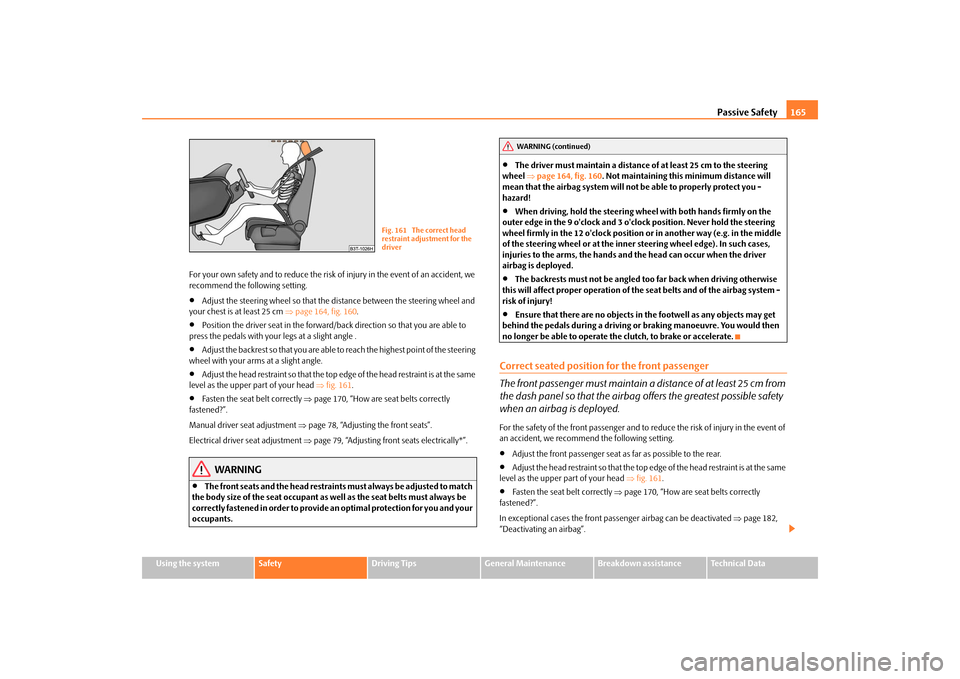
Adjust the head restraint so that the top edge of the head restraint is at the same
level as the upper part of your head
⇒fig. 161
.
•
Fasten the seat belt correctly
⇒page 170, “How are seat belts correctly
fastened?”. Manual driver seat adjustment
⇒page 78, “Adjusting the front seats”.
Electrical driver seat adjustment
⇒page 79, “Adjusting front seats electrically*”.
WARNING
•
The front seats and the head restraints must always be adjusted to match
the body size of the seat occupant as well as the seat belts must always be correctly fastened in order to provide an optimal protection for you and your occupants.
•
The driver must maintain a distance of at least 25 cm to the steering
wheel
⇒page 164, fig. 160
. Not maintaining this minimum distance will
mean that the airbag system will not be able to properly protect you - hazard!•
When driving, hold the steering wheel
with both hands firmly on the
outer edge in the 9 o'clock and 3 o'clock position. Never hold the steering wheel firmly in the 12 o'clock position or in another way (e.g. in the middle of the steering wheel or
at the inner steering wheel edge). In such cases,
injuries to the arms, the hands and
the head can occur when the driver
airbag is deployed.•
The backrests must not be angled to
o far back when driving otherwise
this will affect proper operation of the seat belts and of the airbag system - risk of injury!•
Ensure that there are no objects in the footwell as any objects may get
behind the pedals during a driving or
braking manoeuvre. You would then
no longer be able to operate the clutch, to brake or accelerate.Correct seated position for the front passenger The front passenger must maintain a distance of at least 25 cm from the dash panel so that the airbag offers the greatest possible safety when an airbag is deployed.For the safety of the front passenger and to
reduce the risk of injury in the event of
an accident, we recommend the following setting.•
Adjust the front passenger seat as far as possible to the rear.
•
Adjust the head restraint so that the top edge of the head restraint is at the same
level as the upper part of your head
⇒fig. 161
.
•
Fasten the seat belt correctly
⇒page 170, “How are seat belts correctly
fastened?”. In exceptional cases the front pass
enger airbag can be deactivated
⇒page 182,
“Deactivating an airbag”.
Fig. 161 The correct head restraint adjustment for the driver
WARNING (continued)
s2dk.1.book Page 165 Wednesday, April 8, 2009 12:23 PM
Page 254 of 294

Breakdown assistance
253
Using the system
Safety
Driving Tips
General Maintenance
Breakdown assistance
Technical Data
Only attach the tow rope to the
towing eyes
provided for this purpose
⇒page 253
and
⇒page 254.
Driving style Towing another vehicle requires a certain
amount of practice. Both drivers should
be familiar with the particular points
about towing a vehicle. Unskilled drivers
should not attempt to tow in another vehicle or to be towed in. One should be constantly vigilant not to
allow impermissibly high towing forces or
jerky loadings. There is always a risk of excessive stresses and damage resulting at the points to which you attach the tow rope or tow bar when you attempt to tow a vehicle which is not standing on a paved road.
Caution
If the gearbox of your vehicle no longer
contains any oil because of a defect, your
vehicle must only be towed in with the driv
en wheels raised clear of the ground, or
on a special vehicle transporter or trailer.
Note
•
Please comply with any legal requirements particularly regarding the switched
on signal systems, when towing in
or tow-starting
another vehicle.
•
The tow rope must not be twisted as it may in certain circumstances result in the
front towing eye being unscr
ewed out of your vehicle.
Front towing eye The towing eye is stored in th
e box for the vehicle tool kit.
– Take the cover out of the front bumper
⇒
fig. 224
.
– Screw in the towing eye anticlockwise down to the stop
⇒
fig. 225
and
tighten up using the wheel wrench (push the wheel wrench through eye).
– Put the cover in place after screwing out the towing eye again and
press into place. The cover must engage firmly.
Fig. 224 Front bumper: Removing the coverFig. 225 Front bumper: Installing the towing eye
s2dk.1.book Page 253 Wednesday, April 8, 2009 12:23 PM
Page 255 of 294

Breakdown assistance
254
Rear towing eye– Press onto the bottom part of the cover in the rear bumper
⇒
fig. 226
and take it out.
– Screw in the towing eye anti
clockwise down to the stop
⇒
fig. 227
and
tighten up using the wheel wrench (push the wheel wrench through eye).
– Put the cover in place after screwing out the towing eye again and
press into place. The co
ver must engage firmly.
Tow-starting a vehicleIf the engine does not start, we generally do
not
recommend
to tow-start
your vehicle. One should attempt to start the engine using jump start cables
⇒
page 250 or call on the services of the SERVICE mobile.
If your vehicle has to be towed – Engage 2nd or 3rd gear wi
th the vehicle stationary.
– Depress the clutch pedal fully and keep it depressed. – Switch on the ignition.– Wait until both vehicles are movi
ng then release the clutch pedal
slowly.
– Depress the clutch pedal fully when the engine fires and take the
vehicle out of gear.
For technical reasons it is not possib
le to tow-start a car fitted with an
automatic
gearbox
.WARNING
There is high risk of having an accident when tow-starting a vehicle, when for example the towed vehicle runs into the towing vehicle.
Caution
Vehicles which are fitted with a catalytic
converter should not be tow-started over
a d i s t a n c e o f m o re t h a n 5 0 m e t re s . U n b u r n
t fuel may get into the catalytic converter
and damage it.Towing in a vehicle fitted with a manual gearboxPlease refer to the notes
⇒page 252.
Fig. 226 Rear bumper: Removing coverFig. 227 Rear bumper: Installing the towing eye
s2dk.1.book Page 254 Wednesday, April 8, 2009 12:23 PM
Page 261 of 294
Fuses and light bulbs
260
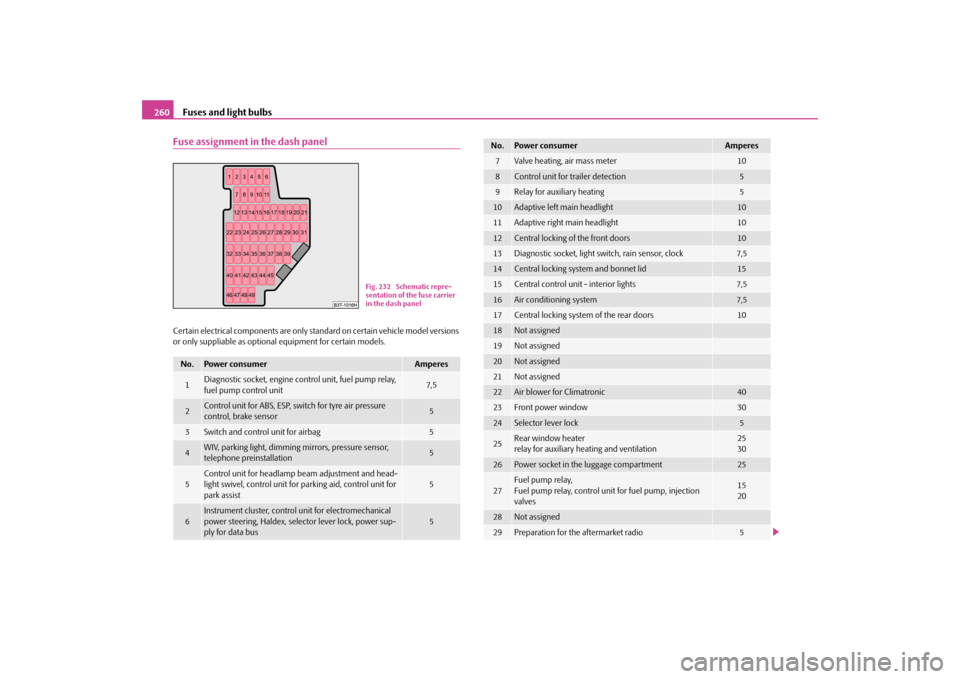
Fuse assignment in the dash panelCertain electrical components are only st
andard on certain vehicle model versions
or only suppliable as optional
equipment for certain models.
No.
Power consumer
Amperes
1
Diagnostic socket, engine control unit, fuel pump relay, fuel pump control unit
7,5
2
Control unit for ABS, ESP, switch for tyre air pressure control, brake sensor
5
3
Switch and control unit for airbag
5
4
WIV, parking light, dimming mirrors, pressure sensor, telephone preinstallation
5
5
Control unit for headlamp beam adjustment and head- light swivel, control unit for parking aid, control unit for park assist
5
6
Instrument cluster, control
unit for electromechanical
power steering, Haldex, selector lever lock, power sup- ply for data bus
5
Fig. 232 Schematic repre- sentation of the fuse carrier in the dash panel
7
Valve heating, air mass meter
10
8
Control unit for trailer detection
5
9
Relay for auxiliary heating
5
10
Adaptive left main headlight
10
11
Adaptive right main headlight
10
12
Central locking of the front doors
10
13
Diagnostic socket, light switch, rain sensor, clock
7,5
14
Central locking system and bonnet lid
15
15
Central control unit - interior lights
7,5
16
Air conditioning system
7,5
17
Central locking system of the rear doors
10
18
Not assigned
19
Not assigned
20
Not assigned
21
Not assigned
22
Air blower for Climatronic
40
23
Front power window
30
24
Selector lever lock
5
25
Rear wind
ow heater
relay for auxiliary heating and ventilation
2530
26
Power socket in the luggage compartment
25
27
Fuel pump relay, Fuel pump relay, control unit for fuel pump, injection valves
1520
28
Not assigned
29
Preparation for the aftermarket radio
5
No.
Power consumer
Amperes
s2dk.1.book Page 260 Wednesday, April 8, 2009 12:23 PM
Page 287 of 294
Index 286Central locking system . . . . . . . . . . . . . . . . . . . . . . . . 45
Changing a wheel . . . . . . . . . . . . . . . . . . . . . . . . . . . . 245
Changing bulbs . . . . . . . . . . . . . . . . . . . . . . . . . . . . . . 261
Changing the engine oil . . . . . . . . . . . . . . . . . . . . . . 226
Changing wheels around . . . . . . . . . . . . . . . . . . . . . 237
Charging the battery . . . . . . . . . . . . . . . . . . . . . . . . . 233
Warning light . . . . . . . . . . . . . . . . . . . . . . . . . . . . . 42
Check engine oil level . . . . . . . . . . . . . . . . . . . . . . . . 224
Child safety . . . . . . . . . . . . . . . . . . . . . . . . . . . . . . . . . 185
Side airbag . . . . . . . . . . . . . . . . . . . . . . . . . . . . . . 187
Child safety lock . . . . . . . . . . . . . . . . . . . . . . . . . . . . . . 44
Child safety seat
on the front passenger seat . . . . . . . . . . . . . . . 186
Safety information . . . . . . . . . . . . . . . . . . . . . . . 185
Child seat . . . . . . . . . . . . . . . . . . . . . . . . . . . . . . . . . . . 188
Classification into groups . . . . . . . . . . . . . . . . . 188
ISOFIX system . . . . . . . . . . . . . . . . . . . . . . . . . . . . 191
Use of child safety seats . . . . . . . . . . . . . . . . . . 188
Children and safety . . . . . . . . . . . . . . . . . . . . . . . . . . 185
Chrome parts . . . . . . . . . . . . . . . . . . . . . . . . . . . . . . . 213
Cigarette lighter . . . . . . . . . . . . . . . . . . . . . . . . . . . . . . 94
Cleaning . . . . . . . . . . . . . . . . . . . . . . . . . . . . . . . . . . . . 211
Climatic
Air outlet vents . . . . . . . . . . . . . . . . . . . . . . . . . . . 105
Climatronic
Defrosting windows . . . . . . . . . . . . . . . . . . . . . . 112
Recirculated air mode . . . . . . . . . . . . . . . . . . . . 111
Climatronic (automatic air conditioning) . . . . . . 109
Clock . . . . . . . . . . . . . . . . . . . . . . . . . . . . . . . . . . . . . . . . 21
Clothes hooks . . . . . . . . . . . . . . . . . . . . . . . . . . . . . . . 103
Cockpit
General view . . . . . . . . . . . . . . . . . . . . . . . . . . . . . . . 9Compartments . . . . . . . . . . . . . . . . . . . . . . . . . . . . . . . . 95
Computer . . . . . . . . . . . . . . . . . . . . . . . . . . . . . . . . . . . . 21
Convenience operation . . . . . . . . . . . . . . . . . . . . . . . . 56
Converting/masking over headlights . . . . . . . . . . 206
Coolant . . . . . . . . . . . . . . . . . . . . . . . . . . . . . . . . . . . . 226
replenishing . . . . . . . . . . . . . . . . . . . . . . . . . . . . . 227
Warning light . . . . . . . . . . . . . . . . . . . . . . . . . . . . . . 38
Coolant level
Warning light . . . . . . . . . . . . . . . . . . . . . . . . . . . . . . 38
Coolant quantity
Warning light . . . . . . . . . . . . . . . . . . . . . . . . . . . . . . 38
Coolant temperature gauge . . . . . . . . . . . . . . . . . . . . 18
Coolant temperature/coolant level
Warning light . . . . . . . . . . . . . . . . . . . . . . . . . . . . . . 38
Correct seated position . . . . . . . . . . . . . . . . . . . . . . 164
Counter for distance driven . . . . . . . . . . . . . . . . . . . . 19
Cruise control system . . . . . . . . . . . . . . . . . . . . . . . . 128
Warning light . . . . . . . . . . . . . . . . . . . . . . . . . . . . . . 35
Cup holder
front . . . . . . . . . . . . . . . . . . . . . . . . . . . . . . . . . . . . . . 92
rear . . . . . . . . . . . . . . . . . . . . . . . . . . . . . . . . . . . . . . . 92
DDaylight driving lights . . . . . . . . . . . . . . . . . . . . . . . . . . 61
Deactivating
an airbag . . . . . . . . . . . . . . . . . . . . . . . . . . . . . . . . 182
Deactivating an airbag . . . . . . . . . . . . . . . . . . . . . . . 182
Defrosting rear window . . . . . . . . . . . . . . . . . . . . . . . . 70
Defrosting windscreen . . . . . . . . . . . . . . . . . . . . . . . . . 70
De-icing rear window . . . . . . . . . . . . . . . . . . . . . . . . . . 70
De-icing the windows . . . . . . . . . . . . . . . . . . . . . . . 214De-icing windscreen . . . . . . . . . . . . . . . . . . . . . . . . . . 70
Detachable towing device . . . . . . . . . . . . . . . . . . . . 210
Diesel . . . . . . . . . . . . . . . . . . . . . . . . . . . . . . . . . . . . . . . 219
Diesel engines
Starting the engine . . . . . . . . . . . . . . . . . . . . . . . 119
Diesel particle filter . . . . . . . . . . . . . . . . . . . . . . . . . . 200
Warning light . . . . . . . . . . . . . . . . . . . . . . . . . . . . . 35
Digital clock . . . . . . . . . . . . . . . . . . . . . . . . . . . . . . . . . . 21
Direction indicators . . . . . . . . . . . . . . . . . . . . . . . . . . . 67
Warning light . . . . . . . . . . . . . . . . . . . . . . . . . . . . . 34
Display . . . . . . . . . . . . . . . . . . . . . . . . . . . . . . . . . . . . . . . 26
Distance driven . . . . . . . . . . . . . . . . . . . . . . . . . . . . . . . 19
Door
Child safety lock . . . . . . . . . . . . . . . . . . . . . . . . . . . 44
Driving economically . . . . . . . . . . . . . . . . . . . . . . . . . 202
EEDL . . . . . . . . . . . . . . . . . . . . . . . . . . . . . . . . . . . . . . . . . 194
Electric power-operated window
Operational faults . . . . . . . . . . . . . . . . . . . . . . . . . 56
Electric sliding/tilting roof . . . . . . . . . . . . . . . . . . . . . 57
Electrically adjustable exterior mirror . . . . . . . . . . . 76
Electronic Differential Lock . . . . . . . . . . . . . . . . . . . 194
Electronic immobiliser . . . . . . . . . . . . . . . . . . . . . . . . 44
Electronic stability programme . . . . . . . . . . . . . . . . 193
Electronic stability programme (ESP)
Warning light . . . . . . . . . . . . . . . . . . . . . . . . . . . . . 39
Emergency wheel . . . . . . . . . . . . . . . . . . . . . . . . . . . . 245
Engine
starting . . . . . . . . . . . . . . . . . . . . . . . . . . . . . . . . . . 119
switching off . . . . . . . . . . . . . . . . . . . . . . . . . . . . . 120
s2dk.1.book Page 286 Wednesday, April 8, 2009 12:23 PM