key SKODA SUPERB 2009 Owner´s Manual
[x] Cancel search | Manufacturer: SKODA, Model Year: 2009, Model line: SUPERB, Model: SKODA SUPERB 2009Pages: 252, PDF Size: 16.33 MB
Page 64 of 252
Acoustic signalsRead and observe
and on page 59 first.
The acoustic signals serve as a safety function and provide information about
the success of a performed action.
SignalsMeaning
Interrupted tone
Open (using the button on the remote control key
or the button C
» Fig. 43 on page 60 )
Automatic closing of the lid » page 59,
in section In-
troduction
1 continuous toneForce limiter3 rising tonesConfirmation of the storage of the lid position3 identical tonesfault
Adjusting/deleting the top lid position
Read and observe
and on page 59 first.
Adjusting
›
Stop the lid in the desired position (electrically or manually).
›
Press and hold the button
B
» Fig. 42 on page 59 for longer than 3 seconds.
Storing the new position is confirmed with an audible signal.
Delete
›
Carefully lift up the lid manually to the maximum opening position.
›
Press and hold the button
B
» Fig. 42 on page 59 for longer than 3 seconds.
An audible signal sounds and the height which was originally set is deleted
from the memory, while the basic position of the top lid position is again set.
The top lid position is adjusted, for example, in the following situations.
› When the space for opening the lid is limited (e.g. garage height).
› For a more convenient operation, such as by a person's height.
The top position which is reached when the lid opens automatically, is always
lower than the maximum top position which can be reached when the lid is
opened manually.
The lid always opens to the height which was last stored.
Malfunctions
Read and observe
and on page 59 first.
If the battery is disconnected and reconnected while the lid is open, it is nec-
essary to activate the system of the electric boot lid.
Activation means closing the lid by hand. Thus, the end position of the lid is stored under fully closed in secured lock.
Examples of operational malfunctions
Description of the malfunc-
tionPossible solutionsThe lid cannot be lifted out
of the lockEmergency unlocking of the lid » page 217The lid does not react to an
opening signalRemoving a possible obstacle (e.g. snow), re-
opening the lid » page 59
Press handle A
and pull the lid upwards
The lid remains in the top
positionManual closing of the lid
Electrical power windows
Introduction
This chapter contains information on the following subjects:
Opening/closing the window from the driver seat
62
Opening the windows in the front passenger door and in the rear doors
63
Force limit
63
Window convenience operation
63
Operational faults
64
61Unlocking and opening
Page 67 of 252

Opening›Press and hold the symbol button on the remote control key.›
Hold the key in the driver's lock in the unlock position.
›
Press and hold the upper part of the central locking button in the driver's
door » page 55 .
›
Hold button
A
» Fig. 44 on page 62 in the opening position.
Closing
›
Press and hold the symbol button
on the remote control key.
›
Hold the key in the driver's lock in the lock position.
›
Press and hold the lower part of the central locking button » page 55 in the
driver's door.
›
Hold button
A
» Fig. 44 on page 62 in the closing position.
›
In the KESSY system, hold a finger on the sensor
B
» Fig. 34 on page 53 .
The speed limit for winter tyres can be set in the MAXI DOT display in the
menu item Window op. . » page 47 .
The prerequisite for ensuring that the convenience operating feature correctly
is the automatic opening/closing of all windows is operational.
Convenience opening or closing the window using the key in the driver's lock
is only possible within 45 seconds after locking the vehicle.
The movement of the window is stopped immediately when the key or the re-
spective button is released.
Operational faults
Read and observe
and on page 62 first.
The automatic power windows do not work if the vehicle battery has been dis-
connected and connected again while a window was open. The system must
be activated.
Activation sequence:
›
Switch on the ignition.
›
Pull the top edge of the button and close the window.
›
Release the button.
›
Drag and drop the button upwards again and hold for about 1 s.
Electric sliding/tilting roof
Introduction
This chapter contains information on the following subjects:
Operation
64
Convenience operation of sliding / tilting roof
65
Electric sliding/tilting roof with solar cells
65
The electric sliding/tilting roof (abbreviated in the following as 'sliding/tilting
roof') can only be operated when the ignition is turned on and when the out-
door temperature is higher than -20 °C.
The sliding/tilting roof can still be operated for approx. 10 minutes after
switching the ignition off. However, as soon as the driver or front passenger's
door is opened it is no longer possible to operate the sliding/tilting roof.
CAUTION
■ Always close the sliding/tilting roof before disconnecting the battery.■If the battery has been disconnected and reconnected, it is possible that the
sliding/tilting roof does not operate correctly. In this case, turn the rotary
switch to the switch position A
» Fig. 46 on page 64 and push forward for
about 10 seconds.
Operation
Fig. 46
Control dial for the sliding/tilting
roof
Read and observe on page 64 first.
Comfort position
›
Turn the switch to position
C
» Fig. 46 .
When the sliding/tilting roof is in the comfort position, the intensity of the
wind noise is reduced.
64Operation
Page 68 of 252

Open partially›Simply turn the knob to a point between A and C.
Open fully
›
Turn the switch to position
B
and hold it in this position (spring-tensioned
position).
Tilting roof
›
Turn the switch to position
D
.
Closing
›
Turn the switch to position
A
.
Sun screen
The sun screen is also opened automatically when the tilt/slide sunroof slides
open. When the tilt/slide sunroof is closed the sun screen can be manually op-
erated »
.
Force limiter
The sliding/tilting roof is fitted with a force limiter. If an obstacle (e.g. ice) pre-
vents closing, the sliding/tilting roof stops and opens completely. The sliding/
tilting roof can be closed completely without the force limiter by pushing the
switch in position
A
» Fig. 46 forwards until the sliding/tilting roof is com-
pletely closed.
WARNINGWhen operating the tilt/slide sunroof and the sunshade, proceed with cau-
tion to avoid causing crushing injuries – risk of injury!
CAUTION
During the winter it may be necessary to remove any ice and snow in the vicin-
ity of the sliding/tilting roof before opening it to prevent any damage to the
opening mechanism.
Convenience operation of sliding / tilting roof
Read and observe
on page 64 first.
The sliding/tilting roof can be operated by locking/unlocking using the key or
using the KESSY system with the aid of the sensor
B
» Fig. 34 on page 53 .
›
Press and hold the symbol button
on the remote control key.
›
In the KESSY system, hold a finger on the sensor
B
» Fig. 34 on page 53 .
By releasing the lock or lifting your finger off the sensor B when using the
KESSY system, the closing process is immediately interrupted.WARNINGClose the sliding/tilting roof carefully – risk of injury. The force limiter does
not operate with the convenience closing.
Electric sliding/tilting roof with solar cells
Read and observe
on page 64 first.
If there is sufficient bright sunlight, the solar cells in the sliding/tilting roof de-liver the electrical power for the fresh air blower. Further informa-
tion » page 115 , Climatronic (automatic air conditioning system) .
The operation of the sliding/tilting roof with solar cells is the same as of a nor-
mal sliding/tilting roof.
Panoramic sliding/tilting roof (Superb Estate)
Introduction
This chapter contains information on the following subjects:
Operation
66
Opening/closing the sun screen
66
Convenience operation of sliding / tilting roof
67
The panoramic sliding/tilting roof (abbreviated in the following as 'sliding/tilt-
ing roof') can only be operated when the ignition is turned on and when the
outdoor temperature is higher than -20 °C.
The sliding/tilting roof can still be operated for approx. 10 minutes after
switching the ignition off. However, as soon as the driver or front passenger's
door is opened it is no longer possible to operate the sliding/tilting roof.
CAUTION
■ Always close the sliding/tilting roof before disconnecting the battery.■If, for example, the battery has been disconnected and reconnected, it is pos-
sible that the sliding/tilting roof does not operate correctly. Next, move the ro-
tary switch into position A
» Fig. 47 on page 66 , pull the recess firmly
65Unlocking and opening
Page 70 of 252
WARNINGWhen operating the sunshade, proceed with caution to avoid causing
crushing injuries – risk of injury!
Convenience operation of sliding / tilting roof
Read and observe
on page 65 first.
The sliding / tilting roof can be operated by locking or unlocking using the keyor using the KESSY system with the aid of the sensor
A
or
B
» Fig. 34 on
page 53 .
Closing
›
Press and hold the symbol button on the key or hold the key in the locking
cylinder of the driver's door in the lock position, or for the KESSY system,
keep your finger on the sensor
B
» Fig. 34 on page 53 » .
By releasing the lock or lifting your finger off the sensor
B
when using the
KESSY system, the closing process is immediately interrupted.
Tilting roof
›
Press and hold the symbol button on the remote control key.
WARNINGClose the sliding/tilting roof carefully – risk of injury. The force limiter does
not operate with the convenience closing.Lights and visibility
Lights
Introduction
This chapter contains information on the following subjects:
Operating the lights and the instrument illumination
68
Daylight running lights (DAY LIGHT)
69
Turn signal and main beam
69
Automatic driving lamp control
70
Adaptive headlights (AHL)
70
Fog lights
71
Fog lights with the CORNER function
71
Rear fog light
71
COMING HOME / LEAVING HOME
72
Hazard warning light system
72
Parking lights
73
Unless otherwise stated, the lights only work when the ignition is on.
The arrangement of the controls right-hand drive models may differ from the layout shown in » Fig. 49 on page 68 . The symbols which mark the positions
of the controls are identical.
Keep the headlights lenses clean. The following guidelines must be ob-
served » page 179 , Headlight lenses .
WARNING■
The activation of the lights should only be undertaken in accordance with
national legal requirements.■
The driver is always responsible for the correct settings and use of the
lights.
67Lights and visibility
Page 71 of 252
WARNING (Continued)■The automatic driving lamp control only operates as a support and
does not release the driver from his responsibility to check the lights and, if
necessary, to switch on the light depending on the prevailing light condi-
tions. The light sensor cannot, for example, detect rain or snow. Under
these conditions we recommend switching on the low beam or fog lights!■
Never drive with only the side lights on! The side lights are not bright
enough to light up the road sufficiently in front of you or to be seen by oth-
er oncoming traffic. Therefore always switch on the low beam when it is
dark or if visibility is poor.
Note
The headlights may mist up temporarily. When the driving lights are switched
on, the light outlet areas are free from condensation after a short time, al-
though the headlight lenses may still be misted up around the edge. This mist
has no influence on the life of the lighting system.
Operating the lights and the instrument illumination
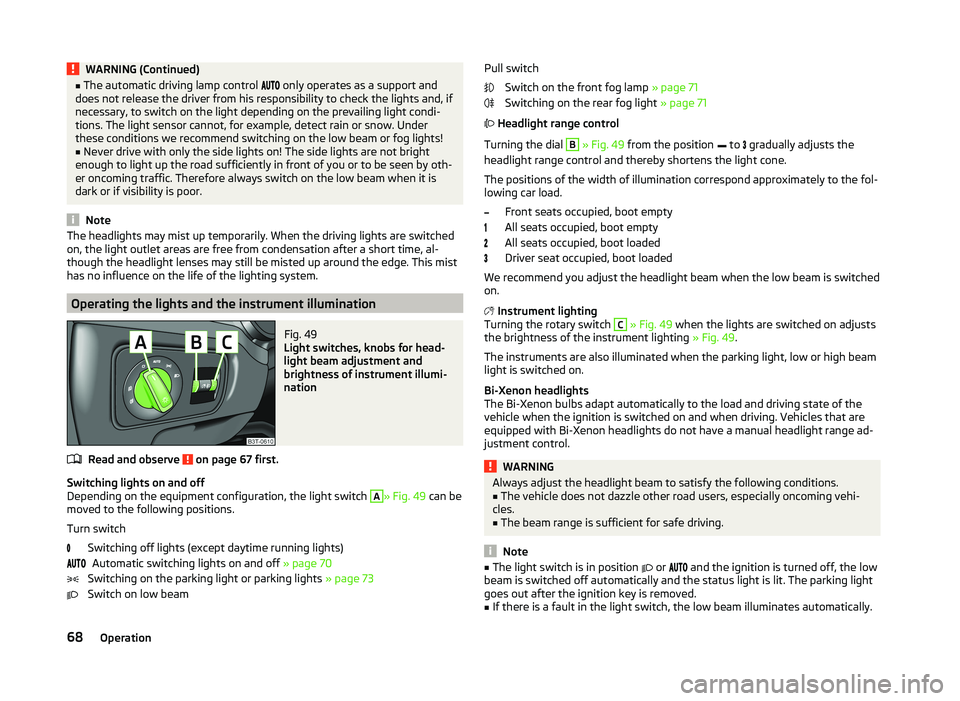
Fig. 49
Light switches, knobs for head-
light beam adjustment and
brightness of instrument illumi-
nation
Read and observe on page 67 first.
Switching lights on and off
Depending on the equipment configuration, the light switch
A
» Fig. 49 can be
moved to the following positions.
Turn switch Switching off lights (except daytime running lights)Automatic switching lights on and off » page 70
Switching on the parking light or parking lights » page 73
Switch on low beam
Pull switch
Switch on the front fog lamp » page 71
Switching on the rear fog light » page 71
Headlight range control
Turning the dial B
» Fig. 49 from the position
to
gradually adjusts the
headlight range control and thereby shortens the light cone.
The positions of the width of illumination correspond approximately to the fol-
lowing car load.
Front seats occupied, boot empty
All seats occupied, boot empty
All seats occupied, boot loaded
Driver seat occupied, boot loaded
We recommend you adjust the headlight beam when the low beam is switched
on.
Instrument lighting
Turning the rotary switch
C
» Fig. 49 when the lights are switched on adjusts
the brightness of the instrument lighting » Fig. 49.
The instruments are also illuminated when the parking light, low or high beam light is switched on.
Bi-Xenon headlights
The Bi-Xenon bulbs adapt automatically to the load and driving state of the vehicle when the ignition is switched on and when driving. Vehicles that are
equipped with Bi-Xenon headlights do not have a manual headlight range ad-
justment control.
WARNINGAlways adjust the headlight beam to satisfy the following conditions.■The vehicle does not dazzle other road users, especially oncoming vehi-
cles.■
The beam range is sufficient for safe driving.
Note
■ The light switch is in position or and the ignition is turned off, the low
beam is switched off automatically and the status light is lit. The parking light
goes out after the ignition key is removed.■
If there is a fault in the light switch, the low beam illuminates automatically.
68Operation
Page 76 of 252
WARNINGSwitch on the hazard warning light system if, for example, the following oc-
curs.■
You encounter a traffic jam.
■
The vehicle has broken down.
Parking lights
Read and observe
on page 67 first.
The parking light is designed for temporary lighting of the parked vehicle.
Switching on the parking light
›
Switch off the ignition.
›
Place the control lever into position
A
or
B
as far as it can go » Fig. 50 on
page 69 - the parking light on the right/left-hand side of the vehicle is
switched on.
If the right or left turn signal light has been switched on and the ignition is
switched off, the parking light is not automatically switched on.
Switching on the side lights on both sides
›
Switch off the ignition.
›
Turn the light switch
A
to position
» Fig. 49 on page 68 and lock the ve-
hicle.
After pulling out the ignition key and opening the driver's door, an audible
warning sounds. After a few seconds or after closing the driver's door, the au-
dible alarm is turned off, but the parking lights will remain switched on.
CAUTION
Turning on the parking light means the battery is heavily loaded, especially
over short distances.
Interior lights
Introduction
This chapter contains information on the following subjects:
Front interior light
73
Rear interior light - Variant 1
74
Rear interior light - Variant 2
74Front door warning light74Entry lighting75
Note
With the ignition off, the light turns off automatically after about 10 minutes.
Front interior light
Fig. 54
Operation of the front interior light: Version 1/version 2
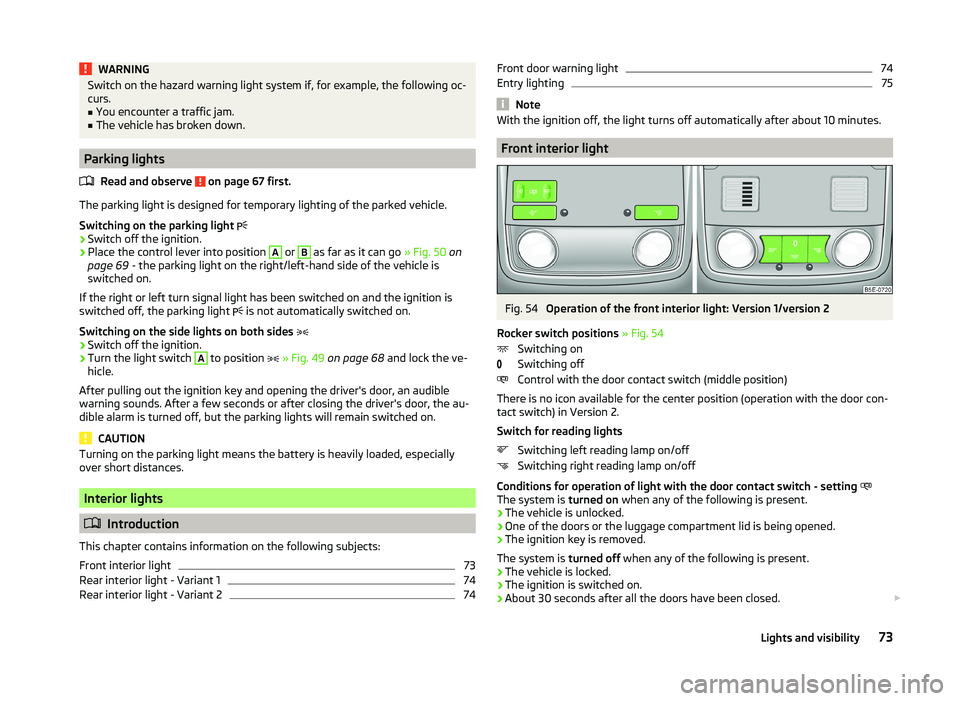
Rocker switch positions » Fig. 54
Switching on
Switching off
Control with the door contact switch (middle position)
There is no icon available for the center position (operation with the door con-
tact switch) in Version 2.
Switch for reading lights Switching left reading lamp on/off
Switching right reading lamp on/off
Conditions for operation of light with the door contact switch - setting
The system is turned on when any of the following is present.
› The vehicle is unlocked.
› One of the doors or the luggage compartment lid is being opened.
› The ignition key is removed.
The system is turned off when any of the following is present.
› The vehicle is locked.
› The ignition is switched on.
› About 30 seconds after all the doors have been closed.
73Lights and visibility
Page 83 of 252
When the interior lights are switched on or the reverse gear is engaged, the
mirror always moves back into the basic position (not dimmed).
Do not attach external navigation devices on to the windscreen or in the vicini-
ty of the automatic dimming interior mirror »
.
WARNINGThe illuminated display of an external navigation unit can lead to opera-
tional faults to the automatic dimming interior mirror – risk of accident.
CAUTION
Automatic mirror dimming operates only properly if the light striking the sen-
sors is not affected by other objects.
Note
If the automatic interior mirror dimming is switched off, the exterior mirror
dimming is also switched off.
Exterior mirrors
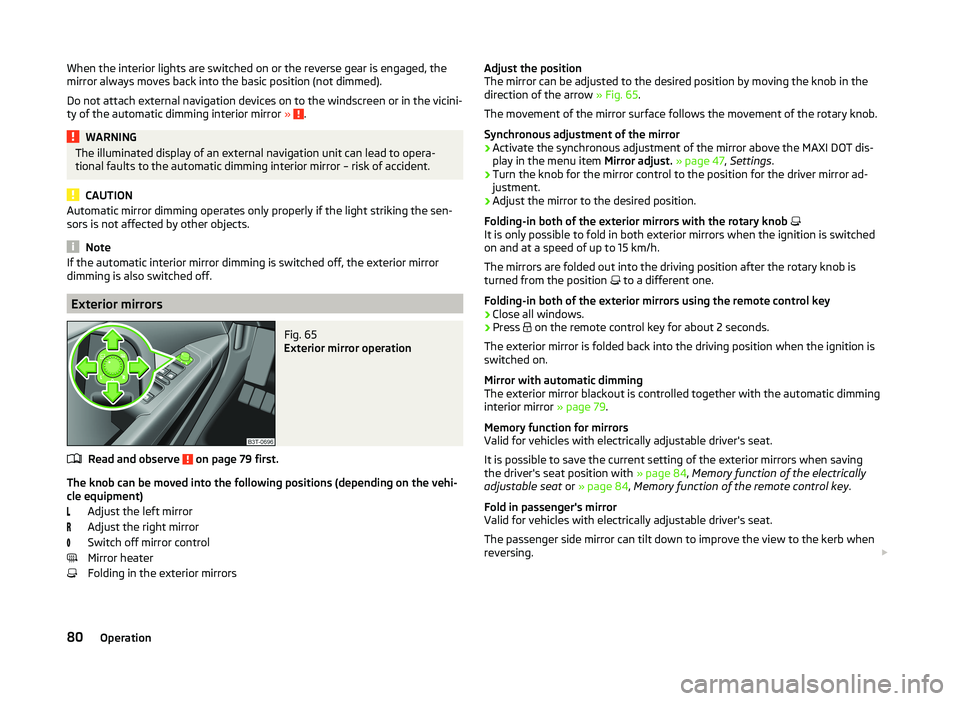
Fig. 65
Exterior mirror operation
Read and observe on page 79 first.
The knob can be moved into the following positions (depending on the vehi-
cle equipment)
Adjust the left mirror
Adjust the right mirror
Switch off mirror control
Mirror heater
Folding in the exterior mirrors
Adjust the position
The mirror can be adjusted to the desired position by moving the knob in the
direction of the arrow » Fig. 65.
The movement of the mirror surface follows the movement of the rotary knob.
Synchronous adjustment of the mirror›
Activate the synchronous adjustment of the mirror above the MAXI DOT dis- play in the menu item Mirror adjust. » page 47 , Settings .
›
Turn the knob for the mirror control to the position for the driver mirror ad-
justment.
›
Adjust the mirror to the desired position.
Folding-in both of the exterior mirrors with the rotary knob
It is only possible to fold in both exterior mirrors when the ignition is switched
on and at a speed of up to 15 km/h.
The mirrors are folded out into the driving position after the rotary knob is
turned from the position to a different one.
Folding-in both of the exterior mirrors using the remote control key
›
Close all windows.
›
Press on the remote control key for about 2 seconds.
The exterior mirror is folded back into the driving position when the ignition is
switched on.
Mirror with automatic dimming
The exterior mirror blackout is controlled together with the automatic dimming
interior mirror » page 79.
Memory function for mirrors
Valid for vehicles with electrically adjustable driver's seat.
It is possible to save the current setting of the exterior mirrors when saving
the driver's seat position with » page 84, Memory function of the electrically
adjustable seat or » page 84 , Memory function of the remote control key .
Fold in passenger's mirror
Valid for vehicles with electrically adjustable driver's seat.
The passenger side mirror can tilt down to improve the view to the kerb when
reversing.
80Operation
Page 84 of 252
The mirror will be folded automatically if the following conditions are met.The function is activated via the MAXI DOT display in the menu item Mirror
down » page 47 , Settings .
The knob for the mirror control is in the position for the passenger mirror
adjustment.
The reverse gear is engaged.
The mirror setting was previously stored » page 84, Memory function of
the electrically adjustable seat or » page 84 , Memory function of the re-
mote control key .WARNINGDo not touch the exterior mirror surfaces if the exterior mirror heater is
switched on - risk of burns.
CAUTION
■ The exterior mirrors with fold in function never mechanically fold by hand -
there is a risk of damaging the electric mirror actuator!■
When the mirror is swung by external influences (due to impact during ma-
noeuvring, for example), then first fold-in the mirror by turning the knob and
wait for a loud clapping noise.
Note
■ The mirror heater only operates when the engine is running and up to an
outside temperature of +35 ℃.■
If the electrical mirror setting fails at any time, the mirrors can be adjusted by
hand by pressing on the edge of the mirror surface.
Seats and practical features
Adjusting the seats
Introduction
This chapter contains information on the following subjects:
Manually adjusting the front seats
82
Electric front seat adjustment
82
Head restraints
83
Memory function of the electrically adjustable seat
84
Memory function of the remote control key
84
The driver's seat should be adjusted in such a way that the pedals can be fully
pressed to the floor with slightly bent legs.
The seat backrest on the driver's seat should be adjusted in such a way that the upper point of the steering wheel can be easily reached with slightly bent
arms.
Correct adjustment of the seats is particularly important for the following rea-
sons.
› Reaching the controls safely and quickly.
› A relaxed and fatigue-free body position.
› Achieving the maximum protection offered by the seat belts and the airbag
system.
WARNING■ Only adjust the driver's seat when the vehicle is stationary – risk of acci-
dent!■
Caution when adjusting the seat! You may suffer injuries or bruises as a
result of adjusting the seat without paying proper attention.
■
The electric front seat adjustment is also functional when the ignition is
turned off (even with the ignition key removed). Therefore, when leaving
the vehicle, never leave people who are not completely independent, such
as children, unattended in the vehicle - there is a danger of injury!
■
Never carry more people than the number of seats in the vehicle.
■
Do not carry any objects on the front passenger seat except objects de-
signed for this purpose (e.g. child seat) – risk of accident!
81Seats and practical features
Page 85 of 252
Note■After a certain time, play can develop within the adjustment mechanism of
the backrest angle.■
For safety reasons, it is not possible to store the seat position in the electric
seat memory and remote control key memory if the inclination angle of the
seat backrest is more than 102° in relation to the seat cushion.
■
Each time you store the position of the electrically adjustable driver's seat
and exterior mirrors, the existing settings are deleted.
Manually adjusting the front seats
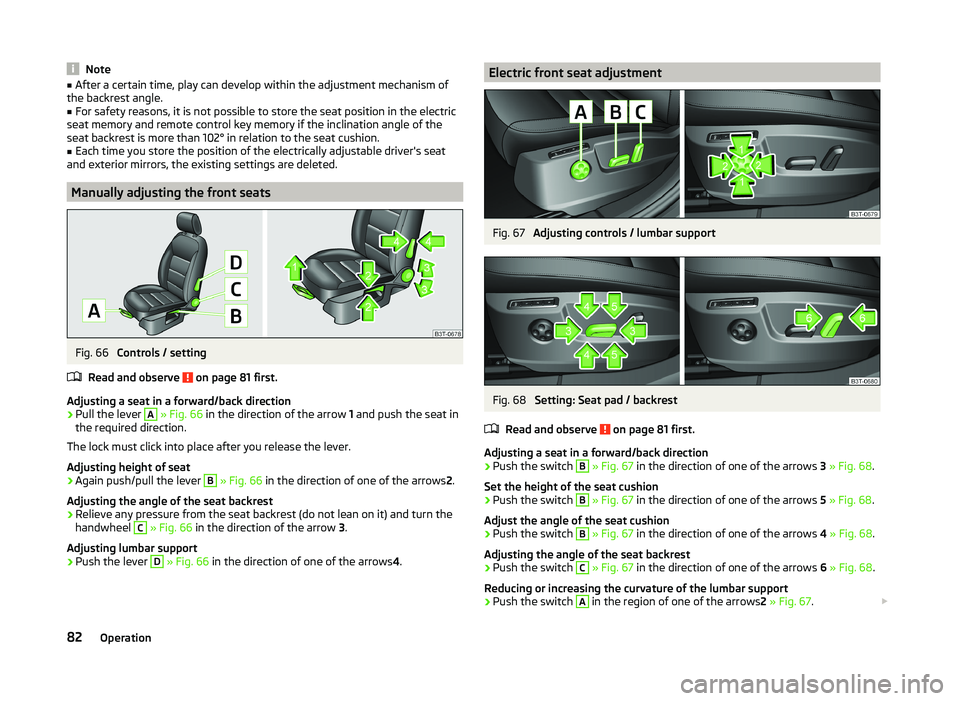
Fig. 66
Controls / setting
Read and observe
on page 81 first.
Adjusting a seat in a forward/back direction
›
Pull the lever
A
» Fig. 66 in the direction of the arrow 1 and push the seat in
the required direction.
The lock must click into place after you release the lever.
Adjusting height of seat
›
Again push/pull the lever
B
» Fig. 66 in the direction of one of the arrows 2.
Adjusting the angle of the seat backrest
›
Relieve any pressure from the seat backrest (do not lean on it) and turn the
handwheel
C
» Fig. 66 in the direction of the arrow 3.
Adjusting lumbar support
›
Push the lever
D
» Fig. 66 in the direction of one of the arrows 4.
Electric front seat adjustmentFig. 67
Adjusting controls / lumbar support
Fig. 68
Setting: Seat pad / backrest
Read and observe
on page 81 first.
Adjusting a seat in a forward/back direction
›
Push the switch
B
» Fig. 67 in the direction of one of the arrows 3 » Fig. 68 .
Set the height of the seat cushion
›
Push the switch
B
» Fig. 67 in the direction of one of the arrows 5 » Fig. 68 .
Adjust the angle of the seat cushion
›
Push the switch
B
» Fig. 67 in the direction of one of the arrows 4 » Fig. 68 .
Adjusting the angle of the seat backrest
›
Push the switch
C
» Fig. 67 in the direction of one of the arrows 6 » Fig. 68 .
Reducing or increasing the curvature of the lumbar support
›
Push the switch
A
in the region of one of the arrows 2 » Fig. 67 .
82Operation
Page 86 of 252
Raising or lowering the curvature of the lumbar support›Push the switch A in the region of one of the arrows1 » Fig. 67 .
The adjusted driver's seat position can be set in the memory of the
seat » page 84 or the remote control key » page 84.
Note
If the setting procedure is interrupted, you will need to press the button again.
Head restraints
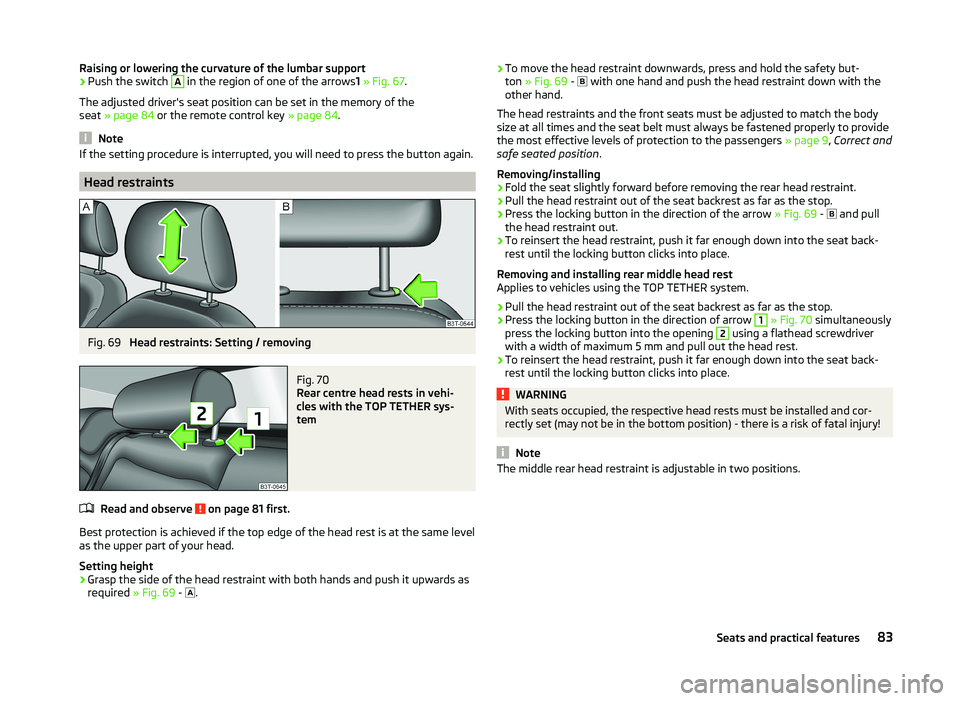
Fig. 69
Head restraints: Setting / removing
Fig. 70
Rear centre head rests in vehi-
cles with the TOP TETHER sys-
tem
Read and observe on page 81 first.
Best protection is achieved if the top edge of the head rest is at the same level
as the upper part of your head.
Setting height
›
Grasp the side of the head restraint with both hands and push it upwards as
required » Fig. 69 -
.
›To move the head restraint downwards, press and hold the safety but-
ton » Fig. 69 - with one hand and push the head restraint down with the
other hand.
The head restraints and the front seats must be adjusted to match the body
size at all times and the seat belt must always be fastened properly to provide
the most effective levels of protection to the passengers » page 9, Correct and
safe seated position .
Removing/installing›
Fold the seat slightly forward before removing the rear head restraint.
›
Pull the head restraint out of the seat backrest as far as the stop.
›
Press the locking button in the direction of the arrow » Fig. 69 -
and pull
the head restraint out.
›
To reinsert the head restraint, push it far enough down into the seat back-
rest until the locking button clicks into place.
Removing and installing rear middle head rest
Applies to vehicles using the TOP TETHER system.
›
Pull the head restraint out of the seat backrest as far as the stop.
›
Press the locking button in the direction of arrow
1
» Fig. 70 simultaneously
press the locking button into the opening
2
using a flathead screwdriver
with a width of maximum 5 mm and pull out the head rest.
›
To reinsert the head restraint, push it far enough down into the seat back-
rest until the locking button clicks into place.
WARNINGWith seats occupied, the respective head rests must be installed and cor-
rectly set (may not be in the bottom position) - there is a risk of fatal injury!
Note
The middle rear head restraint is adjustable in two positions.83Seats and practical features