Boot SKODA SUPERB 2010 2.G / (B6/3T) Owner's Manual
[x] Cancel search | Manufacturer: SKODA, Model Year: 2010, Model line: SUPERB, Model: SKODA SUPERB 2010 2.G / (B6/3T)Pages: 287, PDF Size: 16.59 MB
Page 11 of 287
The brief instruction
10
The brief instructionBasic functions and im portant informationIntroduction
The chapter of the brief instruction is only used as a quick reference of
the most important operating elements of the vehicle. It is necessary to
observe all the information which is contained in the following chapters
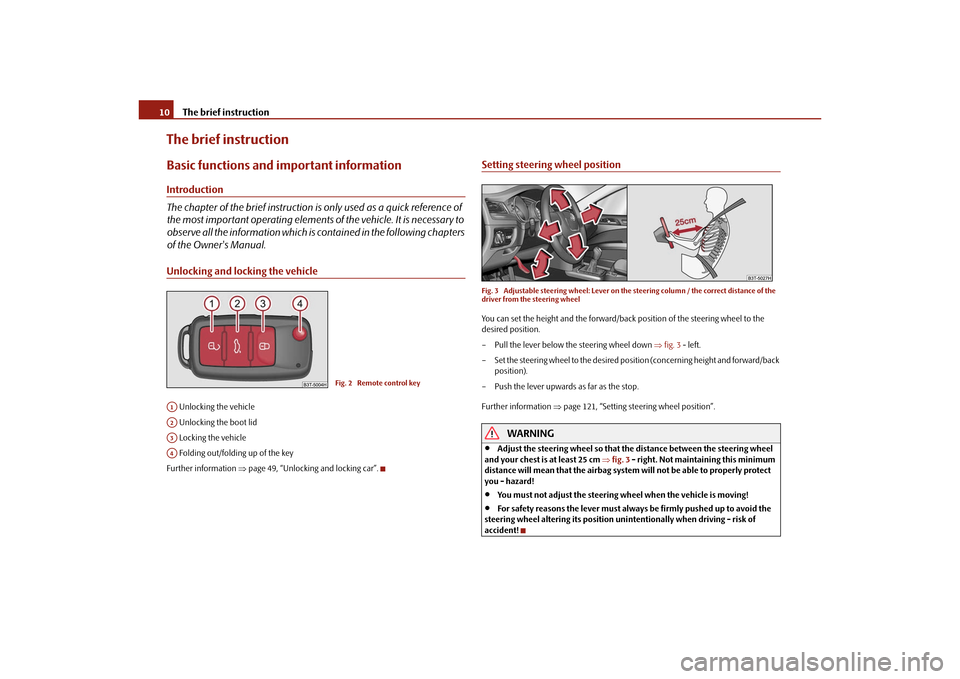
of the Owner's Manual.Unlocking and locking the vehicle Unlocking the vehicle
Unlocking the boot lid
Locking the vehicle
Folding out/folding up of the key
Further information page 49, “Unlocking and locking car”.
Setting steering wheel positionFig. 3 Adjustable steering wheel: Lever on the steering column / the correct distance of the
driver from the steering wheelYou can set the height and the forward/back position of the steering wheel to the
desired position.
– Pull the lever below the steering wheel down fig. 3 - left.
– Set the steering wheel to the desired posi tion (concerning height and forward/back
position).
– Push the lever upwards as far as the stop.
Further information page 121, “Setting steering wheel position”.
WARNING
Adjust the steering wheel so that the distance between the steering wheel
and your chest is at least 25 cm fig. 3 - right. Not maintaining this minimum
distance will mean that the airbag system will not be able to properly protect
you - hazard!
You must not adjust the steering wheel when the vehicle is moving!
For safety reasons the lever must always be firmly pushed up to avoid the
steering wheel altering its position uni ntentionally when driving - risk of
accident!
Fig. 2 Remote control key
A1A2A3A4s3fg.2.book Page 10 Friday, April 30, 2010 12:17 PM
Page 26 of 287
Instruments and warning lights25
Using the system
Safety
Driving Tips
General Maintenance
Breakdown assistance
Technical Data
– Investigate the function indicated.
– Obtain professional assistance.
Meaning of the red symbols:
Three
successive warning signals will sound if a red symbol appears.
Yellow symbols
A yellow symbol signals a warning.Check the relevant function as soon as possible.
The meaning of the yellow symbols:
One warning signal will sound if a yellow symbol appears.
If several operational faults of priority 2 exist, the symbols appear one after the other
and are each illuminated for about 5 seconds.SetupYou can change certain setti ngs by means of the information display. The current
setting is shown on the information display in the respective menu at the top below the
line.
You can select the following information (d epending on the equipment installed on
the vehicle):
Language
Autom. blind
MFD Data
Convenience
Lights & Vision
Time
Winter tyres
Units
Assistants
Alt. speed dis.
Service Interval (Service)
Factory Setting
Back
After selecting the menu point Back you will reach one level higher in the menu.
Language
Here you can set in which language the warning and information texts should be
displayed.
Automatic blind* (Combi)
Here you can deactivate/activate the automatic roll-up function of the luggage
compartment roll cover when opening the boot lid.
Displays of the MFA
Here you can switch off or on certain displays of the multi-functional indicator.
Comfort*
You can set the following f unctions (depending on the equipment installed on the
vehicle):
Engine oil pressure too low
page 31
Overheated clutches of the automatic gear-
box DSG*
page 36
Check engine oil level,
engine oil sensor faulty
page 31
Brake pad worn
page 35
s3fg.2.book Page 25 Friday, April 30, 2010 12:17 PM
Page 29 of 287
Instruments and warning lights
28
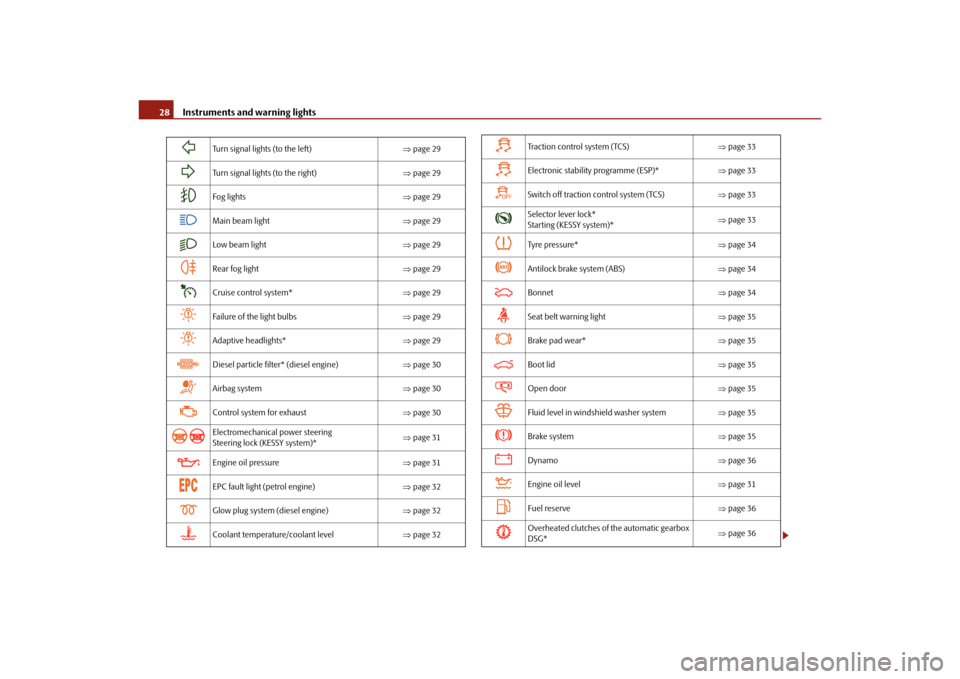
Turn signal lights (to the left) page 29
Turn signal lights (to the right) page 29
Fog lights page 29
Main beam light page 29
Low beam light page 29
Rear fog light page 29
Cruise control system* page 29
Failure of the light bulbs page 29
Adaptive headlights* page 29
Diesel particle filter* (diesel engine) page 30
Airbag system page 30
Control system for exhaust page 30
Electromechanical power steering
Steering lock (KESSY system)*
page 31
Engine oil pressure page 31
EPC fault light (petrol engine) page 32
Glow plug system (diesel engine) page 32
Coolant temperature/coolant level page 32
Tra c t i o n c o n t r o l s y s t e m ( TC S ) page 33
Electronic stability programme (ESP)* page 33
Switch off traction control system (TCS) page 33
Selector lever lock*
Starting (KESSY system)*
page 33
Tyre pressure* page 34
Antilock brake system (ABS) page 34
Bonnet page 34
Seat belt warning light page 35
Brake pad wear* page 35
Boot lid page 35
Open door page 35
Fluid level in windshield washer system page 35
Brake system page 35
Dynamo page 36
Engine oil level page 31
Fuel reserve page 36
Overheated clutches of the automatic gearbox
DSG*
page 36
s3fg.2.book Page 28 Friday, April 30, 2010 12:17 PM
Page 36 of 287
Instruments and warning lights35
Using the system
Safety
Driving Tips
General Maintenance
Breakdown assistance
Technical Data
On vehicles with information display* this
warning light is replaced by a vehicle
symbol.
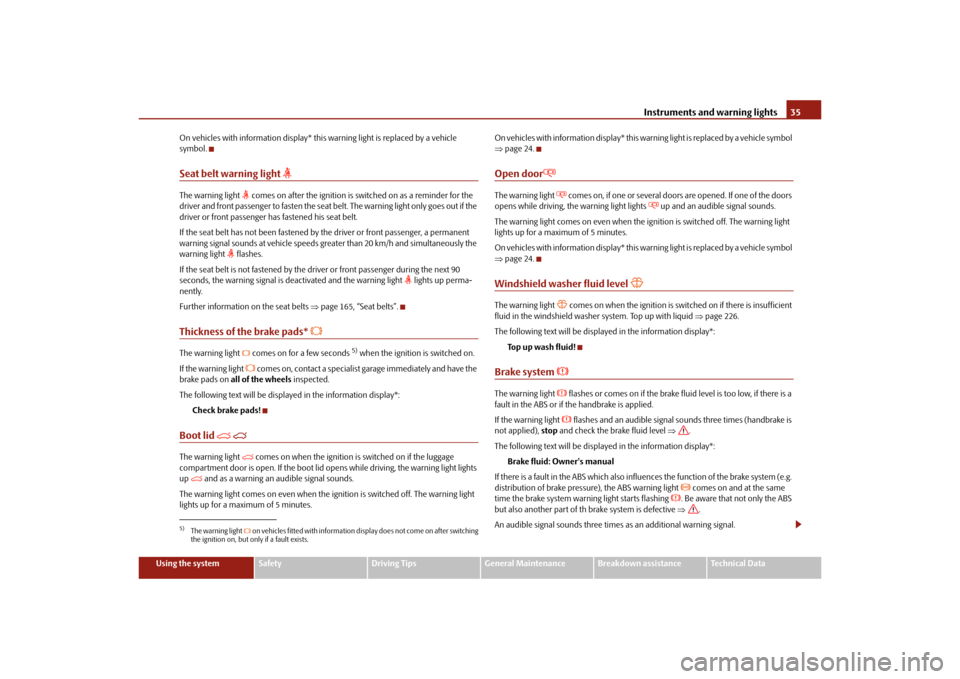
Seat belt warning light
The warning light
comes on after the ignition is sw itched on as a reminder for the
driver and front passenger to fasten the seat belt. The warning light only goes out if the
driver or front passenger has fastened his seat belt.
If the seat belt has not been fastened by the driver or front passenger, a permanent
warning signal sounds at vehicle speeds gr eater than 20 km/h and simultaneously the
warning light
flashes.
If the seat belt is not fastened by the dr iver or front passenger during the next 90
seconds, the warning signal is deactivated and the warning light
lights up perma-
nently.
Further information on the seat belts page 165, “Seat belts”.
Thickness of the brake pads*
The warning light comes on for a few seconds
5) when the ignition is switched on.
If the warning light
comes on, contact a specialist garage immediately and have the
brake pads on all of the wheels inspected.
The following text will be displayed in the information display*: Check brake pads!
Boot lid
The warning light
comes on when the ignition is switched on if the luggage
compartment door is open. If the boot lid op ens while driving, the warning light lights
up
and as a warning an audible signal sounds.
The warning light comes on even when the ig nition is switched off. The warning light
lights up for a maximum of 5 minutes. O n v e h i c l e s w i t h i n f o r m a t i o n d i s p l a y * t h i s w a
rning light is replaced by a vehicle symbol
page 24.
Open door
The warning light
comes on, if one or several doors are opened. If one of the doors
opens while driving, th e warning light lights
up and an audible signal sounds.
The warning light comes on even when the ig nition is switched off. The warning light
lights up for a maximum of 5 minutes.
O n v e h i c l e s w i t h i n f o r m a t i o n d i s p l a y * t h i s w a rning light is replaced by a vehicle symbol
page 24.
Windshield washer fluid level
The warning light
comes on when the ignition is swit ched on if there is insufficient
fluid in the windshield washer system. Top up with liquid page 226.
The following text will be displayed in the information display*: To p u p w a s h f l u i d !
Brake system
The warning light
flashes or comes on if the brake fluid level is too low, if there is a
fault in the ABS or if the handbrake is applied.
If the warning light flashes and an audible signal so unds three times (handbrake is
not applied), stop and check the brake fluid level .
The following text will be displayed in the information display*: Brake fluid: Owner's manual
If there is a fault in the ABS which also infl uences the function of the brake system (e.g.
distribution of brake pressure), the ABS warning light
comes on and at the same
time the brake system warn ing light starts flashing
. Be aware that not only the ABS
but also another part of th brake system is defective .
An audible signal sounds three times as an additional warning signal.
5)The warning light on vehicles fitted with information display does not come on after switching
the ignition on, but only if a fault exists.
s3fg.2.book Page 35 Friday, April 30, 2010 12:17 PM
Page 39 of 287

Unlocking and locking
38For the sake of the environment
Dispose of a used battery in accord ance with environmental regulations.
Note
Pay attention to the correct polarity when changing the battery.
The replacement battery must have the same specification as the original battery.
If it is still not be possible to unlock or lock the vehicle with the remote control key
even after replacing the battery, this means that the system has to be synchronised
page 50.
Electronic immobiliserThe electronic immobiliser prevents the vehicle being operated by an
unauthorised person.An electronic chip is integrated in the head of the key. The immobiliser is deactivated
with the aid of this chip when the key is in serted in the ignition lock. The electronic
immobiliser is automatically activated when you withdraw the ignition key from the
lock.
Note
It is only possible to start the engine of your car with a Genuine Škoda key with the
matching code.
Child safety lockThe child safety lock prevents the re ar door from being opened from the
inside.The rear doors are equipped with a child safe ty lock. You can switch the child safety
lock on and off using the vehicle key.Switching child safety lock on– Use the vehicle key to turn the slit in the rear door to the left in the direction of the
arrow fig. 25 .Switching child safety lock off– Use the vehicle key to turn the slit to the right against the direction of the arrow.
So long as the child safety lock is switched on it is not possible to open the door from
the inside with the door opening lever. In this case the door can be opened only from
the outside.Central locking systemDescriptionUnlocking or locking the vehicle causes all the doors and the fuel filler flap to be
unlocked or locked at the same time by th e central locking system. The boot lid is
Fig. 25 Child safety locks on the rear
doors
s3fg.2.book Page 38 Friday, April 30, 2010 12:17 PM
Page 40 of 287
Unlocking and locking39
Using the system
Safety
Driving Tips
General Maintenance
Breakdown assistance
Technical Data
unlocked when opening. Afterwards you can open the boot lid by pressing the handle
on the lower edge of the boot lid
page 44.
Operation of the central locking system is possible:
with a remote control key page 49,
using the buttons for the central locking system page 42,
from the outside using the vehicle key page 43, “Emergency unlocking and
locking of the driver's door”.
Indicator light in the driver's door
After locking the vehicle the indicator light fl ashes for 2 seconds fast, then more slowly.
If the vehicle is locked and the safe securing system page 42 is not operating, the
indicator light in the driver door flashes for about 2 seconds fast, goes out and starts to
flash slowly after about 30 seconds.
If the indicator light first of all flashes fast for about 2 seconds, afterwards lights up for
about 30 seconds without interruption and th en flashes slowly, there is a fault in the
system of the central locking or in the inte rior monitor and in the towing protection
monitoring* page 51. Visit a specialist garage to obtain assistance.
Convenience operatio n of the windows
One can open and close the windows when opening and closing the vehicle
page 54.
Opening a single door*
This function makes it possible to only unlock the driver's door. The other doors and
the fuel filler flap remain locked and ar e only unlocked after repetitive unlocking.
You can have the function opening a single door activated by an authorised Škoda
Service Partner on request or you can activate it yourself with the aid of the Informa-
tion display* page 25.
Unlocking a vehicle side door*
This selection function enables to unlock both doors on the driver's side. The other
doors and the fuel filler flap remain locked and are only unlocked after repetitive
unlocking. You can have the function opening a single
door activated by an authorised Škoda
Service Partner on request or you can activate it yourself with the aid of the Informa-
tion display* page 25.
Unlocking the vehicle with the KESSY system*
This selection function enables to unlock all th e doors, individual doors, both doors on
the left and right vehicle side or to unlock the driver and front passenger door at the
same time. The other doors and the fuel fille r flap remain locked and are only unlocked
after repetitive unlocking using the unlock button on the remote control page 37,
fig. 23 or the button for the central locking system page 42, fig. 27 .
You can have the function opening a single door activated by an authorised Škoda
Service Partner on request or you can activate it yourself with the aid of the Informa-
tion display* page 25.
Automatic locking and unlocking*
All the doors and the boot lid are locked au tomatically once the car reaches a speed of
about 15 km/h.
If the ignition key is withdrawn, the car is then automatically unlocked again. In addi-
tion, it is possible for the driver or front pa ssenger to unlock the vehicle by pressing the
central locking button
page 42 or by pulling the door opening lever on one of the
front doors.
You can have the function of the automatic lo cking activated by a specialist garage on
request or you can also activate it yourself with the aid of the Information display*
page 25.
WARNING
Locking the doors prevents involuntary op ening in an exceptional situation (an
accident). Locked doors prevent unwanted entry into the vehicle from outside,
for example at road crossings. Locked do ors do, however, make it more difficult
for rescuers to get into the vehicle in an emergency - danger to life!
Note
In the event of an accident in which the airbags are deployed, the locked doors are
automatically unlocked in order to enable rescuers to gain access to the vehicle.
s3fg.2.book Page 39 Friday, April 30, 2010 12:17 PM
Page 41 of 287
Unlocking and locking
40
Only the driver's door can be unlocked or locked using the key if the central locking
system fails page 43, “Emergency unlocking and lo cking of the driver's door”. You
can lock or unlock manually the other doors and the boot lid.
Emergency locking of the door page 43.
Emergency unlocking of the boot lid page 48.
KESSY system* - DescriptionThe KESSY system (Keyless Entry Start Exit System) enables a comfort unlocking and
locking of the vehicle and a start-up without ac tively using the remote control key. It is
sufficient to carry the key with you, for example in your pocket, for unlocking and
locking the vehicle or for starting the engine.
The functions of the central locking system , the safe securing system* and the anti-
theft alarm system* correspond to vehicles without KESSY system. Only the control
elements are different.
Control elements of the system:
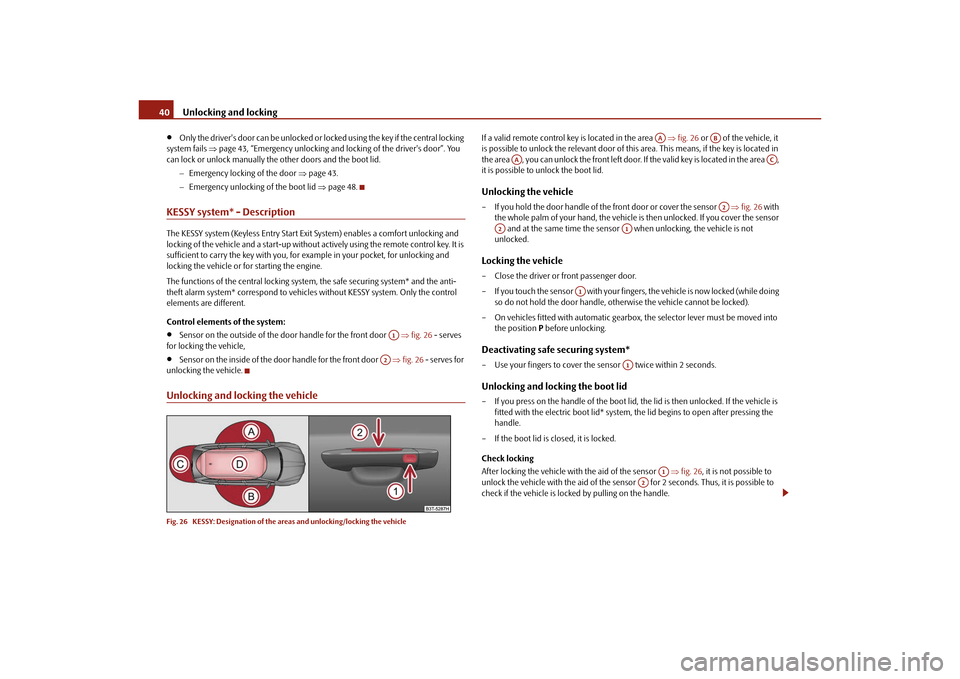
Sensor on the outside of the door handle for the front door fig. 26 - serves
for locking the vehicle,
Sensor on the inside of the d oor handle for the front door fig. 26 - serves for
unlocking the vehicle.
Unlocking and locking the vehicleFig. 26 KESSY: Designation of the areas and unlocking/locking the vehicle
If a valid remote control key is located in the area fig. 26 or of the vehicle, it
is possible to unlock the relevant door of this area. This means, if the key is located in
the area , you can unlock the front left door. If the valid key is located in the area ,
it is possible to unlock the boot lid.Unlocking the vehicle– If you hold the door handle of the front door or cover the sensor fig. 26 with
the whole palm of your hand, the vehicle is then unlocked. If you cover the sensor and at the same time the sensor when unlocking, the vehicle is not
unlocked.Locking the vehicle– Close the driver or front passenger door.
– If you touch the sensor with your finger s, the vehicle is now locked (while doing
so do not hold the door handle, othe rwise the vehicle cannot be locked).
– On vehicles fitted with automatic gearbox, the selector lever must be moved into
the position P before unlocking.Deactivating safe securing system*– Use your fingers to cover the sensor twice within 2 seconds.Unlocking and locking the boot lid– If you press on the handle of the boot lid, the lid is then unlocked. If the vehicle is
fitted with the electric boot lid* system, the lid begins to open after pressing the
handle.
– If the boot lid is closed, it is locked.
Check locking
After locking the vehicle with the aid of the sensor fig. 26 , it is not possible to
unlock the vehicle with the aid of the sensor for 2 seconds. Thus, it is possible to
check if the vehicle is locked by pulling on the handle.
A1
A2
AA
AB
AA
AC
A2
A2
A1
A1
A1
A1
A2
s3fg.2.book Page 40 Friday, April 30, 2010 12:17 PM
Page 42 of 287
Unlocking and locking41
Using the system
Safety
Driving Tips
General Maintenance
Breakdown assistance
Technical Data
Caution
After leaving the vehicle, it does not lock automatically, this is why you should pay
attention to the procedure for locking the vehicle page 40.
Note
If the vehicle battery or the battery in the remote control key is weak or discharged,
perhaps the vehicle cannot be unlocked or locked via KESSY. In such a case, use the
emergency unlocking or locking of the driver's door, see Owner's Manual.Further possibilites of lockingProtection against inadvertently locking the key in the vehicle
If the key, which was used to lock the vehicle, remains in the vehicle in the area
page 40, fig. 26 after locking and closing all of the doors including the boot lid, the
protection against inadvertently locking the key in the vehicle is activated and the
vehicle unlocks itself again.
You are informed about the activation of the protection against inadvertently locking
the key in the vehicle by the turn signal lights flashing and the message Key in vehicle
which appears in the information display* or Key in vehicle which appears in the
display of the instrument cluster. Additiona lly, on vehicles which are fitted with the
anti-theft alarm system*, an audible signal sounds.Messages in the instrument clusterA few warning and information texts of the KESSY system in the information display*
or in the display of the instrument cluster:
Key not found or No Key
This message is displayed when the engine is started and the system cannot detect a
valid key in the vehicle. This can occur if the key is outside the vehicle, the battery in the
key is discharged, the key is defective or the electromagnetic field is strongly disturbed.
This message is also displayed when the ignition is switched on or the engine is
running and the system cannot detect a valid key in the vehicle. Keyless defective or Check Keyless
There is a fault in the KESSY system, contact your specialist garage.
Renew key battery! or Key Battery
Low voltage is present in the battery of th
e remote control key, change the battery.
Parking the vehicleIf the vehicle is not unlocked within 60 hours, the sensors page 40, fig. 26 and
in the handle of the front passenger's d oor are automatically deactivated. For reac-
tivation, one of the following conditions must be met:
Unlocking the driver's door with the aid of the sensor page 40, fig. 26 ,
pressing the handle of the boot lid,
unlocking the vehicle using the button on the remote control key,
emergency unlocking of the driver 's door (see Owner's Manual).
If the vehicle is not unlocked within 90 hour s, the sensors and in the handle of
the driver's door are also automatically deactivated page 40, fig. 26. For reactiva-
tion, one of the following conditions must be met:
unlocking the vehicle using the button on the remote control key,
emergency unlocking of the driver 's door (see Owner's Manual).
Convenience operation of the windowsIf you hold your finger on the sensor page 40, fig. 26 for more than 2 seconds
while locking the vehicle, the opened windows and the panoramic sliding roof are
closed. If you lift your finger off the sens or , the closing process is interrupted. If you
touch the sensor again, the closing process of the windows and the panoramic
sliding roof continues.
If you immediately touch the sensor or pull on the handle during the closing
process of the windows and the panoramic sliding roof initiated by sensor , all of the
windows and the panoramic sliding roof are opened again.
AD
A1
A2
A2A1
A2
A1
A1
A1
A2
A1
s3fg.2.book Page 41 Friday, April 30, 2010 12:17 PM
Page 43 of 287
Unlocking and locking
42
Safe securingThe central locking system is equipped with a safe securing
6) system. Locking the
vehicle from the outside causes the door locks to be automatically blocked. It is not
possible to open the doors with the door handle either from the inside or from the
outside. This acts as an effective deterrent for attempts to break into your vehicle.
You can deactivate the safe securing system by locking twice within 2 seconds.
If the safe securing system is not operating:
the indicator light in the driver door flas hes for about 2 seconds fast, goes out and
starts to flash slowly after about 30 seconds,
is the filler flap locked.
The safe securing system is again activated the next time the vehicle is unlocked and
locked again.
If the vehicle is locked and the safe securing system is deactivated, you can open the
vehicle from the inside by pulling on the door opening lever.
WARNING
If the vehicle is locked from the outside and the safe securing system is acti-
vated, there must not be any person and animals in the vehicle as it is then not
possible to open either a door or a window from the inside. The locked doors
make it more difficult for rescuers to get into the vehicle in an emergency -
hazard!
Note
The anti-theft alarm system* is also activated with the deactivated safe securing
system when locking the vehicle. The interior monitor* is however not activated.
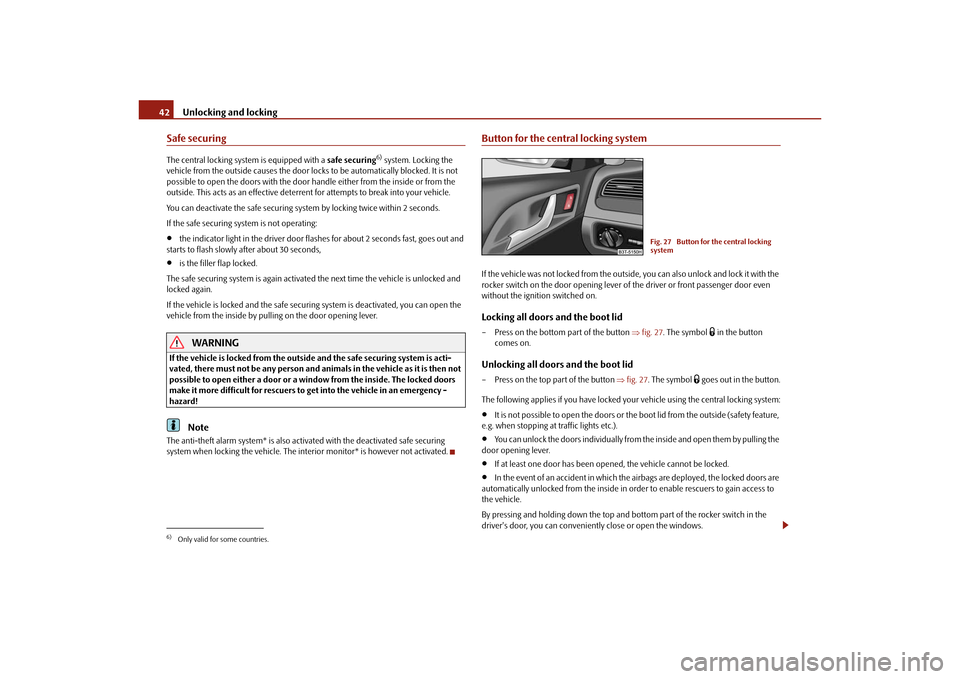
Button for the central locking systemIf the vehicle was not locked from the outside, you can also unlock and lock it with the
rocker switch on the door opening lever of the driver or front passenger door even
without the ignition switched on.Locking all doors and the boot lid– Press on the bottom part of the button fig. 27 . The symbol
in the button
comes on.
Unlocking all doors and the boot lid– Press on the top part of the button fig. 27 . The symbol
goes out in the button.
The following applies if you have locked yo ur vehicle using the central locking system:
It is not possible to open the doors or the boot lid from the outside (safety feature,
e.g. when stopping at traffic lights etc.).
You can unlock the doors individually from the inside and open them by pulling the
door opening lever.
If at least one door has been open ed, the vehicle cannot be locked.
In the event of an accident in which the airbags are deployed, the locked doors are
automatically unlocked from the inside in orde r to enable rescuers to gain access to
the vehicle.
By pressing and holding down the top and bottom part of the rocker switch in the
driver's door, you can conveniently close or open the windows.
6)Only valid for some countries.
Fig. 27 Button for the central locking
system
s3fg.2.book Page 42 Friday, April 30, 2010 12:17 PM
Page 44 of 287
Unlocking and locking43
Using the system
Safety
Driving Tips
General Maintenance
Breakdown assistance
Technical Data
WARNING
The central locking system al so operates if the ignition is switched off. All the
doors and the boot lid are locked. Childr en should never be left unattended in
the vehicle since it is difficult to prov ide assistance from the outside when the
doors are locked. Locked doors make it difficult for rescuers to get into the
vehicle in an emergency - hazard!
Note
The door opening lever and the buttons for the central locking system do not operate
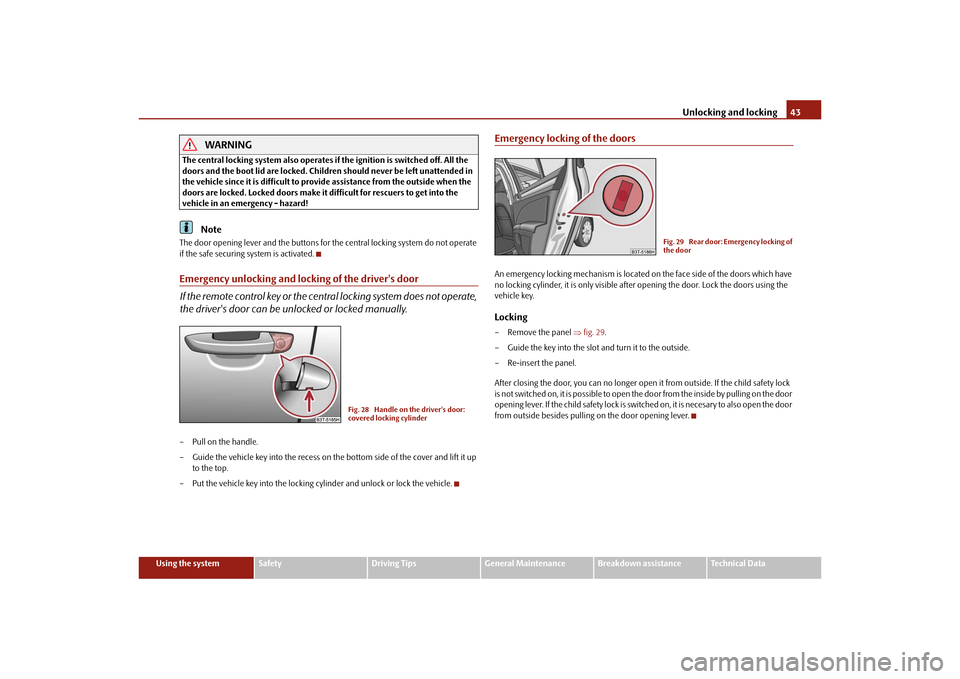
if the safe securing system is activated.Emergency unlocking and locking of the driver's door
If the remote control key or the central locking system does not operate,
the driver's door can be unlocked or locked manually.– Pull on the handle.
– Guide the vehicle key into the recess on the bottom side of the cover and lift it up to the top.
– Put the vehicle key into the locking cy linder and unlock or lock the vehicle.
Emergency locking of the doorsAn emergency locking mechanism is located on the face side of the doors which have
no locking cylinder, it is only visible afte r opening the door. Lock the doors using the
vehicle key.Locking– Remove the panel fig. 29 .
– Guide the key into the slot and turn it to the outside.
– Re-insert the panel.
After closing the door, you can no longer open it from outside. If the child safety lock
is not switched on, it is possible to open the door from the inside by pulling on the door
opening lever. If the child safety lock is switch ed on, it is necesary to also open the door
from outside besides pulling on the door opening lever.
Fig. 28 Handle on the driver's door:
covered locking cylinder
Fig. 29 Rear door: Emergency locking of
the door
s3fg.2.book Page 43 Friday, April 30, 2010 12:17 PM