key SKODA SUPERB 2010 2.G / (B6/3T) Owner's Guide
[x] Cancel search | Manufacturer: SKODA, Model Year: 2010, Model line: SUPERB, Model: SKODA SUPERB 2010 2.G / (B6/3T)Pages: 287, PDF Size: 16.59 MB
Page 57 of 287

Unlocking and locking
56WARNING
Close the sliding/tilting roof carefully - risk of injury!Convenience operationYou can also close an open sliding/tilting roof from the outside.
– Keep the lock button on the radio remote control pressed or hold the key in the
locking cylinder of the driver's door in the lock position, or when using the KESSY*
system keep your finger on the sensor page 40, fig. 26 until the sliding/tilting
roof is closed .
The closing operation stops when one re leases the key or the lock button.
WARNING
Close the sliding/tilting roof carefully - ri sk of injury! The force limiter does not
operate with the convenience closing.Electric sliding/tilting roof with solar cells*If there is sufficient bright sunlight, the solar cells on the sliding/tilting roof deliver
power for the fresh air blower. Further information page 114.
The operation of the sliding/tilting roof with solar cells is the same as of a normal
sliding/tilting roof.
Emergency operationFig. 42 Detail of the headliner: Point for positioning screwdriver / emergency operationYou can close and/or open the sliding/tilting roof by hand if the system is defect.
– Position the flat blade of a screwdriver carefully against the rear edge of the cover of the electrical drive fig. 42 - left.
–Pull the cover down.
– Insert an Allen key, Group 4, up to the stop into the opening and close and/or open the sliding/tilting roof fig. 42 - right.
– Press on the cover again by first of all in serting the plastic lugs and then pushing the
cover up.
– Have the malfunction rectified by a specialist garage.
On vehicles fitted with a storage compartm ent for spectacles*, this compartment must
be opened before removing the cover for the emergency operation page 103.
Note
It is necessary after each emergency operation to move the sliding/tilting roof into the
basic position. Here you have to turn the control dial forward to the switch position
page 55, fig. 41 and press for about 10 seconds.
A1
AA
s3fg.2.book Page 56 Friday, April 30, 2010 12:17 PM
Page 59 of 287

Unlocking and locking
58
Opening and closing the sun screenYou can open or close the sun screen se parately with the aid of the buttons fig. 44 .Opening– Briefly press the button fig. 44 in order to fully open.
– Press the button and hold it pressed in order to open in the desired position.
The opening process stops when one releases the button.Closing– Briefly press the button fig. 44 in order to fully close.
– Press the button and hold it pressed in order to close in the desired position.
The closing process stops when one releases the button.Convenience operationThe panoramic sliding roof and the sun screen can also be operated from the outside
using the remote control key or when using the KESSY* system with the aid of the
sensor page 40, fig. 26.Closing the panoramic sliding roof– Hold down the lock button on the remote control key, or when using the KESSY*
system keep your finger on the sensor page 40, fig. 26 , until the panoramic
sliding roof is closed. The panoramic sliding roof and the sun screen are closed
together. After releasing the button, or lifting your
finger off the sensor when using the
KESSY* system, the closing process is immediately interrupted.
Tilting the panoramic sliding roof– Hold down the unlock button on the remote control key until the panoramic sliding roof is tilted. When tilting the panoramic sliding roof, the sun screen opens at the
same time.
Note
The force limiter also operates for convenience closing.
The panoramic sliding roof can only be tilted but not opened when the conven-
ience operating feature is being used.
Emergency operationFig. 45 Detail of the headliner: Points fo r positioning screwdriver / emergency operationYou can close and/or open the panoramic slid ing roof by hand if the system is defec-
tive.
– Position the flat blade of a screwdriver carefully against the rear edge of the cover of the electrical drive fig. 45 .
–Pull the cover down.
– Insert an Allen key, Group 4, up to the stop into the opening and close or open the panoramic sliding roof.
Fig. 44 Buttons for sun screen
AE
AE
AF
AF
A1
A1
A1
AA
AB
s3fg.2.book Page 58 Friday, April 30, 2010 12:17 PM
Page 61 of 287
Lights and Visibility
60
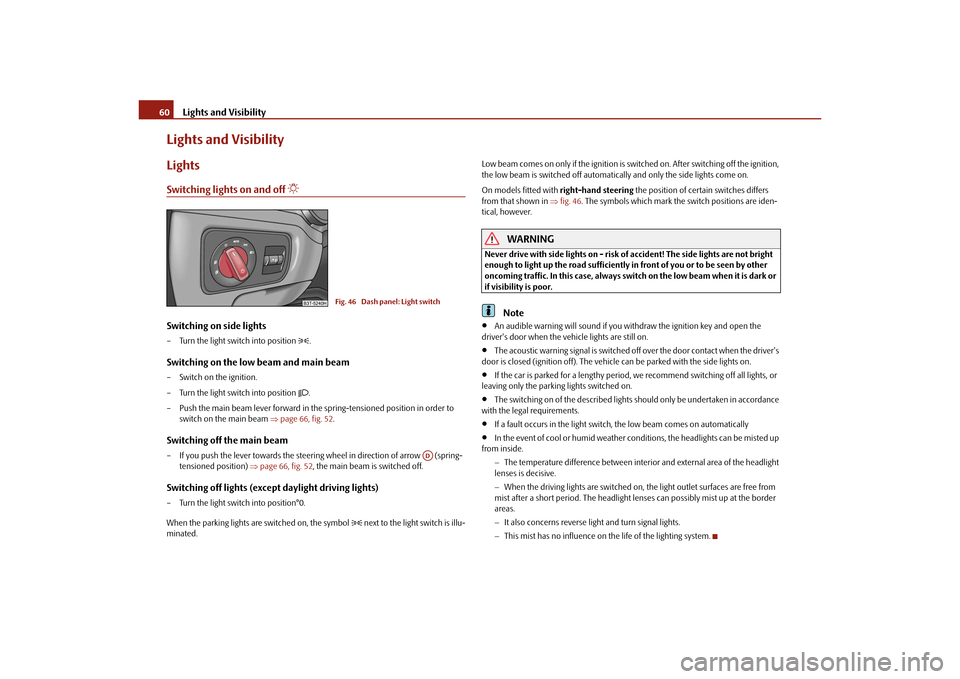
Lights and VisibilityLightsSwitching lights on and off
Switching on side lights– Turn the light switch into position
.
Switching on the low beam and main beam– Switch on the ignition.
– Turn the light switch into position
.
– Push the main beam lever forward in the spring-tensioned position in order to switch on the main beam page 66, fig. 52 .
Switching off the main beam– If you push the lever towards the steering wheel in direction of arrow (spring-
tensioned position) page 66, fig. 52, the main beam is switched off.Switching off lights (except daylight driving lights)– Turn the light switch into position°0.
When the parking lights are switched on, the symbol
next to the light switch is illu-
minated. Low beam comes on only if the ignition is switched on. After switching off the ignition,
the low beam is switched off automatica
lly and only the side lights come on.
On models fitted with right-hand steering the position of certain switches differs
from that shown in fig. 46 . The symbols which mark the switch positions are iden-
tical, however.
WARNING
Never drive with side lights on - risk of accident! The side lights are not bright
enough to light up the road sufficiently in front of you or to be seen by other
oncoming traffic. In this case, always switch on the low beam when it is dark or
if visibility is poor.
Note
An audible warning will sound if you wi thdraw the ignition key and open the
driver's door when the vehicle lights are still on.
The acoustic warning signal is switched off over the door contact when the driver's
door is closed (ignition off). The vehicle can be parked with the side lights on.
If the car is parked for a lengthy period, we recommend switching off all lights, or
leaving only the parking lights switched on.
The switching on of the described lights should only be undertaken in accordance
with the legal requirements.
If a fault occurs in the light switch , the low beam comes on automatically
In the event of cool or humid weather conditions, the headlights can be misted up
from inside.
The temperature difference between interior and external area of the headlight
lenses is decisive.
When the driving lights are switched on, the light outlet surfaces are free from
mist after a short period. The headlight lens es can possibly mist up at the border
areas.
It also concerns reverse light and turn signal lights.
This mist has no influence on th e life of the lighting system.
Fig. 46 Dash panel: Light switch
AD
s3fg.2.book Page 60 Friday, April 30, 2010 12:17 PM
Page 69 of 287
Lights and Visibility
68
Lighting of storage compartment on the front passenger side
– When opening the flap of the storage comp artment on the front passenger side the
lighting in the storage compartment comes on.
– The light switches on automatically when the parking light is switched on and goes
out when the flap is closed.
The interior light comes on as soon as you unlock the car or open a door or when the
ignition key has been removed. The light go es out again about 30 seconds after all the
doors have been closed. The interior lighting is switched off when you lock the car or
switch the ignition on. This only applies when the switch for the corresponding interior
lights is standing n the door contact setting.
The interior lighting goes off after about 10 minutes when a door has been left open in
order to avoid discharging the battery of the vehicle.
If the switch is in the position
(permanent lights), the interior lighting goes off at the
latest after 10 minutes in order to avoid discharging the battery of the vehicle.
Two diffuse lights* are integrated in the interior lighting, which illuminates the shift
lever and the middle of the dash panel. Th ey are switched on automatically when
switching on the parking light.
Furthermore, after switching on the ignition when the parking lights are switched on,
the door handle lighting* comes on.
Together with the front interior light, the rear interior light is simultaniously switched
on or off.
Note
We recommend having these bulbs re placed by a specialist garage.
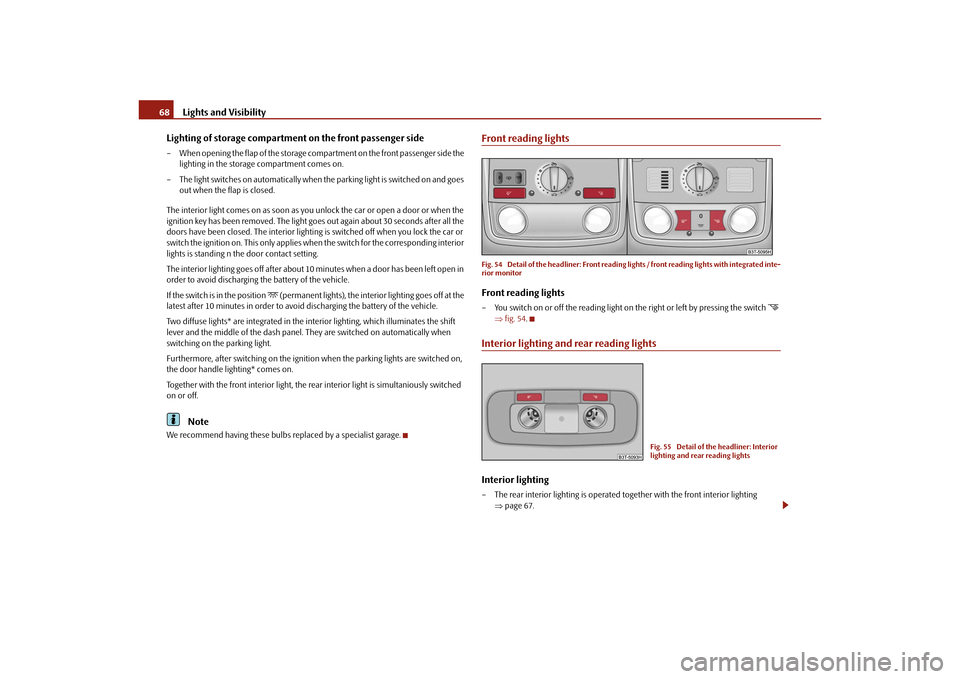
Front reading lightsFig. 54 Detail of the headliner: Front reading lights / front reading lights with integrated inte-
rior monitorFront reading lights– You switch on or off the reading light on the right or left by pressing the switch
fig. 54 .
Interior lighting and rear reading lightsInterior lighting– The rear interior lighting is operated together with the front interior lighting
page 67.
Fig. 55 Detail of the headliner: Interior
lighting and rear reading lights
s3fg.2.book Page 68 Friday, April 30, 2010 12:17 PM
Page 79 of 287
Lights and Visibility
78
Heating of the external mirror
– Turn the rotary knob to position
page 77, fig. 67 .
Adjusting left and right exterior mirrors simultaneously– Turn the rotary knob to position
. The movement of the mirror surface is identical
to the movement of the rotary knob.
The adjustment of both mirrors simultaneously or each individual mirror is possible in
the information display table on page 26 in the menu point Mirror adjust.
Adjusting the right-hand exterior mirror– Turn the rotary knob to position
. The movement of the mirror surface is identical
to the movement of the rotary knob.
Switching off operating control– Turn the rotary knob to position
.
Folding in both exterior mirrors*– Turn the rotary knob to position
.
Folding exterior mirrors* using the key with radio remote control– If all the windows are clos ed, press the unlock button page 49, fig. 37 on the
radio remote control for approx. 2 seconds.
Tilting surface of front passenger exterior mirror*
When the rotary knob is in position
page 77, fig. 67 and the reverse gear is
engaged, the surface of the mirror tilts down slightly. This provides an aid in seeing the
kerb of the pavement when parking the car.
The mirror returns into its initial position, after the rotary knob is moved out of the
position
and put into another position or if the speed is more than 15 km/h.
Memory for exterior mirrors*
On vehicles fitted with a memory for the driver seat, the relevant setting of the exterior
mirror is also stored automatically when the seat position is stored.
WARNING
Convex (curved outward) or spherical (differently curved) exterior mirrors
increase the vision field. They do, however, make objects appear smaller in the
mirror. These mirrors are only of limited use, therefore, for estimating distances
to the following vehicles.
Use whenever possible the interior rear mirror, for estimating the distances
to the following vehicles.Note
Do not touch the surfaces of the exterior mirrors if the exterior mirror heater is
switched on.
You can set the exterior mirrors by hand, if the power setting function fails at any
time by pressing on the edge of the mirror surface.
Contact your specialist garage if a fault exists with the power setting of the exterior
mirrors.
Exterior mirror with entry lighting*The lighting is positioned on the bo ttom edge of the exterior mirror.The light beam is aimed at the entry area of the front doors after the car is unlocked.
The light comes on after the doors have been locked or on opening the front door. The
lighting goes out about 30 seconds after th e doors are closed or if the ignition is
switched on.
If the doors remain open, the lighting go es out automatically after about 10 minutes
provided the ignition is not switched on.Automatic dimming exterior mirror*The exterior mirrors are dimmed together with the interior mirror. If the automatic
dimming is switched on, the mirror dims automatically depending on the light
striking the mirror from the rear.
A3
s3fg.2.book Page 78 Friday, April 30, 2010 12:17 PM
Page 82 of 287
Seats and Stowage81
Using the system
Safety
Driving Tips
General Maintenance
Breakdown assistance
Technical Data
Adjusting lumbar support*– Turn the lever until you have set the most comfortable curvature of the seat
upholstery in the area of your spine.
The driver's seat should be adjusted in such a way that the pedals can be fully pressed
to the floor with slightly bent legs.
The seat backrest on the driver's seat should be adjusted in such a way that the upper
point of the steering wheel can be easi ly reached with slightly bent arms.
WARNING
Only adjust the driver seat when the vehicle is stationary - risk of injury!
Take care when adjusting the seat! Adjusting the seat without care can lead
to bruises or injuries.
The seat backrests must not be angled too far back when driving otherwise
this will affect proper operation of the se at belts and of the airbag system - risk
of injury!
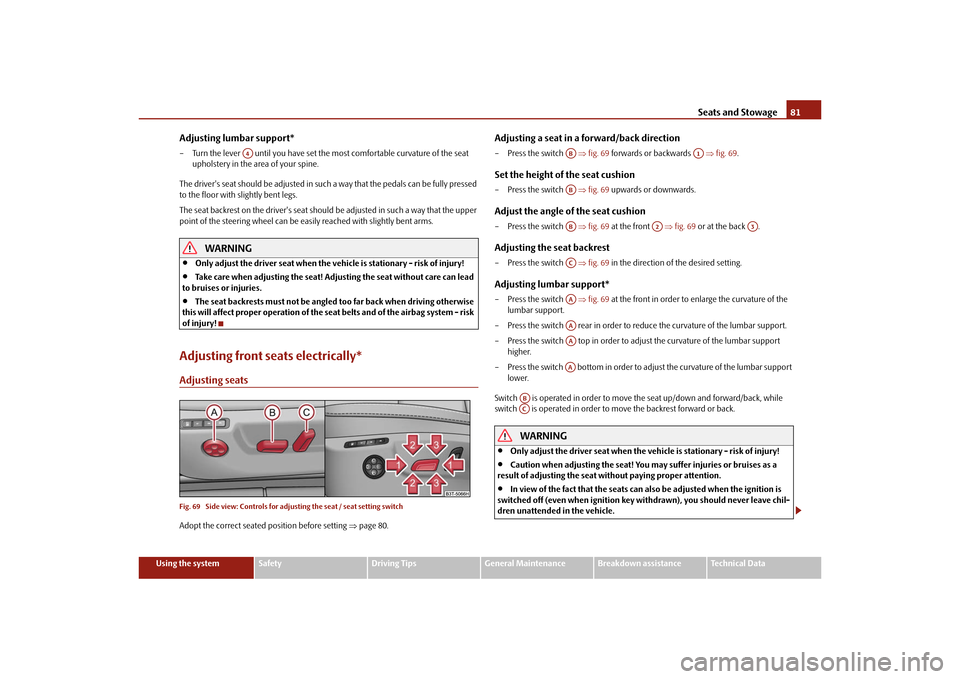
Adjusting front seats electrically*Adjusting seatsFig. 69 Side view: Controls for adju sting the seat / seat setting switchAdopt the correct seated position before setting page 80.
Adjusting a seat in a forward/back direction– Press the switch fig. 69 forwards or backwards fig. 69 .Set the height of the seat cushion– Press the switch fig. 69 upwards or downwards.Adjust the angle of the seat cushion– Press the switch fig. 69 at the front fig. 69 or at the back .Adjusting the seat backrest– Press the switch fig. 69 in the direction of the desired setting.Adjusting lumbar support*– Press the switch fig. 69 at the front in order to enlarge the curvature of the
lumbar support.
– Press the switch rear in order to reduce the curvature of the lumbar support.
– Press the switch top in order to adjust the curvature of the lumbar support higher.
– Press the switch bottom in order to adjust the curvature of the lumbar support lower.
Switch is operated in order to move the seat up/down and forward/back, while
switch is operated in order to move the backrest forward or back.
WARNING
Only adjust the driver seat when the vehicle is stationary - risk of injury!
Caution when adjusting the seat! You ma y suffer injuries or bruises as a
result of adjusting the seat without paying proper attention.
In view of the fact that the seats can also be adjusted when the ignition is
switched off (even when ignition key withdrawn), you should never leave chil-
dren unattended in the vehicle.
A4
AB
A1
ABAB
A2
A3
ACAAAAAAAA
ABAC
s3fg.2.book Page 81 Friday, April 30, 2010 12:17 PM
Page 83 of 287
Seats and Stowage
82
The seat backrests must not be angled too far back when driving otherwise
this will affect proper operation of the se at belts and of the airbag system - risk
of injury!Note
If the movement of the seat is inadvertently interrupted during an adjustment, once
again press the switch in the appropriate di rection and continue with the adjustment
of the seat to the end.Storing settingStoring seat and exterior mirror settings for driving forward– Switch on the ignition.
– Adjust the seat page 81.
– Adjust both exterior mirrors page 77.
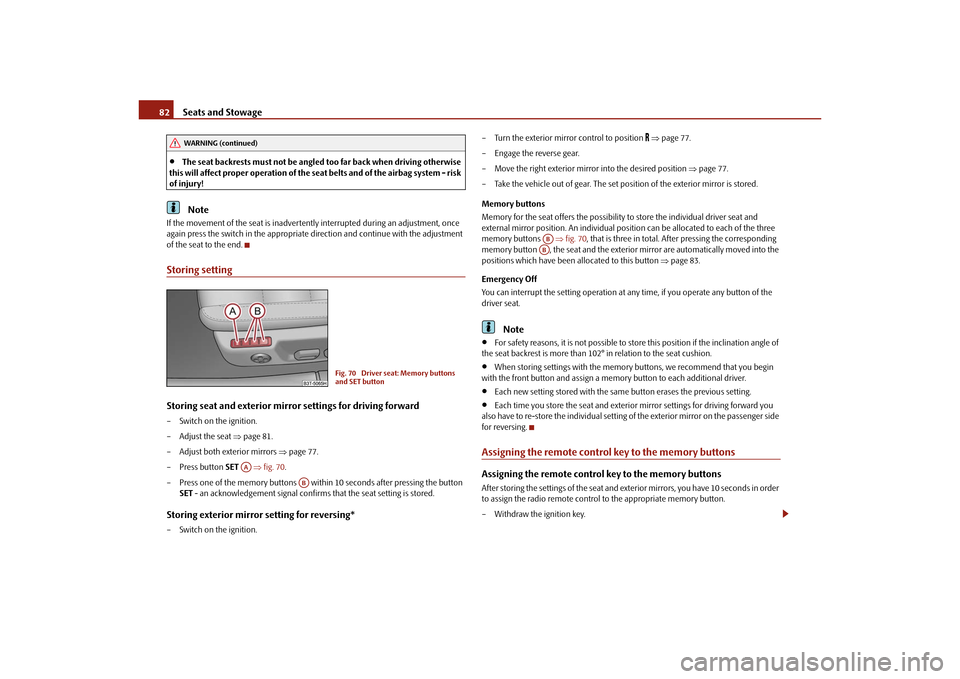
– Press button SET fig. 70 .
– Press one of the memory buttons within 10 seconds after pressing the button SET - an acknowledgement signal confirms that the seat setting is stored.Storing exterior mirror setting for reversing*– Switch on the ignition. – Turn the exterior mirror control to position
page 77.
– Engage the reverse gear.
– Move the right exterior mirror into the desired position page 77.
– Take the vehicle out of gear. The set position of the exterior mirror is stored.
Memory buttons
Memory for the seat offers the possibility to store the individual driver seat and
external mirror position. An individual posi tion can be allocated to each of the three
memory buttons fig. 70 , that is three in total. Af ter pressing the corresponding
memory button , the seat and the exterior mirror are automatically moved into the
positions which have been allocated to this button page 83.
Emergency Off
You can interrupt the setting operation at any time, if you operate any button of the
driver seat.
Note
For safety reasons, it is not possible to store this position if the inclination angle of
the seat backrest is more than 102 ° in relation to the seat cushion.
When storing settings with the memory buttons, we recommend that you begin
with the front button and assign a memory button to each additional driver.
Each new setting stored with the same button erases the previous setting.
Each time you store the seat and exterior mirror settings for driving forward you
also have to re-store the individual setting of the exterior mirror on the passenger side
for reversing.
Assigning the remote contro l key to the memory buttonsAssigning the remote control key to the memory buttonsAfter storing the settings of the seat and exterior mirrors, you have 10 seconds in order
to assign the radio remote control to the appropriate memory button.
– Withdraw the ignition key.
WARNING (continued)
Fig. 70 Driver seat: Memory buttons
and SET button
AA
AB
ABAB
s3fg.2.book Page 82 Friday, April 30, 2010 12:17 PM
Page 84 of 287
Seats and Stowage83
Using the system
Safety
Driving Tips
General Maintenance
Breakdown assistance
Technical Data
– Press the unlock button
page 49, after the successful assignment an audible
signal will sound. The setting is stored with the memory button which you have
selected.
Assigning the remote control key to the memory buttons on the KESSY*
systemOn vehicles which are equipped with the KESSY* system, the following procedure for
assigning the remote control key to the memory buttons exists for electrically adjust-
able front seats and mirrors*.
– Switch the ignition off within 10 seconds after storing the setting.
– Open the driver door.
– Press the unlock button on the remo te control key within 10 seconds.
If you wish to be able to retrieve the settings which are stored in the memory by also
using the radio remote control, you have to assign the radio remote control to a
memory button in each case.
If you wish, you can obtain an additional remote control key from an authorised Škoda
Service partner and then assign the remote control key to another memory button.
Note
If the radio remote control had previously been assigned to another memory
button, this setting is then erased by the new assignment.
If you assign the radio remote control to a memory button which has already been
assigned to a radio remote control, the ol d assignment is also replaced by a new
assignment in this case.
The assignment of the radio remote co ntrol to a memory button is retained,
however, after reassigning the seats and exterior mirrors.
After the successful assignment, the turn si gnal lights flash and an audible signal
will sound as a confirmation. The setting is stored with the memory button which you
have selected.
Retrieving settings of the seat and mirrors
You can retrieve the stored settings either with the memory buttons or
with the remote control*.Retrieving settings with memory buttons– In order to retrieve the stored setting, you have two possibilities:
– One-touch automatic memory: briefly press the desired memory button
page 82, fig. 70 . The seat and exterior mirror are moved automatically into the
stored positions (this applies only if the ignition is switched on and the speed is less
than 5 km/h).
– Memory keying : Press and hold the desired memory button pressed long
enough until the seat and the exterior mi rror are moved into the stored positions.Retrieving settings with remote control– If the driver door is closed and the ignition is switched off, briefly press the unlock
button of the radio remote control page 49 and then open the driver door.
– The seat and exterior mirrors now move automatically into the stored positions.Retrieving setting of exterior mirror for reversing*– Turn the rotary knob for the exterior mirror setting into the position
page 77
before engaging the reverse gear.
The mirror returns into its initial position, after the rotary knob is moved out of the
position
and put into another position or if the speed is more than 15 km/h.
Emergency Off
You can interrupt the setting operation at any time, if you operate any button of the
driver seat.
AB
AB
s3fg.2.book Page 83 Friday, April 30, 2010 12:17 PM
Page 101 of 287

Seats and Stowage
100
Cigarette lighter*, power socketsCigarette lighter
You can also use the socket on the ci garette lighter for other electrical
appliances.Using the cigarette lighter– Press the button of the lighter fig. 101 or page 99, fig. 100.
– Wait until the button jumps forward.
– Remove the cigarette lighter immediately and use it.
– Insert the cigarette lighter again into the socket.Using the socket– Remove the cigarette lighter or the cover of the power socket.
– Connect the plug of the electrical appliance to the socket.
The 12 volt power socket can also be used to supply power to additional electrical
accessories with a power uptake up to 120 watts.
WARNING
Take care when using the cigarette ligh ter! Not paying proper attention or
incorrect use the cigarette lighter in an uncontrolled manner may result in
burns.
The cigarette lighter and the power socket also operates when the ignition is
switched off or the ignition key withdrawn. You should therefore never leave
children unattended in the vehicle.Caution
Always use matching plugs to avoid damagi ng the power socket.
Note
Connecting electrical components when the engine is not running will drain
the battery of the vehicle - risk of battery draining!
Further information page 234.
Power socket in the luggage compartmentFig. 102 Luggage compartment: Power socket / luggage compartment: Power socket (Combi)– Open the cover of the power socket fig. 102 .
– Connect the plug of the electrical appliance to the socket.
You can only use the power socket for the co nnection of approved electrical accesso-
ries with a power uptake up to 120 watts. The vehicle battery will be discharged in the
process if the engine is stationary.
The same remarks apply here as for page 100.
Further information page 234.Storage compartmentsOverviewYou will find the following storag e facilities in your vehicle:
AA
AB
s3fg.2.book Page 100 Friday, April 30, 2010 12:17 PM
Page 120 of 287

Air conditioning system119
Using the system
Safety
Driving Tips
General Maintenance
Breakdown assistance
Technical Data
The prerequisite for the correct switching on of the auxiliary heating (auxiliary heating
and ventilation) according to the programmed
pre-set time is the correct setting of the
current time and the weekday page 118.
If the system is running, a wa rning light in the button for direct switching on/off of the
auxiliary heating lights up.
The running system deactivate s after expiration of the operating period or is deacti-
vated earlier by pressing the button for dire ct switching on/off of the auxiliary heating
page 118.
A random pre-set time can be deactivated by selecting the menu point Deactivate in
the menu Activate.
After selecting the menu Fa c t o r y s e t t i n g in the menu Aux. heating , it is possible to
return to the factory setting.
Radio remote control
The auxiliary heating (auxiliary heating and ventilation) can be
switched on or off with the remote control.– For switching on, press the button .
– For switching off, press the button .
The transmitter and the battery are housed in the housing of the remote control. The
receiver is located in the interior of the car.
If the battery is properly charged, the effective range is up to 600 m. For switching on
or off the auxiliary heating, hold the remo te control vertically with the antenna
fig. 124 towards the top. You must not cover over the antenna with the fingers or the
palm of the hand. Obstacles between the ra dio remote control and the vehicle, bad
weather conditions and a weaker batt ery can clearly reduce the range.
The auxiliary heating can only be switched on or off with the radio remote control, if
the distance between the radio remote control and the vehicle is at least 2 m.
Warning light in the radio remote control
The warning light in the radio remote control fig. 124 indicates after a keystroke if
the remote control signal was received by the auxiliary heating and if the battery is
adequately charged.
Caution
There are electronic components in the radio remote control, protect the remote
control against water, severe shocks and direct sun rays.
Fig. 124 Auxiliary heating: Radio
remote control
ONOFF
AA
Display warning light
Importance
Lights up green for 2 seconds.
The auxiliary heating was switched on.
Lights up red for 2 seconds.
The auxiliary heating was switched off.
Slowly flashes green for 2 seconds.
The ignition signal was not received.
Quickly flashes green for 2 seconds.
The auxiliary heating is blocked, e. g
because the tank is nearly empty or there
is a fault in the auxiliary heating.
Flashes red for 2 seconds.
The switch off signal was not received.
Lights up orange for 2 seconds, then
green or red.
The battery is weak, however the switch-
ing on or off signal was received.
Lights up orange for 2 seconds, then
flashes green or red.
The battery is weak, however the switch-
ing on or off signal was not received.
Flashes orange for 5 seconds.
The battery is discharged, however the
switching on or off signal was not
received.
s3fg.2.book Page 119 Friday, April 30, 2010 12:17 PM