lock SKODA SUPERB 2010 2.G / (B6/3T) Repair Manual
[x] Cancel search | Manufacturer: SKODA, Model Year: 2010, Model line: SUPERB, Model: SKODA SUPERB 2010 2.G / (B6/3T)Pages: 287, PDF Size: 16.59 MB
Page 118 of 287
Air conditioning system117
Using the system
Safety
Driving Tips
General Maintenance
Breakdown assistance
Technical Data
Defrosting windscreenDefrosting windscreen - switching on– Press the button page 114, fig. 122.Defrosting windscreen - switching off– Once again press the button or the button .
The temperature control is controlled automatically. More air flows out of the air outlet
vents 1.Auxiliary heating (auxiliary heating and ventilation)*Description and important information
The auxiliary heating (auxiliary heating and ventilation) heats or
supplies the interior of the vehicl e with fresh air independent of the
engine.Auxiliary heating (auxiliary heating)
The auxiliary heating (auxiliary heating) functions in connection with the Climatic or
Climatronic.
It can be used when stationary, when engi ne is switched off for preheating of the
vehicle as well as while driving (e.g. during the heating phase of the engine).
The engine is also preheated when the vehicle is stationary and the engine is switched
off, if the auxiliary heating is switched on. This is not valid for the engines 3.6 ltr./191 kW
FSI and 1.9 ltr./77 kW TDI.
The auxiliary heating (auxiliary heating) wa rms up the coolant during the combustion
of fuel from the vehicle tank. The coolant warms up the air, which (if the blower speed
is not set to zero) flows in to the occupant compartment.
Auxiliary ve ntilation
The auxiliary ventilation enables fresh air to flow into the vehicle interior by switching
off the engine, whereby the interior temperature is effectively decreased (e.g. with the
vehicle parked in the sun).
WARNING
The auxiliary heating must never be operated in closed rooms - risk of
poisoning!
The auxiliary heating must not be running during refueling - risk of fire.
The exhaust pipe of the auxiliary heatin g is located on the underside of the
vehicle. Therefore do not place the vehicle, if you wish to operate the auxiliary
heating, in such a way that the exhaust gases of the auxiliary heating can come
easily into contact with inflammable mate rials (e.g. dry grass) or easily inflam-
mable substances (e .g. fuel run out).Note
If the auxiliary heating runs, the fuel consumption comes from the vehicle tank.
Therefore the auxiliary heating should not be operated, if there is very little fuel in the
tank.
The exhaust pipe of the auxiliary heating, which is located on the underside of the
vehicle, must not be clogged and th e exhaust flow must not be blocked.
If the auxiliary heating and ventilation is running, the vehicle battery discharges. If
the auxiliary heating and ventilation has been operated several times over a longer
period, the vehicle must be driven a few ki lometers in order to recharge the vehicle
battery.
The auxiliary heating only switches the bl ower on, if it has achieved a coolant
temperature of approx. 50 °C.
At low outside temperatures, this can result in a formation of water vapour in the
area of the engine compartment. This is qu ite normal and is not an operating problem.
After switching off the auxiliary heating, the coolant pump runs for a short period.
The auxiliary heating and ventilation does not switch on or comes on, if the vehicle
battery indicates a low loading state.
The auxiliary heating (auxiliary heating) does not switch on, if the following was
shown in the information display or before switching off the ignition: Please refuel!
The air inlet in front of the windscreen must be free of ice, snow or leaves in order
to ensure that the auxiliary heating operates properly.
AUTO
s3fg.2.book Page 117 Friday, April 30, 2010 12:17 PM
Page 120 of 287

Air conditioning system119
Using the system
Safety
Driving Tips
General Maintenance
Breakdown assistance
Technical Data
The prerequisite for the correct switching on of the auxiliary heating (auxiliary heating
and ventilation) according to the programmed
pre-set time is the correct setting of the
current time and the weekday page 118.
If the system is running, a wa rning light in the button for direct switching on/off of the
auxiliary heating lights up.
The running system deactivate s after expiration of the operating period or is deacti-
vated earlier by pressing the button for dire ct switching on/off of the auxiliary heating
page 118.
A random pre-set time can be deactivated by selecting the menu point Deactivate in
the menu Activate.
After selecting the menu Fa c t o r y s e t t i n g in the menu Aux. heating , it is possible to
return to the factory setting.
Radio remote control
The auxiliary heating (auxiliary heating and ventilation) can be
switched on or off with the remote control.– For switching on, press the button .
– For switching off, press the button .
The transmitter and the battery are housed in the housing of the remote control. The
receiver is located in the interior of the car.
If the battery is properly charged, the effective range is up to 600 m. For switching on
or off the auxiliary heating, hold the remo te control vertically with the antenna
fig. 124 towards the top. You must not cover over the antenna with the fingers or the
palm of the hand. Obstacles between the ra dio remote control and the vehicle, bad
weather conditions and a weaker batt ery can clearly reduce the range.
The auxiliary heating can only be switched on or off with the radio remote control, if
the distance between the radio remote control and the vehicle is at least 2 m.
Warning light in the radio remote control
The warning light in the radio remote control fig. 124 indicates after a keystroke if
the remote control signal was received by the auxiliary heating and if the battery is
adequately charged.
Caution
There are electronic components in the radio remote control, protect the remote
control against water, severe shocks and direct sun rays.
Fig. 124 Auxiliary heating: Radio
remote control
ONOFF
AA
Display warning light
Importance
Lights up green for 2 seconds.
The auxiliary heating was switched on.
Lights up red for 2 seconds.
The auxiliary heating was switched off.
Slowly flashes green for 2 seconds.
The ignition signal was not received.
Quickly flashes green for 2 seconds.
The auxiliary heating is blocked, e. g
because the tank is nearly empty or there
is a fault in the auxiliary heating.
Flashes red for 2 seconds.
The switch off signal was not received.
Lights up orange for 2 seconds, then
green or red.
The battery is weak, however the switch-
ing on or off signal was received.
Lights up orange for 2 seconds, then
flashes green or red.
The battery is weak, however the switch-
ing on or off signal was not received.
Flashes orange for 5 seconds.
The battery is discharged, however the
switching on or off signal was not
received.
s3fg.2.book Page 119 Friday, April 30, 2010 12:17 PM
Page 121 of 287
Air conditioning system
120
Changing the battery of the radio remote controlIf the warning light of the radio remote cont rol indicates a weak or discharged battery,
page 119, fig. 124 , it must be replaced. The battery is located under a cover on the
back of the radio remote control.
– Place a coin into the gap of the battery cover and by turning to the left, unlock the
cover.
– Change the battery, insert the cover and lock it by turning to the right.
For the sake of the environment
Dispose of a used battery in accord ance with environmental regulations.
Note
Pay attention to the correct polarity when changing the battery.
The replacement battery must have the same specification as the original battery.
s3fg.2.book Page 120 Friday, April 30, 2010 12:17 PM
Page 122 of 287
Starting-off and Driving121
Using the system
Safety
Driving Tips
General Maintenance
Breakdown assistance
Technical Data
Starting-off and DrivingSetting steering wheel positionFig. 125 Adjustable steering wheel: Lever belo w the steering wheel / safe distance to the
steering wheelYou can set the height and the forward/back position of the steering wheel to the
desired position.
– Adjust the driver seat page 80.
– Pull the lever below the steering wheel down fig. 125 - left .
– Set the steering wheel to the desired position (concerning height and forward/back position).
– Push the lever upwards as far as the stop.
WARNING
You must not adjust the steering wheel when the vehicle is moving!
The driver must maintain a distance of at least 25 cm to the steering wheel
fig. 125 - right. Not maintaining this minimum distance will mean that the
airbag system will not be able to properly protect you - hazard!
For safety reasons the lever must always be firmly pushed up to avoid the
steering wheel altering its po sition unintentionally when driving - risk of acci-
dent!
If you adjust the steering wheel furthe r towards the head, you will reduce
the protection offered by the driver airbag in the event of an accident. Check
that the steering wheel is aligned to the chest.
When driving, hold the steering wheel with both hands firmly on the outer
edge in the 9 o'clock and 3 o'clock po sition. Never hold the steering wheel
firmly in the 12 o'clock position or in another way (e.g. in the middle of the
steering wheel or at the inne r steering wheel edge). In such cases, injuries to the
arms, the hands and the head can occur when the driver airbag is deployed.
Ignition lockPetrol engines
- ignition switched off, engine off, the steering can be locked
- ignition switched on
- start engine
Diesel engines - interruption of fuel supply, ignition swit ched off, engine off, the steering can be
locked.
- heating glow plugs on, ignition switched on
WARNING (continued)
Fig. 126 Ignition lock positions
A1A2A3A1A2
s3fg.2.book Page 121 Friday, April 30, 2010 12:17 PM
Page 123 of 287
Starting-off and Driving
122
You should not switch on any major elec trical components during the heating
period otherwise the vehicle battery will be drained unnecessarily.
- start engine
Applies to all models:
Position
To lock the steering , with the ignition key withdrawn, turn the steering wheel until the
steering locking pin is heard to engage. You should always lock the steering as a general
rule if you leave your vehicle. This acts as a deterrent against possible theft of your
vehicle .
Position
Move the steering wheel back and forward a little if the ignition key cannot, or cannot
easily be turned into this position, in order to release the steering lock.
Position
The engine is started in this position. At th e same time switched on low beam or main
beam or other electrical components wi th major power consumption are briefly
switched off. The ignition key moves back into position when one releases the key.
The ignition key must be turned back into position each time before starting the
engine again. The starter repeat lock in th e ignition lock prevents the starter being
engaged when the engine is r unning and thus getting damaged.
Ignition key withdrawal lock (automatic gearbox)
You can only withdraw the ignition key after switching off the ignition if the selector
lever is in position P.
WARNING
When driving, the ignition key must always be in the position (ignition
switched on) without the engine running. This position is indicated by the
warning lights coming on. If this is not the case, it could result in unexpected
locking of the steering wh eel - risk of accident!
Only remove the ignition key from the ignition lock when the vehicle has
come to a standstill (by applying the handbrake or moving the selector lever
into the position P). The steering lock can engage imme diately - risk of acci-
dent!
Always withdraw the ignition key if you are going to leave the vehicle, even
for a short time. This is particularly important if children are left in the vehicle.
The children might otherwise start the engi ne or switch on electrical equipment
(e.g. power windows) - risk of accident or injury!
Starting the engineGeneral
You can only start the engine only using an original ignition key.
Place the gearshift lever into neutral (or place the selector lever to the position P or
N in the case of an automatic gearbox) and put on the handbrake firmly before starting
the engine.
Before starting, it is necessary to depres s the clutch pedal and to hold it pressed
until the engine starts. If you start the engi ne without depressing the clutch pedal, the
engine does not start and a message is shown in the display of the instrument cluster
to remind you of th e necessity to depress the clutch pedal.
Before starting the engine, on vehicles fitted with automatic gearbox with the
KESSY system*, it is necessary to depress th e brake pedal and to hold it pressed until
the engine starts. If you start the engine without depressing the brake pedal, the engine
does not start and a message is shown in the display of the instrument cluster to
remind you of the necessity to depress the brake pedal.
Let go of the key as soon as the engine starts otherwise there may be damage to
the starter.
The engine running noises may louder at first be louder for a short time after starting
the cold engine until oil pressure can be built up in the hydraulic valve clearance
compensation. This is quite normal and is not an operating problem.
If the engine does not start ...
You can use the battery of anothe r vehicle as a jump-start aid page 241.
It is only possible to tow-start vehicles fi tted with a manual gearbox. The tow-starting
distance must not be more than 50 metres.
A3
A1A2A3
A2
A1
A2
WARNING (continued)
s3fg.2.book Page 122 Friday, April 30, 2010 12:17 PM
Page 125 of 287

Starting-off and Driving
124WARNING
Never switch off the engine before the ve hicle is stationary - risk of accident!
The brake booster only operates when the engine is running. Greater phys-
ical effort for braking is required when en gine is switched off. Because if you do
not stop as normal, this can cause an accident and severe injuries.Caution
you should not switch the engine off right away at the end of your journey after the
engine has been operated for a lengthy period at high loads but should be allowed it
to run at idling speed for about 2 minutes. This prevents any accumulation of heat
when the engine is switched off.
Note
The radiator fan may continue running fo r a further 10 minutes or so after the
engine and the ignition have been switched off. The coolant fan may, however, also
switch on again after some time if the co olant temperature rises because of an accu-
mulation of heat in the engine or if the engine is warm and the engine compartment is
additionally heated by strong sunlight.
This is why particular care is required when carrying out any work in the engine
compartment page 216, “Working in the engine compartment”.
Shifting (manual gearbox)
Shift into reverse only when the vehicle is stationary. Depress the clutch pedal and hold
it fully depressed. Wait a mo ment before engaging reverse gear in order to avoid any
shift noises.
The reversing lights will come on once reverse gear is engaged, provided the ignition is
on.
WARNING
Never engage the reverse gear when driving - risk of accident!
Note
One should not lay the hand on the shift lever while driving the vehicle. The pres-
sure of the hand will be transferred to the gearshift forks in the gearbox. This can, over
a period of time, lead to earl y wear of the gearshift forks.
Depress the clutch pedal fully when changi ng gears, in order to avoid unnecessary
wear and damage to the clutch and gearbox parts.
HandbrakeApplying the handbrake– Pull the handbrake lever up fully.Releasing the handbrake– Pull the handbrake lever up slightly and at the same time press in the locking
button fig. 128 .
Fig. 127 The shift pattern: 5-speed or 6-
speed manual gearbox
Fig. 128 Centre console: Handbrake
s3fg.2.book Page 124 Friday, April 30, 2010 12:17 PM
Page 126 of 287
Starting-off and Driving125
Using the system
Safety
Driving Tips
General Maintenance
Breakdown assistance
Technical Data
– Hold the button pressed and push the handbrake lever down fully
.
The handbrake warning light
lights up when the handbrak e is applied, provided the
ignition is on.
A warning signal sounds and the following text appears in the display* if you have inad-
vertently driven off with the handbrake applied:
Release parking brake!
The handbrake warning is acti vated if you drive at a speed of more than 6 km/h for
more than 3 seconds.
WARNING
Please note that the handbrake must be fully released. A handbrake which
is only partially released can result in the rear brakes overheating which will
have a negative effect on the operation of the brake system - risk of accident! In
addition this can result in premature wear of the rear brake pads.
Never leave children unattended in the vehicle. The children might, for
example, release the handbrake or take the vehicle out of gear. The vehicle
might then move off - risk of accident!Caution
After the car has come to a stop, always firs t of all apply the handbrake firmly before
then additionally engaging a gear (manual gearbox) or moving the selector lever into
position P (automatic gearbox).KESSY system*IntroductionThe KESSY system makes it possible to switch the ignition on/off and to start/stop the
engine without actively using the key.
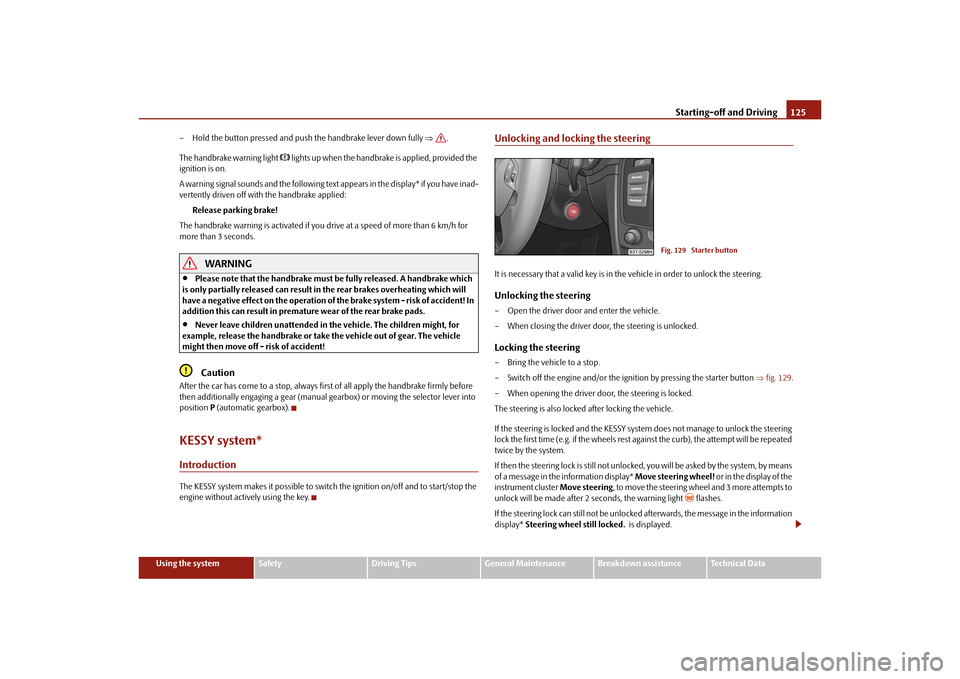
Unlocking and locking the steeringIt is necessary that a valid key is in th e vehicle in order to unlock the steering.Unlocking the steering– Open the driver door and enter the vehicle.
– When closing the driver door, the steering is unlocked.Locking the steering– Bring the vehicle to a stop.
– Switch off the engine and/or the ignition by pressing the starter button fig. 129 .
– When opening the driver door, the steering is locked.
The steering is also locked after locking the vehicle.
If the steering is locked and the KESSY syst em does not manage to unlock the steering
lock the first time (e.g. if the wheels rest against the curb), the attempt will be repeated
twice by the system.
If then the steering lock is still not unlocke d, you will be asked by the system, by means
of a message in the information display* Move steering wheel! or in the display of the
instrument cluster Move steering, to move the steering wheel and 3 more attempts to
unlock will be made after 2 seconds, the warning light
flashes.
If the steering lock can still not be unlocke d afterwards, the message in the information
display* Steering wheel still locked. is displayed.
Fig. 129 Starter button
s3fg.2.book Page 125 Friday, April 30, 2010 12:17 PM
Page 127 of 287

Starting-off and Driving
126
It is necessary to eliminate the possible ca use which prevents the unlocking and repeat
the attempt to unlock the steering.
Engine protection for electric steering lock
The electric steering lock has an engine protection which slows down the locking and
unlocking of the steering if the starter button is pressed repeatedly at short intervals.
Note
After pressing the starter button while th e steering is locked, the steering is
unlocked, the electrical components are acti vated (e.g. radio, navigation system etc.)
and the igntion is switched on.
If you do not exit or enter the vehicle again using the valid key after locking the
steering, however you wish to unlock the st eering, you must press the starter button.
At the same time, electrical components ar e activated (e.g. radio, navigation system
etc.) and the ignition is switched on.
If you switch off the ignition or the engine by pressing the starter button and if the
driver door is already opened, the steering wi ll not lock. In order to lock the steering, it
is necessary to close and open the driver door again or to lock the vehicle with the aid
of the sensor page 40, fig. 26 .
Switching on the ignitionIt is necessary that a valid key is in the vehicle and that the steering is unlocked in order
to switch on the ignition.
– The ignition is switched on by briefly pressing the starter button page 125,
fig. 129 .
Once you switch on the ignition an d open the driver door, the message Switch off
ignition! appears in the information display*.Switching off the ignition– The ignition is switched off by briefly pressing the starter button page 125,
fig. 129 .
The ignition can be switched off up to a speed of 2 km/h. On vehicles fitted with a manual gearbox,
the clutch must not be pressed after
switching off the ignition otherwise the system would try to start.
On vehicles fitted with an automatic gearbox, the selector lever must be in the position
P or N and the brake pedal must not be pressed.
Emergency ignition shutoff systemIn an emergency it is possible to switch off the ignition even at speeds greater than 2
km/h, by way of the so-called em ergency ignition shutoff system.
– Press the starter button page 125, fig. 129 for longer than 1 second or press it
twice within 1 second.
WARNING
Never switch off the ignition while dr iving, otherwise the steering and brake
assist do no longer function - risk of accident!Starting the engineIt is necessary that a valid key is in the vehi cle, the steering is unlocked and the ignition
is switched on in order to start the vehicle. On vehicles with manual gearbox, hold the
clutch pressed when starting the vehicle, on vehicles with automatic gearbox move the
selector lever into position P or N and hold the brake pedal pressed until the engine
starts.Petrol engines– Press the starter button page 125, fig. 129 until the engine has started.Diesel engines– If the starter button is pressed during the whole preglow period, the engine starts
after the warning light
has gone out.
The diesel engine can also be started by pressing the starter button, the ignition is
switched on and the preglow warning light
lights up. You must wait until the
preglow warning light
goes out and then press the starter button again until the
engine starts.
A1
s3fg.2.book Page 126 Friday, April 30, 2010 12:17 PM
Page 128 of 287

Starting-off and Driving127
Using the system
Safety
Driving Tips
General Maintenance
Breakdown assistance
Technical Data
If in an emergency, the engine must be star
ted quickly (e.g. in a critical situation), you
can start the engine by pressing the starte r button again before the preglow warning
light goes out.
WARNING
Never leave the key in the vehicle in th e area where there are children, because
they can easily start the vehicle - risk of accident!
Note
If the steering is locked while the engine is started, it is unlocked by pressing the starter
button, the electrical components (e.g. radio, navigation system etc.) are activated, the
ignition is switched on and the engine is started.Emergency start-up of engineIf the authorised key is not successfully recognised, Key not found is shown in the
information display* or No Key is shown in the display of the instrument cluster and
the emergency start-up of the engine must be carried out.
– Press the starter button fig. 130 and then hold the key at the starter button or
– press the starter button directly with the key.
Note
During an emergency start-up of the engine, the correct orientation of the key must be
kept fig. 130 .
Switching the engine off– Bring the vehicle to a stop.
– Switch off the engine by pressing the starter button page 125, fig. 129 , doing so
switches off the ignition at the same time.
Note
The KESSY system is protected against inadvertently switching off the engine while
driving, this means that the engine can only be switched off in an emergency
page 126.Messages in the instrument clusterIf a fault is present in the electric steering lock, a message regarding this fault is shown
in the information display* or in the display of the instrument cluster.
Steering column lock: Workshop!
If this message is shown in the information display*, the warning light flashes
and
an acoustic signal sounds, you can continue the trip with extra care. The vehicle must
be immediately taken to a specialist garage.
Steering column lock defective.
If this message is shown in the information display*, the warning light
flashes and a
warning signal sounds, the vehicle must no t be driven and it must be taken to a
specialist garage. After switching off the ignition, it is then no longer possible to lock the
steering, to activate the electrical components (e.g. radio, navigation system), to switch
on the ignition again and to start the engine.
Depress clutch! or CLUTCH
This message is shown if you do not depress the clutch pedal when starting the engine.
Depress brake pedal! or BRAKE
This message is shown if you do not depress the brake pedal when starting the engine,
the warning light
comes on.
Fig. 130 Emergency start-up of vehicle
s3fg.2.book Page 127 Friday, April 30, 2010 12:17 PM
Page 129 of 287

Starting-off and Driving
128
Move selector lever to position P/N! or P/N
10)
This message is shown if the selector lever is not in the position P or N, when locking
the steering, switching the ignition on/off or when starting the engine.
Move selector lever to position P! or P
10)
This message is shown if the selector lever is not in the position P when opening the
driver door and the ignition is switched off, or if it is not in the position P, when
switching off the ignition while the driver door is open. The message disappears after
a few seconds by switching on the ignition or by moving the selector lever into the
position P.Parking aid*Rear parking aid*
The parking aid provides a warning of obstacles behind the vehicle.The audible parking aid determines the distance between the rear bumper and an
obstacle located behind the ve hicle with the aid of ultrasound sensors. The tones of
the parking aid can be adapted in the menu of the information display* page 25.
The sensors are integrated in the rear bumper. Range of sensors
The clearance warning begins at a distance of about 160 cm from the obstacle (area
fig. 131 ). The interval between the warning signals becomes shorter as the clear-
ance is reduced.
A continuous tone sounds from a distance of approx. 30 cm (area ) - danger area.
You should not reverse any further after this signal sounds! If the vehicle is
equipped with a factory-fitted towing device*, the border of the danger area starts -
continuous tone - 5 cm further behind th e vehicle. The vehicle can be extended
through an installed detachable towing device.
On vehicles equipped with a factory-fitted radio* or navigation system*, the distance
to the obstruction is shown graphically in the display. On vehicles with a factory-fitted
towing device, the sensors are deactivated when towing a trailer. The driver is informed
about this by a graphic display (vehicle towing a trailer) in the radio* or the navigation*
display. The factory-fitted radio* or navigati on system* can be set so that the play func-
tion volume decreases when activating the parking aid, see Owner's Manual radio* or
navigation system*. This improves the audibility of the parking aid.
Activating
The parking aid is activated automatically when reverse gear is engaged and the igni-
tion is turned on. This is confirmed by a brief acknowledgement signal.
Deactivating
The parking aid is deactivated by removing the reverse gear.
WARNING
The parking aid is not a substitute for the driver paying proper attention and
it is always the driver's responsibility to take care when parking the vehicle or
carrying out similar manoeuvres.
You should therefore satisfy yourself, before reversing, that there is no small
obstacle, such as a rock, thin post, trai ler drawbar etc., behind your vehicle.
Such an obstacle might not be within the range detected by the sensors.
Under certain circumstances, surfaces of certain objects and types of
clothing cannot reflect the signal of the parking aid. Thus, these objects or
people who wear such clothing are not recognised by the sensors of the parking
aid.
10)Valid for vehicles with automatic gearbox.
Fig. 131 Parking aid: Detection range of
rear sensors
AA
AB
s3fg.2.book Page 128 Friday, April 30, 2010 12:17 PM