change time SKODA SUPERB 2010 2.G / (B6/3T) Owner's Manual
[x] Cancel search | Manufacturer: SKODA, Model Year: 2010, Model line: SUPERB, Model: SKODA SUPERB 2010 2.G / (B6/3T)Pages: 287, PDF Size: 16.59 MB
Page 19 of 287
Instruments and warning lights
18
On vehicles which are equipped with inform ation display*, you can call up this infor-
mation in the following menu on page 23:
SETUP
Service Interval (Service)
Info
The following will be displayed in the information display* for 10 seconds: Service in ... km or ... days
Resetting Service Interval Display
It is only possible to reset the Service Interval Display, if a service message or at least a
pre-warning is shown on the display of the instrument cluster.
We recommend having this resetting performed by a specialist garage.
The specialist garage:
resets the memory of the display after the appropriate inspection,
makes an entry in the Service schedule,
affix the sticker with the entry of the following service interval to the side of the
dash panel on the driver's side.
Reset the service interval displays by using the reset button page 15 on the trip
counter.
On vehicles which are equipped with inform ation display*, you can call up this infor-
mation in the following menu on page 23:
SETUP
Service Interval (Service)
ResetCaution
We recommend that you do not reset the Se rvice Interval Display yourself otherwise
this can result in the service interval display being incorrectly set, which may also result
in problems with operation of your vehicle.
Note
Never reset the display between service intervals otherwise this may result in
incorrect readouts.
information is retained in the Service Inter val Display also after the battery of the
vehicle is disconnected.
If the instrument cluster is exchanged after a repair, the correct values must be
entered in the counter for the Service Interva l Display. This work is carried out by a
specialist garage.
The data displayed is the same after resetting the display with flexible service inter-
vals (QG1) using the reset button as that for a vehicle with fixed service intervals (QG2).
We therefore recommend having the Service In terval Display reset only by an author-
ised Škoda Service Partner who is familiar with the procedure for resetting the display
with a vehicle system tester.
Please refer to the brochure Service schedule for extensive information about the
service intervals.
Digital clockThe time is set with the buttons and page 15, fig. 15 .
Select the display which you wish to ch ange with the button and carry out the
change with the button .
On vehicles which are fitted out with the information display*, it is possible to set the
time in the menu Time page 25.
WARNING
The clock should not be adjusted while driving for safety reasons but only when
the vehicle is stationary!
A7
A3
A7
A3
A7
s3fg.2.book Page 18 Friday, April 30, 2010 12:17 PM
Page 20 of 287
Instruments and warning lights19
Using the system
Safety
Driving Tips
General Maintenance
Breakdown assistance
Technical Data
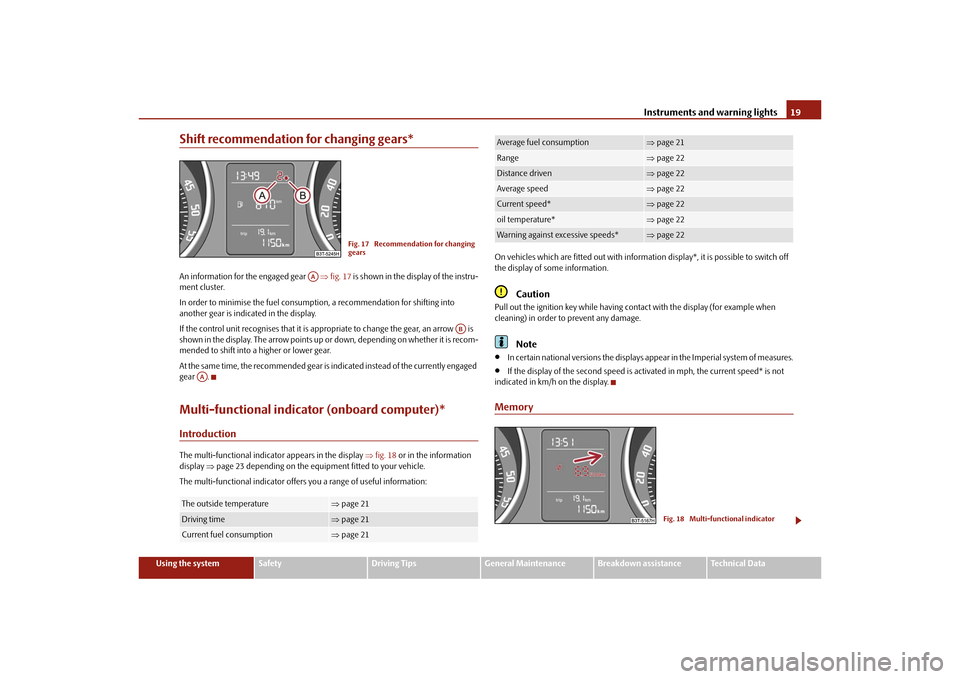
Shift recommendation for changing gears*An information for the engaged gear fig. 17 is shown in the display of the instru-
ment cluster.
In order to minimise the fuel consumptio n, a recommendation for shifting into
another gear is indicated in the display.
If the control unit recognises that it is a ppropriate to change the gear, an arrow is
shown in the display. The arrow points up or down, depending on whether it is recom-
mended to shift into a higher or lower gear.
At the same time, the recommended gear is indicated instead of the currently engaged
gear .Multi-functional indicator (onboard computer)*IntroductionThe multi-functional indicator appears in the display fig. 18 or in the information
display page 23 depending on the equipm ent fitted to your vehicle.
The multi-functional indicator offers you a range of useful information: On vehicles which are fitted out with informat
ion display*, it is possible to switch off
the display of some information.
Caution
Pull out the ignition key while having contact with the display (for example when
cleaning) in order to prevent any damage.
Note
In certain national versions the displays appear in the Imperial system of measures.
If the display of the second speed is acti vated in mph, the current speed* is not
indicated in km/h on the display.
Memory
The outside temperature
page 21
Driving time
page 21
Current fuel consumption
page 21
Fig. 17 Recommendation for changing
gears
AA
AB
AA
Average fuel consumption
page 21
Range
page 22
Distance driven
page 22
Average speed
page 22
Current speed*
page 22
oil temperature*
page 22
Warning against excessive speeds*
page 22
Fig. 18 Multi-functional indicator
s3fg.2.book Page 19 Friday, April 30, 2010 12:17 PM
Page 26 of 287
Instruments and warning lights25
Using the system
Safety
Driving Tips
General Maintenance
Breakdown assistance
Technical Data
– Investigate the function indicated.
– Obtain professional assistance.
Meaning of the red symbols:
Three
successive warning signals will sound if a red symbol appears.
Yellow symbols
A yellow symbol signals a warning.Check the relevant function as soon as possible.
The meaning of the yellow symbols:
One warning signal will sound if a yellow symbol appears.
If several operational faults of priority 2 exist, the symbols appear one after the other
and are each illuminated for about 5 seconds.SetupYou can change certain setti ngs by means of the information display. The current
setting is shown on the information display in the respective menu at the top below the
line.
You can select the following information (d epending on the equipment installed on
the vehicle):
Language
Autom. blind
MFD Data
Convenience
Lights & Vision
Time
Winter tyres
Units
Assistants
Alt. speed dis.
Service Interval (Service)
Factory Setting
Back
After selecting the menu point Back you will reach one level higher in the menu.
Language
Here you can set in which language the warning and information texts should be
displayed.
Automatic blind* (Combi)
Here you can deactivate/activate the automatic roll-up function of the luggage
compartment roll cover when opening the boot lid.
Displays of the MFA
Here you can switch off or on certain displays of the multi-functional indicator.
Comfort*
You can set the following f unctions (depending on the equipment installed on the
vehicle):
Engine oil pressure too low
page 31
Overheated clutches of the automatic gear-
box DSG*
page 36
Check engine oil level,
engine oil sensor faulty
page 31
Brake pad worn
page 35
s3fg.2.book Page 25 Friday, April 30, 2010 12:17 PM
Page 27 of 287
Instruments and warning lights
26
Lights and Visibility
Here you can set how long the light should stay on for the function Coming/Leaving
Home. Furthermore you can here switch on or off the functions daylight driving lights,
automatic rear window wiper, conven ience turn signal and travel mode.
After selecting the menu Fa c t o r y s e t t i n g the factory setting is established again.
After selecting the menu point travel mode, you can activate / deactivate the mode
“tourist light”. This mode makes it possible to drive in countries with opposing traffic system, driving on the left/right, without dazzling the oncoming vehicles. Further infor-
mation
page 64, “Tourist light”.
Time
Here you can set the time, the time format (12 or 24 hour indicator) and the time
change summer/winter time.
Winter tyres
Here you can set at which speed a warning signal should sound. This function is used
for e.g winter tyres with the permissible maximum speed less than the maximum
speed of the vehicle.
When exceeding the speed, the following is displayed on the information display*:
Winter tyres max. speed ... km/h
Measures
Here you can set the units for temperat ure, consumption and distance driven.
Assistant
Here you can adjust the tones of the acoustic signals of the parking aid*.
Second speed
Here you can switch on the display of the second speed in mph or in km/h
2).
Service
Here you can have the kilometers still to be driven and the days until the following
service interval shown and the Service Interval Display reset.
Factory Setting
After selecting the menu Factory Setting the factory setting of the information display
is established again.
Rain closing
On vehicles with rain sensor you can switch on or off the
function for automatic closing of the windows and the
sliding/tilting roof in case of ra in and locked vehicle. If it is
not raining and the function is set, the windows including
the sliding/tilting roof are closed automatically after
approx. 12 hours.
Door open
Here you can switch on or off the functions for opening a
single door and automatic closin g, this also applies to the
KESSY system*.
ATA c o n fi r m
Here you can set if a signal to ne should sound additionally
when activating or deactivating the anti-theft alarm system
.
Window op.
Here you can set the convenience mode only for the driver
window or for all the windows.
Mirror down
Here you can switch on or off the function for mirror low-
ering on the front passenger side when engaging the
reverse gear
a).
a)This function is only available on vehicles with an electrically adjustable driver seat.Mirror adjust.
Here you can switch on or off the function for left and right
exterior mirror adjustment simultaneously.
Fa cto r y se tt ing
After selecting this menu the convenience setting is reset
to factory setting. The following is displayed in the infor-
mation display:
Factory setting for convenience is set
2)Valid for countries where the values ar e indicated in British measuring units.
s3fg.2.book Page 26 Friday, April 30, 2010 12:17 PM
Page 38 of 287
Unlocking and locking37
Using the system
Safety
Driving Tips
General Maintenance
Breakdown assistance
Technical Data
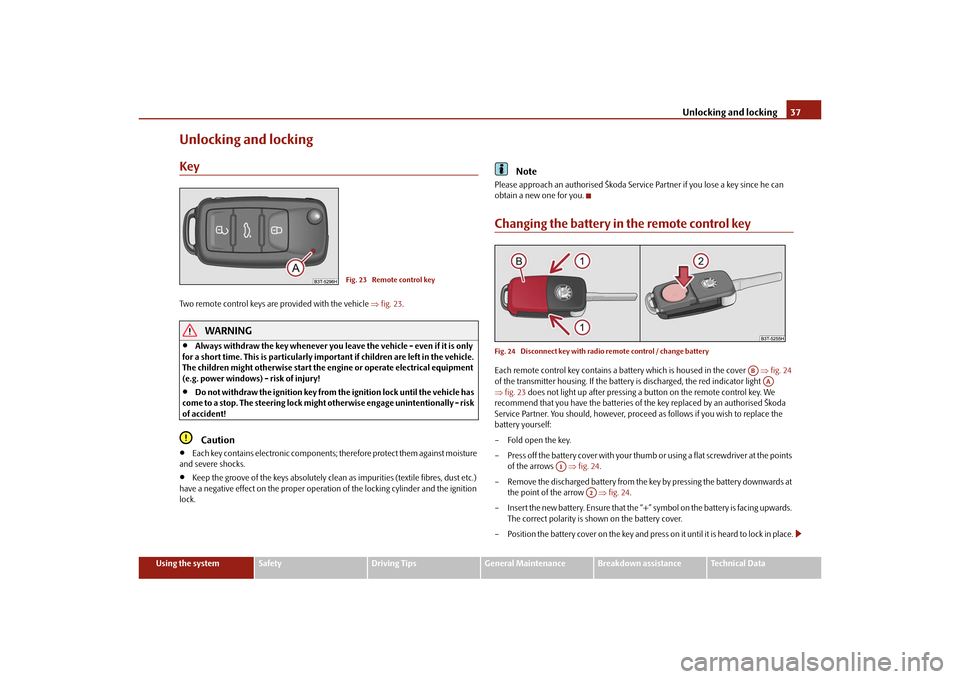
Unlocking and lockingKeyTwo remote control keys are provided with the vehicle fig. 23 .
WARNING
Always withdraw the key whenever you leave the vehicle - even if it is only
for a short time. This is particularly important if children are left in the vehicle.
The children might otherwise start the en gine or operate electrical equipment
(e.g. power windows) - risk of injury!
Do not withdraw the ignition key from the ignition lock until the vehicle has
come to a stop. The steerin g lock might otherwise enga ge unintentionally - risk
of accident!Caution
Each key contains electronic components; therefore protect them against moisture
and severe shocks.
Keep the groove of the keys absolutely clean as impurities (textile fibres, dust etc.)
have a negative effect on the proper operation of the locking cylinder and the ignition
lock.
Note
Please approach an authorised Škoda Servic e Partner if you lose a key since he can
obtain a new one for you.Changing the battery in the remote control keyFig. 24 Disconnect key with radio remote control / change batteryEach remote control key contains a ba ttery which is housed in the cover fig. 24
of the transmitter housing. If the battery is discharged, the red indicator light
fig. 23 does not light up after pressing a button on the remote control key. We
recommend that you have the batteries of the key replaced by an authorised Škoda
Service Partner. You should, however, proceed as follows if you wish to replace the
battery yourself:
– Fold open the key.
– Press off the battery cover with your thumb or using a flat screwdriver at the points
of the arrows fig. 24 .
– Remove the discharged battery from the key by pressing the battery downwards at the point of the arrow fig. 24 .
– Insert the new battery. Ensure that the “+” symbol on the battery is facing upwards.
The correct polarity is shown on the battery cover.
– Position the battery cover on the key and press on it until it is heard to lock in place.
Fig. 23 Remote control key
AB
AA
A1
A2
s3fg.2.book Page 37 Friday, April 30, 2010 12:17 PM
Page 63 of 287
Lights and Visibility
62
Rain lights
If you move the windshield wiper lever in the position slow wipe for more than 5
seconds, the side lights and low beam are automatically switched on. The light is
switched off when the windshield wiper lever is no longer than 4 minutes in the posi-
tion for slow or intermittent wipe.
If you switch on the windscreen wipe in th e operation rain sensor* for longer than 10
seconds or in the operation permanent wipe (position 2 or 3) page 73 switching on
for longer than 15 seconds, the side lights and low beam are switched on automati-
cally. The light switches off if the windscreen wipe is in operation rain sensor* for more
than 4 minutes or is not switched on in the operation permanent wipe.
WARNING
The automatic light control only operat es as a support. The driver is not
released from his responsibility to inspect the light and if necessary to switch on
the light depending on the light conditions. The light sensor cannot detect for
example rain or snow. For these conditions we recommend to switch on the low
beam
!
Note
Do not affix any stickers in front of the light sensor, so that you do not impair its
function or put it out of operation.
The same principles as for using the automa tic light control also apply to the light
which is switched on manually page 60.
Coming Home FunctionThe function makes it possible to switch on the lights in the darkness for a short time
after leaving the vehicle.Switching on Coming Home Function– The light switch is in the position automatic driving lamp control
and the low
beam illuminates.
– Switch off the ignition.
– After opening the driver's door, the function Coming Home is switched on. – Close all the doors and the boot lid and lo
ck the vehicle. After a short time, switch
all lights off.
Depending on equipment fitted the function Coming Home switches on the following
lights:
Parking lights,
Low beam,
Entry lighting in the exterior mirrors,
Licence plate light.
Coming Home Function
The lights go out 10 seconds after cl osing all the doors and the boot lid.
If a door or the boot lid re mains open, the lights go out 60 seconds after switching off
the ignition.
On vehicles fitted with automatic driving la mp control you can also switch the light
switch in the position
. The function Coming Home is controlled with the light
sensor in the mount of the interior rear mirror. If the light intensity is higher than the
set value of the light sensor, the Coming Home Function is not switched on after
switching off the ignition.
Note
If the Coming Home Function is switched on constantly, the battery will be heavily
discharged particularly in short-haul traffic.
The switching on of the described lights should only be undertaken in accordance
with the legal requirements.
You can change the illumination period for the Coming Home Function by means
of the information display*.
Leaving Home FunctionThis function makes it possible to switch on the lights when approaching the vehicle.
s3fg.2.book Page 62 Friday, April 30, 2010 12:17 PM
Page 64 of 287
Lights and Visibility63
Using the system
Safety
Driving Tips
General Maintenance
Breakdown assistance
Technical Data
Switching on Leaving Home Function– After leaving the vehicle, the light switch is in the position automatic driving lamp
control
.
– Unlock the vehicle with the radio remote control - the lights come on.
Depending on equipment fitted the function Leaving Home switches on the following
lights:
Parking lights,
Low beam,
Entry lighting in the exterior mirrors,
Licence plate light.
Leaving Home Function
The function Leaving Home is controlled with the light sensor in the mount of the inte-
rior rear mirror. If the light intensity is higher than the set value of the light sensor, the
Leaving Home Function is not switched on after unlocking the vehicle with the radio
remote control.
After unlocking the vehicle wi th the radio remote control, the lights come on for 10
seconds. The Leaving Home Function is also switched off after the ignition is switched
on and after locking the vehicle.
If no door is opened within 30 seconds, the lights go out and the vehicle is locked auto-
matically.Note
If the Leaving Home Function is switched on constantly, the battery will be heavily
discharged particularly in short-haul traffic.
The switching on of the described lights should only be undertaken in accordance
with the legal requirements.
You can change the illumination period for the Leaving Home Function by means
of the information display*.
Adaptive headlights (AHL)*Switch on Adaptive headlights (AHL)*– Turn the light switch page 61, fig. 47 into position
.
The AHL system* is activated if:
the light sensor recognizes the low light intensity,
no reverse gear is engaged,
the operation “tourist light” is not switched on.
The light sensor switches on the full outer illumination at low light intensity.
System AHL* makes it possible to change th e length and width of illumination of the
headlight. The length and width of illuminati on changes automatically in relation to the
vehicle speed and the use of the windscreen wiper.
System AHL* operates in the following modes.
Mode out of town
The mode “out of town” is a basic mode. The di spersion of the cone of light in front of
the vehicle is similar to the low beam. The mode is active if none of the following
modes are active.
Mode rain
In the mode “rain” the dispersion of the cone of light in front of the vehicle is wider and
the width of illumination is shorter, so th at during bad weather (rain) the dazzling of
the oncoming drivers can be reduced. The mode is activated at speeds of 15 - 70 km/h
and if the windscreen wipers continuously operate for a peri od of time longer than 2
minutes. The mode is deactivated when dr opping below or exceeding the set speed
limit or if the windscreen wipers have been switched off for a period of time longer
than 8 minutes.
Mode city
In the mode “city”, the dispersion of the cone of light in front of the vehicle is wider and
the width of illumination is sh orter. It has as an aim to illuminate the adjacent foot-
paths, crossings, pedestrian crossings etc. The mode is active at speeds of 15 - 50 km/h.
s3fg.2.book Page 63 Friday, April 30, 2010 12:17 PM
Page 75 of 287
Lights and Visibility
74
Automatic wipe/wash for windscreen
– Pull the lever towards the steering wheel into sprung position , the wash system
sprays immediately, the windscreen wiper starts wiping a little later. The wash
system and the windscreen wiper operate simultaneously at a speed of more than
120 km/h.
– Release the lever. The windscreen wash system stops and the wiper continues for another 3 - 4 wiper strokes (depending on the period of spraying of the wind-
screen). At a speed of more than 2 km/h , the wiper wipes once again* 5 seconds
after the last wiper stroke in order to wipe the last drops from the windscreen. This
function can be activated/deacti vated by a specialist garage.Rain sensor*– Move the lever into position .
– You can set the sensitivity of the sensor individually with switch .Wiping the rear window pane* (Combi)– Push the lever away from the st eering wheel into position page 73, fig. 63,
the widescreen wiper will operate every 6 seconds.Automatic wipe/wash for the rear window pane* (Combi)– Press the lever from the steering wheel forward into the sprung position , the wash system sprays immediately, the windscreen wiper starts wiping a little later.
As long as you hold the lever in this position, the wiper operates as well as the wash
system.
– Letting go of the lever will cause the windscreen wash system to stop and the wiper to continue for another 2 - 3 wiper strokes (depending on the period of spraying of
the windscreen). The lever will stay in position after releasing it.Switching windscreen wipers off– Move the lever back into its home position .
After the windscreen wiper switches off each time or the ignition switches off for the
third time, the position of the windscreen wiper changes, this counteracts an early
fatigue of the wiper rubbers. The windscreen wipers and the wash system on
ly operate if the ignition is switched on
and the bonnet is closed.
The rear window wiper operates only if the boot lid is closed.
If the intermittent wipe is switched on, the intervals are also controlled depending on
speed.
The rain sensor* automatically regulates the break between the individual wiper
strokes depending on the intensity of the rain.
The rear window will be wiped again if the front window wipers are on when reverse
gear is selected.
The windscreen washer nozzles are heated* when the ignition is switched on.
Top up with wash liquid page 226.
Winter position
If the windscreen wipers are in rest position, they cannot be folded out from the wind-
screen. For this reason we recommend adjust ing the windscreen wipers in winter so
that they can be folded out from the windscre en easily. You can set this rest position as
follows.
Switch on the windscreen wipers.
Switch off the ignition. The windscreen wipers remain in the position in which they
were when switching off the ignition.
You can also use the service position as a winter position.
WARNING
Properly maintained windscreen wiper blades are essential for clear visi-
bility and safe driving page 76.
Do not use the windscreen washer sy stem at low temperatures, without
heating the windscreen beforehand. Otherwise the window cleaner could
freeze on the windscreen and re strict the view to the front.
The rain sensor only operates as a su pport. The driver is not released from
the responsibility to set the function of the windscreen wipers manually
depending on the visibility conditions.
A5
A1
AA
A6
A7
A6
A0
s3fg.2.book Page 74 Friday, April 30, 2010 12:17 PM
Page 119 of 287
Air conditioning system
118
So that warm air can flow into the vehicl e interior after switching on the auxiliary
heating, you must maintain the temperat ure normally selected by you (we recom-
mend 22°C). It is recommended to put the air flow in the position
.
On vehicles with DPF (diesel particle filter) the warm coolant heats up the engine.
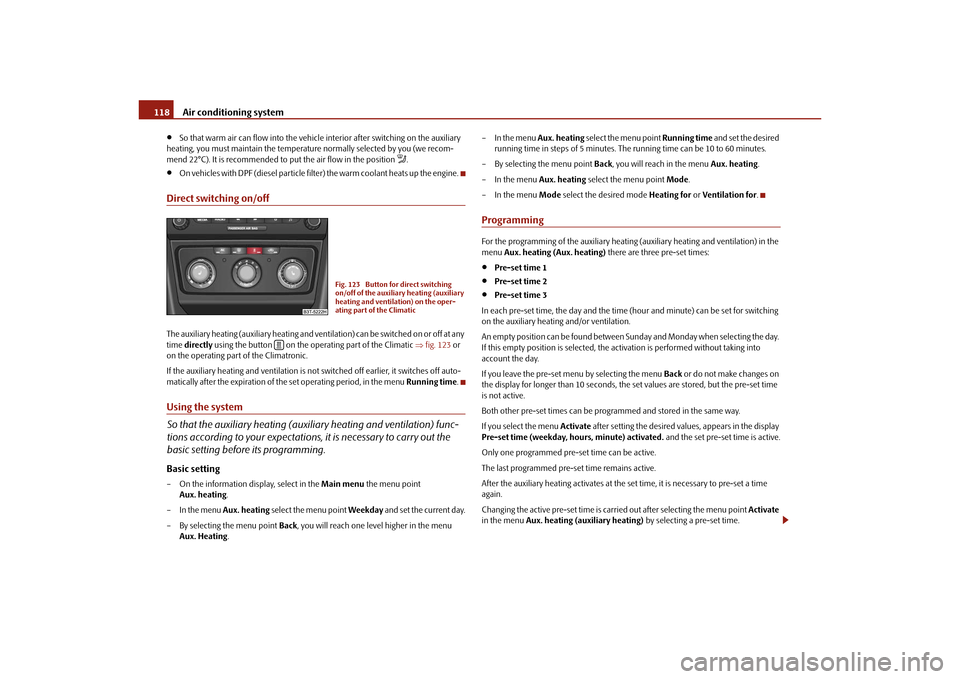
Direct switching on/offThe auxiliary heating (auxiliary heating and vent ilation) can be switched on or off at any
time directly using the button on the operating part of the Climatic fig. 123 or
on the operating part of the Climatronic.
If the auxiliary heating and ventilation is not switched off earlier, it switches off auto-
matically after the expiration of the set operating period, in the menu Running time.Using the system
So that the auxiliary heating (auxiliary heating and ventilation) func-
tions according to your expectations, it is necessary to carry out the
basic setting before its programming.Basic setting– On the information display, select in the Main menu the menu point
Aux. heating .
– In the menu Aux. heating select the menu point Weekday and set the current day.
– By selecting the menu point Back, you will reach one level higher in the menu
Aux. Heating . – In the menu
Aux. heating select the menu point Running time and set the desired
running time in steps of 5 minutes. The running time can be 10 to 60 minutes.
– By selecting the menu point Back, you will reach in the menu Aux. heating.
– In the menu Aux. heating select the menu point Mode.
– In the menu Mode select the desired mode Heating for or Ventilation for .
ProgrammingFor the programming of the auxiliary heating (auxiliary heating and ventilation) in the
menu Aux. heating (Aux. heating) there are three pre-set times:
Pre-set time 1
Pre-set time 2
Pre-set time 3
In each pre-set time, the day and the time (hour and minute) can be set for switching
on the auxiliary heating and/or ventilation.
An empty position can be found between S unday and Monday when selecting the day.
If this empty position is selected, the activation is performed without taking into
account the day.
If you leave the pre-set menu by selecting the menu Back or do not make changes on
the display for longer than 10 seconds, the set values are stored, but the pre-set time
is not active.
Both other pre-set times can be prog rammed and stored in the same way.
If you select the menu Activate after setting the desired values, appears in the display
Pre-set time (weekday, hours, minute) activated. and the set pre-set time is active.
Only one programmed pre-set time can be active.
The last programmed pre-set time remains active.
After the auxiliary heating activates at the set time, it is necessary to pre-set a time
again.
Changing the active pre-set time is carried out after selecting the menu point Activate
in the menu Aux. heating (auxiliary heating) by selecting a pre-set time.
Fig. 123 Button for direct switching
on/off of the auxiliary heating (auxiliary
heating and ventilation) on the oper-
ating part of the Climatic
s3fg.2.book Page 118 Friday, April 30, 2010 12:17 PM
Page 139 of 287
Automatic gearbox DSG*
138WARNING
Never move the selector lever into position R or P when driving - risk of an
accident!
When the engine is running and the vehicle is stationary, it is necessary to
hold the car with the brake pedal in all the positions of the selector lever (except
P and N) since the power transmission is never completely interrupted, also not
when the engine is idling - the vehicle creeps.
You must on no account unintentionally operate the throttle (e.g. by hand
from the engine compartment) if a driv e position is engaged when the car is
stationary. The vehicle would otherwise immediately start off - also when the
handbrake is firmly applied - risk of an accident!
You must move the selector lever into position P and firmly apply the hand-
brake first before you or any other person opens the bonnet and starts working
on the engine when it is running - risk of accident! It is also essential to observe
all warnings page 216.
Selector lever lockAutomatic selector lever lock
With the ignition on, the selector lever is locked when it is in the positions P and N . You
must first of all depress the brake pedal in or der to move the selector lever out of this
position. The warning light
page 27 lights up in the instrument cluster as a
reminder for the driver when the selector lever is in the positions P and N.
A time delay element ensures that the selector lever is not blocked when rapidly
switching over the position N (e.g. from R to D). This does, for example, allow one to
seesaw out a stuck vehicle. The selector lever lo ck will click into place if the lever is in
the N position for more than 2 seconds without the brake pedal being pressed.
The selector lever lock is only active if the vehicle is stationary or moving at speed of
less than 5 km/hour. The lock is swit ched off automatically into position N when the
car is travelling at a higher speed.
Shiftlock button
The Shiftlock button in the hand le of selector lever prevents certain selector lever posi-
tions being engaged inadvertently. The select or lever lock is cancelled when you press
the Shiftlock button. Keylock - Ignition key withdrawal lock
You can only withdraw the ignition key after
switching off the ignition if the selector
lever is in position P. If the ignition key is withdrawn, the selector lever is blocked in
position P.
Kickdown function
The kickdown function provides you with maximum acceleration
power.Fully depressing the accelerato r pedal allows the kickdown function to be activated in
the desired driving program. This function has precedence over the driving
programme and serves for maximum accelerati on of the vehicle when exploiting the
maximum power potential of the engine wi thout taking into account the current
selector lever position ( D, S or Tiptronic). The gearbox shifts down to one or several
gears in line with the driving state and the vehicle accelerates. The gearbox does not
shift up into the highest gear until the en gine has reached its maximum revolutions for
this gear range.
WARNING
Please note that using the kickdown function can result in the driven wheels
spinning on a smooth or slippery road surface - risk of skidding!Dynamic shift programmeThe automatic gearbox of your vehicle is controlled electronically. Shifting up and
down through the gears is performed automati cally on the basis of pre-defined driving
programmes.
Adopting a moderate style of driving will cause the gearbox to select the most
economical driving programme. Shifting up into a higher gear as soon as possible and
shifting down as late as po ssible will have a favourable effect on your fuel consump-
tion.
Adopting a sporty style of driving with rapid movements of the accelerator pedal
combined with sharp acceleration and frequent changes in speed, exploiting the top
speed of the car or depressing the accele rator pedal (kickdown function), will cause
s3fg.2.book Page 138 Friday, April 30, 2010 12:17 PM