service indicator SKODA SUPERB 2010 2.G / (B6/3T) Owner's Manual
[x] Cancel search | Manufacturer: SKODA, Model Year: 2010, Model line: SUPERB, Model: SKODA SUPERB 2010 2.G / (B6/3T)Pages: 287, PDF Size: 16.59 MB
Page 4 of 287
Contents3
Using the system
Safety
Driving Tips
General Maintenance
Breakdown assistance
Technical Data
ContentsLayout of this Owner's Manual
(explanations)
. . . . . . . . . . . . . . . . . . . . . . . . . .
Using the system
. . . . . . . . . . . . . . . . . . . . . .
Cockpit
. . . . . . . . . . . . . . . . . . . . . . . . . . . . . . . . . . . . . . . .
Overview . . . . . . . . . . . . . . . . . . . . . . . . . . . . . . . . . . . .
The brief instruction
. . . . . . . . . . . . . . . . . . . . . . . . . .
Basic functions and important information . . . . .
Instruments and warning lights
. . . . . . . . . . . . . . .
Overview of the instrument cluster . . . . . . . . . . . . .
Engine revolutions counter . . . . . . . . . . . . . . . . . . . .
Speedometer . . . . . . . . . . . . . . . . . . . . . . . . . . . . . . . .
Coolant temperature gauge . . . . . . . . . . . . . . . . . . .
Fuel gauge . . . . . . . . . . . . . . . . . . . . . . . . . . . . . . . . . . .
Counter for distance driven . . . . . . . . . . . . . . . . . . .
Service Interval Display . . . . . . . . . . . . . . . . . . . . . . .
Digital clock . . . . . . . . . . . . . . . . . . . . . . . . . . . . . . . . . .
Shift recommendation for changing gears* . . . . .
Multi-functional indicator (onboard computer)*
Information display* . . . . . . . . . . . . . . . . . . . . . . . . . .
Auto Check Control* . . . . . . . . . . . . . . . . . . . . . . . . . .
Warning lights . . . . . . . . . . . . . . . . . . . . . . . . . . . . . . . .
Unlocking and locking
. . . . . . . . . . . . . . . . . . . . . . . .
Key . . . . . . . . . . . . . . . . . . . . . . . . . . . . . . . . . . . . . . . . . .
Changing the battery in the remote control key .
Electronic immobiliser . . . . . . . . . . . . . . . . . . . . . . . .
Child safety lock . . . . . . . . . . . . . . . . . . . . . . . . . . . . . .
Central locking system . . . . . . . . . . . . . . . . . . . . . . . .
Remote control . . . . . . . . . . . . . . . . . . . . . . . . . . . . . . .
Description . . . . . . . . . . . . . . . . . . . . . . . . . . . . . . . . . .
Unlocking and locking car . . . . . . . . . . . . . . . . . . . . .
Synchronisation of the remote control . . . . . . . . . .
Anti-theft alarm system* . . . . . . . . . . . . . . . . . . . . . . Power windows . . . . . . . . . . . . . . . . . . . . . . . . . . . . . . .
Electric sliding/tilting roof* . . . . . . . . . . . . . . . . . . . . .
Panoramic sliding roof* (Combi) . . . . . . . . . . . . . . .
Lights and Visibility
. . . . . . . . . . . . . . . . . . . . . . . . . . . .
Lights . . . . . . . . . . . . . . . . . . . . . . . . . . . . . . . . . . . . . . . .
Interior lighting . . . . . . . . . . . . . . . . . . . . . . . . . . . . . . .
Luggage compartment light (Combi) . . . . . . . . . . . .
Visibility . . . . . . . . . . . . . . . . . . . . . . . . . . . . . . . . . . . . . .
Windshield wiper and wash system . . . . . . . . . . . . .
Rear-view mirror . . . . . . . . . . . . . . . . . . . . . . . . . . . . . .
Exterior mirror . . . . . . . . . . . . . . . . . . . . . . . . . . . . . . . .
Exterior mirror with entry lighting* . . . . . . . . . . . . .
Automatic dimming exterior mirror* . . . . . . . . . . . .
Seats and Stowage
. . . . . . . . . . . . . . . . . . . . . . . . . . . . .
Front seats . . . . . . . . . . . . . . . . . . . . . . . . . . . . . . . . . . . .
Adjusting front seats electrically* . . . . . . . . . . . . . . .
Head restraints . . . . . . . . . . . . . . . . . . . . . . . . . . . . . . . .
Middle rear head restraint . . . . . . . . . . . . . . . . . . . . .
Rear seats . . . . . . . . . . . . . . . . . . . . . . . . . . . . . . . . . . . .
luggage compartment . . . . . . . . . . . . . . . . . . . . . . . . .
Variable loading floor in the luggage compartment*
(Combi) . . . . . . . . . . . . . . . . . . . . . . . . . . . . . . . . . . . . . .
Net partition* (Combi) . . . . . . . . . . . . . . . . . . . . . . . .
The roof rack* . . . . . . . . . . . . . . . . . . . . . . . . . . . . . . . .
Cup holder . . . . . . . . . . . . . . . . . . . . . . . . . . . . . . . . . . .
Ashtray . . . . . . . . . . . . . . . . . . . . . . . . . . . . . . . . . . . . . . .
Cigarette lighter*, power sockets . . . . . . . . . . . . . . .
Storage compartments . . . . . . . . . . . . . . . . . . . . . . . .
Air conditioning system
. . . . . . . . . . . . . . . . . . . . . . .
Introduction . . . . . . . . . . . . . . . . . . . . . . . . . . . . . . . . . .
Air outlet vents . . . . . . . . . . . . . . . . . . . . . . . . . . . . . . . .
Climatic (semi-automatic air conditioning system)
Climatronic* (automatic air conditioning) . . . . . . .
Auxiliary heating (auxiliary heating and ventilation)*
Starting-off and Driving
. . . . . . . . . . . . . . . . . . . . . . .
Setting steering wheel position . . . . . . . . . . . . . . . .
Ignition lock . . . . . . . . . . . . . . . . . . . . . . . . . . . . . . . . . .
Starting the engine . . . . . . . . . . . . . . . . . . . . . . . . . . . .
KESSY system* . . . . . . . . . . . . . . . . . . . . . . . . . . . . . . .
Parking aid* . . . . . . . . . . . . . . . . . . . . . . . . . . . . . . . . . .
Park Assist* . . . . . . . . . . . . . . . . . . . . . . . . . . . . . . . . . .
Cruise control system (CCS)* . . . . . . . . . . . . . . . . . .
Automatic gearbox DSG*
. . . . . . . . . . . . . . . . . . . . .
Automatic gearbox DSG* . . . . . . . . . . . . . . . . . . . . . .
Communication
. . . . . . . . . . . . . . . . . . . . . . . . . . . . . . .
Multifunction steering wheel* . . . . . . . . . . . . . . . . .
Mobile phones and two-way radio systems . . . . .
Universal telephone preinstallation GSM II* . . . . .
Voice control . . . . . . . . . . . . . . . . . . . . . . . . . . . . . . . . .
Music playback via Bluetooth® . . . . . . . . . . . . . . . .
Universal telephone preinstallation GSM IIl* . . . .
Voice control . . . . . . . . . . . . . . . . . . . . . . . . . . . . . . . . .
Connection to the internet . . . . . . . . . . . . . . . . . . . .
Music playback via Bluetooth® . . . . . . . . . . . . . . . .
Multimedia . . . . . . . . . . . . . . . . . . . . . . . . . . . . . . . . . .
Safety
. . . . . . . . . . . . . . . . . . . . . . . . . . . . . . . . . . . . . . .
Passive Safety
. . . . . . . . . . . . . . . . . . . . . . . . . . . . . . . . .
Basic information . . . . . . . . . . . . . . . . . . . . . . . . . . . . .
Correct seated position . . . . . . . . . . . . . . . . . . . . . . .
Seat belts
. . . . . . . . . . . . . . . . . . . . . . . . . . . . . . . . . . . . . .
Why seat belts? . . . . . . . . . . . . . . . . . . . . . . . . . . . . . . .
The physical principle of a frontal collision . . . . . .
Important safety information regarding the use of seat
belts . . . . . . . . . . . . . . . . . . . . . . . . . . . . . . . . . . . . . . . . .
How are seat belts correctly fastened? . . . . . . . . . .
6799101015151516161617171819192324273737373838384949495050
52555760606770717377777878808081848485879295979899100100109109110111114117
121121121122125128130133136136142142145145150151152157158158159161161161162165165165166167
s3fg.2.book Page 3 Friday, April 30, 2010 12:17 PM
Page 16 of 287
Instruments and warning lights15
Using the system
Safety
Driving Tips
General Maintenance
Breakdown assistance
Technical Data
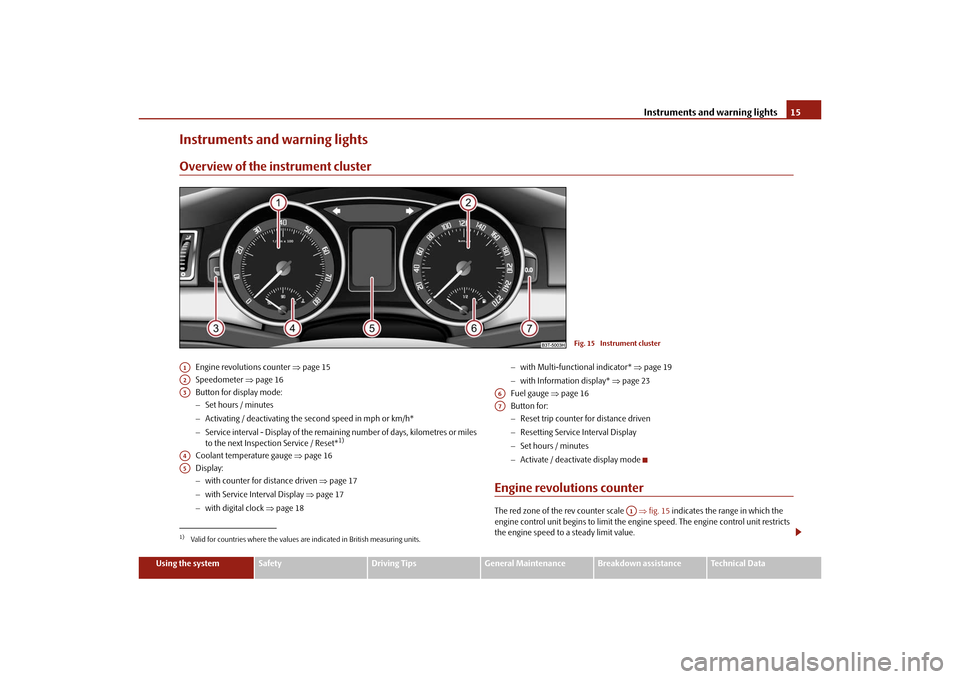
Instruments and warning lightsOverview of the instrument cluster
Engine revolutions counter page 15
Speedometer page 16
Button for display mode:
Set hours / minutes
Activating / deactivating the second speed in mph or km/h*
Service interval - Display of the remaining number of days, kilometres or miles
to the next Inspection Service / Reset*
1)
Coolant temperature gauge page 16
Display:
with counter for distance driven page 17
with Service Interval Display page 17
with digital clock page 18
with Multi-functional indicator* page 19
with Information display* page 23
Fuel gauge page 16
Button for:
Reset trip counter for distance driven
Resetting Service Interval Display
Set hours / minutes
Activate / deactivate display mode
Engine revolutions counterThe red zone of the rev counter scale fig. 15 indicates the range in which the
engine control unit begins to limit the engi ne speed. The engine control unit restricts
the engine speed to a steady limit value.
Fig. 15 Instrument cluster
1)Valid for countries where the values are indicated in British measuring units.A1A2A3A4A5
A6A7
A1
s3fg.2.book Page 15 Friday, April 30, 2010 12:17 PM
Page 18 of 287
Instruments and warning lights17
Using the system
Safety
Driving Tips
General Maintenance
Breakdown assistance
Technical Data
Note
After filling up, it can occur that during dy namic driving (e.g. numerous curves, braking,
driving downhill and climbing a steep hill) the fuel gauge indicates approx. a fraction
less. When stopping or during less dynamic driving, the correct fuel supply quantity is
indicated. This effect is not a fault.Counter for distance drivenThe distance which you have driven with yo ur vehicle is shown in kilometres (km). In
some countries the measuring unit “mile” is used.
Reset button
If you hold the reset button page 15 pressed for about 1 second, the trip counter
is set back to zero.
Trip counter for distance driven
The trip counter indicates the distance which you have driven since it was last reset -
in steps of 100 metres or 1/10 of a mile.
Counter for distance driven
The counter for distance driven indicates th e total distance in kilometers or miles
which the vehicle has been driven.
Fa u l t d i s p l a y
If there is a fault in the instru ment cluster, the constant text Error appears in the display.
Have the fault rectified as soon as possible by a specialist workshop.
WARNING
Never seek to adjust the trip counter for distance driven while driving for safety
reasons!
Note
If vehicles which are fitted with the inform ation display* the display of the second
speed is activated in mph or km/h, this driving speed is indicated instead of the
counter for the total distance driven.
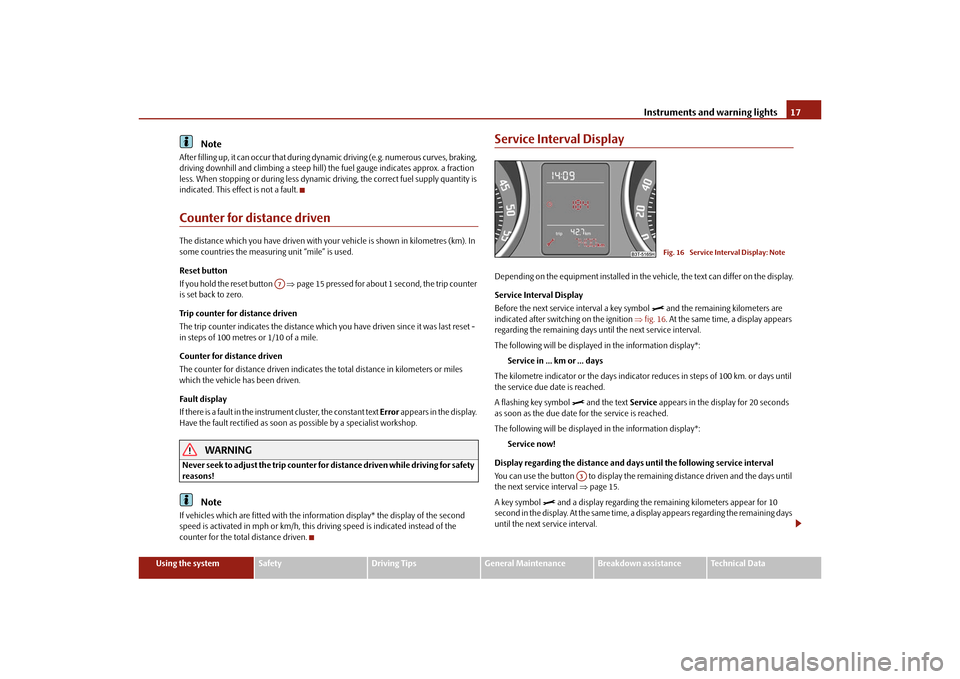
Service Interval DisplayDepending on the equipment installed in the vehicle, the text can differ on the display.
Service Interval Display
Before the next service interval a key symbol
and the remaining kilometers are
indicated after switching on the ignition fig. 16 . At the same time, a display appears
regarding the remaining days until the next service interval.
The following will be displayed in the information display*:
Service in ... km or ... days
The kilometre indicator or the days indicator reduces in steps of 100 km. or days until
the service due date is reached.
A flashing key symbol
and the text Service appears in the display for 20 seconds
as soon as the due date for the service is reached.
The following will be displayed in the information display*:
Service now!
Display regarding the distance and days until the following service interval
You can use the button to display the rema ining distance driven and the days until
the next service interval page 15.
A key symbol
and a display regarding the remaining kilometers appear for 10
second in the display. At the same time, a display appears regarding the remaining days
until the next service interval.
A7
Fig. 16 Service Interval Display: Note
A3
s3fg.2.book Page 17 Friday, April 30, 2010 12:17 PM
Page 24 of 287
Instruments and warning lights23
Using the system
Safety
Driving Tips
General Maintenance
Breakdown assistance
Technical Data
Information display*IntroductionThe information display provides you with information in a convenient way
concerning the current operating state of your vehicle . The information system also
provides you with data (depending on the equipment installed in the vehicle) relating
to the radio, mobile phone, multi-function al indicator, navigation system and auto-
matic gearbox.
Certain functions and operating conditions are always being checked on the vehicle
when the ignition is switched on and also while driving.
Functional faults, if required repair work and other information are indicated by red
symbols page 24 and yellow symbols page 25.
Lighting up of certain symbols is comb ined with an acoustic warning signal.
Information and texts giving warnings are also shown in the display page 27.
The display of text is possible in the following languages: Czech, English, German, French, Italian, Spanish, Portuguese, Russian and Chinese.
You can select the desired language in the setting menu.
The following information can be shown in the display (depending on the equipment
installed on the vehicle):
Caution
Pull out the ignition key while having contact with the display (for example when
cleaning) in order to prevent any damage.
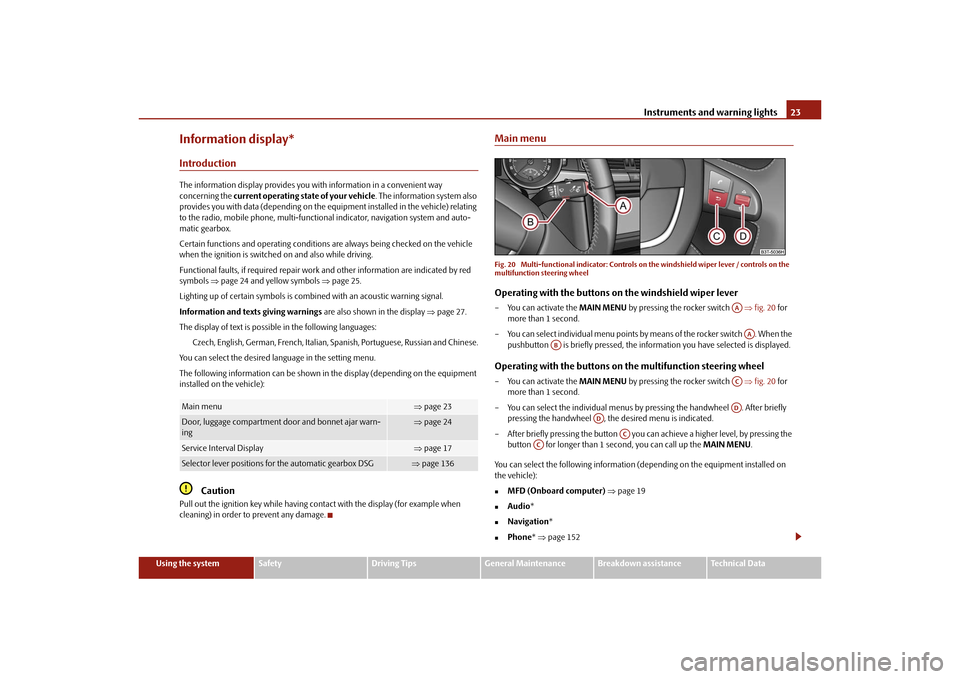
Main menuFig. 20 Multi-functional indica tor: Controls on the windshield wiper lever / controls on the
multifunction steering wheelOperating with the buttons on the windshield wiper lever– You can activate the MAIN MENU by pressing the rocker switch fig. 20 for
more than 1 second.
– You can select indivi dual menu points by means of the rocker switch . When the
pushbutton is briefly pressed, the information you have selected is displayed.Operating with the buttons on the multifunction steering wheel– You can activate the MAIN MENU by pressing the rocker switch fig. 20 for
more than 1 second.
– You can select the individual menus by pressing the handwheel . After briefly
pressing the handwheel , th e desired menu is indicated.
– After briefly pressing the button you can achieve a higher level, by pressing the
button for longer than 1 second, you can call up the MAIN MENU.
You can select the following information (d epending on the equipment installed on
the vehicle):
MFD (Onboard computer) page 19
Audio *
Navigation *
Phone* page 152
Main menu
page 23
Door, luggage compartment door and bonnet ajar warn-
ing
page 24
Service Interval Display
page 17
Selector lever positions fo r the automatic gearbox DSG
page 136
AAAA
AB
ACAD
AD
AC
AC
s3fg.2.book Page 23 Friday, April 30, 2010 12:17 PM
Page 26 of 287
Instruments and warning lights25
Using the system
Safety
Driving Tips
General Maintenance
Breakdown assistance
Technical Data
– Investigate the function indicated.
– Obtain professional assistance.
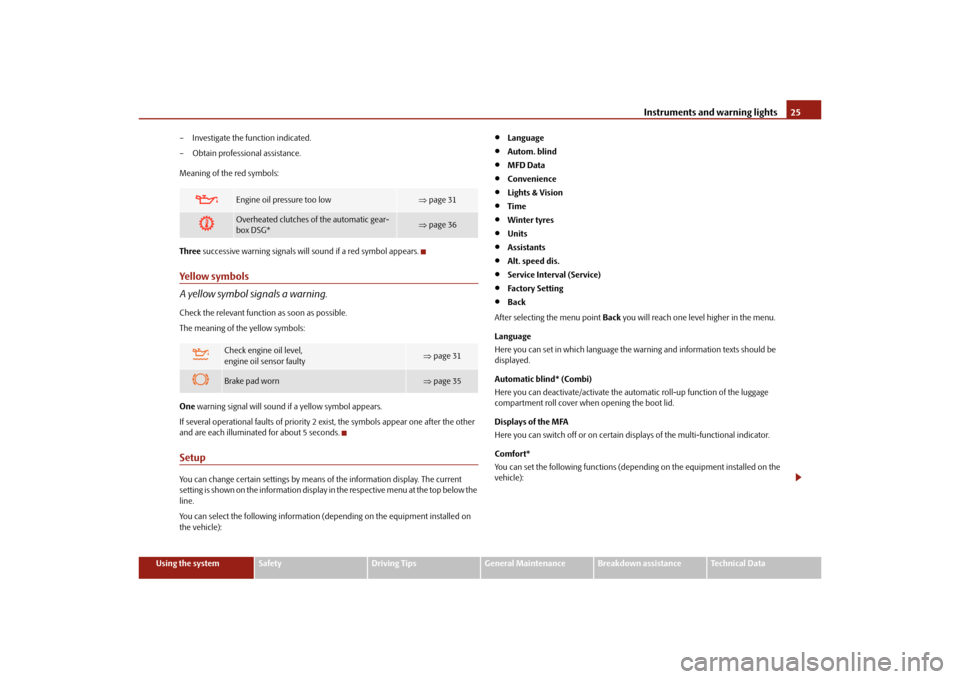
Meaning of the red symbols:
Three
successive warning signals will sound if a red symbol appears.
Yellow symbols
A yellow symbol signals a warning.Check the relevant function as soon as possible.
The meaning of the yellow symbols:
One warning signal will sound if a yellow symbol appears.
If several operational faults of priority 2 exist, the symbols appear one after the other
and are each illuminated for about 5 seconds.SetupYou can change certain setti ngs by means of the information display. The current
setting is shown on the information display in the respective menu at the top below the
line.
You can select the following information (d epending on the equipment installed on
the vehicle):
Language
Autom. blind
MFD Data
Convenience
Lights & Vision
Time
Winter tyres
Units
Assistants
Alt. speed dis.
Service Interval (Service)
Factory Setting
Back
After selecting the menu point Back you will reach one level higher in the menu.
Language
Here you can set in which language the warning and information texts should be
displayed.
Automatic blind* (Combi)
Here you can deactivate/activate the automatic roll-up function of the luggage
compartment roll cover when opening the boot lid.
Displays of the MFA
Here you can switch off or on certain displays of the multi-functional indicator.
Comfort*
You can set the following f unctions (depending on the equipment installed on the
vehicle):
Engine oil pressure too low
page 31
Overheated clutches of the automatic gear-
box DSG*
page 36
Check engine oil level,
engine oil sensor faulty
page 31
Brake pad worn
page 35
s3fg.2.book Page 25 Friday, April 30, 2010 12:17 PM
Page 27 of 287
Instruments and warning lights
26
Lights and Visibility
Here you can set how long the light should stay on for the function Coming/Leaving
Home. Furthermore you can here switch on or off the functions daylight driving lights,
automatic rear window wiper, conven ience turn signal and travel mode.
After selecting the menu Fa c t o r y s e t t i n g the factory setting is established again.
After selecting the menu point travel mode, you can activate / deactivate the mode
“tourist light”. This mode makes it possible to drive in countries with opposing traffic system, driving on the left/right, without dazzling the oncoming vehicles. Further infor-
mation
page 64, “Tourist light”.
Time
Here you can set the time, the time format (12 or 24 hour indicator) and the time
change summer/winter time.
Winter tyres
Here you can set at which speed a warning signal should sound. This function is used
for e.g winter tyres with the permissible maximum speed less than the maximum
speed of the vehicle.
When exceeding the speed, the following is displayed on the information display*:
Winter tyres max. speed ... km/h
Measures
Here you can set the units for temperat ure, consumption and distance driven.
Assistant
Here you can adjust the tones of the acoustic signals of the parking aid*.
Second speed
Here you can switch on the display of the second speed in mph or in km/h
2).
Service
Here you can have the kilometers still to be driven and the days until the following
service interval shown and the Service Interval Display reset.
Factory Setting
After selecting the menu Factory Setting the factory setting of the information display
is established again.
Rain closing
On vehicles with rain sensor you can switch on or off the
function for automatic closing of the windows and the
sliding/tilting roof in case of ra in and locked vehicle. If it is
not raining and the function is set, the windows including
the sliding/tilting roof are closed automatically after
approx. 12 hours.
Door open
Here you can switch on or off the functions for opening a
single door and automatic closin g, this also applies to the
KESSY system*.
ATA c o n fi r m
Here you can set if a signal to ne should sound additionally
when activating or deactivating the anti-theft alarm system
.
Window op.
Here you can set the convenience mode only for the driver
window or for all the windows.
Mirror down
Here you can switch on or off the function for mirror low-
ering on the front passenger side when engaging the
reverse gear
a).
a)This function is only available on vehicles with an electrically adjustable driver seat.Mirror adjust.
Here you can switch on or off the function for left and right
exterior mirror adjustment simultaneously.
Fa cto r y se tt ing
After selecting this menu the convenience setting is reset
to factory setting. The following is displayed in the infor-
mation display:
Factory setting for convenience is set
2)Valid for countries where the values ar e indicated in British measuring units.
s3fg.2.book Page 26 Friday, April 30, 2010 12:17 PM
Page 38 of 287
Unlocking and locking37
Using the system
Safety
Driving Tips
General Maintenance
Breakdown assistance
Technical Data
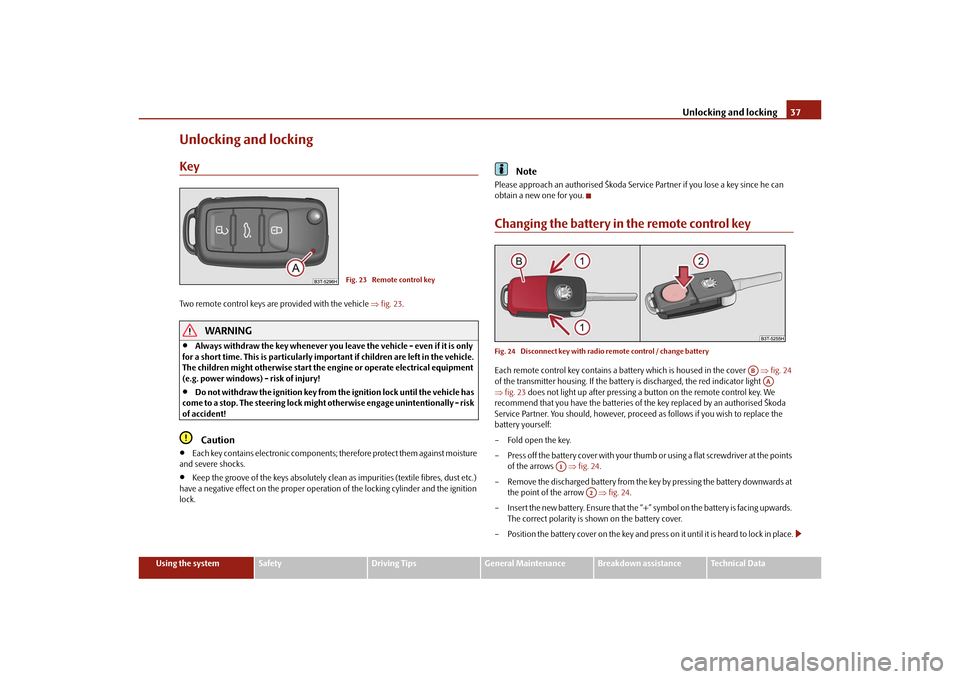
Unlocking and lockingKeyTwo remote control keys are provided with the vehicle fig. 23 .
WARNING
Always withdraw the key whenever you leave the vehicle - even if it is only
for a short time. This is particularly important if children are left in the vehicle.
The children might otherwise start the en gine or operate electrical equipment
(e.g. power windows) - risk of injury!
Do not withdraw the ignition key from the ignition lock until the vehicle has
come to a stop. The steerin g lock might otherwise enga ge unintentionally - risk
of accident!Caution
Each key contains electronic components; therefore protect them against moisture
and severe shocks.
Keep the groove of the keys absolutely clean as impurities (textile fibres, dust etc.)
have a negative effect on the proper operation of the locking cylinder and the ignition
lock.
Note
Please approach an authorised Škoda Servic e Partner if you lose a key since he can
obtain a new one for you.Changing the battery in the remote control keyFig. 24 Disconnect key with radio remote control / change batteryEach remote control key contains a ba ttery which is housed in the cover fig. 24
of the transmitter housing. If the battery is discharged, the red indicator light
fig. 23 does not light up after pressing a button on the remote control key. We
recommend that you have the batteries of the key replaced by an authorised Škoda
Service Partner. You should, however, proceed as follows if you wish to replace the
battery yourself:
– Fold open the key.
– Press off the battery cover with your thumb or using a flat screwdriver at the points
of the arrows fig. 24 .
– Remove the discharged battery from the key by pressing the battery downwards at the point of the arrow fig. 24 .
– Insert the new battery. Ensure that the “+” symbol on the battery is facing upwards.
The correct polarity is shown on the battery cover.
– Position the battery cover on the key and press on it until it is heard to lock in place.
Fig. 23 Remote control key
AB
AA
A1
A2
s3fg.2.book Page 37 Friday, April 30, 2010 12:17 PM
Page 40 of 287
Unlocking and locking39
Using the system
Safety
Driving Tips
General Maintenance
Breakdown assistance
Technical Data
unlocked when opening. Afterwards you can open the boot lid by pressing the handle
on the lower edge of the boot lid
page 44.
Operation of the central locking system is possible:
with a remote control key page 49,
using the buttons for the central locking system page 42,
from the outside using the vehicle key page 43, “Emergency unlocking and
locking of the driver's door”.
Indicator light in the driver's door
After locking the vehicle the indicator light fl ashes for 2 seconds fast, then more slowly.
If the vehicle is locked and the safe securing system page 42 is not operating, the
indicator light in the driver door flashes for about 2 seconds fast, goes out and starts to
flash slowly after about 30 seconds.
If the indicator light first of all flashes fast for about 2 seconds, afterwards lights up for
about 30 seconds without interruption and th en flashes slowly, there is a fault in the
system of the central locking or in the inte rior monitor and in the towing protection
monitoring* page 51. Visit a specialist garage to obtain assistance.
Convenience operatio n of the windows
One can open and close the windows when opening and closing the vehicle
page 54.
Opening a single door*
This function makes it possible to only unlock the driver's door. The other doors and
the fuel filler flap remain locked and ar e only unlocked after repetitive unlocking.
You can have the function opening a single door activated by an authorised Škoda
Service Partner on request or you can activate it yourself with the aid of the Informa-
tion display* page 25.
Unlocking a vehicle side door*
This selection function enables to unlock both doors on the driver's side. The other
doors and the fuel filler flap remain locked and are only unlocked after repetitive
unlocking. You can have the function opening a single
door activated by an authorised Škoda
Service Partner on request or you can activate it yourself with the aid of the Informa-
tion display* page 25.
Unlocking the vehicle with the KESSY system*
This selection function enables to unlock all th e doors, individual doors, both doors on
the left and right vehicle side or to unlock the driver and front passenger door at the
same time. The other doors and the fuel fille r flap remain locked and are only unlocked
after repetitive unlocking using the unlock button on the remote control page 37,
fig. 23 or the button for the central locking system page 42, fig. 27 .
You can have the function opening a single door activated by an authorised Škoda
Service Partner on request or you can activate it yourself with the aid of the Informa-
tion display* page 25.
Automatic locking and unlocking*
All the doors and the boot lid are locked au tomatically once the car reaches a speed of
about 15 km/h.
If the ignition key is withdrawn, the car is then automatically unlocked again. In addi-
tion, it is possible for the driver or front pa ssenger to unlock the vehicle by pressing the
central locking button
page 42 or by pulling the door opening lever on one of the
front doors.
You can have the function of the automatic lo cking activated by a specialist garage on
request or you can also activate it yourself with the aid of the Information display*
page 25.
WARNING
Locking the doors prevents involuntary op ening in an exceptional situation (an
accident). Locked doors prevent unwanted entry into the vehicle from outside,
for example at road crossings. Locked do ors do, however, make it more difficult
for rescuers to get into the vehicle in an emergency - danger to life!
Note
In the event of an accident in which the airbags are deployed, the locked doors are
automatically unlocked in order to enable rescuers to gain access to the vehicle.
s3fg.2.book Page 39 Friday, April 30, 2010 12:17 PM
Page 171 of 287

Airbag system
170
Airbag systemDescription of the airbag systemGeneral information on the airbag systemThe front airbag system is complementary to the three-point seat belts and offers addi-
tional protection for the head and chest area of the driver and passenger in the event
of a frontal collision.
In the case of a violent side cr ash, the side* and head airbags* reduce the risk of inju-
ries to the occupants on the side of the collision .
The airbag system is only functional af ter the ignition has been switched on.
The operational readiness of the airbag syst em is monitored electronically. The airbag
indicator light comes on for a few seconds each time the ignition is switched on.
The airbag system (according to vehicle equipment) consists of:
an electronic control unit,
the front airbags for the driver and front passenger,
driver's knee airbag*,
front side airbags,
Rear side airbags*,
head airbags*,
an airbag indicator light in the instrument cluster,
a front passenger airbag switch*,
an indicator light for a switched off fron t seat passenger airbag* in the middle of
the dash panel.
A fault in the airbag system exists if:
the airbag indicator light does not light up when the ignition is switched on,
the warning light does not go out after about 4 seconds after the ignition is
switched on,
the airbag indicator light goes out and come s on again after the ignition is switched
on,
the airbag indicator light comes on or flickers when driving,
an airbag indicator light showing a switched-off front passenger airbag* in the
middle of the dash panel flashes.
WARNING
To enable the occupants of a vehicle to be protected with the greatest
possible effect when the airbag is deployed, the front seats must be
page 162, “Correct seated position” correctly adjusted to match the body
size of the occupant.
If you do not fasten the seat belts when driving, lean too far forward or
adopt an incorrect seated position, you are exposing yourself to increased risk
of injury in the event of an accident.
Have the airbag system checked immediat ely by a specialist garage if a fault
exists. Otherwise, there is a risk of the airbag not being activated in the event of
an accident.
No modifications of any kind may be made to parts of the airbag system.
It is prohibited to manipulate individual parts of the airbag system as this
might result in the airbag being deployed.
The protective function of the airbag system is sufficient for only one acci-
dent. The airbag system must then be re placed if the airbag has been deployed.
The airbag system needs no maintenance during its working life.
If you sell your car, please hand over the complete vehicle documentation to
the new owener. Please note that the documents relating to the possibility of
deactivating the front passenger airbag are also part of the vehicle documents!
If the vehicle or individual parts of the airbag system are scrapped, it is
essential to observe the relevant safety precautions. The authorised Škoda
Service Partners are familiar with these regulations.
When disposing of vehicle or parts of the airbag system, it is important to
comply with the national legal requirements.
s3fg.2.book Page 170 Friday, April 30, 2010 12:17 PM
Page 179 of 287

Airbag system
178
being deployed. When the deployed head airbag is inflated, parts of the acces-
sories fitted may in certain circumstances be thrown into the interior of the car
and cause injuries to the occupants page 234, “Accessories, changes and
replacement of parts”.
Any work on the head airbag system including installing and removing
system components because of other repair work (e.g. removing headliner)
must only be carried out by a specialist garage.
Deactivating an airbagDeactivating airbags
If any airbags have been deactivated, switch them on again as soon as
possible so that they are able to again provide their proper protection.There is the technical means installed within your vehicle to switch off the front, side
or head* airbag (take out of commission).
This is why you should have the deactivation of the airbags carried out by a specialist
garage.
On vehicles equipped with the switch for de activation of the airbags, you can deacti-
vate the front passenger airbag by means of this switch page 178.
Deactivation of airbags is envisaged only for particular instances, such as if:
you must in exceptional cases use a child seat on the front passenger seat where
the child has its back to the direction of tr avel of the vehicle (in some countries this
must be in the direction of travel due to other legal regulations applying) page 180,
“Important safety information regarding the use of child safety seats”,
you are not able to maintain the distance of at least 25 cm between middle of
steering wheel and chest, despite the driver seat being correctly adjusted,
special attachments are required in the ar ea of the steering wheel because of a
physical disability,
you have installed other seats (e.g. orthopaedic seats without side airbags). Monitoring the airbag system
The functionality of the airbag system is al
so monitored electronically when one airbag
has been switched off.
If the airbag was switched off using diagnostic equipment:
The warning light for the airbag system li ghts up for 4 seconds after switching on
the ignition and then flashes for 12 seco nds afterwards in 2 second intervals.
The following situation applies if the ai rbag has been switched off using the
switch for the airbag* in the storage compartment:
the airbag indicator light in the instrume nt cluster comes on for about 4 seconds
each time the igniti on is switched on,
switching off airbags is indicated in the middle of the dash panel by the lighting up
of the indicator light
in the display
fig. 161 .
Note
Your authorised Škoda Service Partner will be able to advise you whether national
legislation in your country allows airbags in your vehicle to be deactivated, and which
ones.Switch for the front passenger airbag*Fig. 161 Storage compartment: Switch for the front passenger airbag / indicator light for a
switched off front seat passenger airbagThe front passenger airbag is deactivated with the switch.
WARNING (continued)
s3fg.2.book Page 178 Friday, April 30, 2010 12:17 PM