winter tyres SKODA SUPERB 2010 Owner´s Manual
[x] Cancel search | Manufacturer: SKODA, Model Year: 2010, Model line: SUPERB, Model: SKODA SUPERB 2010Pages: 252, PDF Size: 16.33 MB
Page 6 of 252
General Maintenance
Car care173
Services, modifications and technical
alterations
173
Washing vehicle
176
Taking care of your vehicle exterior
177
Taking care of the interior
181
Inspecting and replenishing
183
Fuel
183
Engine compartment
186
Engine oil
189
Coolant
191
Brake fluid
192
Vehicle battery
193
Wheels
197
Tyres and wheel rims
197
Manufacturer-approved tyre variants
201
Winter operation
203
Do-it-yourself
Emergency equipment and self-help
204
Emergency equipment
204
Changing a wheel
205
Puncture set
209
Jump-starting
211
Towing the vehicle
213
Radio remote control
215
Emergency unlocking/locking
216
Emergency operation of the sliding/tilting
roof
217
Replacing windscreen wiper blades
218
Fuses and light bulbs
220
Fuses
220
Replacing bulbs
223Technical data
Technical data228
Vehicle data
228
Index
3Table of Contents
Page 51 of 252
Lights and visibility
The following functions can be activated, deactivated or adjusted here.
Coming HomeActivate/deactivate and adjust the light duration of
the COMING HOME function. Further informa-
tion » page 72 .Leaving HomeSwitch on/off and adjust the light duration of the
LEAVING HOME function. Further informa-
tion » page 72 .Footwell lightActivate/deactivate and adjust the footwell light in-
tensity.Dayl. dri. lightActivate/deactivate “DAY LIGHT” function. Further in-
formation » page 69, Daylight running lights (DAY
LIGHT) .Rear wiperActivate/deactivate the function of the automatic
rear window wiping. Further information » page 78,
Automatic rear window wiper (Superb Combi) .Lane ch. flashActivate/deactivate the lane ch. flash function. Fur-
ther information » page 70.Travel modeActivate/deactivate the travel mode feature. Further
information » page 71, Tourist lights (Travel mode) .Factory settingRestore the factory setting for the lighting.
Time
The time, time format (12 or 24 hour indicator) and the changeover between
summer/winter times can be set here.
Winter tyres
Here, the speed and the switching on and off of the acoustic signals when ex-
ceeding this speed can be adjusted. This function is, for example, used for win-
ter tyres where the maximum permissible speed is lower than the maximum
speed of the vehicle » page 197.
As soon as the parking procedure is completed, an audible signal sounds and
the following message appears in the information display.
Winter tyres max. speed ... km/h.
Units of measurement
The units for the temperature, consumption and distance driven can be set
here.
Assist systems
The tones of the audible signals for the parking aid can be adjusted here.
Alt. speed dis.
Display of the second speed in mph 1)
can be activated here.
Further information » page 33, Display of the second speed .
Service
The days and kilometres remaining until the next service can be displayed
here.
Further information » page 48, Service interval display .
Factory setting
The display functions can be restored to their factory settings here.
Compass point display
Read and observe
on page 47 first.
For vehicles with a factory fitted navigation system, an abbreviation for each
point of the compass (depending on the current direction of travel) is shown
on the top left-hand corner of the display.
The compass point display only operates when the ignition is switched on.
Service interval display
Introduction
This chapter contains information on the following subjects:
Display in the MAXI DOT display
49
Prompt in the segment display
49
Resetting the service interval display
50
The service interval display shows the time and mileage to the next service
event.
1)
On models on which the speedometer indicates mph, the second speed is displayed in km/h.
48Operation
Page 67 of 252

Opening›Press and hold the symbol button on the remote control key.›
Hold the key in the driver's lock in the unlock position.
›
Press and hold the upper part of the central locking button in the driver's
door » page 55 .
›
Hold button
A
» Fig. 44 on page 62 in the opening position.
Closing
›
Press and hold the symbol button
on the remote control key.
›
Hold the key in the driver's lock in the lock position.
›
Press and hold the lower part of the central locking button » page 55 in the
driver's door.
›
Hold button
A
» Fig. 44 on page 62 in the closing position.
›
In the KESSY system, hold a finger on the sensor
B
» Fig. 34 on page 53 .
The speed limit for winter tyres can be set in the MAXI DOT display in the
menu item Window op. . » page 47 .
The prerequisite for ensuring that the convenience operating feature correctly
is the automatic opening/closing of all windows is operational.
Convenience opening or closing the window using the key in the driver's lock
is only possible within 45 seconds after locking the vehicle.
The movement of the window is stopped immediately when the key or the re-
spective button is released.
Operational faults
Read and observe
and on page 62 first.
The automatic power windows do not work if the vehicle battery has been dis-
connected and connected again while a window was open. The system must
be activated.
Activation sequence:
›
Switch on the ignition.
›
Pull the top edge of the button and close the window.
›
Release the button.
›
Drag and drop the button upwards again and hold for about 1 s.
Electric sliding/tilting roof
Introduction
This chapter contains information on the following subjects:
Operation
64
Convenience operation of sliding / tilting roof
65
Electric sliding/tilting roof with solar cells
65
The electric sliding/tilting roof (abbreviated in the following as 'sliding/tilting
roof') can only be operated when the ignition is turned on and when the out-
door temperature is higher than -20 °C.
The sliding/tilting roof can still be operated for approx. 10 minutes after
switching the ignition off. However, as soon as the driver or front passenger's
door is opened it is no longer possible to operate the sliding/tilting roof.
CAUTION
■ Always close the sliding/tilting roof before disconnecting the battery.■If the battery has been disconnected and reconnected, it is possible that the
sliding/tilting roof does not operate correctly. In this case, turn the rotary
switch to the switch position A
» Fig. 46 on page 64 and push forward for
about 10 seconds.
Operation
Fig. 46
Control dial for the sliding/tilting
roof
Read and observe on page 64 first.
Comfort position
›
Turn the switch to position
C
» Fig. 46 .
When the sliding/tilting roof is in the comfort position, the intensity of the
wind noise is reduced.
64Operation
Page 152 of 252
New tyres
New tyres must firstly be “run in” since they do not offer optimal grip at first.
Therefore, drive especially carefully for the first 500 km or so.
New brake pads
New brake pads do not initially provide optimal braking performance. They first
need to be “run in”. Therefore, drive especially carefully for the first 200 km or
so.
Economical driving and environmental sustainability
Introduction
This chapter contains information on the following subjects:
Looking ahead
149
Economical gear changing.
149
Avoiding full throttle
150
Reducing idling
150
Avoiding short distances
150
Checking tyre pressure
150
Avoiding unnecessary ballast
151
Regular maintenance
151
Saving electrical energy
151
Environmental compatibility
151
The technical requirements for low fuel usage and economic efficiency of the
vehicle have already been built into the vehicle at the works. ŠKODA places a
particular emphasis on minimising negative effects on the environment.
It is necessary to take note of the guidelines given in this chapter in order to make best use of these characteristics and to maintain their effectiveness.
Fuel consumption, environmental pollution and the wear to the engine, brakes
and tyres depend essentially on the following three factors:
› Your personal driving style
› Operating conditions
› Technical requirements
The fuel economy by can be improved by 10 - 15 % by always looking ahead
and driving in an economical way.
Fuel consumption is also be influenced by external factors which are beyond
the driver's control. Consumption increases during the winter or under difficult
conditions, on poor roads, etc.
Fuel consumption can vary considerably from the manufacturer's data, as a re-
sult of outside temperatures, the weather and driving style.
The optimal engine speed should be maintained when accelerating, to avoid a high fuel consumption and resonance of the vehicle.
CAUTION
All the speed and engine revolution figures apply only when the engine is at
its normal operating temperature.
Looking ahead
Read and observe
on page 149 first.
A vehicle's highest fuel consumption occurs when accelerating, therefore un-necessary accelerating and braking should be avoided. If looking ahead when
driving, less braking and consequently less accelerating are required.
If possible, let your vehicle coast to a stop, or use the engine brake, if you can see that the next set of traffic lights is on red, for example.
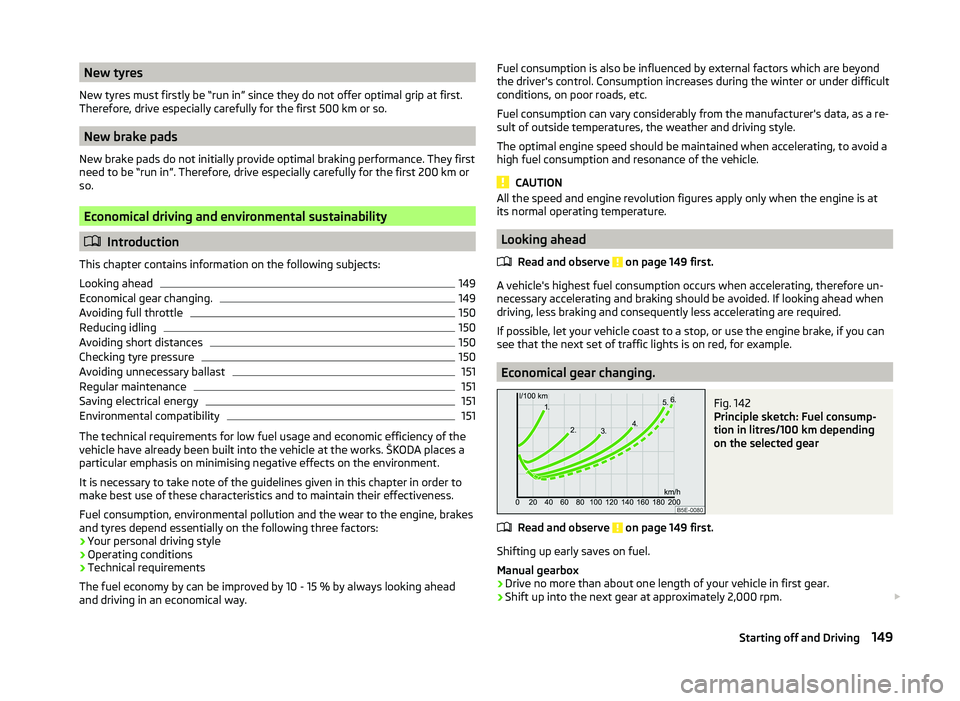
Economical gear changing.
Fig. 142
Principle sketch: Fuel consump-
tion in litres/100 km depending
on the selected gear
Read and observe on page 149 first.
Shifting up early saves on fuel.
Manual gearbox › Drive no more than about one length of your vehicle in first gear.
› Shift up into the next gear at approximately 2,000 rpm.
149Starting off and Driving
Page 203 of 252
Spare and temporary spare wheelFig. 173
Fixing the spare or temporary
spare wheel
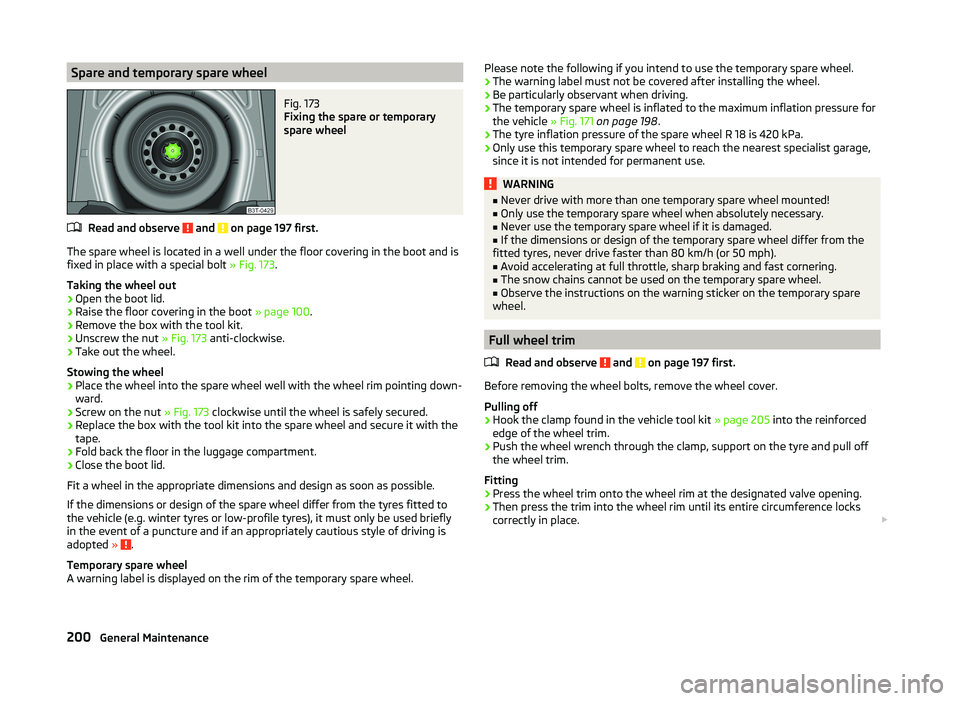
Read and observe and on page 197 first.
The spare wheel is located in a well under the floor covering in the boot and is fixed in place with a special bolt » Fig. 173.
Taking the wheel out
›
Open the boot lid.
›
Raise the floor covering in the boot » page 100.
›
Remove the box with the tool kit.
›
Unscrew the nut » Fig. 173 anti-clockwise.
›
Take out the wheel.
Stowing the wheel
›
Place the wheel into the spare wheel well with the wheel rim pointing down-
ward.
›
Screw on the nut » Fig. 173 clockwise until the wheel is safely secured.
›
Replace the box with the tool kit into the spare wheel and secure it with the
tape.
›
Fold back the floor in the luggage compartment.
›
Close the boot lid.
Fit a wheel in the appropriate dimensions and design as soon as possible.
If the dimensions or design of the spare wheel differ from the tyres fitted to
the vehicle (e.g. winter tyres or low-profile tyres), it must only be used briefly
in the event of a puncture and if an appropriately cautious style of driving is
adopted »
.
Temporary spare wheel
A warning label is displayed on the rim of the temporary spare wheel.
Please note the following if you intend to use the temporary spare wheel.
› The warning label must not be covered after installing the wheel.
› Be particularly observant when driving.
› The temporary spare wheel is inflated to the maximum inflation pressure for
the vehicle » Fig. 171 on page 198 .
› The tyre inflation pressure of the spare wheel R 18 is 420 kPa.
› Only use this temporary spare wheel to reach the nearest specialist garage,
since it is not intended for permanent use.WARNING■ Never drive with more than one temporary spare wheel mounted!■Only use the temporary spare wheel when absolutely necessary.■
Never use the temporary spare wheel if it is damaged.
■
If the dimensions or design of the temporary spare wheel differ from the
fitted tyres, never drive faster than 80 km/h (or 50 mph).
■
Avoid accelerating at full throttle, sharp braking and fast cornering.
■
The snow chains cannot be used on the temporary spare wheel.
■
Observe the instructions on the warning sticker on the temporary spare
wheel.
Full wheel trim
Read and observe
and on page 197 first.
Before removing the wheel bolts, remove the wheel cover.
Pulling off
›
Hook the clamp found in the vehicle tool kit » page 205 into the reinforced
edge of the wheel trim.
›
Push the wheel wrench through the clamp, support on the tyre and pull off
the wheel trim.
Fitting
›
Press the wheel trim onto the wheel rim at the designated valve opening.
›
Then press the trim into the wheel rim until its entire circumference locks
correctly in place.
200General Maintenance
Page 204 of 252
CAUTION■Only use the manual pressure and do not hit the full wheel trim – there is a
risk of damaging the trim.■
When using the anti-theft wheel bolt, ensure that it is in the hole in the
valve area.
■
If wheel trims are fitted, an adequate flow of air must be assured in order to
cool the brake system.
Note
We recommend that you use wheel trims from ŠKODA Original Accessories.
Wheel bolts
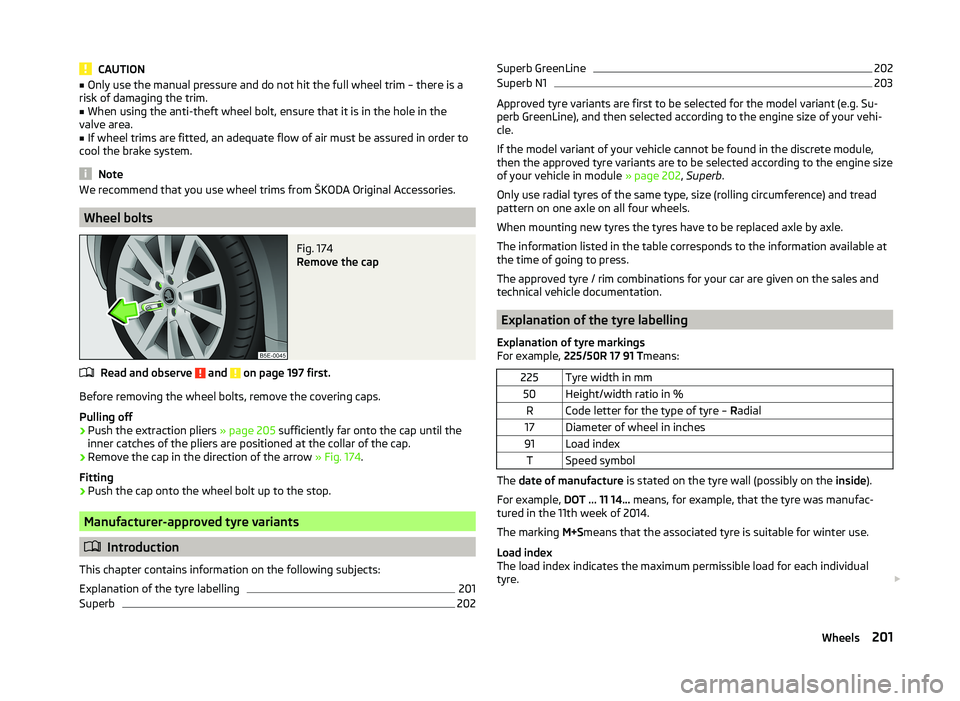
Fig. 174
Remove the cap
Read and observe and on page 197 first.
Before removing the wheel bolts, remove the covering caps.
Pulling off
›
Push the extraction pliers » page 205 sufficiently far onto the cap until the
inner catches of the pliers are positioned at the collar of the cap.
›
Remove the cap in the direction of the arrow » Fig. 174.
Fitting
›
Push the cap onto the wheel bolt up to the stop.
Manufacturer-approved tyre variants
Introduction
This chapter contains information on the following subjects:
Explanation of the tyre labelling
201
Superb
202Superb GreenLine202Superb N1203
Approved tyre variants are first to be selected for the model variant (e.g. Su-
perb GreenLine), and then selected according to the engine size of your vehi-
cle.
If the model variant of your vehicle cannot be found in the discrete module,
then the approved tyre variants are to be selected according to the engine size
of your vehicle in module » page 202, Superb .
Only use radial tyres of the same type, size (rolling circumference) and tread
pattern on one axle on all four wheels.
When mounting new tyres the tyres have to be replaced axle by axle.
The information listed in the table corresponds to the information available at the time of going to press.
The approved tyre / rim combinations for your car are given on the sales and
technical vehicle documentation.
Explanation of the tyre labelling
Explanation of tyre markings
For example, 225/50R 17 91 T means:
225Tyre width in mm50Height/width ratio in %RCode letter for the type of tyre – Radial17Diameter of wheel in inches91Load indexTSpeed symbol
The date of manufacture is stated on the tyre wall (possibly on the inside).
For example, DOT ... 11 14... means, for example, that the tyre was manufac-
tured in the 11th week of 2014.
The marking M+Smeans that the associated tyre is suitable for winter use.
Load index
The load index indicates the maximum permissible load for each individual
tyre.
201Wheels
Page 206 of 252

Superb N1MotorisationTyresizeMinimal
Load indexMinimal Speed icon
3.6 l/191 kW FSI
205/50 R1793W225/45 R1794W225/40 R1892Y
Winter operation
Introduction
This chapter contains information on the following subjects:
Winter tyres
203
Snow chains
203
Winter tyres
Summer tyres have less grip on ice, snow and at temperatures below 7 °C. This
is especially true of low-profile tyres or high-speed tyres .
Fitting winter tyres will significantly improve the handling of your vehicle when
driving in wintry road conditions.
To get best possible handling, winter tyres must be fitted to all four wheels.
The minimum tread depth must be 4 mm.
Winter tyres (marked with M+S and a peak/snowflake symbol) of a lower speed
category can be used provided that the permissible maximum speed of these
tyres is not exceeded even if the possible maximum speed of the vehicle is
higher.
Only use those tyres or wheel rims which have been approved by ŠKODA for
your model of vehicle.
The speed limit for winter tyres can be set in the MAXI DOT display in the Win-
ter tyres menu item » page 47.
For the sake of the environmentRe-fit the summer tyres at an appropriate time as they provide better handling
properties, a shorter braking distance, less tyre noise, and reduced tyre wear
on roads which are free of snow and ice as well as at temperatures above 7 °C.
The fuel consumption is also lower.
Snow chains
When driving in wintry road conditions, snow chains improve not only traction,
but also the braking performance.
Snow chains must only be mounted on the front wheels.
Only fit snow chains with links and locks not larger than 9 mm.
For technical reasons, it is only permissible to fit snow chains with the follow-
ing wheel/tyre combinations.
Wheel sizeDepth DTyre size7J x 16 a)45 mm205/55 R166J x 16 a)50 mm205/55 R166J x 1745 mm205/50 R17a)
Not valid for vehicles with 3.6 l/191 kW FSI engine.
Remove the full wheel trims before installing the snow chains » page 200.
WARNINGObserve the national legal regulations relating to the use of snow chains.
CAUTION
The chains are to be removed when driving on snow-free paths. They would
otherwise cause loss of performance and damage the tyres.203Wheels
Page 248 of 252
Operation in winter195
Replacing196
Safety instructions193
Vehicle care Alcantara
182
Fabrics182
Synthetic leather182
washing176
Vehicle Condition see Auto Check Control
33
Vehicle data sticker228
Vehicle dimensions230
Vehicle height230
Vehicle Identification Number (VIN)228
Vehicle key lock
51
unlock51
Vehicle length230
Vehicle tool kit205
Vehicle width230
Visibility75
Visors see Sun screen
76
see Sun visors76
W
Warning at excessive speeds
46
Warning lights34
warning messages Diesel particulate filter
39
Warning symbols see Warning lights
34
Warning triangle204
Washing Automatic car wash system
177
by hand176
Chrome parts178
High-pressure cleaner177
Washing vehicles176
Water Driving through152
Wax treatment See Taking care of your vehicle
178
Weather conditions173
Wheel bolts Anti-theft wheel bolts
208
Caps201
Loosening and tightening207
Wheel rims197
Wheels Changing
205
Full trim200
General information197
Load index201
Replacing wheels198
Service life of tyres198
Snow chains203
Spare wheel200
Speed symbol202
Storing wheels198
Temporary spare wheel200
Tyre pressure198
Tyre size201
Tyre sizes198
Tyre wear indicator198
Unidirectional tyres199
Winter tyres203
Wi-Fi130
Windows179
De-icing179
See Electrical power windows61
Windscreen De-icing
179
Heater75
Windscreen washer fluid Checking
188
Replenishing188
Warning light40
Winter188
Windscreen washers Windscreen washers78
Windscreen washer system188
Windscreen wiper Replacing the rear window wiper blade
219
Windscreen wipers Operating
78
Replacing the windscreen wiper blades219
Windscreen washer fluid188
Windscreen wipers and washers77
Winter De-icing windows
179
Winter operation203
Snow chains203
Winter tyres203
Winter tyres See Wheels
203
WLAN130
MAXI DOT131
Network connection130
Switching off130
Switching on130
245Index