stop start SKODA SUPERB 2012 2.G / (B6/3T) Owner's Manual
[x] Cancel search | Manufacturer: SKODA, Model Year: 2012, Model line: SUPERB, Model: SKODA SUPERB 2012 2.G / (B6/3T)Pages: 235, PDF Size: 5.86 MB
Page 5 of 235

Table of Contents
Abbreviations
Using the system
Cockpit 7
Overview 6
Instruments and Indicator Lights 8
Instrument Cluster 8
Multifunction display (onboard computer) 12
MAXI DOT (information display) 15
Indicator lights 18
Unlocking and locking 27
Vehicle key 27
Child safety lock 28
Central locking system 28
Remote control 30
KESSY system 32
Anti-theft alarm system 33
Emergency unlocking and locking 35
Boot lid 35
Electric boot lid 38
Electric power windows 40
Electric sliding/tilting roof 43
Panoramic sliding roof (Combi) 45
Lights and visibility 48
Lights 48
Interior light 54
Boot light (Combi) 57
Visibility 58
Windscreen wipers and washers 59
Rear window 63Seats and Stowage 66
Front seats 66
Seat heaters 69
Ventilated front seats 69
Head restraints 70
Rear seats 71
Boot 72
Variable loading floor in the boot 76
Extendable variable loading floor with
integrated aluminium strips and fastening
elements (Combi) 77
Net partition (Combi) 79
Roof rack system 81
Cup holder 82
Ashtray 83
Cigarette lighter, 12-volt power socket 84
Storage compartments 85
Clothes hooks 91
Parking ticket holder 91
The air conditioning system 93
Air conditioning system 93
Air outlet vents 94
Air conditioning system (manual air conditioning
system) 94
Climatronic (automatic air conditioning
system) 97
Auxiliary heating (auxiliary heating and
ventilation) 100
Starting-off and Driving 103
Starting and stopping the engine 103
KESSY system 105
Brakes and brake assist systems 108
Shifting (manual gearbox) 112
Pedals 112
Parking aid 112
Park assist 113
Cruise control system (CCS) 116START/STOP 118
Fatigue detection system (break
recommendation) 119
Automatic gearbox 121
Automatic gearbox 121
Communication 126
Mobile phones and two-way radio systems 126
Operating the phone on the multifunction
steering wheel 127
Symbols in the information display 128
Phone Phonebook 128
Universal telephone preinstallation GSM II 128
Universal telephone preinstallation GSM IIl 131
Voice control 135
Multimedia 137
Safety
Passive Safety 140
General information 140
Correct seated position 141
Seat belts 144
Seat belts 144
Airbag system 148
Description of the airbag system 148
Front airbags 149
Driver’s knee airbag 150
Side airbags 151
Head airbags 152
Deactivating airbags 152
Transporting children safely 154
Child seat 154
3
Table of Contents
Page 20 of 235
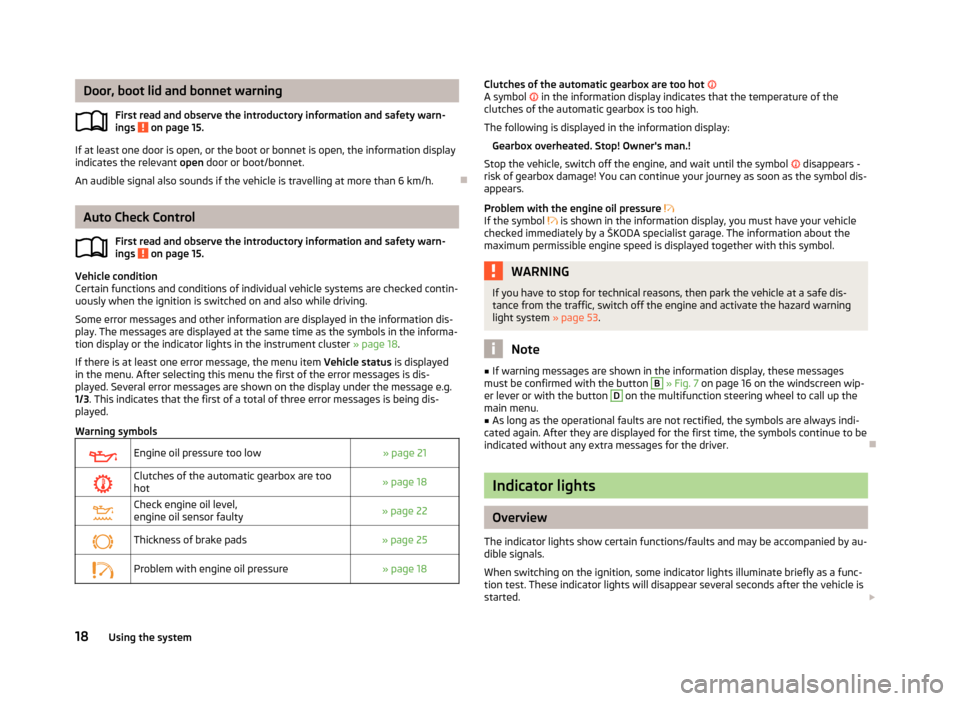
Door, boot lid and bonnet warning
First read and observe the introductory information and safety warn-
ings on page 15.
If at least one door is open, or the boot or bonnet is open, the information display
indicates the relevant
open door or boot/bonnet.
An audible signal also sounds if the vehicle is travelling at more than 6
km/h.ÐAuto Check Control
First read and observe the introductory information and safety warn-
ings on page 15.
Vehicle condition
Certain functions and conditions of individual vehicle systems are checked contin-
uously when the ignition is switched on and also while driving.
Some error messages and other information are displayed in the information dis-
play. The messages are displayed at the same time as the symbols in the informa-
tion display or the indicator lights in the instrument cluster » page 18.
If there is at least one error message, the menu item Vehicle status is displayed
in the menu. After selecting this menu the first of the error messages is dis-
played. Several error messages are shown on the display under the message e.g.
1/3. This indicates that the first of a total of three error messages is being dis-
played.
Warning symbols
Engine oil pressure too low
» page 21
Clutches of the automatic gearbox are too
hot » page 18
Check engine oil level,
engine oil sensor faulty
» page 22
Thickness of brake pads
» page 25
Problem with engine oil pressure
» page 18ä
ä
Clutches of the automatic gearbox are too hot
A symbol in the information display indicates that the temperature of the
clutches of the automatic gearbox is too high.
The following is displayed in the information display: Gearbox overheated. Stop! Owner's man.!
Stop the vehicle, switch off the engine, and wait until the symbol disappears -
risk of gearbox damage! You can continue your journey as soon as the symbol dis-
appears.
Problem with the engine oil pressure
If the symbol is shown in the information display, you must have your vehicle
checked immediately by a
ŠKODA specialist garage. The information about the
maximum permissible engine speed is displayed together with this symbol. WARNING
If you have to stop for technical reasons, then park the vehicle at a safe dis-
tance from the traffic, switch off the engine and activate the hazard warning
light system » page 53. Note
■ If warning messages are shown in the information display, these messages
must be confirmed with the button B
» Fig. 7 on page 16 on the windscreen wip-
er lever or with the button D
on the multifunction steering wheel to call up the
main menu. ■ As long as the operational faults are not rectified, the symbols are always indi-
cated again. After they are displayed for the first time, the symbols continue to be
indicated without any extra messages for the driver. Ð Indicator lights
Overview
The indicator lights show certain functions/faults and may be accompanied by au-
dible signals.
When switching on the ignition, some indicator lights illuminate briefly as a func-
tion test. These indicator lights will disappear several seconds after the vehicle is
started. £
18 Using the system
Page 24 of 235
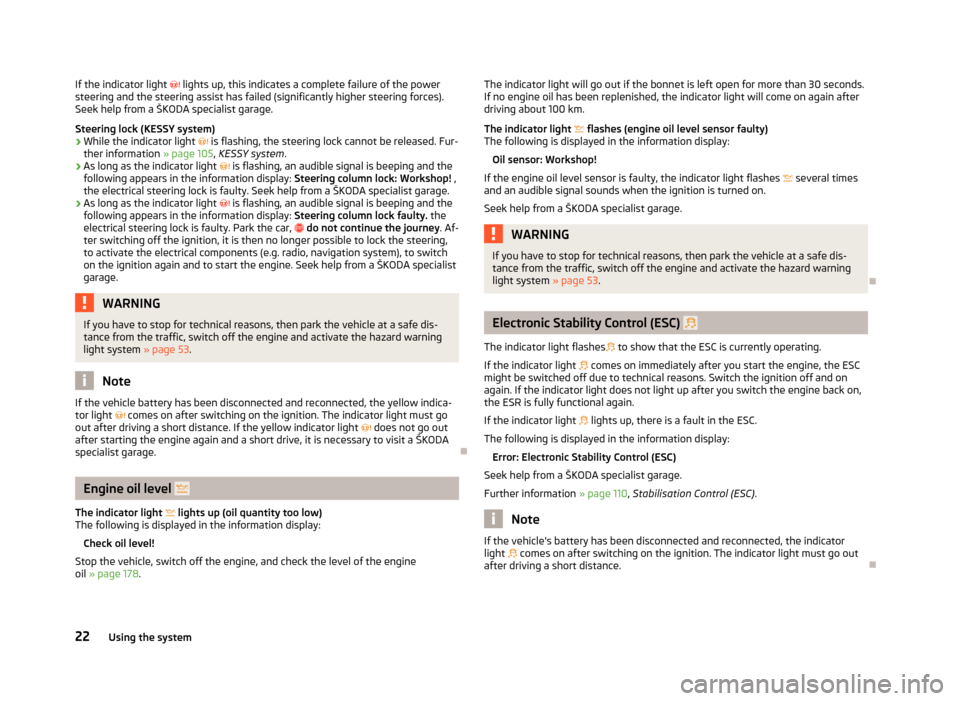
If the indicator light
lights up, this indicates a complete failure of the power
steering and the steering assist has failed (significantly higher steering forces).
Seek help from a ŠKODA specialist garage.
Steering lock (KESSY system)
› While the indicator light
is flashing, the steering lock cannot be released. Fur-
ther information » page 105 , KESSY system .
› As long as the indicator light
is flashing, an audible signal is beeping and the
following appears in the information display: Steering column lock: Workshop! ,
the electrical steering lock is faulty. Seek help from a ŠKODA specialist garage.
› As long as the indicator light
is flashing, an audible signal is beeping and the
following appears in the information display: Steering column lock faulty. the
electrical steering lock is faulty. Park the car, do not continue the journey. Af-
ter switching off the ignition, it is then no longer possible to lock the steering,
to activate the electrical components (e.g. radio, navigation system), to switch
on the ignition again and to start the engine. Seek help from a ŠKODA specialist
garage. WARNING
If you have to stop for technical reasons, then park the vehicle at a safe dis-
tance from the traffic, switch off the engine and activate the hazard warning
light system » page 53. Note
If the vehicle battery has been disconnected and reconnected, the yellow indica-
tor light comes on after switching on the ignition. The indicator light must go
out after driving a short distance. If the yellow indicator light does not go out
after starting the engine again and a short drive, it is necessary to visit a
ŠKODA
specialist garage. ÐEngine oil level
The indicator light lights up (oil quantity too low)
The following is displayed in the information display:
Check oil level!
Stop the vehicle, switch off the engine, and check the level of the engine
oil » page 178. The indicator light will go out if the bonnet is left open for more than 30 seconds.
If no engine oil has been replenished, the indicator light will come on again after
driving about 100 km.
The indicator light flashes (engine oil level sensor faulty)
The following is displayed in the information display:
Oil sensor: Workshop!
If the engine oil level sensor is faulty, the indicator light flashes several times
and an audible signal sounds when the ignition is turned on.
Seek help from a
ŠKODA specialist garage. WARNING
If you have to stop for technical reasons, then park the vehicle at a safe dis-
tance from the traffic, switch off the engine and activate the hazard warning
light system » page 53. Ð Electronic Stability Control (ESC)
The indicator light flashes to show that the ESC is currently operating.
If the indicator light comes on immediately after you start the engine, the ESC
might be switched off due to technical reasons. Switch the ignition off and on
again. If the indicator light does not light up after you switch the engine back on,
the ESR is fully functional again.
If the indicator light lights up, there is a fault in the ESC.
The following is displayed in the information display: Error: Electronic Stability Control (ESC)
Seek help from a ŠKODA specialist garage.
Further information » page 110, Stabilisation Control (ESC) . Note
If the vehicle's battery has been disconnected and reconnected, the indicator
light comes on after switching on the ignition. The indicator light must go out
after driving a short distance. Ð
22 Using the system
Page 25 of 235
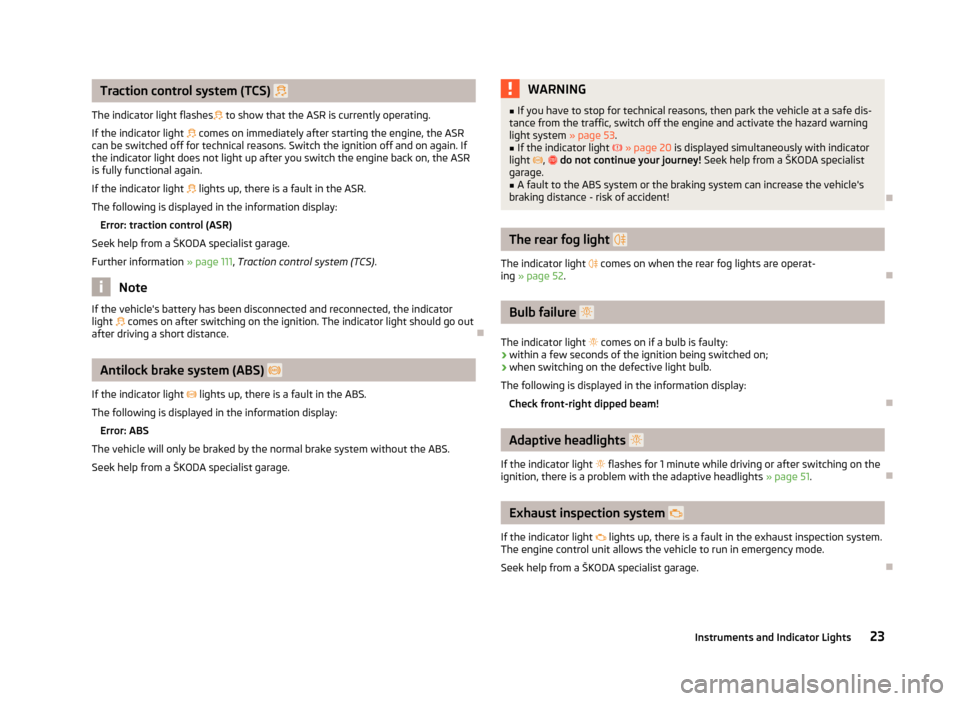
Traction control system (TCS)
The indicator light flashes to show that the ASR is currently operating.
If the indicator light comes on immediately after starting the engine, the ASR
can be switched off for technical reasons. Switch the ignition off and on again. If
the indicator light does not light up after you switch the engine back on, the ASR
is fully functional again.
If the indicator light lights up, there is a fault in the ASR.
The following is displayed in the information display: Error: traction control (ASR)
Seek help from a ŠKODA
specialist garage.
Further information » page 111, Traction control system (TCS).Note
If the vehicle's battery has been disconnected and reconnected, the indicator
light comes on after switching on the ignition. The indicator light should go out
after driving a short distance. ÐAntilock brake system (ABS)
If the indicator light lights up, there is a fault in the ABS.
The following is displayed in the information display: Error: ABS
The vehicle will only be braked by the normal brake system without the ABS.
Seek help from a
ŠKODA specialist garage. WARNING
■ If you have to stop for technical reasons, then park the vehicle at a safe dis-
tance from the traffic, switch off the engine and activate the hazard warning
light system » page 53.
■ If the indicator light » page 20 is displayed simultaneously with indicator
light , do not continue your journey!
Seek help from a ŠKODA specialist
garage.
■ A fault to the ABS system or the braking system can increase the vehicle's
braking distance - risk of accident! Ð The rear fog light
The indicator light
comes on when the rear fog lights are operat-
ing » page 52. Ð Bulb failure
The indicator light comes on if a bulb is faulty:
› within a few seconds of the ignition being switched on;
› when switching on the defective light bulb.
The following is displayed in the information display: Check front-right dipped beam! Ð Adaptive headlights
If the indicator light flashes for 1 minute while driving or after switching on the
ignition, there is a problem with the adaptive headlights »
page 51. Ð Exhaust inspection system
If the indicator light lights up, there is a fault in the exhaust inspection system.
The engine control unit allows the vehicle to run in emergency mode.
Seek help from a
ŠKODA specialist garage. Ð
23
Instruments and Indicator Lights
Page 29 of 235

Unlocking and locking
Vehicle key
Introductory information
Fig. 8
Remote control key
Two remote control keys are provided with the vehicle » Fig. 8.WARNING
■ Always withdraw the key whenever you leave the vehicle - even if it is only
for a short time. This is particularly important if children are left in the vehicle.
The children might otherwise start the engine or operate electrical equipment
(e.g. power windows) - risk of injury!
■ Do not withdraw the ignition key from the ignition lock until the vehicle has
come to a stop. The steering lock might otherwise engage unintentionally -
risk of accident! CAUTION
■ Each key contains electronic components; therefore it must be protected
against moisture and severe shocks.
■ Keep the groove of the keys absolutely clean. Impurities (textile fibres, dust,
etc.) have a negative effect on the functionality of the locking cylinder and igni-
tion lock. Note
If you lose a key, please contact a ŠKODA Service Partner who will obtain a re-
placement key for you. Ð Replacing the battery in the remote control key
Fig. 9
Remote control key: Remove cover/remove battery
Each remote control key contains a battery which is housed under the cover B
» Fig. 9. If the battery is discharged, the red indicator light A
does not flash
after you press a button on the remote control key » Fig. 8 on page 27. We recom-
mend that you ask a ŠKODA
Service Partner to replace the key battery. However,
if you would like to replace the discharged battery yourself proceed as follows.
› Flip out the key.
› Press off the battery cover with your thumb or using a flat screwdriver in the
region of arrows 1
» Fig. 9.
› Remove the discharged battery from the key by pressing the battery down-
wards in the region of arrow 2
.
› Insert the new battery. Ensure that the “+” symbol on the battery is facing up-
wards. The correct polarity is shown on the battery cover.
› Place the battery cover on the key and press it down until it clicks into place. CAUTION
■ Pay attention to the correct polarity when changing the battery.
■ The replacement battery must have the same specification as the original bat-
tery. £
27
Unlocking and locking
Page 32 of 235

Vehicle locking/unlocking from the inside
Fig. 11
Central locking button
The doors and the boot lid can be unlocked/locked with the rocker switch on the
door opening lever of the driver or front passenger door » Fig. 11 even when the
ignition is not switched on.
The central locking button works only when the vehicle was not locked from the
outside and all doors are closed.
Locking
Press the symbol » Fig. 11 on the button. The symbol in the button comes on.
Unlocking
Press the symbol » Fig. 11 on the button. The symbol in the button is no longer
illuminated.
The following applies if your vehicle has been locked using the central locking
button.
› It is not possible to open the doors or the boot lid from the outside (safety fea-
ture, e.g. when stopping at traffic lights etc.).
› The vehicle doors can be unlocked and opened by pulling once on the door
opening lever.
› In the event of an accident in which the airbags are deployed, the locked doors
are automatically unlocked from the inside in order to enable rescuers to gain
access to the vehicle.
By pressing and holding down the symbol or on the rocker switch in the driv-
er's door, the windows can be conveniently closed or opened. WARNING
The central locking system also operates if the ignition is switched off. Chil-
dren should never be left unattended in the vehicle since it is difficult to pro-
vide assistance from the outside when the doors are locked. Locked doors
make it difficult for rescuers to get into the vehicle in an emergency - hazard! Note
If the safe securing system is activated » page 29, the door opening lever and the
central locking buttons do not operate. Ð Remote control
Introductory information
You can use the remote control key to:
› unlock and lock the vehicle,
› unlock or open the boot lid,
› open and close the windows
»
page 42, Window convenience operation .
The transmitter with the battery is housed in the handle of the remote control
key. The receiver is located in the interior of the vehicle. The operating range of
the remote control key is approx. 30 m. But this range of the remote control can
be reduced if the batteries are weak.
The key has a fold-open key bit which can be used for unlocking and locking the
car manually and also for starting the engine.
If a lost key is replaced or if the receiver unit has been repaired or replaced, the
system must be initialised by a ŠKODA Service Partner. Only then can the remote
control key be used again. Note
■ The remote control is automatically deactivated when the ignition is switched
on. ■ The operation of the remote control may temporarily be affected by interfer-
ence from transmitters close to the car and which operate in the same frequency
range (e.g. mobile phone, TV transmitter). £
30 Using the system
Page 37 of 235
Emergency unlocking and locking
Unlocking and locking the driver's door
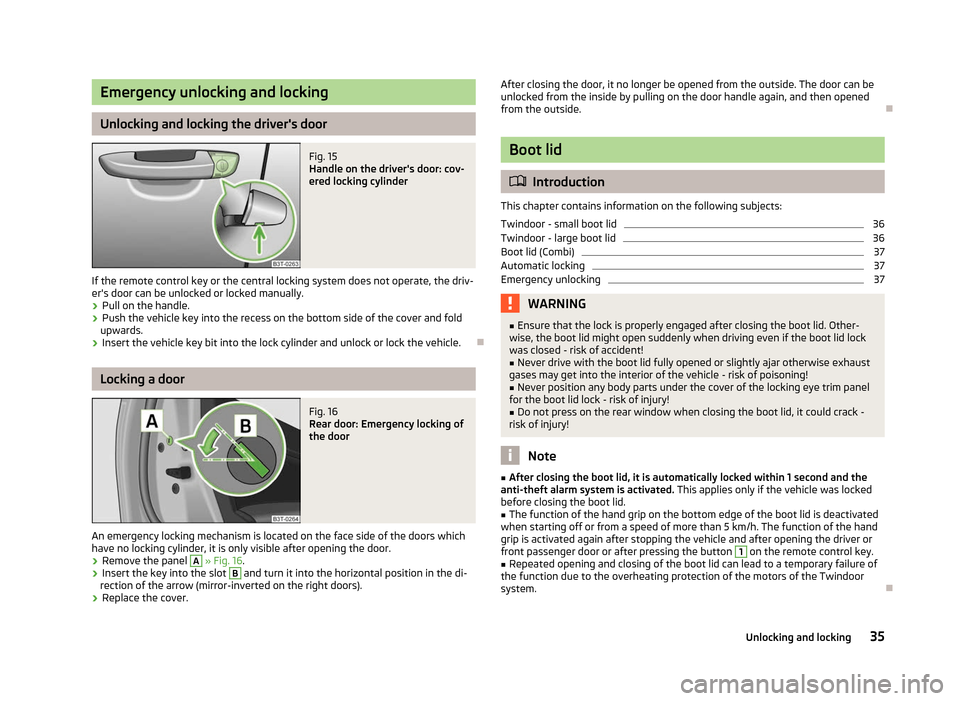
Fig. 15
Handle on the driver's door: cov-
ered locking cylinder
If the remote control key or the central locking system does not operate, the driv-
er's door can be unlocked or locked manually.
› Pull on the handle.
› Push the vehicle key into the recess on the bottom side of the cover and fold
upwards.
› Insert the vehicle key bit into the lock cylinder and unlock or lock the vehicle. ÐLocking a door
Fig. 16
Rear door: Emergency locking of
the door
An emergency locking mechanism is located on the face side of the doors which
have no locking cylinder, it is only visible after opening the door.
› Remove the panel A
» Fig. 16
.
› Insert the key into the slot B
and turn it into the horizontal position in the di-
rection of the arrow (mirror-inverted on the right doors).
› Replace the cover. After closing the door, it no longer be opened from the outside. The door can be
unlocked from the inside by pulling on the door handle again, and then opened
from the outside.
Ð Boot lid
ä
Introduction
This chapter contains information on the following subjects:
Twindoor - small boot lid 36
Twindoor - large boot lid 36
Boot lid (Combi) 37
Automatic locking 37
Emergency unlocking 37
WARNING
■ Ensure that the lock is properly engaged after closing the boot lid. Other-
wise, the boot lid might open suddenly when driving even if the boot lid lock
was closed - risk of accident!
■ Never drive with the boot lid fully opened or slightly ajar otherwise exhaust
gases may get into the interior of the vehicle - risk of poisoning!
■ Never position any body parts under the cover of the locking eye trim panel
for the boot lid lock - risk of injury! ■ Do not press on the rear window when closing the boot lid, it could crack -
risk of injury! Note
■ After closing the boot lid, it is automatically locked within 1 second and the
anti-theft alarm system is activated. This applies only if the vehicle was locked
before closing the boot lid. ■ The function of the hand grip on the bottom edge of the boot lid is deactivated
when starting off or from a speed of more than 5
km/h. The function of the hand
grip is activated again after stopping the vehicle and after opening the driver or
front passenger door or after pressing the button 1
on the remote control key.
■ Repeated opening and closing of the boot lid can lead to a temporary failure of
the function due to the overheating protection of the motors of the Twindoor
system. Ð
35
Unlocking and locking
Page 63 of 235

›
Set the desired break between the individual wiper strokes with the switch A
.
Slow wipe
› Position the lever upwards into position 2
» Fig. 47.
Fast wipe
› Position the lever upwards into position 3
» Fig. 47.
Automatic wipe/wash for windscreen
› Pull the lever towards the steering wheel into the spring-tensioned position 5
» Fig. 47, the washer system is activated immediately, while the windscreen
wipers start wiping a little later. The wash system and the windscreen wiper op-
erate simultaneously at a speed of more than 120
km/h.
› Release the lever. The windscreen wash system stops and the wiper continues
for another 3 - 4 wiper strokes (depending on the period of spraying of the
windscreen). At a speed of more than 2 km/h, the wiper wipes once again 5 sec-
onds after the last wiper stroke in order to wipe the last drops from the wind-
screen. This feature can be activated/deactivated by a
ŠKODA specialist garage.
Rain sensor
› Place the lever in position 1
» Fig. 47.
› The sensitivity of the sensor can be set individually with the switch A
.
Wiping the rear window pane (Combi)
› Push the lever away from the steering wheel into position 6
» Fig. 47
and the
windscreen wiper will operate every 6
seconds.
Automatic wipe/wash for the rear window (Combi)
› Press the lever completely away from the steering wheel into the spring-ten-
sioned position 7
» Fig. 47, the washer system is activated immediately, while
the windscreen wiper starts wiping a little later. The wiper and washer system
will operate as long as the lever is held in this position.
› Release the lever. The washer system stops and the wiper continues for anoth-
er 2 to 3
wiper strokes (depending on the duration of the spraying process). The
lever will stay in position after releasing it 6
.
Switching windscreen wipers off
› Move the lever back into the home position 0
» Fig. 47.
Winter position
If the windscreen wipers are in rest position, they cannot be folded out from the
windscreen. For this reason we recommend adjusting the windscreen wipers in
winter so that they can be folded out from the windscreen easily. This rest position is set as follows:
›
Switch on the windscreen wipers.
› Switch off the ignition. The windscreen wipers remain in the position in which
they were when switching off the ignition.
The service position can also be used as a winter position » page 62.Ð Automatic rear window wiper (Combi)
First read and observe the introductory information and safety warn-
ings on page 59.
If the windscreen wiper is in position 2
» Fig. 47 on page 60 or 3
the rear win-
dow is wiped every 30 or 10 seconds if the vehicle's speed exceeds 5
km/h.
When the rain sensor is active (the lever is in the position 1
) the function is only
active if the windscreen wipers operate in continuous mode (no break between
each wiping process).
Activation/deactivation
The function of the automatic rear window wiper is activated/deactivated in the
information display in the menu:
■ Settings
■ Lights & Vision
■ Rear wiper Ð Alternative park position of the rear window wiper (Combi)
First read and observe the introductory information and safety warn-
ings on page 59.
Each time after switching off the engine for the second time, the wiper blade of
the rear window wiper is tilted. This prolongs the life of the wiper blade.
Activation/deactivation
› Switch on the ignition.
› Push the operating level into the position 6
» Fig. 47 on page 60 five times in
succession within 5
seconds.
› Switch off the ignition. After switching on the ignition again, the alternative
park position of the rear window wiper is activated/deactivated. Ð
ä
ä
61
Lights and visibility
Page 98 of 235
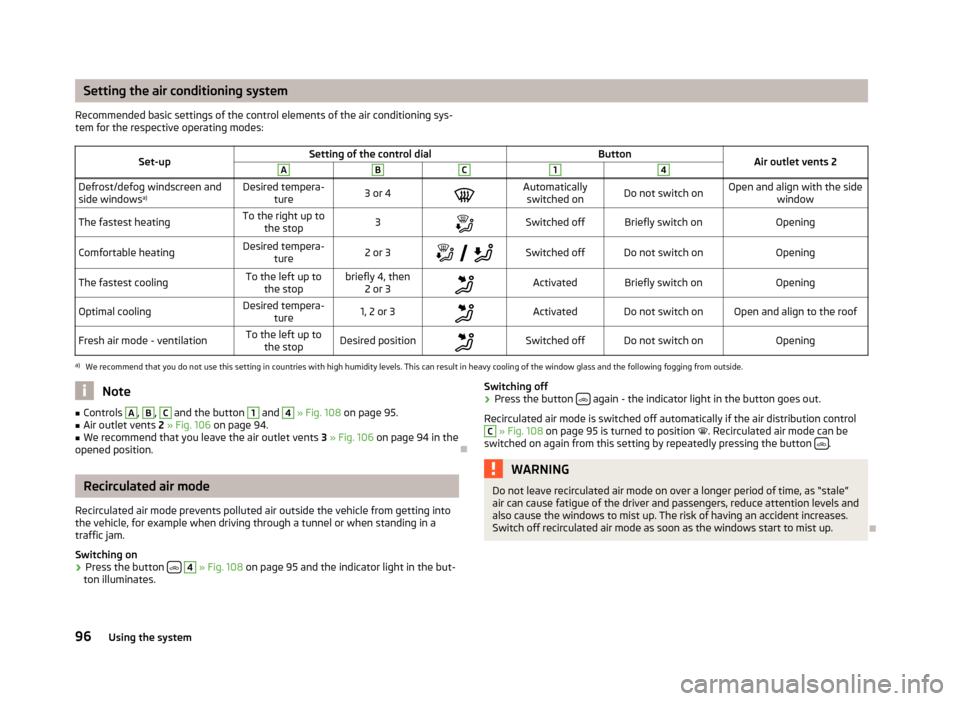
Setting the air conditioning system
Recommended basic settings of the control elements of the air conditioning sys-
tem for the respective operating modes:
Set-up Setting of the control dial
Button
Air outlet vents 2 A B C 1 4
Defrost/defog windscreen and
side windows
a) Desired tempera-
ture 3 or 4
Automatically
switched on Do not switch on Open and align with the side
window
The fastest heating To the right up to
the stop 3
Switched off Briefly switch on
Opening
Comfortable heating Desired tempera-
ture 2 or 3
Switched off Do not switch on
Opening
The fastest cooling To the left up to
the stop briefly 4, then
2 or 3 Activated Briefly switch on
Opening
Optimal cooling Desired tempera-
ture 1, 2 or 3
Activated Do not switch on Open and align to the roof
Fresh air mode - ventilation To the left up to
the stop Desired position
Switched off Do not switch on
Openinga)
We recommend that you do not use this setting in countries with high humidity levels. This can result in heavy cooling of the window glass and the following fogging from outside. Note
■ Controls A
, B
, C
and the button 1
and 4
» Fig. 108 on page 95
.
■ Air outlet vents 2 » Fig. 106 on page 94 .
■ We recommend that you leave the air outlet vents 3 » Fig. 106 on page 94 in the
opened position. ÐRecirculated air mode
Recirculated air mode prevents polluted air outside the vehicle from getting into
the vehicle, for example when driving through a tunnel or when standing in a
traffic jam.
Switching on
› Press the button
4
» Fig. 108
on page
95 and the indicator light in the but-
ton illuminates. Switching off
› Press the button
again - the indicator light in the button goes out.
Recirculated air mode is switched off automatically if the air distribution control C
» Fig. 108
on page
95 is turned to position . Recirculated air mode can be
switched on again from this setting by repeatedly pressing the button .
WARNING
Do not leave recirculated air mode on over a longer period of time, as “stale”
air can cause fatigue of the driver and passengers, reduce attention levels and
also cause the windows to mist up. The risk of having an accident increases.
Switch off recirculated air mode as soon as the windows start to mist up. Ð
96 Using the system
Page 105 of 235

Starting-off and Driving
Starting and stopping the engine
ä
Introduction
This chapter contains information on the following subjects:
Adjusting the steering wheel position 104
Electromechanical power steering 104
Electronic immobiliser 104
Ignition lock 105
Starting engine 105
Switching the engine off 105
Starting and stopping the engine on vehicles with the KESSY system » page 105,
KESSY system. WARNING
■ Never adjust the steering wheel when the vehicle is moving only when the
vehicle is stationary! ■ Maintain a distance of 25 cm 1
to the steering wheel
» Fig. 112 on page 104
- . Not maintaining this minimum distance will mean that the airbag system
will not be able to properly protect you - hazard!
■ The lever for adjusting the steering wheel must be locked whilst driving so
that the position of the steering wheel cannot accidently change during the
journey - risk of accident!
■ If the steering wheel is adjusted further towards the head, the protection
provided by the driver airbag in the event of an accident is reduced. Check
that the steering wheel is aligned to the chest. ■ When driving, hold the steering wheel with both hands firmly on the outer
edge in the 9 o'clock and 3 o'clock position. Never hold the steering wheel in
the 12 o'clock position or in any other way (e.g. in the middle or inner edge of
the steering wheel). In such cases, you could severely injure the arms, hands
and head when the driver airbag is deployed. WARNING (Continued)
■ When driving, the ignition key must always be in the position 2
» Fig. 113
on
page 105 (ignition switched on) without the engine running. This position is
indicated by the indicator lights coming on. If this is not the case, it could re-
sult in unexpected locking of the steering wheel - risk of accident! ■ Only pull the ignition key from the ignition lock when the vehicle has come
to a complete stop (by applying the handbrake). Otherwise the steering wheel
could block - risk of accident! ■ When leaving the vehicle, the ignition must always be removed. This is par-
ticularly important if children are left in the vehicle. Otherwise the children
could, for example, start the engine - risk of accident or injury! ■ Never leave the engine running in unventilated or closed rooms. The ex-
haust gases of the engine contain besides the odorless and colourless carbon
monoxide a poisonous gas - hazard! Carbon monoxide can cause unconscious-
ness and death. ■ Never leave the vehicle unattended with the engine running.
■ Never switch off the engine before the vehicle is stationary - risk of acci-
dent! CAUTION
■ The starter may only be operated (ignition key position 3
» Fig. 113 on
page 105), if the engine is not running. The starter or engine can be damaged if
the starter is activated when the engine is running. ■ Let go of the ignition key as soon as the engine starts otherwise the starter
could be damaged. ■ Avoid high engine revolutions, full throttle and high engine loads as long as the
engine has not yet reached its operating temperature - risk of damaging the en-
gine!
■ Do not tow start the engine - danger of damaging the engine! On vehicles with
a catalytic converter, unburnt fuel may get into the catalytic converter where it
may ignite. This in turn may damage the catalytic converter. The battery from an-
other vehicle can be used as a jump-start aid » page 202, Jump-starting.
■ Do not switch the engine off immediately at the end of your journey after the
engine has been operated over a prolonged period at high loads but leave it to
run at an idling speed for about 1
minute. This prevents any possible accumulation
of heat when the engine is switched off. £
103
Starting-off and Driving