headlamp SKODA SUPERB 2013 2.G / (B6/3T) Owner's Manual
[x] Cancel search | Manufacturer: SKODA, Model Year: 2013, Model line: SUPERB, Model: SKODA SUPERB 2013 2.G / (B6/3T)Pages: 274, PDF Size: 17.31 MB
Page 56 of 274

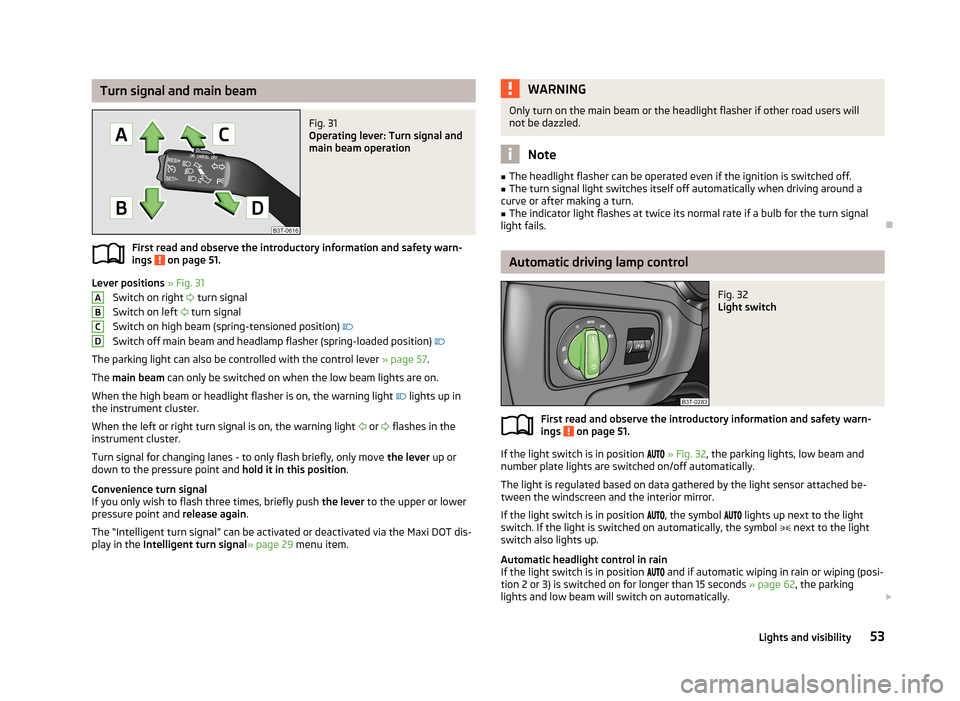
Turn signal and main beamFig. 31
Operating lever: Turn signal and
main beam operation
First read and observe the introductory information and safety warn-
ings on page 51.
Lever positions » Fig. 31
Switch on right
turn signal
Switch on left
turn signal
Switch on high beam (spring-tensioned position)
Switch off main beam and headlamp flasher (spring-loaded position)
The parking light can also be controlled with the control lever » page 57.
The main beam can only be switched on when the low beam lights are on.
When the high beam or headlight flasher is on, the warning light
lights up in
the instrument cluster.
When the left or right turn signal is on, the warning light
or
flashes in the
instrument cluster.
Turn signal for changing lanes - to only flash briefly, only move the lever up or
down to the pressure point and hold it in this position.
Convenience turn signal
If you only wish to flash three times, briefly push the lever to the upper or lower
pressure point and release again.
The “Intelligent turn signal” can be activated or deactivated via the Maxi DOT dis-
play in the Intelligent turn signal » page 29 menu item.
ABCDWARNINGOnly turn on the main beam or the headlight flasher if other road users will
not be dazzled.
Note
■ The headlight flasher can be operated even if the ignition is switched off.■The turn signal light switches itself off automatically when driving around a
curve or after making a turn.■
The indicator light flashes at twice its normal rate if a bulb for the turn signal
light fails.
Automatic driving lamp control
Fig. 32
Light switch
First read and observe the introductory information and safety warn-
ings on page 51.
If the light switch is in position
» Fig. 32 , the parking lights, low beam and
number plate lights are switched on/off automatically.
The light is regulated based on data gathered by the light sensor attached be-
tween the windscreen and the interior mirror.
If the light switch is in position
, the symbol
lights up next to the light
switch. If the light is switched on automatically, the symbol
next to the light
switch also lights up.
Automatic headlight control in rain
If the light switch is in position
and if automatic wiping in rain or wiping (posi-
tion 2 or 3) is switched on for longer than 15 seconds » page 62, the parking
lights and low beam will switch on automatically.
53Lights and visibility
Page 66 of 274

NoteIf the slow or the fast wiper setting is switched on and the vehicle speed decrea-
ses to below 4 km/h, the wiper speed is incrementally set to a lower wiper speed.
The original setting is restored step by step when the speed of the vehicle ex-
ceeds 8 km/h.
Alternative parking position of the rear windscreen wiper
(Superb Combi)
First read and observe the introductory information and safety warn-ings
on page 61.
Each time after switching off the engine for the second time, the wiper blade of
the rear window wiper is tilted. This prolongs the life of the wiper blade.
Activation/deactivation
›
Switch on the ignition.
›
Push the operating lever to position
6
» Fig. 44 on page 62 five times in suc-
cession within 5 seconds.
›
Switch off the ignition. After switching on the ignition again, the alternative park position of the rear window wiper is activated/deactivated.
Headlight cleaning system
First read and observe the introductory information and safety warn-
ings
on page 61.
After the ignition is turned on headlamps are always cleaned at the first and after
every tenth spraying of the windscreen
5
» Fig. 44 on page 62 when the low
beam or high beam is switched on.
You should remove stubborn dirt (such as insect residues) from the headlight len-
ses at regular intervals, for example when refuelling. The following guidelines
must be observed » page 200, Headlight lenses .
To ensure the proper operation of the cleaning system during the winter, any snow should be removed from the washer nozzle fixtures and ice should be
cleared with a de-icing spray.
CAUTIONNever remove the nozzles from the headlight cleaning system by hand – risk of
damage!
Rear mirror
Introduction
This chapter contains information on the following subjects:
Interior mirror
64
Exterior mirrors
65WARNING■ Make sure that the mirror is not covered by ice, snow, mist or other objects.■Convex (curved outward) or aspheric exterior mirrors increase the field of vi-
sion. They do, however, make objects appear smaller in the mirror. These mir-
rors are therefore only of limited use for estimating distances to the following
vehicles.■
Whenever possible use the interior mirror for estimating the distances to
the following vehicles.
■
The illuminated display of an external navigation unit can lead to operation-
al faults to the automatic dimming interior mirror – risk of accident.
WARNINGAutomatic dimming mirrors contain an electrolytic fluid which may leak should
the mirror glass break.■
The leaking electrolytic fluid can irritate the skin, eyes and breath apparatus.
Immediately seek out fresh air and leave the vehicle. If this is not possible,
open all windows and doors.
■
If you swallow electrolytic fluid, seek medical assistance immediately.
■
If your eyes or skin come into contact with the electrolytic fluid, immediately
wash the affected area for a few minutes long with a lot of water. Then con-
sult a doctor immediately.
63Lights and visibility