oil change SKODA SUPERB 2013 2.G / (B6/3T) Owner's Manual
[x] Cancel search | Manufacturer: SKODA, Model Year: 2013, Model line: SUPERB, Model: SKODA SUPERB 2013 2.G / (B6/3T)Pages: 274, PDF Size: 17.31 MB
Page 33 of 274
Time
The time, time format (12 or 24 hour indicator) and the changeover between sum-
mer/winter time can be set here.
Winter tyres
Here, you can set the speed at which an audible signal should sound. This func-
tion is, for example, used for winter tyres where the maximum permissible speed
is lower than the maximum speed of the vehicle » page 220.
The following message appears in the display when exceeding the speed limit: Winter tyres: maximum ... km/h.
Units of measurement
The units for the temperature, consumption and distance driven can be set here.
Assistants
The tones of the audible signals for the parking aid can be adjusted here.
Alt. speed dis.
Here, the display of the second speed in mph 1)
can be activated.
Service
Here you can have the remaining kilometres and days until the next service inter-
val displayed, and reset the Service Interval Display.
Factory setting
Here, the factory settings of the display can be restored.
Service Interval Display
Introduction
This chapter contains information on the following subjects:
Prompt in the segment display
30
Prompt in the MAXI DOT display
31
Before the next service interval is reached, a message concerning the kilometres
and days remaining until the next service is due is shown for about 10 seconds
after the ignition is switched on.
The kilometre indicator or the days indicator reduces in steps of 100 km or, where
applicable, days until the service due date is reached.
Note
■ Information is retained in the Service Interval Display even after the vehicle bat-
tery is disconnected.■
If the instrument cluster is exchanged after a repair, the correct values must be
entered in the counter for the Service Interval Display. This work is carried out by a specialist garage.
■
For more information on the service intervals » page 191, Service intervals .
Prompt in the segment display
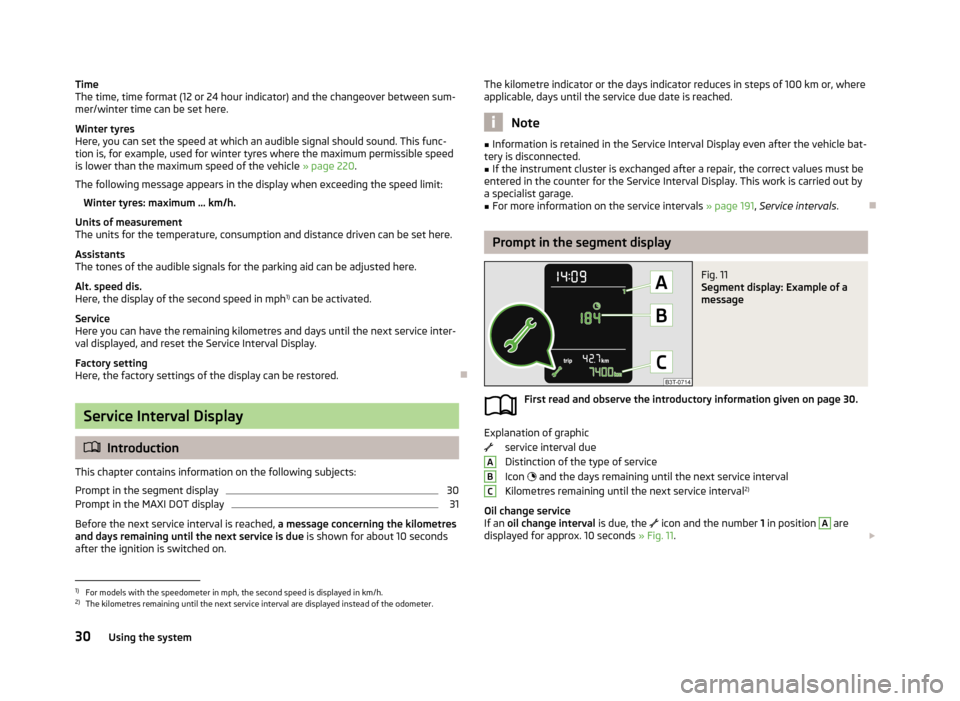
Fig. 11
Segment display: Example of a
message
First read and observe the introductory information given on page 30.
Explanation of graphic
service interval due
Distinction of the type of service
Icon
and the days remaining until the next service interval
Kilometres remaining until the next service interval 2)
Oil change service
If an oil change interval is due, the
icon and the number 1 in position
A
are
displayed for approx. 10 seconds » Fig. 11.
ABC1)
For models with the speedometer in mph, the second speed is displayed in km/h.
2)
The kilometres remaining until the next service interval are displayed instead of the odometer.
30Using the system
Page 34 of 274
The days and kilometres remaining until the next service interval are displayed atthe same time.
As soon as the due date for the service is reached, the flashing icon and the
message OIL CHNG appears in the display for about 20 seconds after the ignition
has been switched on.
Inspection
If an inspection is due, the icon and the number 2 in position A
are displayed
for approx. 10 seconds » Fig. 11.
The days and kilometres remaining until the next service interval are displayed at the same time.
As soon as the due date for the service is reached, the flashing key symbol
and
the text INSPEC _ appears in the display for about 20 seconds after the ignition
has been switched on.
Display the days and distance until the next service interval
You can press button
3
» Fig. 2 on page 10 continuously to display the remaining
distance and days until the next service interval whenever the ignition is switch-
ed on.
The
symbol and the distance and days remaining until next service interval ap-
pear in the display for about 10 seconds.
The distance and the days remaining until the next oil change interval are dis-
played first; after pressing button
3
again, the distance and the days remaining
until the next inspection are displayed.
Prompt in the MAXI DOT display
First read and observe the introductory information given on page 30.
Oil change service
If an oil change service is due, the message Oil change in ... km or .... days ap-
pears.
As soon as the service interval date has arrived, the message Oil change now!
appears once the ignition has been switched on.
Inspection
If an inspection is due, the message Inspection in ... km or ... days appears.
As soon as the service interval date has arrived, the message Inspection now! ap-
pears once the ignition has been switched on.
Displaying the distance and days until the next service interval
You can display the remaining distance and days until the next service interval whenever the ignition is switched on in menu Settings » page 29 .
The following message is displayed for 10 seconds. Oil change ... km / ... days
Inspection ... km / ... days
31Information system
Page 65 of 274

Note■Each time the ignition switches off for the third time, the position of the wind-
screen wipers changes. This counteracts an early fatigue of the wiper rubbers.■
The rear window wiper only operates if the boot lid is closed.
■
Keep the wiper blades clean. They may become soiled, e.g., with wax residues
after washing in automatic car wash systems » page 197.
■
The windscreen washer nozzles for the windscreen are heated when the en-
gine is running and the outside temperature is less than approx. +10 °C.
Windscreen wipers and washers
Fig. 44
Operating lever: Windscreen
wipers and washer settings
First read and observe the introductory information and safety warn-
ings on page 61.
Lever positions » Fig. 44
Wipers off
Periodic windscreen wiping/automatic wiping in rain
slow windscreen wiping
rapid windscreen wiping
Flick windscreen wiping (spring-tensioned position)
Automatic wipe/wash for windscreen (spring-tensioned position) Wiping the rear window pane (the windscreen wiper wipes at regular inter- vals after a few seconds)
Automatic wipe/wash for the rear window (spring-tensioned position)
Switches for setting the required break between the individual wiper strokes
(
1
periodic windscreen wiping) or the wiper speed in rain (
1
automatic
windscreen wiping in rain)
01234567AAutomatic wipe/wash for windscreen
The wash system operates immediately, the windscreen wipers wipe somewhat
later. The wash system and the windscreen wiper operate simultaneously at a
speed of more than 120 km/h.
Letting go of the lever will cause the windscreen wash system to stop and the wiper to continue for another 3-4 wiper strokes (depending on the period of
spraying of the windscreen).
At a speed of more than 2 km/h, the wiper wipes once again 5 seconds after the
last wiper stroke in order to wipe the last drops from the windscreen. This func-
tion can be activated/deactivated by a specialist garage.
Automatic wipe/wash for the rear window (Superb Combi)The wash system operates immediately, the windscreen wiper wipes somewhat later.
Letting go of the lever will cause the windscreen wash system to stop and the
wiper to continue for another 2-3 wiper strokes (depending on the period of
spraying of the windscreen). The lever remains in position 6
» Fig. 44 .
Automatic rear window wiper (Superb Combi)
If the lever is in position
2
» Fig. 44 or
3
the rear window is wiped every
30 or 10 seconds if the vehicle's speed exceeds 5 km/h.
If automatic windscreen wiping in rain is activated (the lever is in the position
1
)
the function is only active if the windscreen wipers operate in continuous mode
(no break between each wiping process).
Automatic rear window wiping can be activated/deactivated via the MAXI DOT
display in the menu item Rear wiper » page 29 .
Winter setting of the windscreen wiper If the windscreen wipers are in rest position, they cannot be folded out from the
windscreen. For this reason we recommend adjusting the windscreen wipers in
winter so that they can be folded out from the windscreen easily.
› Switch on the windscreen wipers.
› Switch off the ignition.
The windscreen wipers remain in the position in which they were when switching
off the ignition.
The service position can also be used as a winter position » page 243.
62Using the system
Page 177 of 274
WARNINGObserve the following instructions for the proper use of the seat belts.■Never use one seat belt to secure two persons (including children). The
seatbelt must not be placed over a child who is sitting on the lap of another
passenger.■
The lock tongue should only be inserted into the lock which is the correct
one for your seat. Wrong use of the safety belt will reduce its capacity to pro-
tect and the risk of injury increases.
■
The slot of the belt tongue must not be blocked, otherwise the belt tongue
will not lock in place properly.
■
Many layers of clothing and loose clothing (e. g. a winter coat over a jacket)
do not allow you to be correctly seated and impairs proper operation of the
seat belts.
■
It is prohibited to use clamps or other objects to adjust seat belts (e. g. for
shortening the belts for smaller persons).
■
The seat belts for the rear seats can only fulfil their function reliably when
the seat backrests are correctly locked into position » page 73.
WARNINGObserve the following instructions for proper maintenance of the seat belts.■The belt webbing must always be kept clean. Soiled belt webbing may im-
pair proper operation of the inertia reel » page 203.■
The seat belts must not be removed or changed in any way. Do not attempt
to repair the seat belts yourself.
■
Check the condition of all the seat belts on a regular basis. If any damage to
the seat belts, seat belt connections, inertia reel or the lock is detected, the
relevant seat belt must be replaced by a specialist garage.
■
Damaged seat belts which have been subjected to stress in an accident and
were therefore stretched, must be replaced – this is best done by a specialist
garage. The anchorage points of the belts must also be inspected. The an-
chorage points for the belts should also be checked.
Note
The national legal requirements must be observed when using seat belts.
The physical principle of a frontal collisionFig. 145
Driver without a fastened seat belt/rear passenger without a fas-
tened seat belt
First read and observe the introductory information and safety warn-ings
on page 173.
Motion energy, so-called kinetic energy, is produced as soon as the vehicle is
moving, both for the vehicle and its occupants.
The magnitude of this kinetic energy depends essentially on the speed at which
the vehicle is travelling and on the weight of the vehicle including the occupants.
The greater the speed and weight increase, the greater the amount of energy
which has to be absorbed in the event of an accident.
The speed of the vehicle is the most important factor. Doubling the speed of the
vehicle from 25 km/h up to 50 km/hour increases the kinetic energy four times.
The idea that it is possible to support your body with your hands in a minor acci- dent is incorrect. Even in a collision at only a low speed, the forces acting on the
body are such that it is no longer possible to support your body.
Even if you only drive at a speed of 30-50 km/h, the forces that your body is ex-
posed to in the event of an accident can exceed a metric ton (1000 kg).
For example, a person's weight of 80 kg “increases” to 4.8 tons (4800 kg) at
50 km/h.
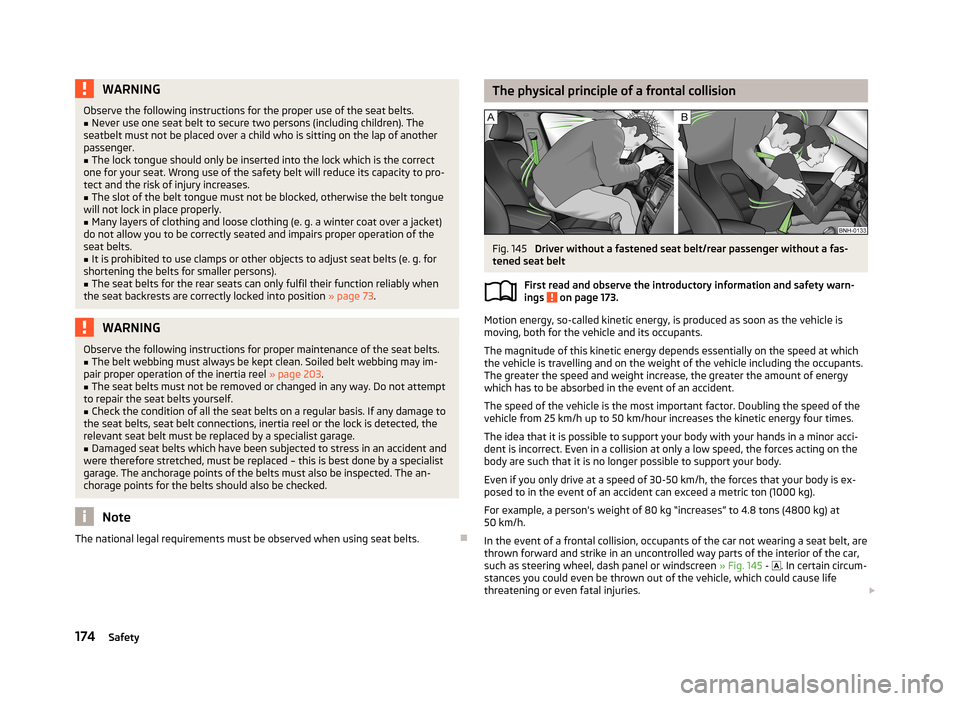
In the event of a frontal collision, occupants of the car not wearing a seat belt, are thrown forward and strike in an uncontrolled way parts of the interior of the car,
such as steering wheel, dash panel or windscreen » Fig. 145 -
. In certain circum-
stances you could even be thrown out of the vehicle, which could cause life threatening or even fatal injuries.
174Safety
Page 195 of 274
In order to be able to operate a vehicle with a variable service interval, it must
only be filled and topped up with the specified engine oil.
If this engine oil is not available, the oil change is subject to a fixed service inter-val. In this case, the vehicle must be changed to the fixed service interval.
Note
■
The corresponding motor oil specifications » page 210.■A changeover from the variable service interval to the fixed service interval, or
from the fixed service interval to the variable service interval, can be carried out
by a specialist garage.
Fixed service intervals QI1 - QI4
First read and observe the introductory information given on page 191.
InspectionQI1 - QI4
First after 30,000 km or 2 years a)
, thereafter every
30,000 km or every 1 year a)
.Every 15,000 km or every 1 year a)
(Applies to Rus-
sia).
Oil change service
QI1After 5,000 km or every 1 year a)
.QI2After 7,500 km or every 1 year a)
.QI3After 10,000 km or every 1 year a)
.QI4After 15,000 km or every 1 year a)
.Brake fluid
change First change after 3 years, then every 2 years.a)
(Whichever comes first).
WARNINGThe brake fluid must always be changed after the first 3 years and then every
2 years. When the brake fluid becomes too old, vapour bubbles may form in
the brake system when the brakes are used hard. The efficiency of the brakes could be seriously affected – risk of accident!NoteFor diesel operation with a high sulphur content, the interval of engine oil change
will be every 7,500 km. Please ask your specialist garage for information on the
countries where diesel fuel has a high sulphur content.
Variable service interval QI6
First read and observe the introductory information given on page 191.
The service intervals depend on how the vehicle is driven and the local conditions
in which the vehicle is used. For example, your vehicle is subjected to different
loads when driven over short distances than long distances. The service intervals
are also variable.
InspectionFirst after 30,000 km or 2 years a)
, then every 30,000 km or
every 1 year a)
.Oil change serviceAccording to the service interval display (at the latest after
30,000 km or every 2 years a)
).Brake fluid
changeFirst change after 3 years, then every 2 years.a)
(Whichever comes first).
WARNINGThe brake fluid must always be changed after the first 3 years and then every
2 years. When the brake fluid becomes too old, vapour bubbles may form in
the brake system when the brakes are used hard. The efficiency of the brakes could be seriously affected – risk of accident!
Information about the ŠKODA service
First read and observe the introductory information given on page 191.
There is an extensive servicing network made up of ŠKODA service partners at
your disposal, for the maintenance of your vehicle.
192General Maintenance
Page 205 of 274
■Do not stick any stickers on the inside of the rear windows, the rear side win-
dows and in the vicinity of the heating elements on the windscreen or near the
window aerial. These may get damaged.■
Do not clean the roof panelling with a brush – risk of damage to the surface of
the panelling.
■
Cleaner that contain solvents can damage the material being cleaned.
■
Apply only a small amount of the cleaning and care product.
For the sake of the environment
Used vehicle care product cans represent hazardous waste that is harmful to the
environment. These must be disposed of in accordance with national legal regula- tions.
Note
Due to the special tools and knowledge required, and to avoid any potential prob-
lems with the cleaning and care of the interior of your vehicle, we recommend
that cleaning and care of the interior of your vehicle be carried out by a ŠKODA service partner.
Natural leather
First read and observe the introductory information and safety warn-
ings
on page 201.
Leather is a natural material with specific properties, and requires regular clean-
ing and maintenance.
The leather should be cleaned on a regular basis depending on the amount of
wear-and-tear.
Dust and dirt in the pores and folds act as abrasive materials. This leads to severe corrosion and the premature brittleness of the leather surface.
We recommend that you remove dust regularly and at short intervals using a
cloth or vacuum cleaner.
Clean soiled leather surfaces with a water-dampened cotton or woollen cloth and
then dry with a clean, dry cloth »
.
Clean severely soiled areas with a cloth soaked in a mild soap solution (2 table-
spoons of neutral soap to 1 litre of water).
To remove stains , use a cleaning agent specially designed for this purpose.
Treat the leather regularly and at suitable intervals using a suitable leather care
product.
CAUTION
■ Ensure that no part of the leather is soaked through during cleaning and that
no water gets into the seams. Otherwise, the leather could become brittle or
cracked.■
Avoid leaving the vehicle for lengthy periods in bright sunlight to avoid the
leather from bleaching. If the vehicle is parked in the open for lengthy periods, protect the leather from direct sunlight by covering it.
■
Sharp-edged objects on items of clothing such as zip fasteners, rivets, sharp-
edged belts, jewellery and pendants may leave permanent scratches or signs of
rubbing on the surface. Such damage cannot be subsequently recognised as a
justified complaint.
■
The use of a mechanical steering wheel lock may damage the leather surface of
the steering wheel.
■
Use a care cream with light blocker and impregnation effect on a regular basis
and each time after cleaning. The cream nourishes the leather, allows it to
breathe and keeps it supple and also provides moisture. It also creates surface
protection.
■
Some clothing materials, e.g. dark denim, do not have sufficient colour fastness.
This can cause damage or clearly visible discolouration to seat covers, even when used correctly. This applies particularly to light-coloured seat covers. This does
not relate to a fault in the seat cover, but rather to poor colour fastness of the
clothing textiles.
Note
When using the vehicle, minor visible changes may occur to the leather parts of
the covers (e.g. wrinkles or creases) as a result of the stress applied to the covers.
Artificial leather, cloths and Alcantara ®
First read and observe the introductory information and safety warn- ings
on page 201.
Artificial leather
Clean artificial leather with a damp cloth.
If this method does not completely clean the artificial leather, use a mild soap sol-ution or cleaning products specially designed for this purpose.
202General Maintenance
Page 213 of 274
In Winter, the washing water should always be mixed with antifreeze even if the
vehicle has heated windscreen washer nozzles.
Under exceptional circumstances, methylated spirits can also be used if no screen
cleaner with antifreeze is available. The concentration of methylated spirits must
not be more than 15 %. The freeze protection at this concentration is sufficient
only to -5 °C.
CAUTION
■ Under no circumstances must radiator antifreeze or other additives be added to
the windscreen washer fluid.■
If the vehicle is fitted with a headlight cleaning system, only cleaning products
which do not attack the polycarbonate coating of the headlights must be added
to the windscreen washer fluid.
■
Do not remove the filter from the windscreen washer fluid reservoir when refill-
ing, as this may cause contamination of the liquid transportation system, leading
in turn to a windscreen washer system malfunction.
Engine oil
Introduction
This chapter contains information on the following subjects:
Specifications and capacity
210
Checking the oil level
211
Replenishing
212
Changing
212
The engine has been factory-filled with a high-grade oil that can be use through-
out the year - except in extreme climate zones.
The engine oils are undergoing continuous further development. Thus the infor-
mation stated in this Owner's Manual is only correct at the time of publication.
ŠKODA Service Partners are informed about the latest changes by the manufac-
turer. We therefore recommend that the oil change be completed by a ŠKODA
Service Partner.
The specifications (VW standards) stated in the following can be indicated sepa-
rately or together with other specifications on the bottle.
The oil capacities include oil filter change. Check the oil level when filling; do not
over fill. The oil level must be between the markings » page 211.WARNING■
The engine compartment of your car is a hazardous area. The following
warning instructions must be followed at all times when working in the en-
gine compartment » page 206.■
Do not continue your journey if for some reason it is not possible to top up
the engine oil . Switch off the engine and seek assistance from a specialist
garage.
■
If the oil level is above level
A
» Fig. 164 on page 211, do not continue to
drive! Switch off the engine and seek assistance from a specialist garage.
CAUTION
Do not pour any additives into the engine oil – risk of serious damage to the en-
gine parts!
Note
■ Before a long drive we recommend that you purchase and carry with you engine
oil which complies with the specification for your vehicle.■
We recommend that you use oils from ŠKODA Original Accessories.
■
If your skin has come into contact with oil, it must be washed thoroughly.
Specifications and capacity
First read and observe the introductory information and safety warn-
ings
on page 210.
Specifications and capacity (in l) for vehicles with flexible service intervals
Petrol enginesSpecificationFilling level1.4 ltr./92 kW TSIVW 503 00, VW 504 003.61.8 ltr/112 kW TSI
1.8 ltr/118 kW TSIVW 504 004.62.0 l/147 kW TSIVW 504 004.63.6 l/191 kW FSIVW 504 005.5 210General Maintenance
Page 214 of 274

Diesel enginesa)SpecificationFilling level1.6 l./77 kW TDI CRVW 507 004.32.0 ltr/103 kW TDI CR DPFVW 507 004.32.0 ltr/125 kW TDI CR DPFVW 507 004.3a)
Engine oil VW 505 01 can optionally be used in diesel engines
without a DPF.
Specifications and capacity (in l) for vehicles with fixed service intervals
Petrol enginesSpecificationFilling lev- el1.4 ltr./92 kW TSIVW 501 01, VW 502 003.61.8 ltr/112 kW TSI
1.8 ltr/118 kW TSIVW 502 004.62.0 l/147 kW TSIVW 502 004.63.6 l/191 kW FSIVW 502 005.5Diesel engines a)SpecificationFilling lev-
el1.6 l./77 kW TDI CRVW 507 004.32.0 ltr/103 kW TDI CR DPFVW 507 004.32.0 ltr/125 kW TDI CR DPFVW 507 004.3a)
Engine oil VW 505 01 can optionally be used in diesel engines without a DPF.
CAUTION
■
If the above engine oils are not available, a different engine oil can be used in
an emergency. To prevent damage to the engine, a maximum of 0.5 litres only of
the following engine oils may be used until the next oil change: ■ For petrol engine models: ACEA A3/ACEA B4 or API SN/API SM;
■ For diesel engine models: ACEA C3 or API CJ-4.
Checking the oil levelFig. 164
Dipstick
First read and observe the introductory information and safety warn-
ings on page 210.
The dipstick indicates the level of oil in the engine » Fig. 164.
Checking the oil level
Ensure that the vehicle is positioned on a level surface and the engine has reached its operating temperature.
›
Switch off the engine.
Wait a few minutes until the engine oil flows back into the oil trough.
›
Open the bonnet.
›
Pull out the dipstick.
›
Wipe the dipstick with a clean cloth and insert it again to the stop.
›
Pull the dipstick out again and check the oil level.
Oil level within range
A
No oil must be refilled.
Oil level within range
B
Oil can be refilled. Afterwards, the oil level can lie in the range
A
.
Oil level within range
C
The engine must be topped up with oil so that the oil level at least reaches the
range
B
.
The engine consumes a little oil. The oil consumption may be as much as 0.5 l/
1 000 km depending on your style of driving and the conditions under which you operate your vehicle. Consumption may be slightly higher than this during the
first 5 000 kilometres.
211Inspecting and replenishing
Page 215 of 274
The oil level must be checked at regular intervals. We recommend after each time
you refuel or prior to making a long journey.
We recommend maintaining the oil level within the range A
, but not above , if
the engine has been operating at high loads, for example, during a lengthy motor-
way trip during the summer months, towing a trailer or negotiating a high moun- tain pass.
The indicator light in the instrument cluster will indicate whether the oil level is
too low » page 18 , Engine oil level . Check the oil level using the dipstick as
soon as possible. Add oil accordingly.
CAUTION
The oil level must not exceed the range A » Fig. 164 – there is a risk of damaging
the exhaust system.
Replenishing
First read and observe the introductory information and safety warn-
ings
on page 210.
›
Check the oil level » page 211.
›
Unscrew the cap of the engine oil filler opening » Fig. 162 on page 209.
›
Replenish the oil in portions of 0.5 litres in accordance with the correct specifi-
cations » page 210 .
›
Check the oil level » page 211.
›
Carefully screw on the oil filler opening cap and push the dipstick in fully.
Changing
First read and observe the introductory information and safety warn-ings
on page 210.
The engine oil must be changed according to pre-specified service inter-
vals » page 191 or according to the service interval display » page 30.
Coolant
Introduction
This chapter contains information on the following subjects:
Capacity
213
Checking the coolant level
213
Replenishing
214
The coolant consists of water with coolant additive. This mixture guarantees anti- freeze protection, protects the cooling/heater system against corrosion and pre-
vents lime formation.
Vehicles exported to countries with a mild climate are already factory-filled with
a coolant which offers antifreeze protection down to about -25 ℃. In these coun-
tries, the concentration of coolant additive should be at least 40%.
Vehicles exported to countries with a cold climate are already factory-filled with a
coolant which offers antifreeze protection down to about -35 °C. In these coun-
tries, the concentration of coolant additive should be at least 50%.
If a higher concentration of antifreeze is required for climatic reasons, the con-centration of coolant additive can be increased up to a maximum of 60% (anti-
freeze protection down to approx. -40 °C).
When refilling, only use the same antifreeze written on the antifreeze expansion tank » Fig. 165 on page 213.
WARNING■
The engine compartment of your car is a hazardous area. The following
warning instructions must be followed at all times when working in the en-
gine compartment » page 206.■
Do not continue your journey if for some reason it is not possible to fill with
coolant under the current circumstances . Switch off the engine and seek
assistance from a specialist garage.
CAUTION
■ The concentration of coolant additive in the coolant must never be under 40%.■Over 60% of coolant additive in the coolant reduces the antifreeze protection
and cooling effect. 212General Maintenance
Page 264 of 274
BootAutomatic retraction (Superb Combi)89
Class N1 vehicles85
Extending variable loading floor92
Folding hook86
Non-closable side pocket (Superb Combi)90
Removable Light (Superb Combi)91
Roll-up boot cover (Superb Combi)88
Side compartment with battery90
Boot cover (Superb Combi)88
Boot lid40
Automatic locking41
Warning light17
(Superb Combi)41
Brake booster138
Brake fluid214
Changing215
Checking214
display messaes15
Brake pads warning light
21
Brakes Brake assist systems
150
Brake booster138
Brake fluid214
Handbrake138
Indicator light15
Running in143
Braking Information on braking
137
Breakdown kit233
Break recommendation See Fatigue detection
161
Bulbs Replacing
247
Button in the driver's door Electric power windows
44
C
Car care
191
Car computer see multifunction display25
Car park ticket holder75
Carrier96
Cavity protection200
CD changer128
Central locking button36
Changing Brake fluid
215
Engine oil212
Wheels229
Changing a wheel Follow-up work
230
Preliminary work229
Remove and attaching a wheel230
Charging a vehicle battery217
Check Fit ball head properly
164
Checking Battery electrolyte level
217
Brake fluid214
Coolant213
Engine oil211
Oil level211
Windscreen washer fluid209
Children and safety186
Child safety Side airbag
187
Child safety lock36
Child seat Classification
188
ISOFIX189
on the front passenger seat187
TOP TETHER190
Use of child seats188
Use of ISOFIX child seats189
Chrome parts refer to Taking care of your vehicle
199
Cigarette lighter77
Cleaning191
Alcantara202
Artificial leather202
cloths202
Covers of electrically heated seats203
Headlight lenses200
Natural leather202
Plastic parts199
Wheels201
Climatronic103
Air recirculation105, 106
automatic mode104
Control elements103
Controlling blower106
Cooling system104
Defrosting windscreen106
Setting the temperature104
Clock13
Clothes hook81
Cockpit 12-Volt power outlet
78
Ashtray77
Cigarette lighter77
General view9
Lighting57
Practical equipment74
Storage compartments74
COMING HOME55
Compartments74
Compass display25
Computer see multifunction display
25
Convenience operation of sliding/tilting roof48
Convenience operation of sliding/tilting roof (Su- perb Combi)
50
Coolant212
Checking213
display messaes16
Replenishing214
Coolant temperature gauge display
11
261Index