seat adjustment SKODA SUPERB 2014 2.G / (B6/3T) User Guide
[x] Cancel search | Manufacturer: SKODA, Model Year: 2014, Model line: SUPERB, Model: SKODA SUPERB 2014 2.G / (B6/3T)Pages: 246, PDF Size: 17.16 MB
Page 84 of 246
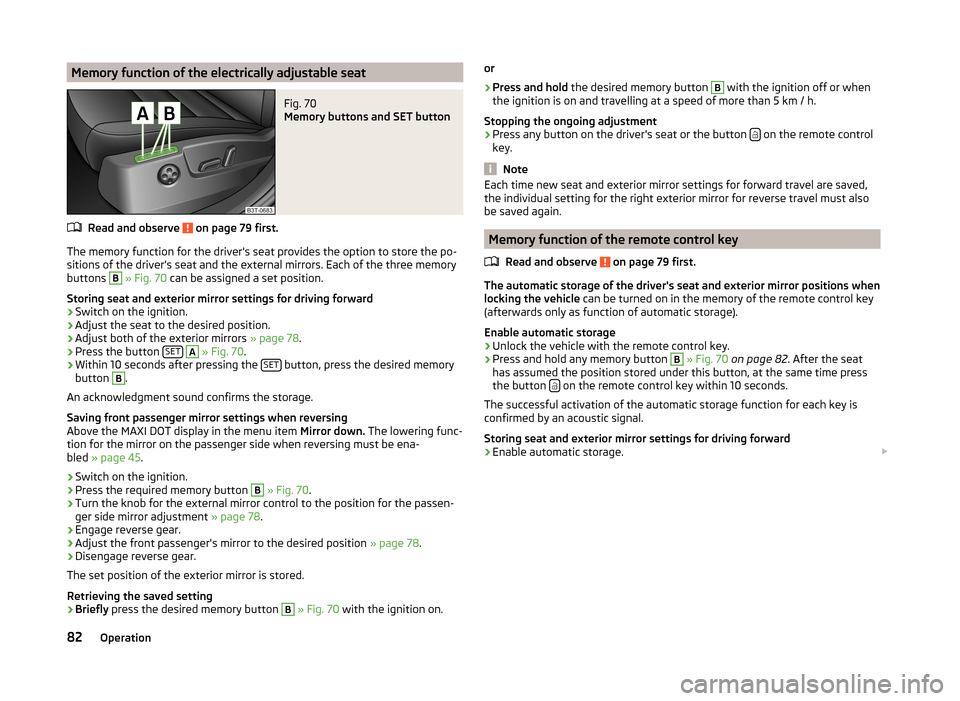
Memory function of the electrically adjustable seatFig. 70
Memory buttons and SET button
Read and observe on page 79 first.
The memory function for the driver's seat provides the option to store the po-
sitions of the driver's seat and the external mirrors. Each of the three memory
buttons
B
» Fig. 70 can be assigned a set position.
Storing seat and exterior mirror settings for driving forward
›
Switch on the ignition.
›
Adjust the seat to the desired position.
›
Adjust both of the exterior mirrors » page 78.
›
Press the button SET
A
» Fig. 70 .
›
Within 10 seconds after pressing the SET button, press the desired memory
button
B
.
An acknowledgment sound confirms the storage.
Saving front passenger mirror settings when reversing
Above the MAXI DOT display in the menu item Mirror down. The lowering func-
tion for the mirror on the passenger side when reversing must be ena-
bled » page 45 .
›
Switch on the ignition.
›
Press the required memory button
B
» Fig. 70 .
›
Turn the knob for the external mirror control to the position for the passen-
ger side mirror adjustment » page 78.
›
Engage reverse gear.
›
Adjust the front passenger's mirror to the desired position » page 78.
›
Disengage reverse gear.
The set position of the exterior mirror is stored.
Retrieving the saved setting
›
Briefly press the desired memory button
B
» Fig. 70 with the ignition on.
or›
Press and hold the desired memory button
B
with the ignition off or when
the ignition is on and travelling at a speed of more than 5 km / h.
Stopping the ongoing adjustment
›
Press any button on the driver's seat or the button on the remote control
key.
Note
Each time new seat and exterior mirror settings for forward travel are saved,
the individual setting for the right exterior mirror for reverse travel must also
be saved again.
Memory function of the remote control key
Read and observe
on page 79 first.
The automatic storage of the driver's seat and exterior mirror positions when
locking the vehicle can be turned on in the memory of the remote control key
(afterwards only as function of automatic storage).
Enable automatic storage
›
Unlock the vehicle with the remote control key.
›
Press and hold any memory button
B
» Fig. 70 on page 82 . After the seat
has assumed the position stored under this button, at the same time press
the button
on the remote control key within 10 seconds.
The successful activation of the automatic storage function for each key is
confirmed by an acoustic signal.
Storing seat and exterior mirror settings for driving forward
›
Enable automatic storage.
82Operation
Page 85 of 246
When automatic storage is activated, the current positions of the driver's seat
and the external mirrors are saved in the memory of the remote control key
each time the vehicle is locked. When the vehicle is next unlocked using the
same key, the driver's seat and the external mirrors assume the positions stor-
ed in the memory of this key 1)
.
Saving front passenger mirror settings when reversing
Above the MAXI DOT display in the menu item Mirror down. The lowering func-
tion for the mirror on the passenger side when reversing must be ena-
bled » page 45 .›
Unlock the vehicle with the remote control key.
›
Switch on the ignition.
›
Turn the knob for the external mirror control to the position for the passen-
ger side mirror adjustment » page 78.
›
Engage reverse gear.
›
Adjust the front passenger's mirror to the desired position » page 78.
›
Disengage reverse gear.
The adjusted position of the exterior mirror is stored in the remote control key
memory.
Disable the function of automatic storage
›
Unlock the vehicle with the remote control key.
›
Press and hold the SET button
A
» Fig. 70 on page 82 . At the same time,
press the button on the remote control key within 10 seconds.
The successful deactivation of the automatic storage function for each key is confirmed by an acoustic signal.
Stopping the ongoing adjustment
›
Press any button on the driver's seat or the button on the remote control
key.
Seat features
Introduction
This chapter contains information on the following subjects:
Seat heaters
83
Ventilated front seats
84Convenience features of passenger seat85Armrest, front85
Armrest rear
85
Seat backrests
85
Rear seat folded forward (Superb Combi)
86
Seat heaters
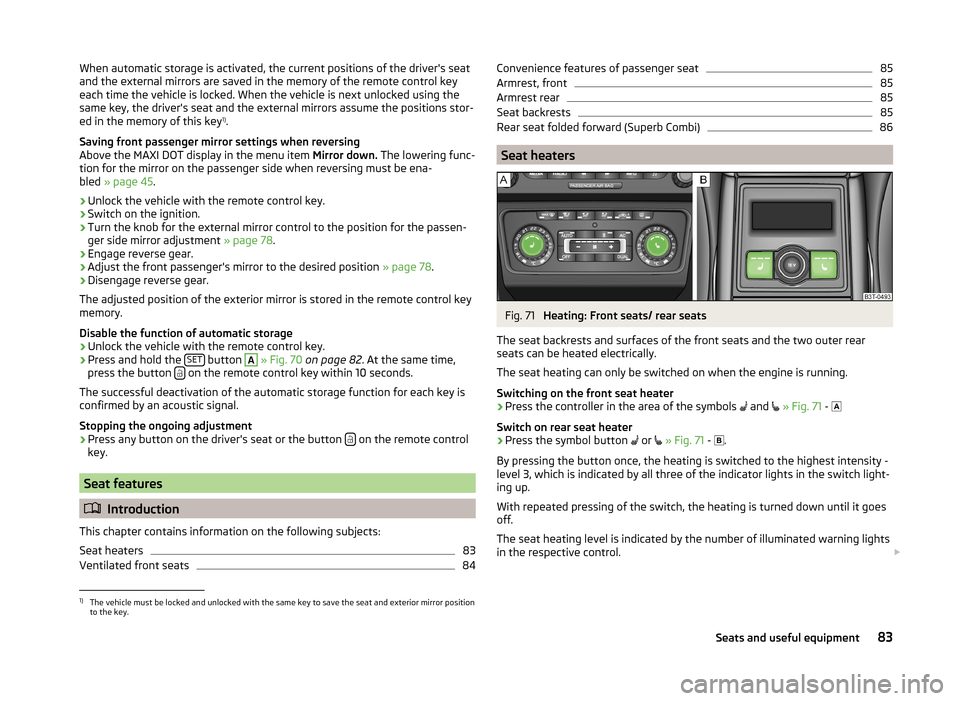
Fig. 71
Heating: Front seats/ rear seats
The seat backrests and surfaces of the front seats and the two outer rear
seats can be heated electrically.
The seat heating can only be switched on when the engine is running.
Switching on the front seat heater
›
Press the controller in the area of the symbols and
» Fig. 71 -
Switch on rear seat heater
›
Press the symbol button or
» Fig. 71 -
.
By pressing the button once, the heating is switched to the highest intensity -
level 3, which is indicated by all three of the indicator lights in the switch light-
ing up.
With repeated pressing of the switch, the heating is turned down until it goes
off.
The seat heating level is indicated by the number of illuminated warning lights
in the respective control.
1)
The vehicle must be locked and unlocked with the same key to save the seat and exterior mirror position
to the key.
83Seats and useful equipment
Page 86 of 246
WARNINGIf you have a subdued pain and/or temperature sensitivity, e.g. through
medication, paralysis or because of chronic illness (e.g. diabetes), we rec-
ommend not to use the seat heating. This can lead to burns on the back,
the posterior and the legs which are difficult to heal. If the seat heating is
used, we recommend to make regular breaks in your journey when driving
long distances, so that the body can recuperate from the stress of the jour-
ney. Please consult your doctor, who can evaluate your specific condition.
CAUTION
■ Do not kneel on the seats or otherwise apply concentrated pressure to them.■Do not turn on the seat heater if seats are not occupied.■
Do not switch on the seat heating if the seats have objects attached to or
placed on them, for example a child seat, a bag, etc. A fault of the heating ele-
ments in the seat heating can occur.
■
If additional seat covers or protective covers are attached to the seats, do
not turn on the seat heater - there is a risk of damaging the seat covers and
seat heating.
■
Do not clean the seats using moisture » page 178, Seat covers .
Note
■
If the on-board voltage drops, the seat heating is switched off automatically,
in order to provide sufficient electrical energy for the engine con-
trol » page 193 .■
If the heaters for the rear seats are set to the highest intensity - level 3, they
are automatically switched over to level 2 after 10 minutes (two indicator lights
are illuminated on the switch).
Ventilated front seats
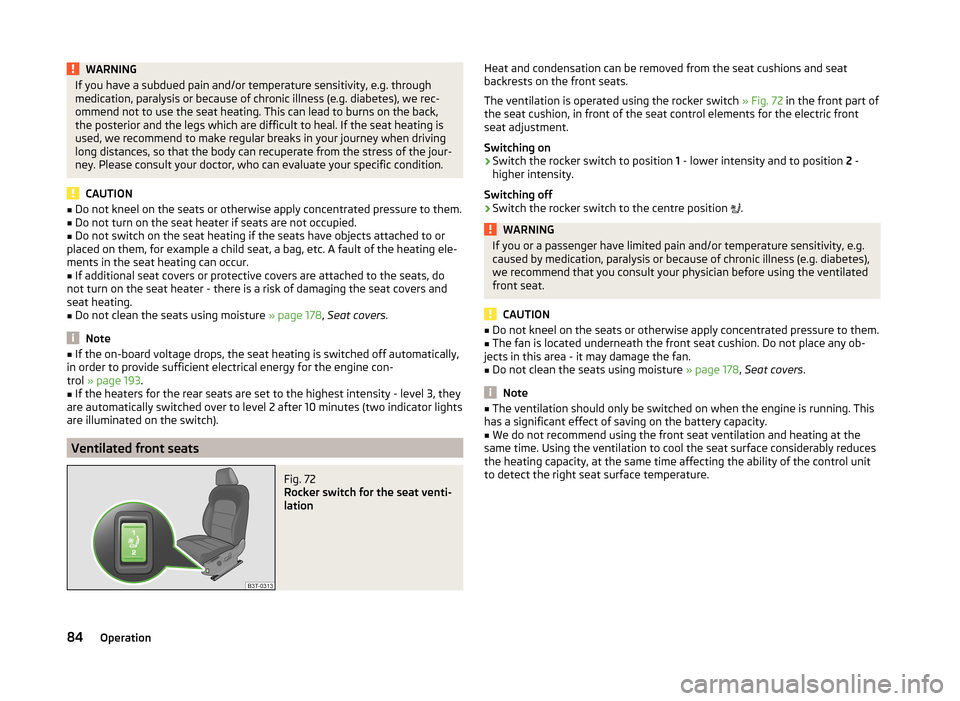
Fig. 72
Rocker switch for the seat venti-
lation
Heat and condensation can be removed from the seat cushions and seat
backrests on the front seats.
The ventilation is operated using the rocker switch » Fig. 72 in the front part of
the seat cushion, in front of the seat control elements for the electric front
seat adjustment.
Switching on›
Switch the rocker switch to position 1 - lower intensity and to position 2 -
higher intensity.
Switching off
›
Switch the rocker switch to the centre position
.
WARNINGIf you or a passenger have limited pain and/or temperature sensitivity, e.g.
caused by medication, paralysis or because of chronic illness (e.g. diabetes),
we recommend that you consult your physician before using the ventilated
front seat.
CAUTION
■ Do not kneel on the seats or otherwise apply concentrated pressure to them.■The fan is located underneath the front seat cushion. Do not place any ob-
jects in this area - it may damage the fan.■
Do not clean the seats using moisture » page 178, Seat covers .
Note
■
The ventilation should only be switched on when the engine is running. This
has a significant effect of saving on the battery capacity.■
We do not recommend using the front seat ventilation and heating at the
same time. Using the ventilation to cool the seat surface considerably reduces
the heating capacity, at the same time affecting the ability of the control unit
to detect the right seat surface temperature.
84Operation
Page 135 of 246
Button/wheel
» Fig. 13 0
ActionRadioTVAudio sourcesDVD videoNavigation
5
Turn upwardsSwitch to the previous station and at the same time
display list of saved/available stationsSkip to next chan- nelSkip to next trackSkip to next chap- terShow the option
to stop navigation or display the list
of recent destina- tions5
Turn downwardsSwitch to the next station and at the same time
display list of saved/available stationsSwitch to previous channelSwitch to start of tracka)Switch to previous
chapter6Press brieflyCall up the main menua)
To go to the previous track, press the adjustment wheel twice or rotate it by two positions.
AUX- and MDIinputs
The AUX and MDI inputs are used to connect external audio sources (e.g. iPod
or mp3 player) and to play back music from these devices via the factory-fitted
radio or navigation system.
The AUX input for external audio sources is located below the armrest of the
front seats and is marked with the symbol. 1)
.
The MDI input is located in the storage compartment below the front armrest.
For a description of use, refer to the relevant operating instructions for the ra-
dio or navigation system.
CD change
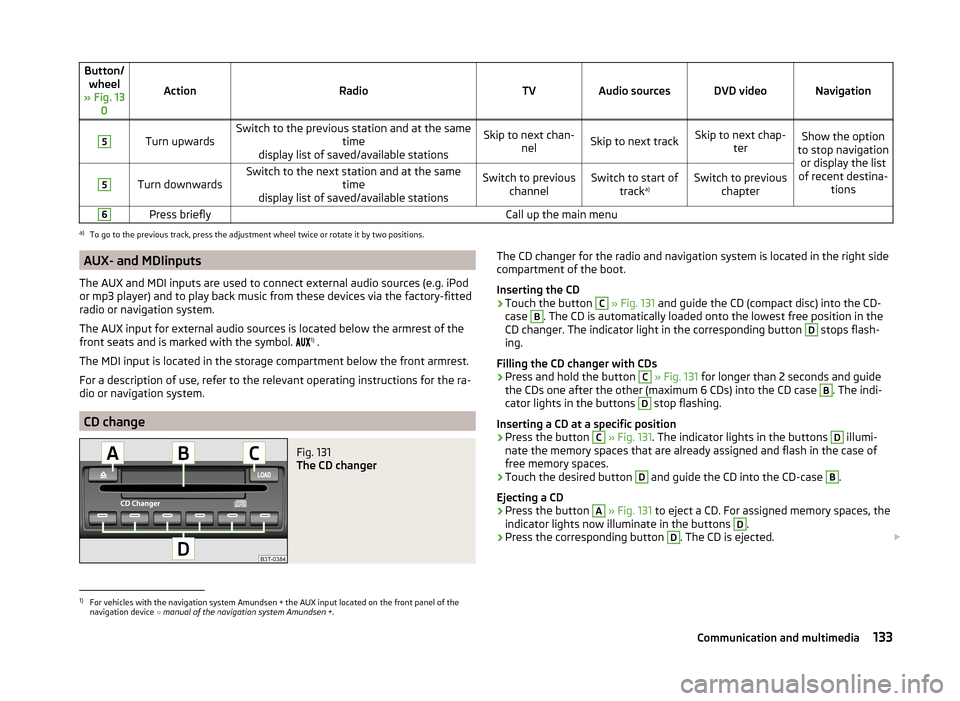
Fig. 131
The CD changer
The CD changer for the radio and navigation system is located in the right side
compartment of the boot.
Inserting the CD›
Touch the button
C
» Fig. 131 and guide the CD (compact disc) into the CD-
case
B
. The CD is automatically loaded onto the lowest free position in the
CD changer. The indicator light in the corresponding button
D
stops flash-
ing.
Filling the CD changer with CDs
›
Press and hold the button
C
» Fig. 131 for longer than 2 seconds and guide
the CDs one after the other (maximum 6 CDs) into the CD case
B
. The indi-
cator lights in the buttons
D
stop flashing.
Inserting a CD at a specific position
›
Press the button
C
» Fig. 131 . The indicator lights in the buttons
D
illumi-
nate the memory spaces that are already assigned and flash in the case of
free memory spaces.
›
Touch the desired button
D
and guide the CD into the CD-case
B
.
Ejecting a CD
›
Press the button
A
» Fig. 131 to eject a CD. For assigned memory spaces, the
indicator lights now illuminate in the buttons
D
.
›
Press the corresponding button
D
. The CD is ejected.
1)
For vehicles with the navigation system Amundsen + the AUX input located on the front panel of the
navigation device » manual of the navigation system Amundsen + .
133Communication and multimedia
Page 234 of 246
Index
A
Abroad Driving abroad
150
Unleaded petrol150
ABS Operation
152
Warning light36
Accessories169
Adaptive headlights (AFS)68
Adjust Auxiliary heating (auxiliary heating and ventila-tion)
117
Adjusting Belt height
13
Exterior mirrors78
Head restraints81
Interior mirror77
Manual air conditioning112
Seats79, 80
Steering wheel8
Adjusting the seats7, 79
Adjustment Headlight beam
66
Aerial173
See windows175
AFS68
Warning light36
Airbag14
Deactivating19
Deactivating the front passenger airbag20
Deployment14
Front airbag15
Head airbag18
Indicator light38
Knee airbag16
Modifications and damage to the airbag system 171 Side airbag
17
Airbag system14
Air conditioning system108
Air outlets108
Climatronic113
Manual air conditioning system110
Air outlets108
Air recirculation Climatronic
115
Alarm Switching off
54
Triggering54
Anti-theft alarm system Activating/deactivating
54
Trailer168
Antilock brake system (ABS)152
Armrest front
85
rear85, 94
Artificial leather178
Ashtray89
ASR Warning light
35
Assist systems151
ABS36, 152
ASR35
Cruise Control System158
DSR152
EDL152
ESC35, 151
HBA152
HHC153
Park assist154
Parking aid153
START-STOP159
TCS152
Auto Check Control31
Automatic driving lamp control68
Automatic gearbox142
Selector lever-emergency unlocking213
Starting-off and driving144
Tiptronic143
Using the selector lever142
Automatic gearbox modes142
Automatic load deactivation193
Automatic retractable cargo cover (Superb Combi))
99
Automatic transmission Kickdown
144
Malfunction144
Selector lever lock143
AUX Installation in the storage compartment
90
Auxiliary heating (auxiliary heating and ventila- tion)
116
Adjust117
Radio remote control118
Switching on/off117
Avoiding damage to the vehicle Driving through water
149
Avoiding damage to your vehicle149
B
Ball head Check fitting
165
Fitting164
Ready position164
Removing165
Battery In the remote control key
211
iReplace the remote control of the auxiliary heater (parking heater)
211
Belts10
Belt tensioners13
Bonnet Closing
183
Opening183
Warning light34
Boot Automatic retraction (Superb Combi)
99
Extending variable loading floor103
232Index
Page 238 of 246
HeadlightsDriving abroad150
Headlight cleaning system77
Replacing a bulb220
Head restraint81
Heater Windscreen and rear window
73
Heating Exterior mirrors
78
Seats83
HHC153
Hill Hold Control (HHC)153
Horn27
Hydraulic Brake Assist (HBA)152
I
Ignition
136
Immobilizer136
Individual settings Locking
52
Unlocking52
Inertia reels13
Information message see KESSY
51
Information system39
Compass point display46
Display a low temperature40
Door warning41
Gear recommendation40
MAXI DOT display44
Multifunction display41
Operation40
Service interval display46
instrument cluster Auto Check Control
31
Instrument cluster28
Counter for distance driven30
Display29
Display of the second speed31
Fuel gauge30
Overview28
Revolutions counter29
see instrument cluster28
Speedometer29
Temperature gauge29
Warning lights32
Interior monitor54
Internet connection127
ISOFIX23
J
Jack
201
Jacking points Raise vehicle
203
Jump-starting207
K
KESSY
50
Information message51
Lock / unlock the steering138
Locking50
Starting the engine139
Switching off the engine139
Switch off ignition138
Switch on ignition138
Unlocking50
Key Starting the engine
136
Stopping the engine137
Knee airbag16
L
Lamp Warning light
36
Lamp failure Warning light
36
LEAVING HOME70
Lever Main beam67
Turn signal67
Windscreen wipers76
Licht COMING HOME / LEAVING HOME
70
Light Cockpit
71
Fog lights with CORNER function69
Replacing bulbs219
Travel mode69
Light bulbs Rear light (Superb Combi)
222
Lighting Luggage compartment
95
Lights65
Adaptive headlights (AFS)68
Automatic driving lamp control68
Daylight running67
Fog lights69
Hazard warning light system70
Headlight beam adjustment66
Headlight flasher67
Instrument lighting66
Low beam lights66
Main beam67
Parking lights66, 71
Rear fog light69
Switching on and off66
Tourist lights69
Turn signal67
Warning lights32
Lock Remote control
49
Vehicle key49
Locking Individual settings
52
KESSY50
Locking and unlocking the vehicle from the in- side
52
236Index
Page 240 of 246
Passive safetyBefore setting off6
Driving safety6
Safety equipment6
Passive Safety6
Payload224
Pedals142
Footmats142
Petrol refer to Fuel
180
Polishing the paintwork See Taking care of your vehicle
174
Power outlet 12 V
90
Power Steering / steering lock (KESSY system) warning light
34
Power windows Button in the front passenger door
61
Practical features86
12-Volt power outlet90
Storage compartment for umbrella93
Storage compartment in rear centre console93
Storage compartment on the passenger side92
Storage compartment under the armrest, front 90
Storage compartment under the passenger seat
92
Storage net in the front centre console91
Storage pockets on the front seats93
R
Radiator fan
184
Radio reception See windows
175
Radio remote control Auxiliary heating
118
Raise vehicle203
Rear-view mirror Exterior mirrors78
Fold in passenger mirror78
Synchronous adjustment of the rear-view mir- ror
78
Rear fog light69
Warning light36
Rear interior light72
Rear mirror77
Interior mirror77
Rear seats Seat folded forward Combi
86
Rear window - heater73
Recirculated air mode Manual air conditioning
112
Refuelling180
Fuel180
Remote control lock
49
Replacing the battery211
Synchronisation process211
unlock49
Remote control key Replacing the battery
211
Removable lights (Superb Combi) Changing rechargeable light batteries
101
Removable Light (Superb Combi) Remove light
101
Removable ski bag95
Removable variable loading floor Fit and remove
104
Repairs and technical alterations169
Replace Vehicle battery
192
Replacing Bulb for main beam
221
Bulb for main beam and daytime running lights 220
Bulb for the fog light
221
Bulb for the licence plate light222
Bulb in rear light (Superb Combi)223
Bulbs219
Fuses215
Fuses in the dash panel216
Fuses in the engine compartment217
Low beam bulb220
Wiper blades214
Replenishing Coolant
188
Engine oil187
Windscreen washer fluid184
Revolutions counter29
Roof luggage rack Attachment points
107
Roof rack system106
Roof load107
Running-in The first 1500 km
145
Running in Brake pads
145
Engine145
Tyres145
S
SAFE see Safe securing
51
SAFELOCK see Safe securing
51
Safe securing51
Safety6
Child safety21
Child safety seats21
Correct seated position7
Head restraints81
ISOFIX23
TOP TETHER24
Saving electrical energy146
Screens see Sun screen in the rear doors
74
Seals Taking care of your vehicle
174
238Index
Page 241 of 246
Seat beltwarning light33
Seat belts10
Belt tensioners13
Cleaning178
fastening and unfastening12
Height adjustment13
Inertia reels13
The physical principle of a frontal collision11
Seat features83
Seats Armrest rear
85
Armtest, front85
Convenience features of passenger seat85
Electric adjustment80
Head restraints81
Heating83
Manually adjusting80
save82
Seat backrests85
Storing in memory of remote control key82
Ventilated front seats84
Seats and useful equipment79
Adjusting the seats79
see automatic gearbox Manual shifting of gears on the multifunctionsteering wheel
143
Selector lever Refer to Selector lever
142
Selector lever lock / starter (system KESSY) Warning light
39
Service170
Service interval display46
Service intervals169
Setting30
Setting the30
Shelves86
Shifting gears Driving and saving energy
146
Side airbag17
Side compartment in boot with battery100
Side compartments in the luggage compart- ment
99
ski bag95
Sliding/tilting roof Close (Superb Combi)
64
Closing62
Closing the sun screen (Superb Combi)64
Electric sliding/tilting roof62
Emergency operation213
Opening/closing the sun screen (Superb Combi) 64
Opening and tilting
62
Opening and tilting (Superb Combi)64
Operation62
Operation (Superb Combi)64
Snow chains199
Spare wheel197
Speedometer29
see speedometer29
Speed symbol See Wheels
196
Spoiler171
START-STOP159
Manually deactivating/activating the system161
Operating conditions of the system160
operation in vehicles with automatic gearbox 160
operation in vehicles with manual gearbox
160
system-related automatic start-up161
Starting and stopping the engine - KESSY137
Starting and stopping the engine using the key 135
Starting engine Jump-starting
207
Starting the engine Jump-starting
207
Key136
see KESSY139
START STOP Information messages
161
Jump-starting208
Steering lock / unlock see KESSY138
Steering wheel8
Stopping the engine Key
137
Storage compartment in rear centre console93
Storage compartment on the passenger side92
Storage compartments86
Storage compartment under the passenger seat
92
Storage pockets on the front seats93
Storing skis94
Sun screen74
Sun screen in the rear doors74
Sun visors74
Switch see Ignition
136
Switching lights on and off66
Switching off the engine see KESSY
139
Switch off ignition Refer to KESSY
138
Switch on ignition Refer to KESSY
138
Synchronous adjustment of the rear-view mir- ror
78
T
Tailgate TwinDoor
56
Taking care of the vehicle Natural leather
177
Seat belts178
Taking care of your vehicle Automatic car wash system
173
Cavity protection176
Chrome parts174
Cleaning the wheels176
Decorative films175
239Index