sensor SKODA SUPERB 2014 2.G / (B6/3T) User Guide
[x] Cancel search | Manufacturer: SKODA, Model Year: 2014, Model line: SUPERB, Model: SKODA SUPERB 2014 2.G / (B6/3T)Pages: 246, PDF Size: 17.16 MB
Page 68 of 246
WARNING (Continued)■The automatic driving lamp control only operates as a support and
does not release the driver from his responsibility to check the light and, if
necessary, to switch on the light depending on the given light conditions.
The light sensor cannot, for example, detect rain or snow. Under these con-
ditions we recommend switching on the low beam or fog lights!■
Never drive with only the side lights on! The side lights are not bright
enough to light up the road sufficiently in front of you or to be seen by oth-
er oncoming traffic. Therefore always switch on the low beam when it is
dark or if visibility is poor.
Note
The headlights may mist up temporarily. When the driving lights are switched
on, the light outlet surfaces are free from mist after a short period, although
the headlight lenses may still be misted up in the peripheral areas. This mist
has no influence on the life of the lighting system.
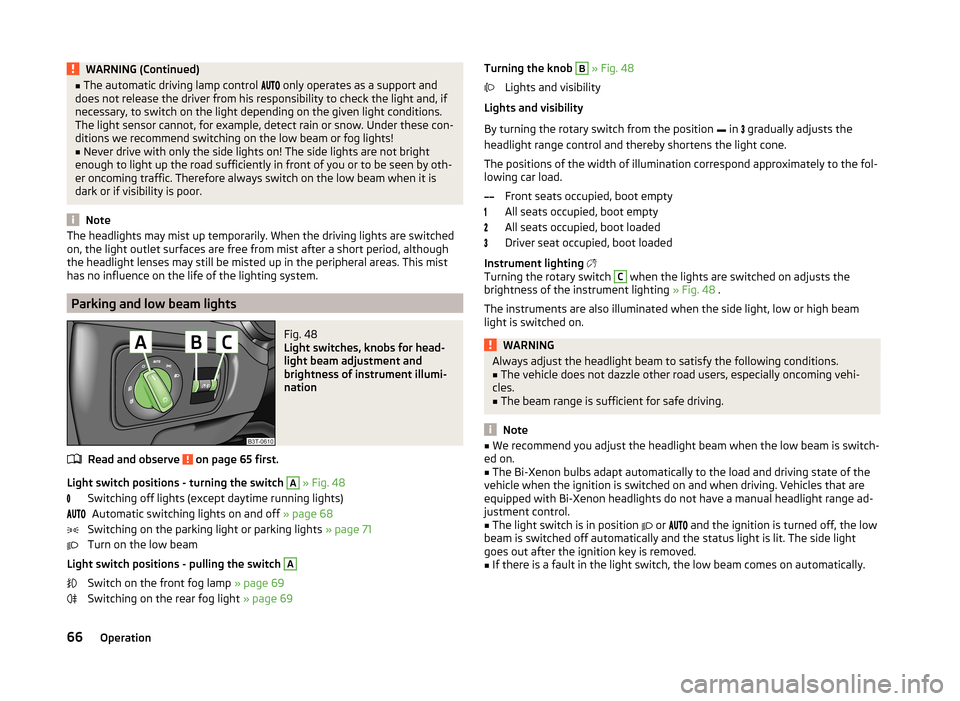
Parking and low beam lights
Fig. 48
Light switches, knobs for head-
light beam adjustment and
brightness of instrument illumi-
nation
Read and observe on page 65 first.
Light switch positions - turning the switch
A
» Fig. 48
Switching off lights (except daytime running lights) Automatic switching lights on and off » page 68
Switching on the parking light or parking lights » page 71
Turn on the low beam
Light switch positions - pulling the switch
A
Switch on the front fog lamp » page 69
Switching on the rear fog light » page 69
Turning the knob B » Fig. 48
Lights and visibility
Lights and visibility
By turning the rotary switch from the position in
gradually adjusts the
headlight range control and thereby shortens the light cone.
The positions of the width of illumination correspond approximately to the fol-
lowing car load.
Front seats occupied, boot empty
All seats occupied, boot empty
All seats occupied, boot loaded
Driver seat occupied, boot loaded
Instrument lighting
Turning the rotary switch C
when the lights are switched on adjusts the
brightness of the instrument lighting » Fig. 48 .
The instruments are also illuminated when the side light, low or high beam
light is switched on.
WARNINGAlways adjust the headlight beam to satisfy the following conditions.■The vehicle does not dazzle other road users, especially oncoming vehi-
cles.■
The beam range is sufficient for safe driving.
Note
■ We recommend you adjust the headlight beam when the low beam is switch-
ed on.■
The Bi-Xenon bulbs adapt automatically to the load and driving state of the
vehicle when the ignition is switched on and when driving. Vehicles that are
equipped with Bi-Xenon headlights do not have a manual headlight range ad-
justment control.
■
The light switch is in position
or
and the ignition is turned off, the low
beam is switched off automatically and the status light is lit. The side light
goes out after the ignition key is removed.
■
If there is a fault in the light switch, the low beam comes on automatically.
66Operation
Page 70 of 246
The “Intelligent turn signal” can be activated or deactivated via the Maxi DOT
display in the Intelligent turn signal » page 45 menu item.WARNINGOnly turn on the main beam or the headlight flasher if other road users will
not be dazzled.
Note
The headlight flasher can be operated even if the ignition is switched off.
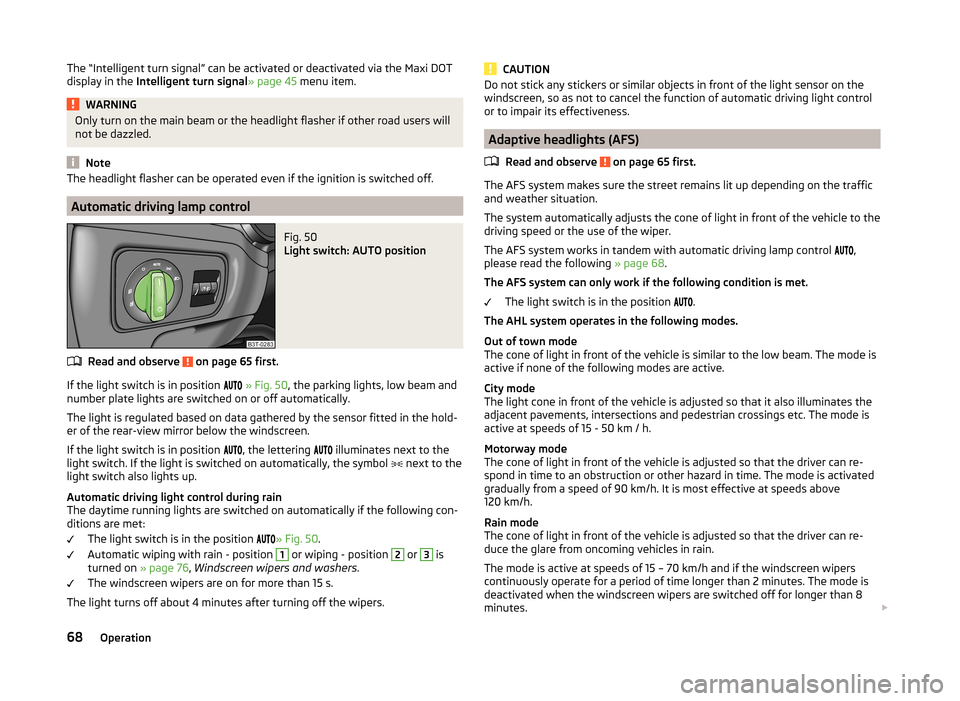
Automatic driving lamp control
Fig. 50
Light switch: AUTO position
Read and observe on page 65 first.
If the light switch is in position
» Fig. 50 , the parking lights, low beam and
number plate lights are switched on or off automatically.
The light is regulated based on data gathered by the sensor fitted in the hold- er of the rear-view mirror below the windscreen.
If the light switch is in position
, the lettering
illuminates next to the
light switch. If the light is switched on automatically, the symbol
next to the
light switch also lights up.
Automatic driving light control during rain
The daytime running lights are switched on automatically if the following con-
ditions are met:
The light switch is in the position
» Fig. 50 .
Automatic wiping with rain - position
1
or wiping - position
2
or
3
is
turned on » page 76, Windscreen wipers and washers .
The windscreen wipers are on for more than 15 s.
The light turns off about 4 minutes after turning off the wipers.
CAUTIONDo not stick any stickers or similar objects in front of the light sensor on the
windscreen, so as not to cancel the function of automatic driving light control
or to impair its effectiveness.
Adaptive headlights (AFS)
Read and observe
on page 65 first.
The AFS system makes sure the street remains lit up depending on the trafficand weather situation.
The system automatically adjusts the cone of light in front of the vehicle to the
driving speed or the use of the wiper.
The AFS system works in tandem with automatic driving lamp control ,
please read the following » page 68.
The AFS system can only work if the following condition is met. The light switch is in the position .
The AHL system operates in the following modes.
Out of town mode
The cone of light in front of the vehicle is similar to the low beam. The mode is active if none of the following modes are active.
City mode
The light cone in front of the vehicle is adjusted so that it also illuminates the
adjacent pavements, intersections and pedestrian crossings etc. The mode is
active at speeds of 15 - 50 km / h.
Motorway mode
The cone of light in front of the vehicle is adjusted so that the driver can re-
spond in time to an obstruction or other hazard in time. The mode is activated
gradually from a speed of 90 km/h. It is most effective at speeds above
120 km/h.
Rain mode
The cone of light in front of the vehicle is adjusted so that the driver can re-
duce the glare from oncoming vehicles in rain.
The mode is active at speeds of 15 – 70 km/h and if the windscreen wipers
continuously operate for a period of time longer than 2 minutes. The mode is
deactivated when the windscreen wipers are switched off for longer than 8
minutes.
68Operation
Page 72 of 246
The rear fog light is switched off in the reverse order.
The warning light
lights up in the instrument cluster when the rear fog light
is switched on » page 32.
When in reverse gear only the rear fog lamp illuminates on the driver's side.
Only the rear fog light on the trailer lights up if the vehicle has a factory-fitted
towing device or a towing device from ŠKODA original accessories and it is
driven with a trailer.
COMING HOME / LEAVING HOME
Read and observe
on page 65 first.
COMING HOME/LEAVING HOME (hereafter referred to only as function)
switches on the lights for a short time after leaving the vehicle or when ap-
proaching the vehicle.
The daytime running lights are switched on automatically if the following
conditions are met:
The light switch is in the position » Fig. 50
on page 68 .
The visibility in the vehicle environment is reduced.
The ignition is switched off.
The parking aid is activated.
The function switches on the following light, depending on the equipment
fitted.
› Parking lights
› Low beam
› Entry lighting in the exterior mirrors
› Licence plate light
The light is controlled on the basis of information that is collected from the
holder mounted in the rear-view mirror sensor » page 68 .
COMING HOME
The light turns on automatically when you open the driver's door on (within 60
seconds of turning off the ignition).
The light turns off 10 seconds after closing all the doors and the boot lid or af-
ter the pre-set time has expired.
If a door or the boot lid remains open, the light goes out after 60 seconds.
LEAVING HOME
The light turns on automatically after the vehicle is unlocked with the remote
control.
The light turns off after 10 seconds or after a pre-set time or after the vehicle
is locked.
Activate/deactivate the function
The functions and settings of the illumination time can be activated/deactiva- ted via the MAXI DOT display in the menu items Coming Home or Leaving
Home » page 45 .
CAUTION
■
Do not attach any stickers or similar objects in front of the light sensor on
the windscreen to avoid impairing the function or its reliability.■
If this function is activated constantly, the battery will be heavily discharged
particularly in short-haul traffic.
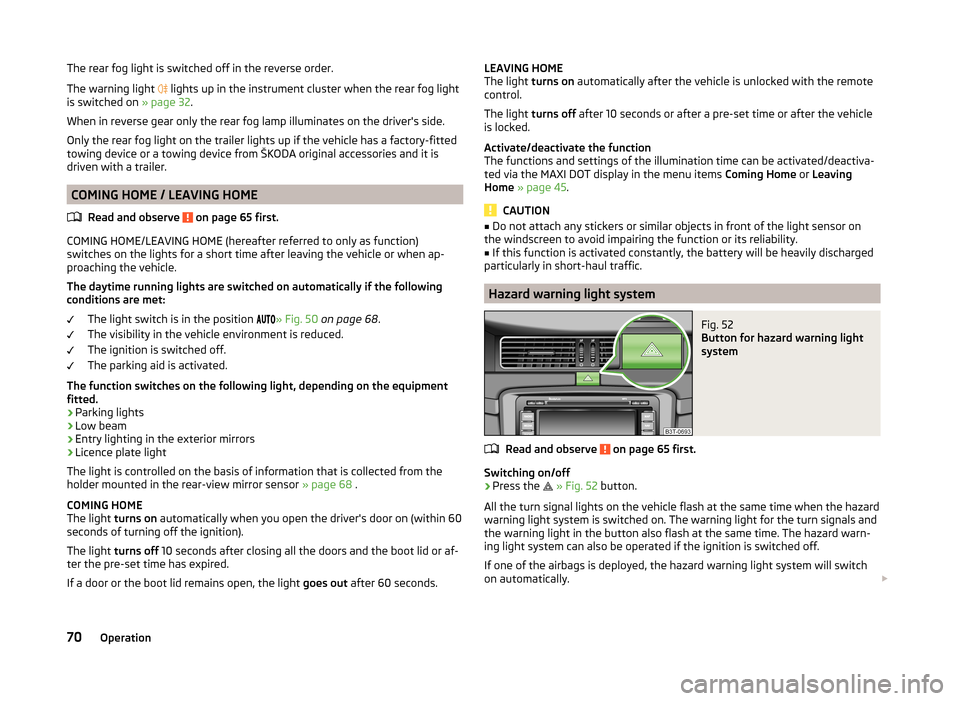
Hazard warning light system
Fig. 52
Button for hazard warning light
system
Read and observe on page 65 first.
Switching on/off
›
Press the
» Fig. 52 button.
All the turn signal lights on the vehicle flash at the same time when the hazard
warning light system is switched on. The warning light for the turn signals and
the warning light in the button also flash at the same time. The hazard warn-
ing light system can also be operated if the ignition is switched off.
If one of the airbags is deployed, the hazard warning light system will switch
on automatically.
70Operation
Page 79 of 246
Headlight cleaning systemRead and observe
and on page 75 first.
After the ignition is switched on, the headlights are always cleaned at the first
and after every tenth spray of the windscreen (setting
5
» Fig. 62 on
page 76 ), when the low beam or main beam is switched on.
You should remove stubborn dirt (such as insect residues) from the headlight
lenses at regular intervals, for example when refuelling. The following guide-
lines must be observed » page 175, Headlight lenses .
To ensure the proper operation of the cleaning system during the winter, any snow should be removed from the washer nozzle fixtures and ice should be
cleared with a de-icing spray.
CAUTION
Never remove the nozzles from the headlight cleaning system by hand – risk of
damage!
Rear mirror
Introduction
This chapter contains information on the following subjects:
Interior mirror
77
Exterior mirrors
78WARNING■ Make sure that the mirror is not covered by ice, snow, mist or other ob-
jects.■
Convex (curved outward) or aspheric exterior mirrors increase the field of
vision. They do, however, make objects appear smaller in the mirror. These
mirrors are therefore only of limited use for estimating distances to the fol-
lowing vehicles.
■
Whenever possible use the interior mirror for estimating the distances to
the following vehicles.
■
The illuminated display of an external navigation unit can lead to opera-
tional faults to the automatic dimming interior mirror – risk of accident.
WARNINGThe mirrors with automatic dimming contain an electrolyte liquid which can
escape if mirror glass is broken.■
The leaking electrolytic fluid can irritate the skin, eyes and breath appara-
tus. Immediately seek out fresh air and leave the vehicle. If this is not pos-
sible, at least open the window.
■
If you swallow electrolytic fluid, seek medical assistance immediately.
■
If your eyes or skin come into contact with the electrolytic fluid, immedi-
ately wash the affected area for a few minutes long with a lot of water.
Then consult a doctor immediately.
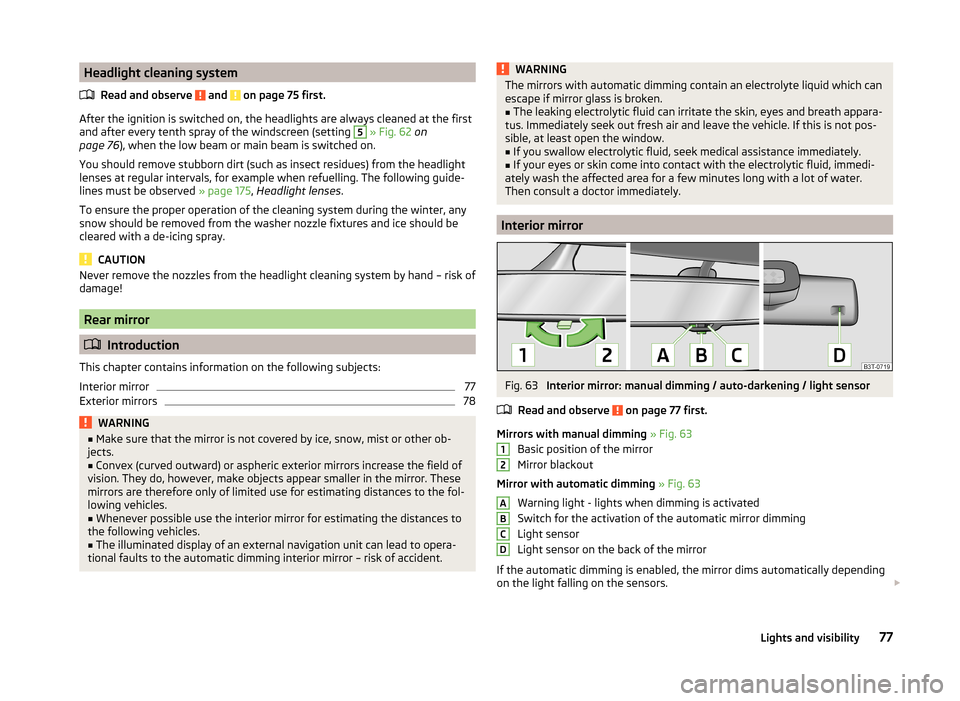
Interior mirror
Fig. 63
Interior mirror: manual dimming / auto-darkening / light sensor
Read and observe
on page 77 first.
Mirrors with manual dimming » Fig. 63
Basic position of the mirror
Mirror blackout
Mirror with automatic dimming » Fig. 63
Warning light - lights when dimming is activated
Switch for the activation of the automatic mirror dimming
Light sensor
Light sensor on the back of the mirror
If the automatic dimming is enabled, the mirror dims automatically depending
on the light falling on the sensors.
12ABCD77Lights and visibility
Page 80 of 246
When the interior lights are switched on or the reverse gear is engaged, the
mirror always moves back into the basic position (not dimmed).
Do not attach external navigation devices on to the windscreen or in the vicini-
ty of the automatic dimming mirror » page 77,
in section Introduction .
Note
■
The automatic dimming mirror only functions smoothly if the light falling on
the sensors is not compromised (e.g. by the sun screen back).■
If the automatic interior mirror dimming is switched off, the exterior mirror
dimming is also switched off.
Exterior mirrors
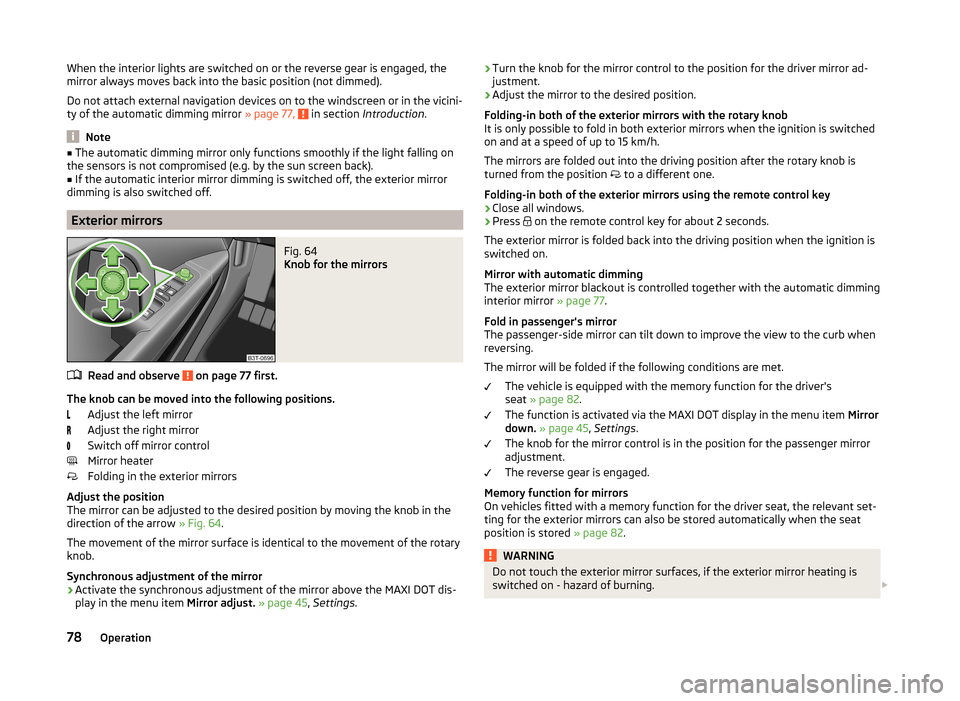
Fig. 64
Knob for the mirrors
Read and observe on page 77 first.
The knob can be moved into the following positions.
Adjust the left mirror
Adjust the right mirror
Switch off mirror control
Mirror heater
Folding in the exterior mirrors
Adjust the position
The mirror can be adjusted to the desired position by moving the knob in the
direction of the arrow » Fig. 64.
The movement of the mirror surface is identical to the movement of the rotary
knob.
Synchronous adjustment of the mirror
›
Activate the synchronous adjustment of the mirror above the MAXI DOT dis- play in the menu item Mirror adjust. » page 45 , Settings .
›Turn the knob for the mirror control to the position for the driver mirror ad-
justment.›
Adjust the mirror to the desired position.
Folding-in both of the exterior mirrors with the rotary knob
It is only possible to fold in both exterior mirrors when the ignition is switched
on and at a speed of up to 15 km/h.
The mirrors are folded out into the driving position after the rotary knob is
turned from the position
to a different one.
Folding-in both of the exterior mirrors using the remote control key
›
Close all windows.
›
Press on the remote control key for about 2 seconds.
The exterior mirror is folded back into the driving position when the ignition is
switched on.
Mirror with automatic dimming
The exterior mirror blackout is controlled together with the automatic dimming
interior mirror » page 77.
Fold in passenger's mirror
The passenger-side mirror can tilt down to improve the view to the curb when
reversing.
The mirror will be folded if the following conditions are met. The vehicle is equipped with the memory function for the driver's
seat » page 82 .
The function is activated via the MAXI DOT display in the menu item Mirror
down. » page 45 , Settings .
The knob for the mirror control is in the position for the passenger mirror
adjustment.
The reverse gear is engaged.
Memory function for mirrors
On vehicles fitted with a memory function for the driver seat, the relevant set-
ting for the exterior mirrors can also be stored automatically when the seat
position is stored » page 82.
WARNINGDo not touch the exterior mirror surfaces, if the exterior mirror heating is
switched on - hazard of burning. 78Operation
Page 115 of 246
Climatronic (automatic air conditioning system)
Introduction
This chapter contains information on the following subjects:
Control elements
113
automatic mode
114
Switching the cooling system on/off
114
Setting the temperature
114
Recirculation mode - Version 1
115
Recirculation mode - Version 2
115
Controlling blower
116
Defrosting windscreen
116
The Climatronic in automatic mode ensures the best-possible setting of the
temperature of the outflowing air, the blower stage and air distribution.
The system also takes sunlight into account, which eliminates the need to al-
ter the settings manually.
The cooling system operates only if the following conditions are met. The cooling system is switched on » page 110.
The engine is running.
The outside temperature is above approx. +2 °C.
The cooling system is switched off at a high coolant temperature in order to
provide cooling at a high load of the engine.
Aeration of the vehicle when ignition is switched off
On models fitted with power sliding/tilting roof with sollar cells, the fresh air
blower is automatically switched over to “solar mode” if the sun ray's are suffi- cient after switching off the ignition. The solar cells on the sliding/tilting roof
deliver power for the fresh air blower. This supplies the interior of the car with
fresh air.
For an optimum ventilation, the air outlet vents 2 and 3 must be
opened » Fig. 122 on page 108 .
The ventilation functions only when the sliding/tilting roof is fully closed.
Note■ We recommend that you have Climatronic cleaned by a specialist garage
once every year.■
During operation of the Climatronic, an increase in engine idle speed can oc-
cur under certain circumstances in order to ensure adequate heating comfort.
■
On vehicles equipped with a factory-fitted radio or radio navigation system,
the Climatronic information is also shown on their displays. This function can
be switched off, see » operating instructions for the radio or navigation sys-
tem .
Control elements
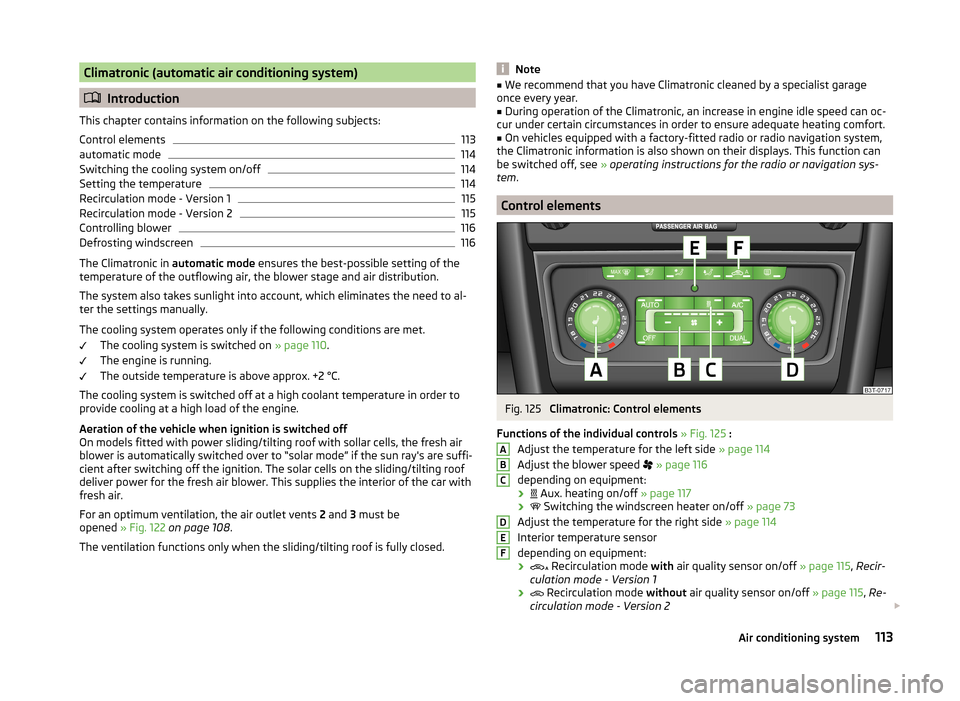
Fig. 125
Climatronic: Control elements
Functions of the individual controls » Fig. 125 :
Adjust the temperature for the left side » page 114
Adjust the blower speed
» page 116
depending on equipment:
›
Aux. heating on/off
» page 117
›
Switching the windscreen heater on/off
» page 73
Adjust the temperature for the right side » page 114
Interior temperature sensor
depending on equipment:
›
Recirculation mode
with air quality sensor on/off » page 115, Recir-
culation mode - Version 1
›
Recirculation mode
without air quality sensor on/off » page 115, Re-
circulation mode - Version 2
ABCDEF113Air conditioning system
Page 116 of 246
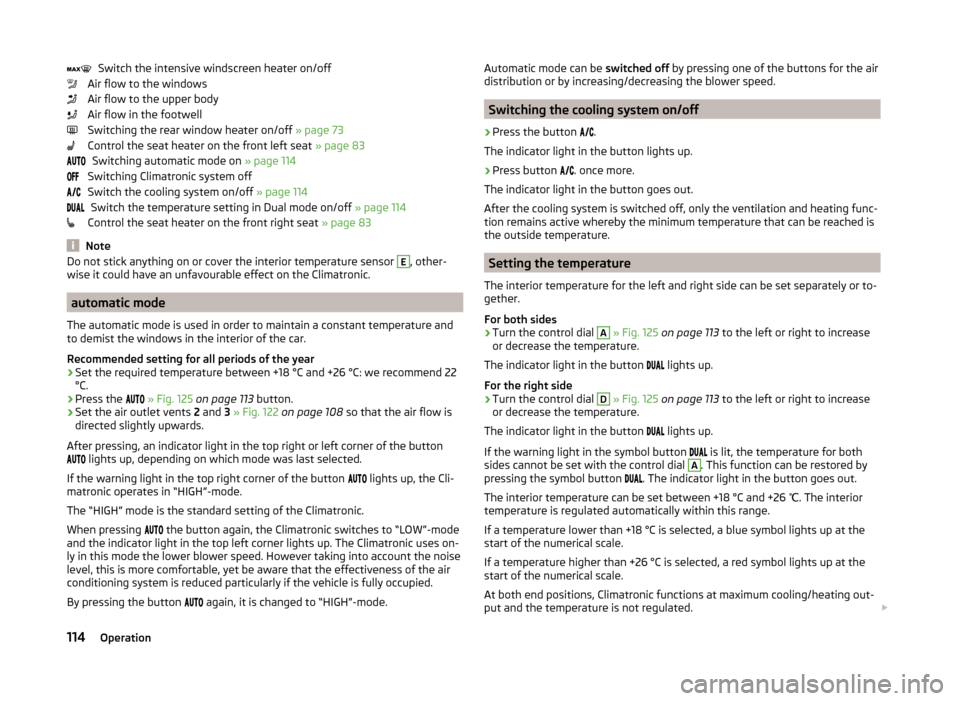
Switch the intensive windscreen heater on/off
Air flow to the windows
Air flow to the upper body
Air flow in the footwell
Switching the rear window heater on/off » page 73
Control the seat heater on the front left seat » page 83
Switching automatic mode on » page 114
Switching Climatronic system off
Switch the cooling system on/off » page 114
Switch the temperature setting in Dual mode on/off » page 114
Control the seat heater on the front right seat » page 83
Note
Do not stick anything on or cover the interior temperature sensor E, other-
wise it could have an unfavourable effect on the Climatronic.
automatic mode
The automatic mode is used in order to maintain a constant temperature and
to demist the windows in the interior of the car.
Recommended setting for all periods of the year
›
Set the required temperature between +18 °C and +26 °C: we recommend 22
°C.
›
Press the
» Fig. 125 on page 113 button.
›
Set the air outlet vents 2 and 3 » Fig. 122 on page 108 so that the air flow is
directed slightly upwards.
After pressing, an indicator light in the top right or left corner of the button
lights up, depending on which mode was last selected.
If the warning light in the top right corner of the button lights up, the Cli-
matronic operates in “HIGH”-mode.
The “HIGH” mode is the standard setting of the Climatronic.
When pressing the button again, the Climatronic switches to “LOW”-mode
and the indicator light in the top left corner lights up. The Climatronic uses on-
ly in this mode the lower blower speed. However taking into account the noise
level, this is more comfortable, yet be aware that the effectiveness of the air
conditioning system is reduced particularly if the vehicle is fully occupied.
By pressing the button again, it is changed to “HIGH”-mode.
Automatic mode can be
switched off by pressing one of the buttons for the air
distribution or by increasing/decreasing the blower speed.
Switching the cooling system on/off
›
Press the button
.
The indicator light in the button lights up.
›
Press button
. once more.
The indicator light in the button goes out.
After the cooling system is switched off, only the ventilation and heating func-
tion remains active whereby the minimum temperature that can be reached is
the outside temperature.
Setting the temperature
The interior temperature for the left and right side can be set separately or to-
gether.
For both sides
›
Turn the control dial
A
» Fig. 125 on page 113 to the left or right to increase
or decrease the temperature.
The indicator light in the button lights up.
For the right side
›
Turn the control dial
D
» Fig. 125 on page 113 to the left or right to increase
or decrease the temperature.
The indicator light in the button lights up.
If the warning light in the symbol button is lit, the temperature for both
sides cannot be set with the control dial
A
. This function can be restored by
pressing the symbol button . The indicator light in the button goes out.
The interior temperature can be set between +18 °C and +26 ℃. The interior
temperature is regulated automatically within this range.
If a temperature lower than +18 °C is selected, a blue symbol lights up at the start of the numerical scale.
If a temperature higher than +26 °C is selected, a red symbol lights up at the
start of the numerical scale.
At both end positions, Climatronic functions at maximum cooling/heating out-
put and the temperature is not regulated.
114Operation
Page 117 of 246
CAUTIONLengthy and uneven distribution of the air flow out of the vents (especially
around the feet) and large differences in temperature, for example, when get-
ting out of the vehicle, can cause susceptible individuals to catch a cold.
Recirculation mode - Version 1
Recirculated air mode prevents polluted air outside the vehicle from getting in-
to the vehicle, for example when driving through a tunnel or when standing in
a traffic jam.
If a considerable increase in concentration of pollutants is recognised by the air quality sensor, recirculated air mode will temporarily be switched off.
If the concentration of pollutants decreases to the normal level, the air distri-
bution control is automatically switched off so that fresh air can be guided into
the vehicle interior.
In recirculated air mode air is sucked out of the interior of the vehicle and then
fed back into the interior.
When the automatic air distribution control is switched on, an air quality sen-
sor measures the concentration of pollutants in the drawn in air.
Switching recirculated air mode on
›
Repeatedly press the button until the indicator light on the
left side of
the button is illuminated.
Switch on automatic air distribution control
›
Repeatedly press the button until the warning light on the
right-hand
side of the button lights up.
Switch off automatic air distribution control temporarily
If the air quality sensor does not switch on automatic recirculated air mode
when there is an unpleasant smell, you can switch it on manually.
›
Press the symbol button .
The indicator light lights up in the button on the left side.
Switching recirculated air mode off
›
Press the button or press the symbol button
again until the warning
lights in the button go out.
WARNINGDo not leave recirculated air mode on over a longer period of time, as
“stale” air can cause fatigue of the driver and passengers, reduce attention
levels and also cause the windows to mist up. The risk of having an acci-
dent increases. Switch off recirculated air mode as soon as the windows
start to mist up.
Note
■ If the windscreen mists up, press the symbol button . Press the button
once the windscreen has demisted.■
The automatic air distribution control operates only if the outside tempera-
ture is higher than approx. 2 °C.
Recirculation mode - Version 2
Recirculated air mode prevents polluted air outside the vehicle from getting in-
to the vehicle, for example when driving through a tunnel or when standing in
a traffic jam.
In recirculated air mode air is sucked out of the interior of the vehicle and then
fed back into the interior.
The air recirculation mode is automatically activated after the ignition is
switched if it was on before the ignition was turned off. The indicator light in the button lights up.
Switch off / on
›
Press the
button.
The indicator light in the button goes out.
›
Press the
button again.
The indicator light in the button lights up.
WARNINGDo not leave recirculated air mode on over a longer period of time, as
“stale” air can cause fatigue of the driver and passengers, reduce attention
levels and also cause the windows to mist up. The risk of having an acci-
dent increases. Switch off recirculated air mode as soon as the windows
start to mist up. 115Air conditioning system
Page 155 of 246
The HBA function is automatically deactivated when the brake pedal is re-
leased.
The ABS is activated faster and more effectively with the intervention of the
HBA.
Hill Hold Control (HHC)
Read and observe
and on page 151 first.
When driving on slopes, HHC allows you to move your foot from the brake ped-
al to the accelerator pedal without having to use the handbrake.
The system holds the brake pressure produced by the activation of the brake pedal for approx. 2 seconds after the brake pedal is released.
The brake pressure drops gradually the more you operate the accelerator ped-
al. If the vehicle does not start off within 2 seconds, it starts to roll back.
The HHC is active on slops of >5 % if the driver door is closed. HHC is only ever active on slopes when in forward or reverse start off. When driving downhill, it
is inactive.
Parking aid
Introduction
This chapter contains information on the following subjects:
Function
154
Activation/deactivation
154WARNING■ The parking aid is not a substitute for the driver paying proper attention
and it is always the driver's responsibility to take care when reversing the
vehicle or carrying out similar manoeuvres. Pay particular attention to small
children and animals as they may not be recognised by the system sensors.■
Before reversing, you should make sure that there are no small obstacles,
such as rocks, thin posts, trailer drawbars etc. in front or behind your vehi-
cle. Such obstacles may not be recognised by the system sensors.
WARNING (Continued)■ Under certain circumstances, surfaces of certain objects and types of
clothing cannot reflect the system signals. Thus, these objects or people
who wear such clothing are not recognised by the System sensors.■
External sound sources can have a detrimental effect on the system. Un-
der adverse conditions, this may cause objects or people to not be recog-
nised by the system.
CAUTION
■ If a warning signal sounds for about 3 seconds after activating the system
and there is no obstacle close to your car, this indicates a system fault. The
fault is also indicated by the symbol
flashing in the button » Fig. 147 on
page 154 . Seek help from a specialist garage.■
The sensors must be kept clean (free of ice, etc.) to enable the system to op-
erate properly.
■
Under adverse weather conditions (heavy rain, water vapour, very low or
high temperatures etc.) system function may be limited.
■
Additionally installed modules such as bicycle carriers can impair the function
of the parking aid.
Note
■ The signal tones for front obstacle recognition are factory-set to be higher
than for rear obstacle recognition.■
If not all fields around the vehicle are shown after the system is activated,
the vehicle will need to be moved a few metres forwards or in reverse.
■
The sound of the park-assist can be adjusted via the MAXI DOT display in the
Wizards menu option » page 45.
■
If the system is activated and the selector lever of the automatic gearbox is
in position P (the vehicle cannot move), the warning tone is interrupted and no
obstacles are displayed.
153Assist systems
Page 156 of 246
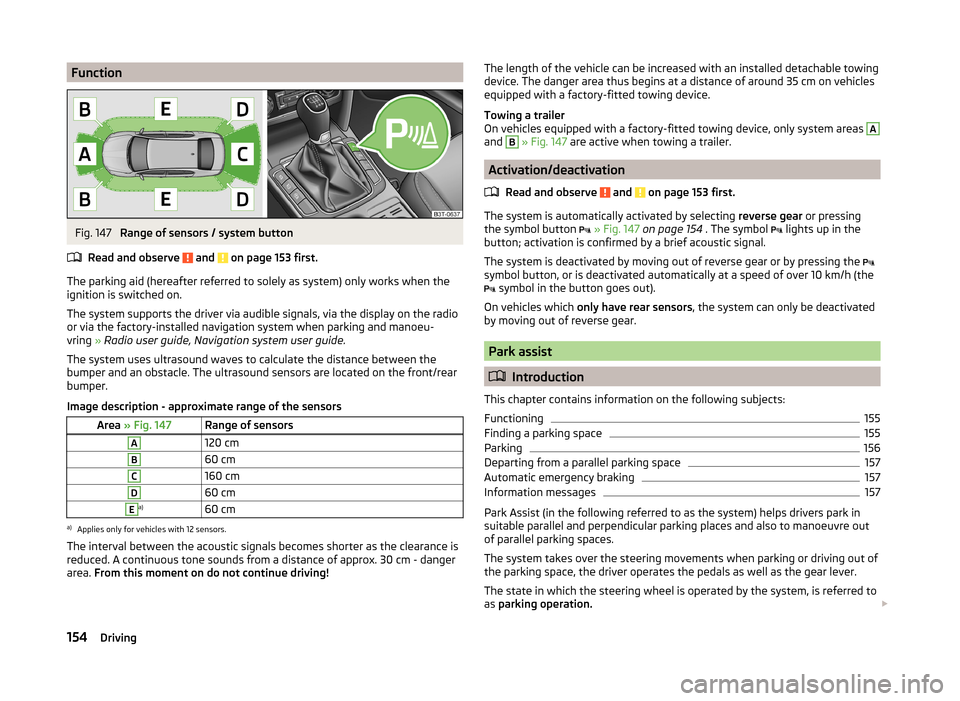
FunctionFig. 147
Range of sensors / system button
Read and observe
and on page 153 first.
The parking aid (hereafter referred to solely as system) only works when the
ignition is switched on.
The system supports the driver via audible signals, via the display on the radio
or via the factory-installed navigation system when parking and manoeu-
vring » Radio user guide, Navigation system user guide.
The system uses ultrasound waves to calculate the distance between the
bumper and an obstacle. The ultrasound sensors are located on the front/rear
bumper.
Image description - approximate range of the sensors
Area » Fig. 147Range of sensorsA120 cmB60 cmC160 cmD60 cmEa)60 cma)
Applies only for vehicles with 12 sensors.
The interval between the acoustic signals becomes shorter as the clearance is
reduced. A continuous tone sounds from a distance of approx. 30 cm - danger
area. From this moment on do not continue driving!
The length of the vehicle can be increased with an installed detachable towing
device. The danger area thus begins at a distance of around 35 cm on vehicles equipped with a factory-fitted towing device.
Towing a trailer
On vehicles equipped with a factory-fitted towing device, only system areas A
and
B
» Fig. 147 are active when towing a trailer.
Activation/deactivation
Read and observe
and on page 153 first.
The system is automatically activated by selecting reverse gear or pressing
the symbol button
» Fig. 147 on page 154 . The symbol
lights up in the
button; activation is confirmed by a brief acoustic signal.
The system is deactivated by moving out of reverse gear or by pressing the
symbol button, or is deactivated automatically at a speed of over 10 km/h (the
symbol in the button goes out).
On vehicles which only have rear sensors , the system can only be deactivated
by moving out of reverse gear.
Park assist
Introduction
This chapter contains information on the following subjects:
Functioning
155
Finding a parking space
155
Parking
156
Departing from a parallel parking space
157
Automatic emergency braking
157
Information messages
157
Park Assist (in the following referred to as the system) helps drivers park in
suitable parallel and perpendicular parking places and also to manoeuvre out
of parallel parking spaces.
The system takes over the steering movements when parking or driving out of
the parking space, the driver operates the pedals as well as the gear lever.
The state in which the steering wheel is operated by the system, is referred to
as parking operation.
154Driving