sensor SKODA SUPERB 2014 2.G / (B6/3T) Owner's Guide
[x] Cancel search | Manufacturer: SKODA, Model Year: 2014, Model line: SUPERB, Model: SKODA SUPERB 2014 2.G / (B6/3T)Pages: 246, PDF Size: 17.16 MB
Page 157 of 246
The parking aid is part of the park assist system, therefore the information
and safety guidelines » page 153 , Parking aid must also be read and ob-
served.WARNING■ The system only serves to support and does not relieve the driver of the
responsibility for the vehicle operation.■
During the parking process, the system automatically performs rapid
steering movements. While it is doing so, do not place your hands between
the steering wheel – risk of injury!
■
During a parking manoeuvre on loose or slippery surfaces (gravel, snow,
ice, etc.) you may stray from the calculated road because of the surface
conditions. We therefore recommend not using the system in such situa-
tions.
■
External noise sources may affect the signals of the system sensors. Un-
der adverse conditions, this may cause objects or people to not be recog-
nised by the system.
CAUTION
■ If other vehicles are parked behind or on the kerb, the system can guide your
vehicle beyond the kerb or onto it. Ensure that the wheels or the wheel rims of
your vehicle are not damaged and if necessary intervene in time.■
Under certain circumstances, the surfaces or structures of certain objects
such as wire mesh fences or powder snow cannot be detected by the system.
■
Under adverse weather conditions (heavy rain, water vapour, very low or
high temperatures etc.) system function may be limited.
CAUTION
The correct evaluation of the parking space and the parking procedure de-
pends on the circumference of the wheels on the vehicle.■
The system only works correctly if the vehicle is fitted with the wheel size
approved by the manufacturer.
■
Do without the use of the system if snow chains or a spare wheel is moun-
ted.
■
If wheels other than those approved by the manufacturer are mounted, the
resulting position of the vehicle in the parking space can differ slightly. This
can be avoided by readjusting the system at a specialist garage.
Note
We recommend performing the parking at a safe speed to about 5 km / h.Functioning
Read and observe
and on page 155 first.
Basic system operations
› The measurement and evaluation of the size of parking spaces when driving.
› The determination of the correct position of the vehicle for parking.
› The calculation of the line on which the vehicle drives backwards into the
parking space or forwards from the parking space.
› Automatic rotation of the front wheels during the parking.
The display of the instrument cluster (hereinafter only in the display) informa- tion and system messages are displayed.
When the system is activated, the warning light lights up
» Fig. 148 on
page 155 -
.
The traction control system (TCS) must always be switched on when parking.
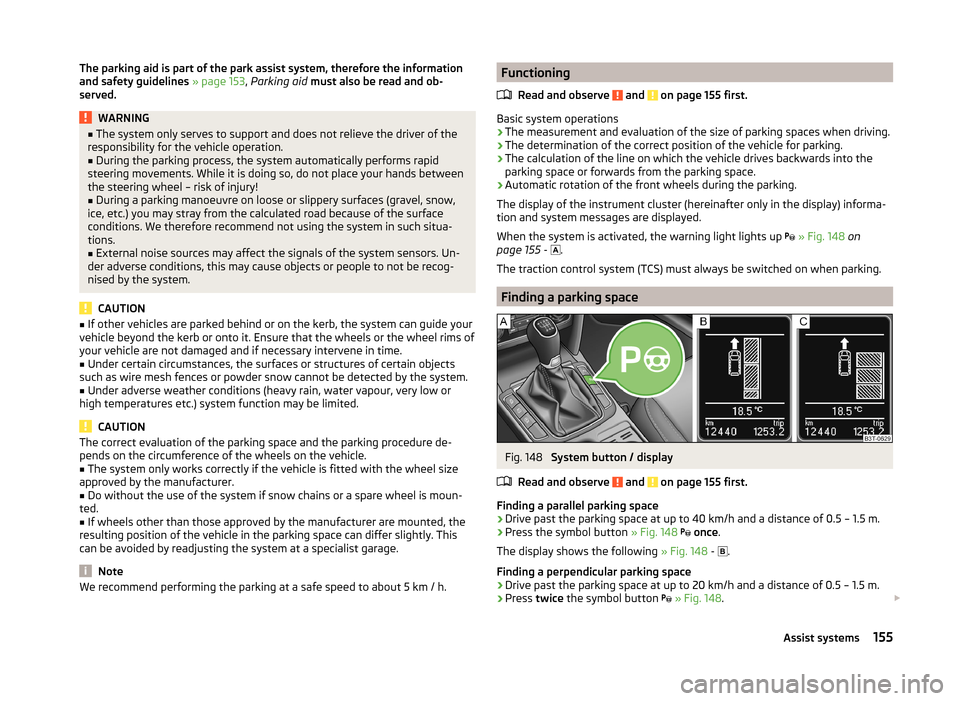
Finding a parking space
Fig. 148
System button / display
Read and observe
and on page 155 first.
Finding a parallel parking space
›
Drive past the parking space at up to 40 km/h and a distance of 0.5 – 1.5 m.
›
Press the symbol button » Fig. 148
once .
The display shows the following » Fig. 148 -
.
Finding a perpendicular parking space
›
Drive past the parking space at up to 20 km/h and a distance of 0.5 – 1.5 m.
›
Press twice the symbol button
» Fig. 148 .
155Assist systems
Page 174 of 246
WARNINGThe airbag control unit operates using pressure sensors located in the front
doors. For this reason, no adjustments may be carried out to the doors or
door panels (e.g. installation of additional loudspeakers). Resulting damage
can have a negative impact on the function of the airbag system. Any work
on the front doors and door panels must be carried out by a specialist ga-
rage. The following guidelines must be observed.■
Never drive with inner door panels removed.
■
Never drive if parts of the inner door panel have been removed and the
resulting openings have not been properly sealed.
■
Never drive if the loudspeakers in the doors have been removed, unless
the loudspeaker openings have been properly sealed.
■
Always make sure that the openings are covered or filled if additional
loudspeakers or other equipment parts have been installed in the inner
door panels.
Washing your car
Introduction
This chapter contains information on the following subjects:
Washing by hand
172
Automatic car wash systems
173
Washing with a high-pressure cleaner
173
The best way to protect your vehicle against harmful environmental influences
is frequent washing.
How often the vehicle should be washed depends on factors such as:
› Frequency of use.
› Parking situation (garage, under trees etc.).
› Season.
› Weather conditions.
› Environmental influences.
The longer insect residues, bird droppings, tree sap, road and industrial dust,
tar, soot particles, road salt and other aggressive deposits remain adhering to
the paintwork of your vehicle, the more detrimental their destructive effect
can be. High temperatures, such as those caused by intensive sun's rays, ac-
centuate this caustic effect.
It is essential to also thoroughly clean the underside of the vehicle at the end
of the winter.WARNING■ When washing your vehicle in the winter: Water and ice in the braking
system can affect the braking efficiency – risk of accident!■
Only wash the vehicle when the ignition is switched off – risk of accident!
CAUTION
Do not wash your vehicle in bright sunlight – risk of paint damage.
For the sake of the environment
Only wash the vehicle at washing bays intended for this purpose.
Washing by hand
Read and observe
and on page 172 first.
Soak the dirt with plenty of water and rinse as well as possible.
Clean the vehicle with a soft sponge, a washing glove or a washing brush .
Work from the top to the bottom - starting with the roof.
Only use a car shampoo for stubborn dirt.
Wash out the sponge or washing glove thoroughly at short intervals.
Clean wheels, door sills and similar parts last. Use a second sponge for such
areas.
Give the vehicle a good rinse after washing it and dry it off using a chamois
leather.
CAUTION
■ When washing the car by hand, protect your hands and arms from sharp-
edged metal parts (e.g. when cleaning the under floor, the inside of the wheel
housings or the wheel trims, etc.). - There is a risk of cuts!■
Only apply slight pressure when cleaning the vehicle's paintwork.
172General Maintenance
Page 175 of 246
Automatic car wash systemsRead and observe
and on page 172 first.
The usual precautionary measures must be taken before washing the vehicle
in an automatic car wash system (e.g. closing the windows and the sliding/tilt-
ing roof etc.).
If your vehicle is fitted with any particular attached parts, such as a spoiler,
roof rack system, two-way radio aerial etc., it is best to consult the operator of
the car wash system beforehand.
After an automatic wash with wax treatment, the lips of the wipers should be
cleaned with cleaning agents specially designed for the purpose, and then de-
greased.
WARNINGFold in the exterior mirrors to prevent damage before washing the vehicle
in an automatic car wash system. Never manually fold in electric exterior
mirrors - always use the electric controls.
Washing with a high-pressure cleaner
Read and observe
and on page 172 first.
When washing the vehicle with a high-pressure cleaner, the instructions for
use of the equipment must be observed. This applies in particular to the pres-
sure used and to the spraying distance .
Maintain a sufficiently large distance to the parking aid sensors and soft mate-
rials such as rubber hoses or insulation material.
WARNINGNever use circular spray nozzles or dirt cutters!
CAUTION
■ If washing the vehicle in the winter using a hose or high-pressure cleaner,
ensure that the jet of water is not aimed directly at the locking cylinders or the
door/panel joints – risk of freezing!■
To avoid damaging the parking aid sensors while cleaning with high-pressure
cleaners or steam jets, the sensors must only be directly sprayed for short pe-
riods while a minimum distance of 10 cm must be observed.
■ The temperature of the water used for cleaning must not exceed 60 °C – risk
of damaging the vehicle.■
See also Washing cars with decorative films using a high-pressure clean-
er » page 175 .
Taking care of your vehicle exterior
Introduction
This chapter contains information on the following subjects:
Taking care of your vehicle's paintwork
174
Plastic parts
174
Rubber seals
174
Chrome parts
174
Decorative films
175
Windows and exterior mirrors
175
Headlight lenses
175
Door lock cylinders
175
Cavity protection
176
Wheels
176
Underbody protection
176
Regular and proper care help to retain the efficiency and value of your vehicle.
It may also be one of the requirements for the acceptance of warranty claims
relating to corrosion damage and paint defects on the bodywork.
We recommend using vehicle care products from ŠKODA Original Accessories.
These are available from ŠKODA Partners. The usage instructions on the pack-
age must be observed.
WARNING■ Vehicle care products may be harmful to your health if not used according
to the instructions.■
Always keep the vehicle care products safe from people who are not com-
pletely independent, e.g. children - there is a danger of poisoning!
■
Protect your hands and arms from sharp-edged metal parts when clean-
ing the underfloor, the inside of the wheel housings or the wheel trims –
risk of cuts!
173Car care
Page 218 of 246
CAUTION■“Never repair” fuses or replace them with a fuse of a higher amperage – risk
of fire! This may also cause damage at another part of the electrical system.■
If a newly inserted fuse blows again after a short time, have the electrical
system checked as quickly as possible by a specialist garage.
■
A blown fuses is recognisable by the molten metal strip. Replace the faulty
fuse with a new one of the same amperage.
Note
■
We recommend always carrying replacement fuses in the vehicle. A box of
replacement fuses can be purchased from ŠKODA Original Accessories.■
There can be several power consuming devices for one fuse.
■
Multiple fuses may exist for a single power consuming device.
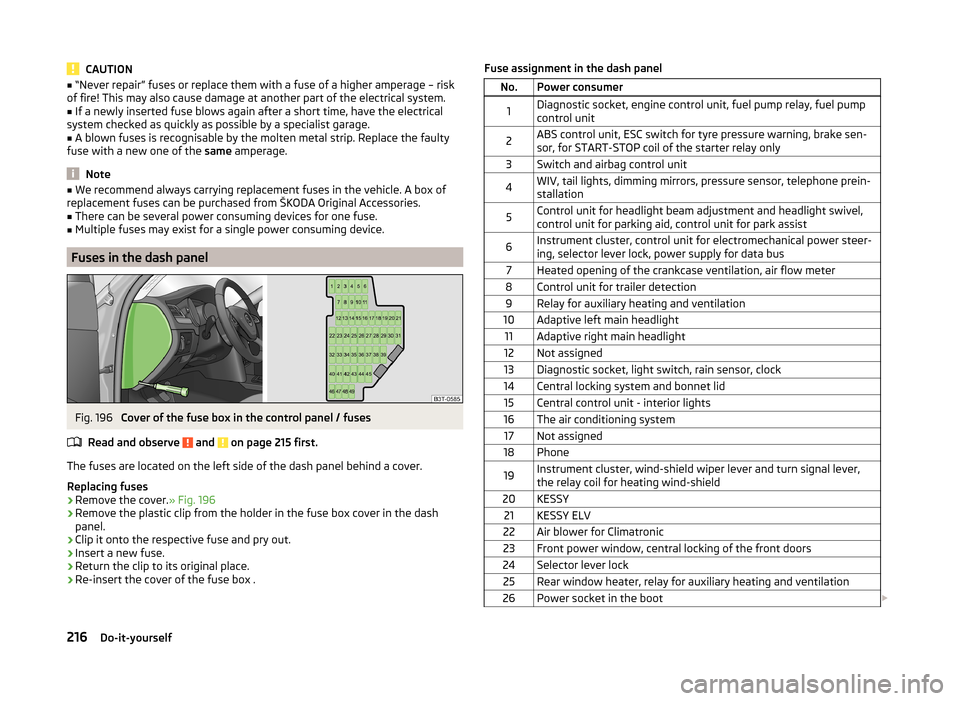
Fuses in the dash panel
Fig. 196
Cover of the fuse box in the control panel / fuses
Read and observe
and on page 215 first.
The fuses are located on the left side of the dash panel behind a cover.
Replacing fuses
›
Remove the cover. » Fig. 196
›
Remove the plastic clip from the holder in the fuse box cover in the dash
panel.
›
Clip it onto the respective fuse and pry out.
›
Insert a new fuse.
›
Return the clip to its original place.
›
Re-insert the cover of the fuse box .
Fuse assignment in the dash panelNo.Power consumer1Diagnostic socket, engine control unit, fuel pump relay, fuel pump
control unit2ABS control unit, ESC switch for tyre pressure warning, brake sen-
sor, for START-STOP coil of the starter relay only3Switch and airbag control unit4WIV, tail lights, dimming mirrors, pressure sensor, telephone prein-
stallation5Control unit for headlight beam adjustment and headlight swivel,
control unit for parking aid, control unit for park assist6Instrument cluster, control unit for electromechanical power steer-
ing, selector lever lock, power supply for data bus7Heated opening of the crankcase ventilation, air flow meter8Control unit for trailer detection9Relay for auxiliary heating and ventilation10Adaptive left main headlight11Adaptive right main headlight12Not assigned13Diagnostic socket, light switch, rain sensor, clock14Central locking system and bonnet lid15Central control unit - interior lights16The air conditioning system17Not assigned18Phone19Instrument cluster, wind-shield wiper lever and turn signal lever,
the relay coil for heating wind-shield20KESSY21KESSY ELV22Air blower for Climatronic23Front power window, central locking of the front doors24Selector lever lock25Rear window heater, relay for auxiliary heating and ventilation26Power socket in the boot 216Do-it-yourself
Page 220 of 246
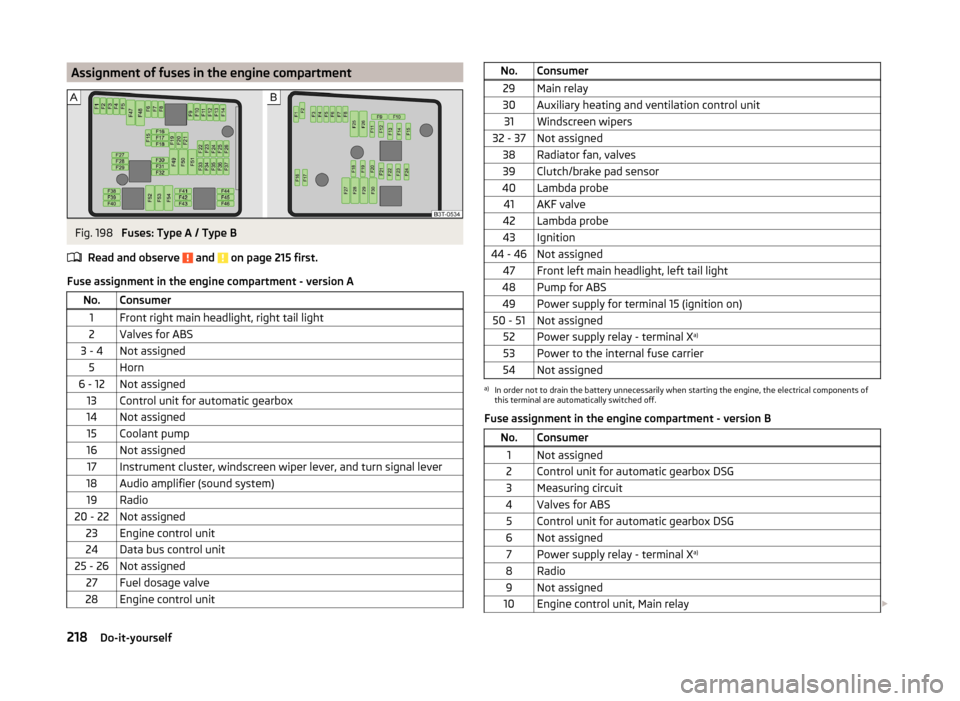
Assignment of fuses in the engine compartmentFig. 198
Fuses: Type A / Type B
Read and observe
and on page 215 first.
Fuse assignment in the engine compartment - version A
No.Consumer1Front right main headlight, right tail light2Valves for ABS3 - 4Not assigned5Horn6 - 12Not assigned13Control unit for automatic gearbox14Not assigned15Coolant pump16Not assigned17Instrument cluster, windscreen wiper lever, and turn signal lever18Audio amplifier (sound system)19Radio20 - 22Not assigned23Engine control unit24Data bus control unit25 - 26Not assigned27Fuel dosage valve28Engine control unitNo.Consumer29Main relay30Auxiliary heating and ventilation control unit31Windscreen wipers32 - 37Not assigned38Radiator fan, valves39Clutch/brake pad sensor40Lambda probe41AKF valve42Lambda probe43Ignition44 - 46Not assigned47Front left main headlight, left tail light48Pump for ABS49Power supply for terminal 15 (ignition on)50 - 51Not assigned52Power supply relay - terminal X a)53Power to the internal fuse carrier54Not assigneda)
In order not to drain the battery unnecessarily when starting the engine, the electrical components of
this terminal are automatically switched off.
Fuse assignment in the engine compartment - version B
No.Consumer1Not assigned2Control unit for automatic gearbox DSG3Measuring circuit4Valves for ABS5Control unit for automatic gearbox DSG6Not assigned7Power supply relay - terminal X a)8Radio9Not assigned10Engine control unit, Main relay
218Do-it-yourself