ESP SKODA SUPERB 2014 2.G / (B6/3T) Owner's Guide
[x] Cancel search | Manufacturer: SKODA, Model Year: 2014, Model line: SUPERB, Model: SKODA SUPERB 2014 2.G / (B6/3T)Pages: 246, PDF Size: 17.16 MB
Page 117 of 246
CAUTIONLengthy and uneven distribution of the air flow out of the vents (especially
around the feet) and large differences in temperature, for example, when get-
ting out of the vehicle, can cause susceptible individuals to catch a cold.
Recirculation mode - Version 1
Recirculated air mode prevents polluted air outside the vehicle from getting in-
to the vehicle, for example when driving through a tunnel or when standing in
a traffic jam.
If a considerable increase in concentration of pollutants is recognised by the air quality sensor, recirculated air mode will temporarily be switched off.
If the concentration of pollutants decreases to the normal level, the air distri-
bution control is automatically switched off so that fresh air can be guided into
the vehicle interior.
In recirculated air mode air is sucked out of the interior of the vehicle and then
fed back into the interior.
When the automatic air distribution control is switched on, an air quality sen-
sor measures the concentration of pollutants in the drawn in air.
Switching recirculated air mode on
›
Repeatedly press the button until the indicator light on the
left side of
the button is illuminated.
Switch on automatic air distribution control
›
Repeatedly press the button until the warning light on the
right-hand
side of the button lights up.
Switch off automatic air distribution control temporarily
If the air quality sensor does not switch on automatic recirculated air mode
when there is an unpleasant smell, you can switch it on manually.
›
Press the symbol button .
The indicator light lights up in the button on the left side.
Switching recirculated air mode off
›
Press the button or press the symbol button
again until the warning
lights in the button go out.
WARNINGDo not leave recirculated air mode on over a longer period of time, as
“stale” air can cause fatigue of the driver and passengers, reduce attention
levels and also cause the windows to mist up. The risk of having an acci-
dent increases. Switch off recirculated air mode as soon as the windows
start to mist up.
Note
■ If the windscreen mists up, press the symbol button . Press the button
once the windscreen has demisted.■
The automatic air distribution control operates only if the outside tempera-
ture is higher than approx. 2 °C.
Recirculation mode - Version 2
Recirculated air mode prevents polluted air outside the vehicle from getting in-
to the vehicle, for example when driving through a tunnel or when standing in
a traffic jam.
In recirculated air mode air is sucked out of the interior of the vehicle and then
fed back into the interior.
The air recirculation mode is automatically activated after the ignition is
switched if it was on before the ignition was turned off. The indicator light in the button lights up.
Switch off / on
›
Press the
button.
The indicator light in the button goes out.
›
Press the
button again.
The indicator light in the button lights up.
WARNINGDo not leave recirculated air mode on over a longer period of time, as
“stale” air can cause fatigue of the driver and passengers, reduce attention
levels and also cause the windows to mist up. The risk of having an acci-
dent increases. Switch off recirculated air mode as soon as the windows
start to mist up. 115Air conditioning system
Page 122 of 246
WARNING (Continued)■Never leave a mobile phone on a seat, on the dash panel or in any area
from where it becomes a projectile during a sudden braking manoeuvre, an
accident or a collision — risk of injury.■
Before transport of the vehicle by air, the Bluetooth ®
function must be
switched off by a specialist company.
Universal telephone preinstallation (hands free)
The universal telephone preinstallation (“hands-free system”) includes a con- venience mode for the mobile phone via voice control, the multifunction steer-
ing wheel, the radio or navigation system.
WARNING■ Concentrate fully at all times on your driving! As the driver, you are fully
responsible for the operation of your vehicle.■
Only use the device in such a way that you are in full control of your vehi-
cle in every traffic situation – there is the risk of accidents!
■
The national regulations for using a mobile phone in a vehicle must be
observed.
Note■ We recommend that the installation of mobile phones and two-way radio
systems in a vehicle be carried out by a specialist firm.■
Not all mobile phones that enable Bluetooth ®
communication are compatible
with the universal telephone preinstallation GSM II or GSM III. Ask a ŠKODA Partner whether your phone is compatible with the universal telephone prepa-
ration GSM II or GSM III.
■
The range of the Bluetooth ®
connection to the hands-free system is restric-
ted to the vehicle interior. The range is dependent on local factors, e.g. obsta-
cles between the devices and mutual interferences with other devices. If your
mobile phone is in a jacket pocket, for example, this can lead to difficulties
when establishing a connection with the hands-free-system or transferring
data.
Operating the phone on the multifunction steering wheel
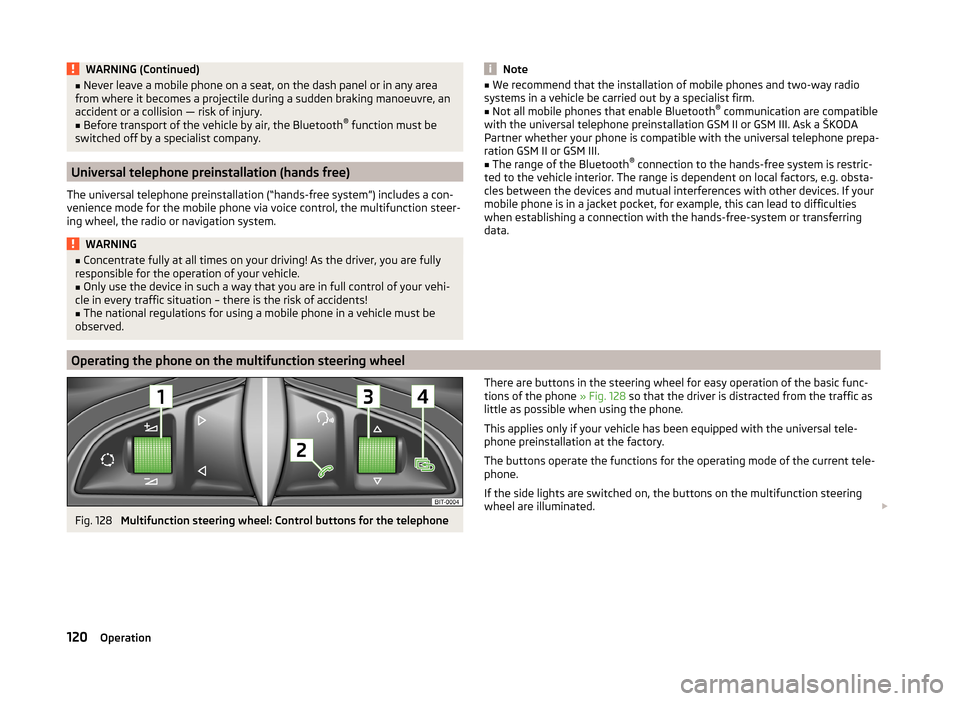
Fig. 128
Multifunction steering wheel: Control buttons for the telephone
There are buttons in the steering wheel for easy operation of the basic func-
tions of the phone » Fig. 128 so that the driver is distracted from the traffic as
little as possible when using the phone.
This applies only if your vehicle has been equipped with the universal tele-
phone preinstallation at the factory.
The buttons operate the functions for the operating mode of the current tele-
phone.
If the side lights are switched on, the buttons on the multifunction steering
wheel are illuminated. 120Operation
Page 134 of 246
Operating the radio and navigation system on the multifunction steering wheelFig. 130
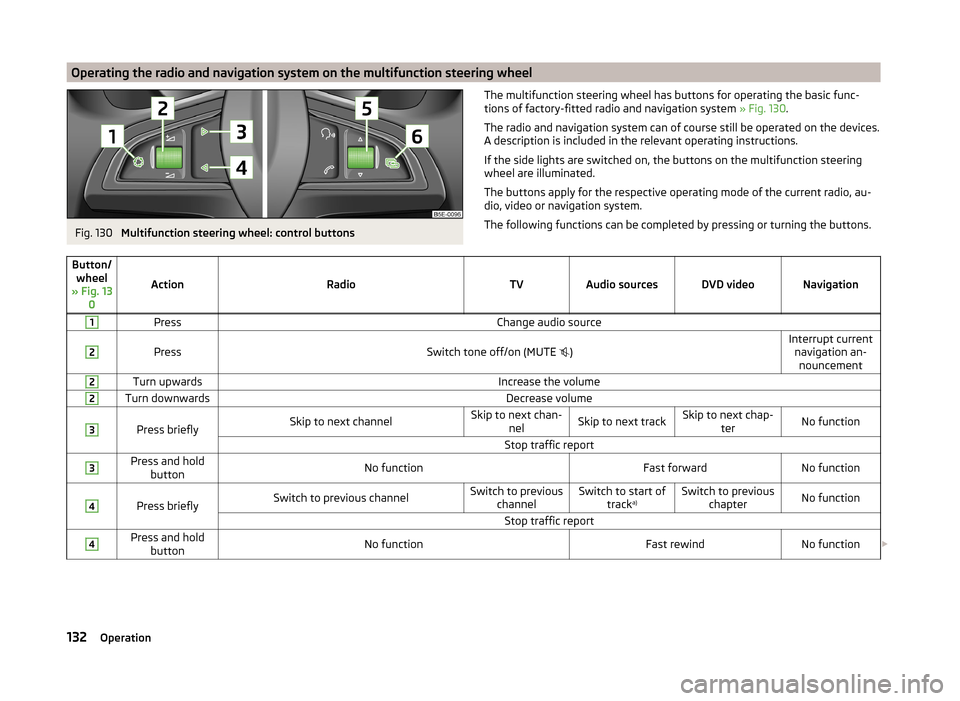
Multifunction steering wheel: control buttons
The multifunction steering wheel has buttons for operating the basic func-
tions of factory-fitted radio and navigation system » Fig. 130.
The radio and navigation system can of course still be operated on the devices.
A description is included in the relevant operating instructions.
If the side lights are switched on, the buttons on the multifunction steering wheel are illuminated.
The buttons apply for the respective operating mode of the current radio, au-
dio, video or navigation system.
The following functions can be completed by pressing or turning the buttons.Button/ wheel
» Fig. 13 0
ActionRadioTVAudio sourcesDVD videoNavigation
1PressChange audio source2
PressSwitch tone off/on (MUTE
)Interrupt current
navigation an-nouncement2Turn upwardsIncrease the volume2Turn downwardsDecrease volume3
Press brieflySkip to next channelSkip to next chan- nelSkip to next trackSkip to next chap- terNo functionStop traffic report3Press and holdbuttonNo functionFast forwardNo function4
Press brieflySwitch to previous channelSwitch to previous channelSwitch to start of tracka)Switch to previous
chapterNo functionStop traffic report4Press and holdbuttonNo functionFast rewindNo function 132Operation
Page 135 of 246
Button/wheel
» Fig. 13 0
ActionRadioTVAudio sourcesDVD videoNavigation
5
Turn upwardsSwitch to the previous station and at the same time
display list of saved/available stationsSkip to next chan- nelSkip to next trackSkip to next chap- terShow the option
to stop navigation or display the list
of recent destina- tions5
Turn downwardsSwitch to the next station and at the same time
display list of saved/available stationsSwitch to previous channelSwitch to start of tracka)Switch to previous
chapter6Press brieflyCall up the main menua)
To go to the previous track, press the adjustment wheel twice or rotate it by two positions.
AUX- and MDIinputs
The AUX and MDI inputs are used to connect external audio sources (e.g. iPod
or mp3 player) and to play back music from these devices via the factory-fitted
radio or navigation system.
The AUX input for external audio sources is located below the armrest of the
front seats and is marked with the symbol. 1)
.
The MDI input is located in the storage compartment below the front armrest.
For a description of use, refer to the relevant operating instructions for the ra-
dio or navigation system.
CD change
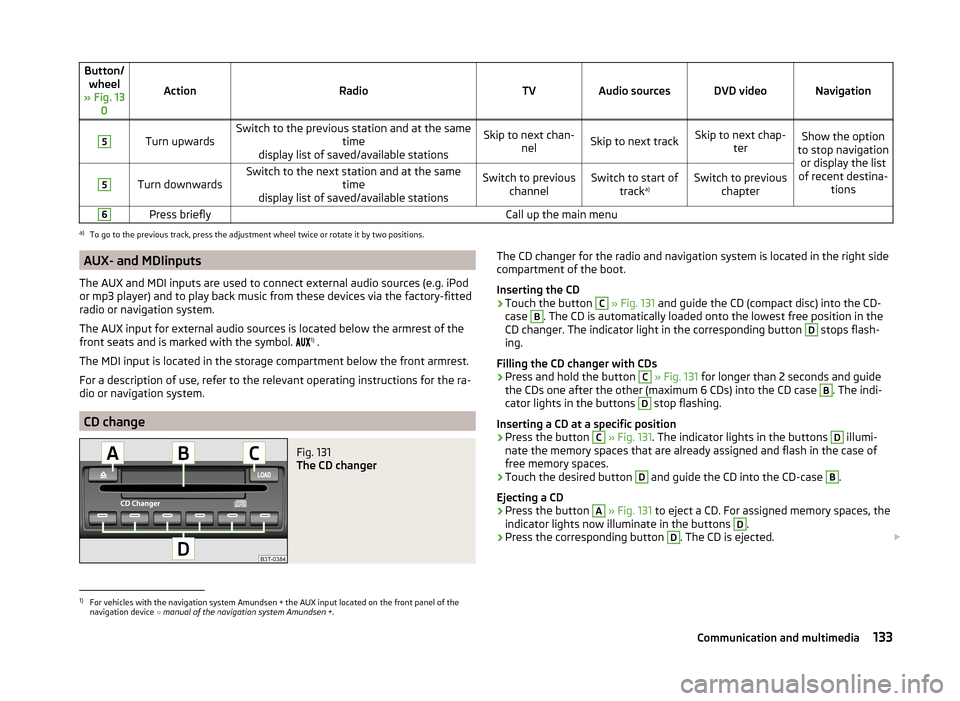
Fig. 131
The CD changer
The CD changer for the radio and navigation system is located in the right side
compartment of the boot.
Inserting the CD›
Touch the button
C
» Fig. 131 and guide the CD (compact disc) into the CD-
case
B
. The CD is automatically loaded onto the lowest free position in the
CD changer. The indicator light in the corresponding button
D
stops flash-
ing.
Filling the CD changer with CDs
›
Press and hold the button
C
» Fig. 131 for longer than 2 seconds and guide
the CDs one after the other (maximum 6 CDs) into the CD case
B
. The indi-
cator lights in the buttons
D
stop flashing.
Inserting a CD at a specific position
›
Press the button
C
» Fig. 131 . The indicator lights in the buttons
D
illumi-
nate the memory spaces that are already assigned and flash in the case of
free memory spaces.
›
Touch the desired button
D
and guide the CD into the CD-case
B
.
Ejecting a CD
›
Press the button
A
» Fig. 131 to eject a CD. For assigned memory spaces, the
indicator lights now illuminate in the buttons
D
.
›
Press the corresponding button
D
. The CD is ejected.
1)
For vehicles with the navigation system Amundsen + the AUX input located on the front panel of the
navigation device » manual of the navigation system Amundsen + .
133Communication and multimedia
Page 136 of 246
Ejecting all CDs›Press and hold the button A » Fig. 131 for more than 2 seconds. All CDs in
the CD-changer are ejected consecutively.
Note
■ Insert a CD, with the labelled side facing up, into the CD slot B » Fig. 131 until
it is automatically drawn in. The play function will start automatically.■
After loading a CD into the CD changer, wait until the indicator light of the
corresponding button
D
is illuminated. Then the CD case
B
is free to load the
next CD.
■
If a position is selected, on which a CD is already located, this CD is ejected.
Remove the ejected CD and load the desired CD.
DVD-preinstallation
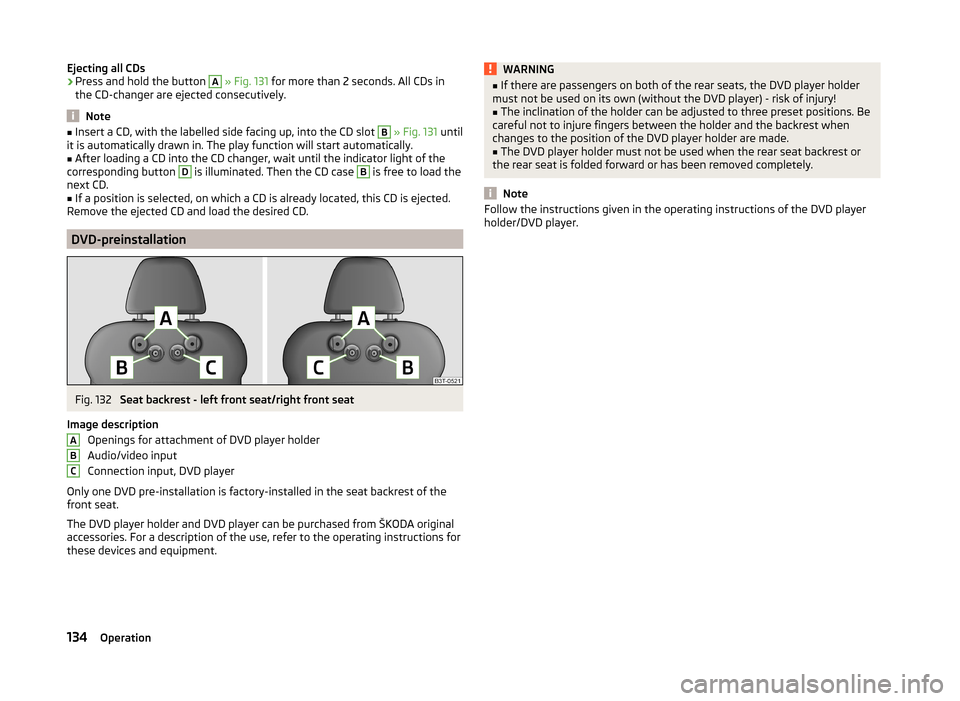
Fig. 132
Seat backrest - left front seat/right front seat
Image description Openings for attachment of DVD player holder
Audio/video input
Connection input, DVD player
Only one DVD pre-installation is factory-installed in the seat backrest of the
front seat.
The DVD player holder and DVD player can be purchased from ŠKODA original
accessories. For a description of the use, refer to the operating instructions for
these devices and equipment.
ABCWARNING■ If there are passengers on both of the rear seats, the DVD player holder
must not be used on its own (without the DVD player) - risk of injury!■
The inclination of the holder can be adjusted to three preset positions. Be
careful not to injure fingers between the holder and the backrest when
changes to the position of the DVD player holder are made.
■
The DVD player holder must not be used when the rear seat backrest or
the rear seat is folded forward or has been removed completely.
Note
Follow the instructions given in the operating instructions of the DVD player
holder/DVD player.134Operation
Page 147 of 246
Indications of an activated emergency programme include the following:
› Only certain gears are selected.
› The reverse gear
R cannot be used.
› Shifting gears in Tiptronic mode is not possible.
Gearbox overheating The gearbox may, for example, become too hot due to frequent repeated
starting or stop-and-go traffic. Overheating is indicated by the warning
light » page 31 ,
Clutches of the automatic DSG gearbox are too hot .
Defective selector lever lock
If the selector lever lock is defective or its power supply is interrupted (e.g. dis-
charged vehicle battery, faulty fuse), the selector lever can no longer be moved
out of position P in the normal manner, and the vehicle can no longer be driv-
en. The selector lever must be unlocked specially » page 213.
Note
If the gearbox has switched to the emergency programme, visit a specialist ga-
rage.
Running in
Introduction
This chapter contains information on the following subjects:
New engine
145
New tyres
145
New brake pads
145
New engine
The engine has to be run in during the first 1 500 kilometres.
Up to 1 000 kilometres
›
Do not drive faster than 3/4 of the maximum speed of the gear in use, i.e. 3/4
of the maximum permissible engine speed.
›
No full throttle.
›
Avoid high engine speeds.
›
Do not tow a trailer.
From 1 000 up to 1 500 kilometres
Gradually increase the power output of the engine up to the full speed of the
gear engaged, i.e. up to the maximum permissible engine speed.
The red scale of the rev counter indicates the range in which the system be-
gins to limit the engine speed.
During the first operating hours the engine has higher internal friction than
later until all of the moving parts have harmonized. The driving style which you
adopt during the first approx.1 500 kilometres plays a decisive part in the suc-
cess of running in your car.
Never drive at unnecessarily high engine speeds even after the running-in pe-
riod.
On vehicles fitted with a manual gearbox, at the very latest shift up into the
next gear when the red area is reached. Observe the recommended
gear » page 40 , Gear recommendation . Very high engine speeds when acceler-
ating (accelerator) are automatically restricted »
.
In vehicles with manual transmission, do not drive at unnecessarily low engine
speeds. Shift down a gear when the engine is no longer running smoothly. Ob-
serve the recommended gear » page 40, Gear recommendation .
CAUTION
■
The engine is not protected from excessive engine revs caused by shifting
down at the wrong time. This can result in a sudden increase in revs beyond
the permissible maximum rpm, thereby causing engine damage.■
Never rev up a cold engine when the vehicle is stationary or when driving in
individual gears.
For the sake of the environment
Do not drive at unnecessarily high engine speeds. Shifting up sooner helps
save fuel, reduces engine noise and protects the environment.
New tyres
New tyres must firstly be “run in”, as they do not offer optimal grip at first.
Therefore, drive especially carefully for the first 500 km or so.
New brake pads
New brake pads do not initially provide optimal braking performance. They first
need to be “run in”. Therefore, drive especially carefully for the first 200 km or
so.
145Starting-off and Driving
Page 155 of 246
The HBA function is automatically deactivated when the brake pedal is re-
leased.
The ABS is activated faster and more effectively with the intervention of the
HBA.
Hill Hold Control (HHC)
Read and observe
and on page 151 first.
When driving on slopes, HHC allows you to move your foot from the brake ped-
al to the accelerator pedal without having to use the handbrake.
The system holds the brake pressure produced by the activation of the brake pedal for approx. 2 seconds after the brake pedal is released.
The brake pressure drops gradually the more you operate the accelerator ped-
al. If the vehicle does not start off within 2 seconds, it starts to roll back.
The HHC is active on slops of >5 % if the driver door is closed. HHC is only ever active on slopes when in forward or reverse start off. When driving downhill, it
is inactive.
Parking aid
Introduction
This chapter contains information on the following subjects:
Function
154
Activation/deactivation
154WARNING■ The parking aid is not a substitute for the driver paying proper attention
and it is always the driver's responsibility to take care when reversing the
vehicle or carrying out similar manoeuvres. Pay particular attention to small
children and animals as they may not be recognised by the system sensors.■
Before reversing, you should make sure that there are no small obstacles,
such as rocks, thin posts, trailer drawbars etc. in front or behind your vehi-
cle. Such obstacles may not be recognised by the system sensors.
WARNING (Continued)■ Under certain circumstances, surfaces of certain objects and types of
clothing cannot reflect the system signals. Thus, these objects or people
who wear such clothing are not recognised by the System sensors.■
External sound sources can have a detrimental effect on the system. Un-
der adverse conditions, this may cause objects or people to not be recog-
nised by the system.
CAUTION
■ If a warning signal sounds for about 3 seconds after activating the system
and there is no obstacle close to your car, this indicates a system fault. The
fault is also indicated by the symbol
flashing in the button » Fig. 147 on
page 154 . Seek help from a specialist garage.■
The sensors must be kept clean (free of ice, etc.) to enable the system to op-
erate properly.
■
Under adverse weather conditions (heavy rain, water vapour, very low or
high temperatures etc.) system function may be limited.
■
Additionally installed modules such as bicycle carriers can impair the function
of the parking aid.
Note
■ The signal tones for front obstacle recognition are factory-set to be higher
than for rear obstacle recognition.■
If not all fields around the vehicle are shown after the system is activated,
the vehicle will need to be moved a few metres forwards or in reverse.
■
The sound of the park-assist can be adjusted via the MAXI DOT display in the
Wizards menu option » page 45.
■
If the system is activated and the selector lever of the automatic gearbox is
in position P (the vehicle cannot move), the warning tone is interrupted and no
obstacles are displayed.
153Assist systems
Page 157 of 246
The parking aid is part of the park assist system, therefore the information
and safety guidelines » page 153 , Parking aid must also be read and ob-
served.WARNING■ The system only serves to support and does not relieve the driver of the
responsibility for the vehicle operation.■
During the parking process, the system automatically performs rapid
steering movements. While it is doing so, do not place your hands between
the steering wheel – risk of injury!
■
During a parking manoeuvre on loose or slippery surfaces (gravel, snow,
ice, etc.) you may stray from the calculated road because of the surface
conditions. We therefore recommend not using the system in such situa-
tions.
■
External noise sources may affect the signals of the system sensors. Un-
der adverse conditions, this may cause objects or people to not be recog-
nised by the system.
CAUTION
■ If other vehicles are parked behind or on the kerb, the system can guide your
vehicle beyond the kerb or onto it. Ensure that the wheels or the wheel rims of
your vehicle are not damaged and if necessary intervene in time.■
Under certain circumstances, the surfaces or structures of certain objects
such as wire mesh fences or powder snow cannot be detected by the system.
■
Under adverse weather conditions (heavy rain, water vapour, very low or
high temperatures etc.) system function may be limited.
CAUTION
The correct evaluation of the parking space and the parking procedure de-
pends on the circumference of the wheels on the vehicle.■
The system only works correctly if the vehicle is fitted with the wheel size
approved by the manufacturer.
■
Do without the use of the system if snow chains or a spare wheel is moun-
ted.
■
If wheels other than those approved by the manufacturer are mounted, the
resulting position of the vehicle in the parking space can differ slightly. This
can be avoided by readjusting the system at a specialist garage.
Note
We recommend performing the parking at a safe speed to about 5 km / h.Functioning
Read and observe
and on page 155 first.
Basic system operations
› The measurement and evaluation of the size of parking spaces when driving.
› The determination of the correct position of the vehicle for parking.
› The calculation of the line on which the vehicle drives backwards into the
parking space or forwards from the parking space.
› Automatic rotation of the front wheels during the parking.
The display of the instrument cluster (hereinafter only in the display) informa- tion and system messages are displayed.
When the system is activated, the warning light lights up
» Fig. 148 on
page 155 -
.
The traction control system (TCS) must always be switched on when parking.
Finding a parking space
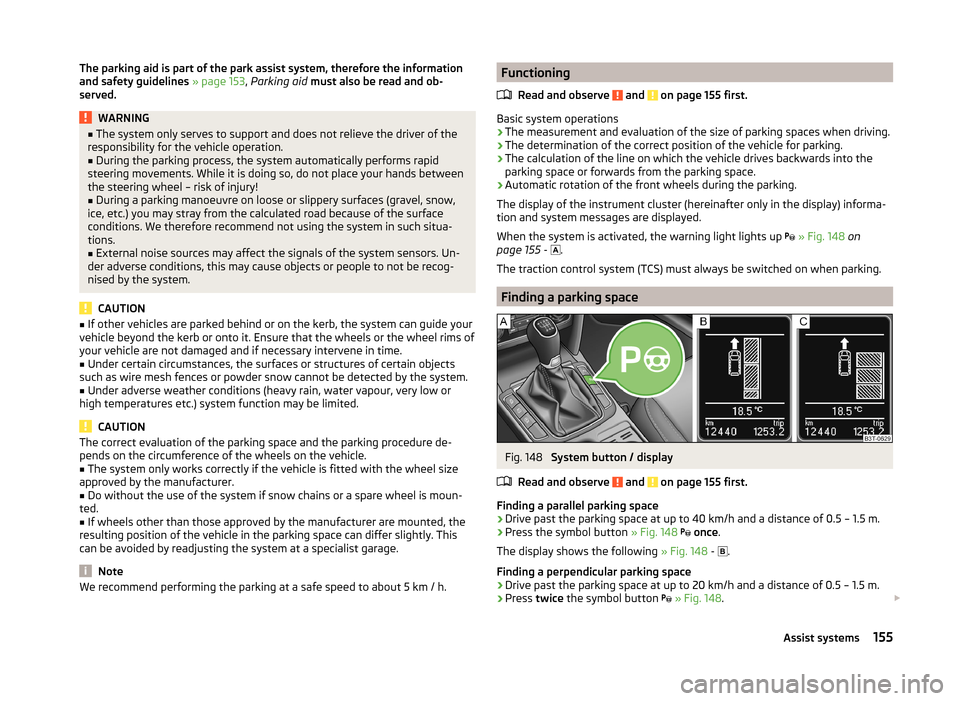
Fig. 148
System button / display
Read and observe
and on page 155 first.
Finding a parallel parking space
›
Drive past the parking space at up to 40 km/h and a distance of 0.5 – 1.5 m.
›
Press the symbol button » Fig. 148
once .
The display shows the following » Fig. 148 -
.
Finding a perpendicular parking space
›
Drive past the parking space at up to 20 km/h and a distance of 0.5 – 1.5 m.
›
Press twice the symbol button
» Fig. 148 .
155Assist systems
Page 164 of 246
Fatigue detection (break recommendation)
Introduction
This chapter contains information on the following subjects:
Function
162
Information messages
162WARNING■ For the driving ability is always the driver's responsibility. Never drive if
you feel tired.■
The system may not detect all cases where a break is needed.
■
Therefore, take regular, sufficient breaks during long trips.
■
There will be no system warning during the so-called micro-sleep.
Note
■ In some situations, the system may evaluate the driving incorrectly and thus
mistakenly recommend a break (e.g. sporty driving, adverse weather condi-
tions or poor road conditions).■
The fatigue detection system is designed primarily for motorway driving.
Function
Read and observe
on page 162 first.
The fatigue detection system advises the driver on the basis of informationabout the steering behaviour, to take a break from driving. The system recom-
mends a break at speeds of 65-200 km/h.
After the ignition has been switched on, the system evaluates the steering be-
haviour for 15 minutes. This baseline analysis is constantly compared with the
current steering behaviour.
If the system detects deviations from normal steering behaviour due to possi-
ble fatigue of the driver, it recommends to take a break from driving.
The system deletes the stored baseline analysis if one of the following con-
ditions is met.
› The vehicle is stopped and the ignition switched off.
› The vehicle is stopped, the seat belt removed and the driver's door opened.
› The vehicle is stopped for more than 15 minutes.
If none of these conditions are met or if the driving style is not changed, the
system recommends a driving break again after 15 minutes.
Activation/deactivation
The system can be activated/deactivated via the MAXI DOT display in the Wiz-
ards menu option » page 44.
Information messages
Read and observe
on page 162 first.
In MAXI DOT display the icon appears for a few seconds and the following
message.
Fatigue detected. Take a break!
An audible signal is also emitted.
162Driving
Page 172 of 246
The ŠKODA service partners have been informed about the necessary legal
tests and will prepare the vehicle for the tests in a service operation at the
customer's discretion, or will ensure that these tests are carried out. The spe-
cialist garages can carry out the specified tests directly at the customer's dis-
cretion, if they are designated for such a procedure. This saves you time and
money.
Even if you want to take your vehicle to an officially approved test centre for
prior checking in preparation of a legally required test, we recommend that you
consult the service consultant of your ŠKODA service partner beforehand.
The service consultant will tell you which areas, according to his appraisal, you
should focus on in order that your vehicle may pass the technical test without
any problems. In this way, you can avoid additional expenses resulting from a
possible subsequent test.
ŠKODA Service Partners
Read and observe
on page 169 first.
ŠKODA Service Partners feature modern, specially developed tools and equip-
ment. Here, trained specialists have access to a comprehensive range of
ŠKODA Original Parts and ŠKODA Original Accessories for carrying out modifi-
cations, repairs and technical alterations.
All ŠKODA service partners operate according to the most recent guidelines
and instructions from ŠKODA AUTO a.s. All service and repair work is therefore
carried out on time and at the appropriate quality. Adhering to these instruc-
tions and guidelines helps ensure road safety and helps keep your vehicle in a
good technical condition.
ŠKODA Service Partners are therefore properly prepared to service your vehicle
and to provide quality work. We therefore advise you to have all modifications,
repairs and technical alterations to your vehicle carried out by a ŠKODA Service
Partner.
ŠKODA Original Parts
Read and observe
on page 169 first.
We recommend the use of ŠKODA Genuine Parts for your vehicle, since these
parts are approved by ŠKODA AUTO a.s. They correspond exactly to the ŠKODA
AUTO a.s. regulations in regard to design, dimensional accuracy and material,
and are identical to the components used in the batch production.
ŠKODA AUTO a.s. is able to warrant the safety, suitability, and long life of
these products. Therefore, we recommend that you only use ŠKODA Genuine
Parts.
ŠKODA AUTO a.s. supplies the market with a complete range of ŠKODA Genu-
ine Parts not only while the model is still in production but for at least 15 years
after the end of series production; the market is supplied with wear-and-tear
parts and for at least 10 years with equipment parts.
ŠKODA service partners are liable for any ŠKODA original part defects for a pe- riod of 2 years after sale in accordance with the materials defect liability, provi-
ded that nothing else was agreed in the purchase agreement. You should keep
the approved warranty certificate and the bill for these components for this
period of time, so that the commencement of the term may be verified.
Body repairs
ŠKODA vehicles are designed so that if the body suffers damage, it is only nec-
essary to replace those parts which are in fact damaged.
Before you decide to have damaged body parts replaced, however, you should first of all contact your specialist garage to determine whether or not such
parts can also be repaired. Repairs to body parts are usually cheaper.
ŠKODA Original Accessories
Read and observe
on page 169 first.
If you wish to fit accessories to your vehicle, you should remember the follow-
ing:
We recommend that you use ŠKODA Genuine Accessories in your vehicle.
ŠKODA AUTO a.s. has selected such accessories to ensure that they are relia-
ble, safe and suitable for your particular vehicle. Although we constantly moni-
tor the market, we are not able to assess or warrant the parts even though in
some instances such parts may have a type approval or may have been ap-
proved by a nationally recognised testing laboratory.
All accessory products go through a fastidious process in the area of technical
development (technical tests) and quality inspection (customer tests), and only
if all tests are positive does the product become a ŠKODA Genuine Accessory.
Our ŠKODA Genuine Accessories service also provides expert advice, and pro-
fessional fitting at the customer's discretion.
170General Maintenance