gearbox SKODA SUPERB 2014 2.G / (B6/3T) Owner's Guide
[x] Cancel search | Manufacturer: SKODA, Model Year: 2014, Model line: SUPERB, Model: SKODA SUPERB 2014 2.G / (B6/3T)Pages: 246, PDF Size: 17.16 MB
Page 151 of 246
Trade-in and recycling of old cars
ŠKODA meets the requirements of the brand and its products with regard to
protecting the environment and the preserving resources. All new ŠKODA ve-
hicles can be utilized up to 95 % and always 1)
be returned.
In a lot of countries sufficient trade-in networks have been created, where you
can trade-in your vehicle. After you trade-in your vehicle, you will receive a
confirmation stating the recycling in accordance with environmental regula-
tions.
Note
You can find more detailed information about the trade-in and recycling of old
cars from a specialist garage.
Avoiding damage to your vehicle
Introduction
This chapter contains information on the following subjects:
General information
149
Driving through water on streets
149
General information
Pay attention to low-slung parts of the vehicle, such as the spoiler and ex-
haust, particularly in the following situations.
› When driving on poorly maintained roads and paths.
› When driving over kerbs.
› When driving on steep ramps etc.
Particular attention must be paid with vehicles with sport suspension and
when the vehicle is fully laden.
Driving through water on streetsFig. 144
Driving through water
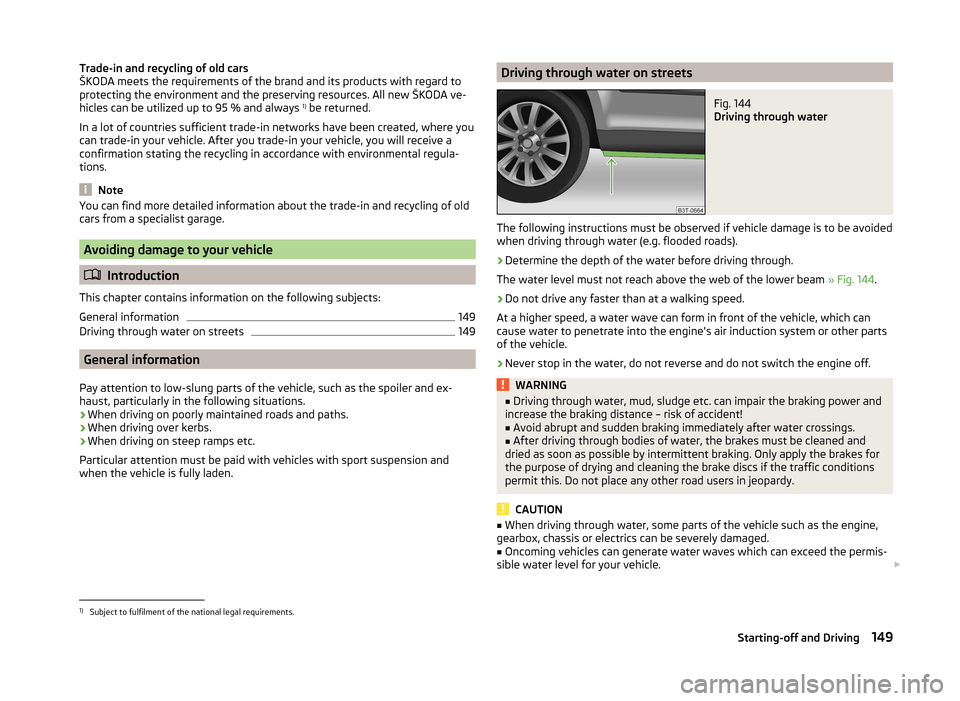
The following instructions must be observed if vehicle damage is to be avoided
when driving through water (e.g. flooded roads).
›
Determine the depth of the water before driving through.
The water level must not reach above the web of the lower beam » Fig. 144.
›
Do not drive any faster than at a walking speed.
At a higher speed, a water wave can form in front of the vehicle, which can
cause water to penetrate into the engine's air induction system or other parts
of the vehicle.
›
Never stop in the water, do not reverse and do not switch the engine off.
WARNING■ Driving through water, mud, sludge etc. can impair the braking power and
increase the braking distance – risk of accident!■
Avoid abrupt and sudden braking immediately after water crossings.
■
After driving through bodies of water, the brakes must be cleaned and
dried as soon as possible by intermittent braking. Only apply the brakes for
the purpose of drying and cleaning the brake discs if the traffic conditions
permit this. Do not place any other road users in jeopardy.
CAUTION
■ When driving through water, some parts of the vehicle such as the engine,
gearbox, chassis or electrics can be severely damaged.■
Oncoming vehicles can generate water waves which can exceed the permis-
sible water level for your vehicle.
1)
Subject to fulfilment of the national legal requirements.
149Starting-off and Driving
Page 155 of 246
The HBA function is automatically deactivated when the brake pedal is re-
leased.
The ABS is activated faster and more effectively with the intervention of the
HBA.
Hill Hold Control (HHC)
Read and observe
and on page 151 first.
When driving on slopes, HHC allows you to move your foot from the brake ped-
al to the accelerator pedal without having to use the handbrake.
The system holds the brake pressure produced by the activation of the brake pedal for approx. 2 seconds after the brake pedal is released.
The brake pressure drops gradually the more you operate the accelerator ped-
al. If the vehicle does not start off within 2 seconds, it starts to roll back.
The HHC is active on slops of >5 % if the driver door is closed. HHC is only ever active on slopes when in forward or reverse start off. When driving downhill, it
is inactive.
Parking aid
Introduction
This chapter contains information on the following subjects:
Function
154
Activation/deactivation
154WARNING■ The parking aid is not a substitute for the driver paying proper attention
and it is always the driver's responsibility to take care when reversing the
vehicle or carrying out similar manoeuvres. Pay particular attention to small
children and animals as they may not be recognised by the system sensors.■
Before reversing, you should make sure that there are no small obstacles,
such as rocks, thin posts, trailer drawbars etc. in front or behind your vehi-
cle. Such obstacles may not be recognised by the system sensors.
WARNING (Continued)■ Under certain circumstances, surfaces of certain objects and types of
clothing cannot reflect the system signals. Thus, these objects or people
who wear such clothing are not recognised by the System sensors.■
External sound sources can have a detrimental effect on the system. Un-
der adverse conditions, this may cause objects or people to not be recog-
nised by the system.
CAUTION
■ If a warning signal sounds for about 3 seconds after activating the system
and there is no obstacle close to your car, this indicates a system fault. The
fault is also indicated by the symbol
flashing in the button » Fig. 147 on
page 154 . Seek help from a specialist garage.■
The sensors must be kept clean (free of ice, etc.) to enable the system to op-
erate properly.
■
Under adverse weather conditions (heavy rain, water vapour, very low or
high temperatures etc.) system function may be limited.
■
Additionally installed modules such as bicycle carriers can impair the function
of the parking aid.
Note
■ The signal tones for front obstacle recognition are factory-set to be higher
than for rear obstacle recognition.■
If not all fields around the vehicle are shown after the system is activated,
the vehicle will need to be moved a few metres forwards or in reverse.
■
The sound of the park-assist can be adjusted via the MAXI DOT display in the
Wizards menu option » page 45.
■
If the system is activated and the selector lever of the automatic gearbox is
in position P (the vehicle cannot move), the warning tone is interrupted and no
obstacles are displayed.
153Assist systems
Page 161 of 246
Storing and maintaining speedRead and observe
and on page 158 first.
›
Activate the cruise control system » page 158.
›
Drive at the desired speed.
›
Push the rocker button
B
into the SET/- » Fig. 150 on page 158 position.
After you have released the rocker button
B
from the SET/- position, the
speed you have just stored is kept constant without having to depress the ac-
celerator.
Changing the stored speed
Read and observe
and on page 158 first.
Increasing the speed with the rocker button
B›
Push the rocker button
B
into the RES/+ » Fig. 150 on page 158 position.
If the rocker button is held in the RES/+ position, the speed will increase con-
tinuously. Release the rocker button once the desired speed is reached. The
set speed is then stored in the memory.
Decreasing the speed using the rocker button
B
The stored speed can be reduced by pushing the rocker switch
B
into the
SET/- » Fig. 150 on page 158 position.
If the rocker button is pressed and held in the SET/- position, the speed will
decrease continuously. Release the rocker button once the desired speed is
reached. The set speed is then stored in the memory.
If the rocker button is released at a speed of less than approx. 25 km/h, the
speed is not stored and the memory is erased. Once the speed of the vehicle
has increased to more than approx. 25 km/h, the speed must then be stored
again by pushing the rocker button
B
into the SET/- position.
Increasing the speed with the accelerator
›
Depress the accelerator pedal.
Releasing the accelerator pedal will cause the speed to drop again to the set
speed.
Decreasing the speed with the brake pedal
The speed can also be reduced by depressing the brake pedal, which tempora-
rily deactivates the system » page 159.
Switching off temporarily
Read and observe
and on page 158 first.
The cruise control system can be temporarily deactivated by pushing the
switch
A
» Fig. 150 on page 158 into the spring-mounted CANCEL position or
by depressing the brake or clutch pedal.
The set speed remains stored in the memory.
Briefly push the rocker button
B
into the RES/+ position in order to resume
the stored speed after the clutch or brake pedal is released.
START-STOP
Introduction
This chapter contains information on the following subjects:
Operating conditions of the system
160
Operation in vehicles with manual gearbox
160
Operation in vehicles with automatic gearbox
160
System related automatic start-up
161
Manually deactivating/activating the system
161
Information messages
161
The START-STOP system (hereinafter referred to as the system) saves fuel and
reduces polluting emissions and CO 2 emissions by turning the engine off, e.g.
when stopping at traffic lights, and starting the engine again when moving off.
WARNING■ Never let the vehicle roll with the engine switched off.■The brake servo unit and power steering only operate if the engine is run-
ning.159Assist systems
Page 162 of 246
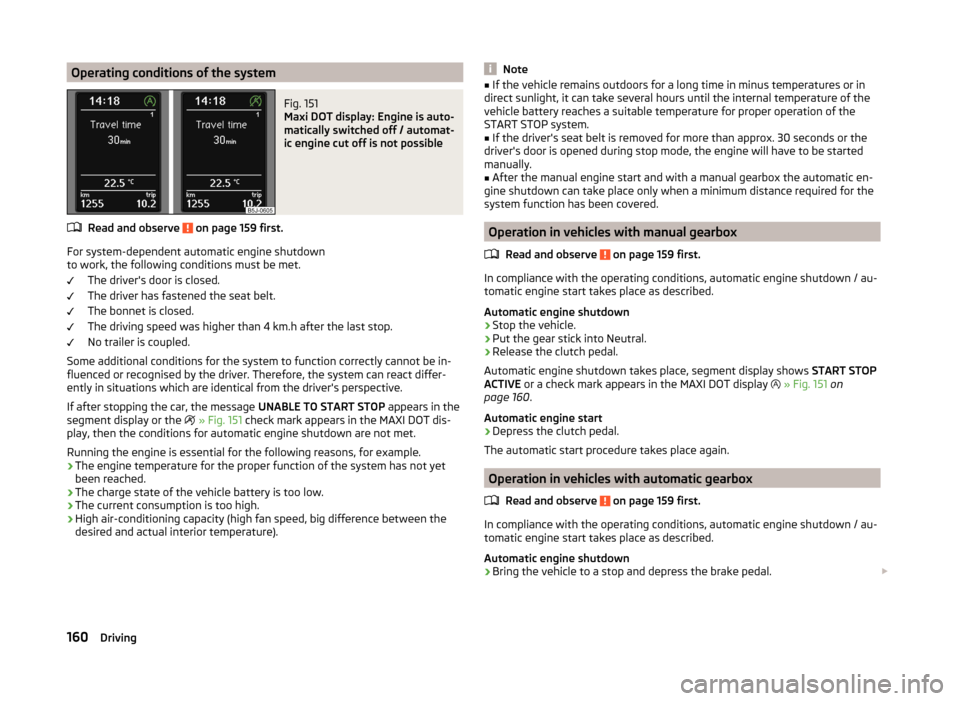
Operating conditions of the systemFig. 151
Maxi DOT display: Engine is auto-
matically switched off / automat-
ic engine cut off is not possible
Read and observe on page 159 first.
For system-dependent automatic engine shutdown
to work, the following conditions must be met.
The driver's door is closed.
The driver has fastened the seat belt.
The bonnet is closed.
The driving speed was higher than 4 km.h after the last stop.
No trailer is coupled.
Some additional conditions for the system to function correctly cannot be in-
fluenced or recognised by the driver. Therefore, the system can react differ-
ently in situations which are identical from the driver's perspective.
If after stopping the car, the message UNABLE TO START STOP appears in the
segment display or the
» Fig. 151 check mark appears in the MAXI DOT dis-
play, then the conditions for automatic engine shutdown are not met.
Running the engine is essential for the following reasons, for example.
› The engine temperature for the proper function of the system has not yet
been reached.
› The charge state of the vehicle battery is too low.
› The current consumption is too high.
› High air-conditioning capacity (high fan speed, big difference between the
desired and actual interior temperature).
Note■ If the vehicle remains outdoors for a long time in minus temperatures or in
direct sunlight, it can take several hours until the internal temperature of the
vehicle battery reaches a suitable temperature for proper operation of the
START STOP system.■
If the driver's seat belt is removed for more than approx. 30 seconds or the
driver's door is opened during stop mode, the engine will have to be started
manually.
■
After the manual engine start and with a manual gearbox the automatic en-
gine shutdown can take place only when a minimum distance required for the
system function has been covered.
Operation in vehicles with manual gearbox
Read and observe
on page 159 first.
In compliance with the operating conditions, automatic engine shutdown / au-
tomatic engine start takes place as described.
Automatic engine shutdown
›
Stop the vehicle.
›
Put the gear stick into Neutral.
›
Release the clutch pedal.
Automatic engine shutdown takes place, segment display shows START STOP
ACTIVE or a check mark appears in the MAXI DOT display
» Fig. 151 on
page 160 .
Automatic engine start
›
Depress the clutch pedal.
The automatic start procedure takes place again.
Operation in vehicles with automatic gearbox
Read and observe
on page 159 first.
In compliance with the operating conditions, automatic engine shutdown / au-
tomatic engine start takes place as described.
Automatic engine shutdown
›
Bring the vehicle to a stop and depress the brake pedal.
160Driving
Page 184 of 246
CAUTION■Just filling the tank once with diesel fuel that does not comply with the
standard, can cause severe damage to parts of the engine, the fuel and ex-
haust system!■
If a different fuel other than diesel fuel, which complies to the above men-
tioned standards (e.g. petrol) is used by mistake do not start the engine or
switch on the ignition! Extensive damage to engine parts can occur! We rec-
ommend that you have the fuel system cleaned by a specialist garage.
■
Water which has collected in the fuel filter can cause engine faults.
CAUTION
■ The vehicle cannot be operated with bio fuel RME, therefore this fuel must
not be filled in the tank and used for driving the vehicle. The use of biofuel
RME can cause considerable damage to parts of the engine or fuel system.■
Do not mix any fuel additives, so-called “flow improvers” (petrol and similar
agents), into the diesel. This can result in considerable damage to parts of the
engine or the exhaust system!
Engine compartment
Introduction
This chapter contains information on the following subjects:
Opening and closing the bonnet
183
Engine compartment overview
184
Radiator fan
184
Windscreen washer system
184WARNINGInjuries or scolding or risks of accident or fire may occur when working in
the engine compartment. For this reason, it is essential to comply with the
warning instructions outlined below and with the general applicable safety
rules. The engine compartment of your car is a hazardous area!WARNINGInstructions before beginning work in the engine compartment■Turn off the engine and withdraw the ignition key.■
Firmly apply the handbrake.
WARNING (Continued)■ If the vehicle is fitted with a manual gearbox, move the gearshift lever in-
to Neutral, or if the vehicle is fitted with an automatic gearbox, move the
selector lever into position P.■
Allow the engine to cool.
■
Never open the bonnet if you can see steam or coolant escaping from the
engine compartment – risk of scalding! Wait until no more steam or coolant
is escaping.
WARNINGInformation for working in the engine compartment■Keep all people, especially children, away from the engine compartment.■
Never touch the radiator fan while the engine is still warm. The fan might
suddenly start running!
■
Do not touch any hot engine parts – risk of burns!
■
The coolant is harmful to health.
■
Avoid contact with the coolant.
■
Coolant vapours are harmful to health.
■
Never open the end cover of the coolant expansion reservoir while the
engine is still warm. The cooling system is pressurized!
■
When opening the end cover of the coolant expansion reservoir, cover it
with a cloth to protect your face, hands and arms from hot steam or hot
coolant.
■
If any coolant splashes into your eyes, immediately rinse out your eyes
with clear water and contact a doctor as soon as possible.
■
Always keep the coolant in the original container, safe from people who
are not completely independent, especially children - there is a danger of
poisoning!
■
If coolant is swallowed, consult a doctor immediately.
■
Never spill fluids on the hot engine. Such fluids (e.g. the antifreeze con-
tained in the coolant) may ignite!
WARNINGInformation for working in the engine compartment with the engine run-
ning■
Pay particular attention to rotating engine parts (e.g. V-ribbed belt, gen-
erator, radiator fan) and the high-voltage ignition system – risk to life!
■
Never touch the electric wiring on the ignition system.
182General Maintenance
Page 204 of 246
WARNINGNotes for vehicle lifting■If the wheel has to be changed on a slope, first of all block the opposite
wheel with a stone or similar object to prevent the vehicle from unexpect-
edly rolling away.■
Secure the base plate of the lifting jack with suitable means to prevent
possible moving. A soft and slippery ground under the base plate may move
the lifting jack, causing the vehicle to fall down. It is therefore always nec-
essary to place the lifting jack on a solid surface or use a wide and stable
base. Use a non-slip base (e.g. a rubber foot mat) if the surface is smooth,
such as cobbled stones, tiled floor, etc.
■
Only attach the lifting jack to the attachment points provided for this pur-
pose.
■
Always raise the vehicle with the doors closed.
■
Never position any body parts, such as arms or legs under the vehicle,
while the vehicle is raised with a lifting jack.
■
Never start the engine when the vehicle is raised – risk of injury.
WARNINGInformation on the wheel bolts■The wheel bolts must be clean and must turn easily. Never treat them
with grease or oil.■
The prescribed tightening torque of the wheel bolts for steel and light al-
loy wheels is 120 Nm.
■
If the wheel bolts are tightened to a too low tightening torque, the rims
could come loose when the car is moving – risk of accident! A tightening
torque which is too high can damage the bolts and threads and this can re-
sult in permanent deformation of the contact surfaces on the rims.
■
In case of incorrect treatment of the wheel bolts, the wheel can loosen
when the car is moving – risk of accident!
Note
The national legal requirements must be observed when changing a wheel.
Preliminary work
Read and observe
on page 201 first.
Always change a wheel on a level surface as far as possible.
The following steps must be carried out before actually changing the wheel:
› Have
all the occupants get out. The passengers should not stand on the
road (instead they should remain behind a crash barrier, for instance) while
the wheel is being changed.›
Switch off the engine.
›
Move the gearshift lever into Neutral or move the selector lever for the auto-
matic gearbox into position P .
›
Apply the handbrake firmly.
›
Uncouple a trailer.
›
Remove the vehicle tool kit » page 201 and the spare wheel » page 197 from
the boot.
Changing a wheel
Read and observe
on page 201 first.
›
Remove the full wheel trim » page 198 or caps » page 198 .
›
First of all slacken the anti-theft wheel bolt and then the other wheel
bolts » page 203 .
›
Jack up the vehicle until the wheel that needs changing is clear of the
ground » page 203 .
›
Unscrew the wheel bolts and place them on a clean surface (cloth, paper,
etc.).
›
Remove the wheel carefully.
›
Attach the spare wheel and slightly screw on the wheel bolts.
›
Lower the vehicle.
›
Alternately tighten wheel bolts opposite (diagonally) with the wheel wrench.
Tighten the anti-theft wheel bolt last » page 203.
›
Replace the wheel trim or the caps.
Note
■
All bolts must be clean and must turn easily.■Under no circumstances grease or oil the wheel bolts!■
When fitting unidirectional tyres, ensure that the direction of rotation is cor-
rect » page 193 .
Follow-up work
Read and observe
on page 201 first.
The following steps must also be performed after changing the wheel.
›
Stow and attach the replaced wheel in the spare wheel well using a special
bolt » page 197 .
202Do-it-yourself
Page 207 of 246

WARNING■A tyre filled with sealant has the same driving characteristics as a stand-
ard tyre.■
Do not travel faster than 80 km/h.
■
Avoid accelerating at full throttle, sharp braking and fast cornering.
■
Check the tyre pressure after driving for 10 minutes.
■
The sealant is hazardous to heath. Remove immediately if it comes into
contact with the skin.
For the sake of the environment
Used sealant or sealant whose expiry date has passed must be disposed of in
accordance with environmental protection regulations.
Note
■ Observe the manufacturer's usage instructions for the breakdown kit.■A new bottle of sealant can be purchased from ŠKODA Original Parts.■
Immediately replace the tyre that was repaired using the breakdown kit, or
consult a specialist garage about repair options.
Breakdown kit
Fig. 181
Principle sketch: Components of the breakdown kit
Read and observe
on page 205 first.
The kit is located in a box under the floor covering in the luggage compart-
ment.
Components of the breakdown kit » Fig. 181
Valve remover
Sticker with speed designation “max. 80 km/h”/“max. 50 mph” Inflation hose with plug
Air compressor
Tyre inflation hose
Tyre inflation pressure indicator
Air release valve
ON and OFF switch
12 volt cable connector
Tyre inflator bottle with sealing agent
Replacement valve core
The valve remover 1
has a slot at its lower end which fits into the valve core.
This is the only way in which you can remove and re-install the valve core from
the tyre valve. The same also applies to the replacement valve core
11
.
Preparations for using the breakdown kit
Read and observe
on page 205 first.
The following preparatory work must be carried out before using the break-
down kit.
›
Park the vehicle as far away as possible from the flow of traffic. Park on as
flat and firm a surface as possible.
›
If you are in flowing traffic, switch on the hazard warning light system and
set up the warning triangle at the prescribed distance! The national legal re-
quirements must be observed.
›
Have all the occupants get out. The passengers should not stand on the
road (instead they should remain behind a crash barrier, for instance) while
the wheel is being changed.
›
Switch off the engine and move the gearshift lever into Neutral or move the
selector lever on the automatic gearbox into position P.
›
Apply the handbrake firmly.
›
Check that you can carry out the repairs with the breakdown kit » page 204.
Uncouple a trailer.
›
Remove the breakdown kit from the boot.
›
Stick the sticker
2
» Fig. 181 on page 205 on the dashboard in the driver's
field of view.
1234567891011205Emergency equipment and self-help
Page 210 of 246
Negative cable - colour coding in the majority of cases is black.
Jump-starting in vehicles with the START-STOP system
Fig. 183
Engine earth: START-STOP sys-
tem
Read and observe and on page 207 first.
On vehicles with the START-STOP system, the jump-start cable of the charger
must never be connected directly to the negative pole of the vehicle battery,
but only to the engine earth » Fig. 183.
Jump-starting vehicles with the vehicle battery in the boot
Fig. 184
Detail of the engine compart-
ment: Jump-starting point
Read and observe and on page 207 first.
On vehicles with the vehicle battery in the boot, the positive terminal of the
battery supplying the power can only be connected to the jump-starting point
in the engine compartment of the vehicle being started by means of a jump-
start cable » Fig. 184.
›
Open the protective cap of the jump-starting point in the direction of the ar-
row » Fig. 184 .
›
Connect the positive terminal of the battery supplying the power with the
jump-starting point.
› Attach the negative terminal of the battery supplying the power to a solid
metal part firmly connected to the engine block or to the engine block itself.›
Start the engine.
›
After starting the engine, close the protective cap of the jump-starting point.
Towing the vehicle
Introduction
This chapter contains information on the following subjects:
Front towing eye
209
Rear towing eye
210
Vehicles with a tow hitch
210
Vehicles with manual transmission may be towed in with a tow bar or a tow
rope or with the front or rear wheels raised.
Vehicles with automatic transmission may be towed in with a tow bar or a tow
rope or with the front wheels raised. If the vehicle is raised at rear, the auto-
matic gearbox is damaged!
A tow bar is the safest way of towing a vehicle and also minimises any shocks.
Only use a tow rope if a suitable tow bar is not available.
When towing, the following guidelines must be observed.
Driver of the tow vehicle
›
Release the clutch particularly gently when starting off or depress the accel-
erator particularly gently if the vehicle is fitted with an automatic gearbox.
›
On vehicles with a manual transmission, only push down on the accelerator
pedal once the rope is taught.
The maximum towing speed is 50 km/h.
Driver of the towed vehicle
›
Switch on the ignition so that the steering wheel is not locked and so that
the turn signal lights, horn, windscreen wipers and windscreen washer sys-
tem can be used.
›
Take the vehicle out of gear or move the selector lever into position N if the
vehicle is fitted with an automatic gearbox.
Please note that the brake servo unit and power steering only operate if the
engine is running. If the engine is not running, significantly more physical force
is required to depress the brake pedal and steer the vehicle.
208Do-it-yourself
Page 211 of 246
If using a tow rope, ensure that it is always kept taught.
CAUTION
■Do not tow start the engine – there is a risk of damaging the engine and the
catalytic converter. The battery from another vehicle can be used as a jump-
start aid » page 207 , Jump-starting .■
If the gearbox no longer contains any oil because of a defect, your vehicle
must only be towed with the driven wheels raised clear of the ground or on a
special breakdown vehicle or trailer.
■
The vehicle must be transported on a special breakdown vehicle or trailer if it
is not possible to tow in the vehicle in the way described or if the towing dis-
tance is greater than 50 km.
■
To protect both vehicles when tow-starting or towing, the tow rope should
be elastic. Thus one should only use plastic fibre rope or a rope made out of a
similarly elastic material.
■
While towing, take care to avoid impermissibly high tensile forces or jerky
loads. There is always a risk of excessive stresses and damage resulting at the
points to which you attach the tow rope or tow bar when you attempt to tow a
vehicle which is not standing on a paved road.
■
Attach the tow rope or the tow bar to the towing eyes » page 209 , Front
towing eye or » page 210 , Rear towing eye to the detachable ball head of the
towing equipment » page 163 .
Note
■
We recommend using a tow rope from ŠKODA Original Accessories, which is
available from a ŠKODA Partner.■
Towing another vehicle requires a certain amount of practice. Both drivers
should be familiar with the particular points about towing a vehicle. Unskilled
drivers should not attempt to tow in another vehicle or to be towed in.
■
When towing, respect the national legal provisions, especially those which
relate to the identification of the towing vehicle and the vehicle being towed.
■
The tow rope must not be twisted as it may in certain circumstances result in
the front towing eye being unscrewed out of your vehicle.
Front towing eyeFig. 185
Removing the cap / installing the towing eye
Read and observe
on page 209 first.
›
Remove the cap from the front bumper » Fig. 185 -
.
›
Screw in the towing eye by turning to the left up to the stop
» Fig. 185 -
and tighten as much as possible. For tightening purposes, we recommend,
for example, using the wheel wrench, towing eye from another vehicle or a
similar object that can be pushed through the eye.
›
After unscrewing the towing eye, put the cap on and press into place. The
cap must engage firmly.
CAUTION
The towing eye must always be screwed in fully and firmly tightened, other-
wise the towing eye can tear when towing in or tow-starting.209Emergency equipment and self-help
Page 220 of 246
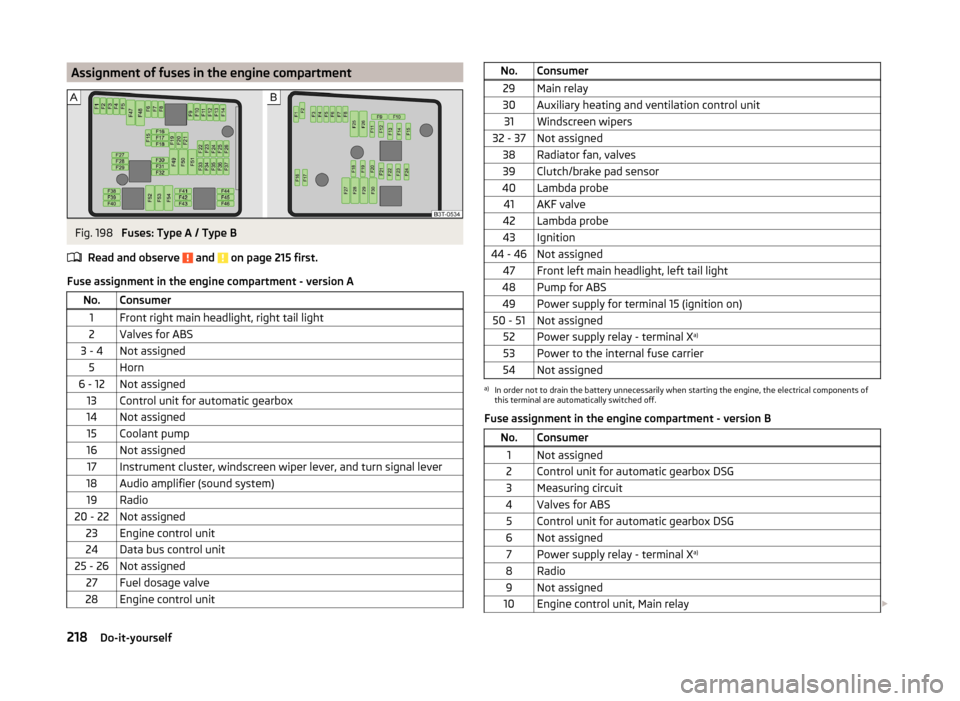
Assignment of fuses in the engine compartmentFig. 198
Fuses: Type A / Type B
Read and observe
and on page 215 first.
Fuse assignment in the engine compartment - version A
No.Consumer1Front right main headlight, right tail light2Valves for ABS3 - 4Not assigned5Horn6 - 12Not assigned13Control unit for automatic gearbox14Not assigned15Coolant pump16Not assigned17Instrument cluster, windscreen wiper lever, and turn signal lever18Audio amplifier (sound system)19Radio20 - 22Not assigned23Engine control unit24Data bus control unit25 - 26Not assigned27Fuel dosage valve28Engine control unitNo.Consumer29Main relay30Auxiliary heating and ventilation control unit31Windscreen wipers32 - 37Not assigned38Radiator fan, valves39Clutch/brake pad sensor40Lambda probe41AKF valve42Lambda probe43Ignition44 - 46Not assigned47Front left main headlight, left tail light48Pump for ABS49Power supply for terminal 15 (ignition on)50 - 51Not assigned52Power supply relay - terminal X a)53Power to the internal fuse carrier54Not assigneda)
In order not to drain the battery unnecessarily when starting the engine, the electrical components of
this terminal are automatically switched off.
Fuse assignment in the engine compartment - version B
No.Consumer1Not assigned2Control unit for automatic gearbox DSG3Measuring circuit4Valves for ABS5Control unit for automatic gearbox DSG6Not assigned7Power supply relay - terminal X a)8Radio9Not assigned10Engine control unit, Main relay
218Do-it-yourself