battery SKODA SUPERB 2014 2.G / (B6/3T) Owner's Manual
[x] Cancel search | Manufacturer: SKODA, Model Year: 2014, Model line: SUPERB, Model: SKODA SUPERB 2014 2.G / (B6/3T)Pages: 246, PDF Size: 17.16 MB
Page 6 of 246
Inspecting and replenishing179Fuel179
Engine compartment
182
Engine oil
185
Coolant
187
Brake fluid
189
Vehicle battery
189
Wheels
193
Tyres and wheel rims
193
Winter operation
198
Do-it-yourself
Emergency equipment and self-help
200
Emergency equipment
200
Changing a wheel
201
Tyre repair
204
Jump-starting
207
Towing the vehicle
208
Radio remote control
210
Emergency unlocking/locking
212
Emergency operation of the sliding/tilting
roof
213
Replacing windscreen wiper blades
214
Fuses and light bulbs
215
Fuses
215
Bulbs
219
Technical data
Technical data
224
Vehicle data
224
Index
4Table of Contents
Page 37 of 246
If the warning light or illuminates again, then immediately obtain help
from an authorised dealer.
Steering lock (KESSY system)
As long as the warning light
is flashing , the steering lock cannot be re-
leased.
If the warning light
flashes , a signal tone sounds, and the following mes-
sage appears in the MAXI DOT- display steering column lock. If Workshop! ap-
pears the electrical steering lock is faulty. Seek assistance from a specialist ga-
rage immediately.
If the warning light
flashes , a beep sounds and in the MAXI DOT display the
message Steering lock defective appears, then the electric steering lock is
broken. Park the car,
do not continue the journey . After switching off the
ignition, it is then no longer possible to lock the steering, to activate the elec-
trical components (e.g. radio, navigation system), to switch on the ignition
again and to start the engine. Seek help from a specialist garage.
Note
The warning light illuminates after the ignition is switched on if the vehi-
cle's battery has been disconnected and reconnected. If the warning light
does not go out after moving a short distance, this means there is an error in
the system. Seek assistance from a specialist garage immediately.
Engine oil level
Read and observe
on page 33 first.
The indicator light lights up (oil quantity too low)
The following message is shown in the MAXI DOT display.
Check oil level!
› Stop the vehicle, switch off the engine, and check the engine oil lev-
el » page 186 .
The warning light will go out if the bonnet is left open for more than 30 sec-
onds. If no engine oil has been replenished, the warning light will come on
again after driving about 100 km.
The indicator light flashes (engine oil level sensor faulty)
The following message is shown in the MAXI DOT display.
Oil sensor: Workshop!
If the engine oil level sensor is faulty, the warning light flashes several
times and an audible signal sounds when the ignition is turned on.
Seek assistance from a specialist garage immediately.
Traction Control System (ASR)
Read and observe
on page 33 first.
The warning light
flashes to show that the ASR is currently operating.
If the warning light
illuminates , there is a fault in the ASR.
The following message is shown in the MAXI DOT display. Error: Traction control (ASR)
Seek assistance from a specialist garage immediately.
If the warning light
illuminates immediately after you start the engine, the
ASR might be switched off due to technical reasons.
›
Switch the ignition off and on again.
The ASR is fully functional again if the warning light
no longer illuminates
after you switch the engine back on.
Further information » page 152.
Note
The warning light illuminates after the ignition is switched on if the vehi-
cle's battery has been disconnected and reconnected. If the warning light
does not go out after moving a short distance, this means there is an error in
the system. Seek assistance from a specialist garage immediately.
Electronic Stability Control (ESC)
Read and observe
on page 33 first.
The warning light
flashes to show that the ESC is currently operating.
If the warning light
illuminates , there is a fault in the ESC.
The following message is shown in the MAXI DOT display. Error: Electronic Stability Control (ESC)
Seek assistance from a specialist garage immediately.
35Instruments and Indicator Lights
Page 38 of 246
If the warning light illuminates immediately after you start the engine, the
ESC might be switched off due to technical reasons.›
Switch the ignition off and on again.
The ESC is fully functional again if the warning light
no longer illuminates
after you switch the engine back on.
Further information » page 151.
Note
The warning light illuminates after the ignition is switched on if the vehi-
cle's battery has been disconnected and reconnected. If the warning light
does not go out after moving a short distance, this means there is an error in
the system. Seek assistance from a specialist garage immediately.
Antilock brake system (ABS)
Read and observe
on page 33 first.
If the warning light
illuminates , there is a fault in the ABS.
The following message is shown in the MAXI DOT display. Error: ABS
The vehicle will only be braked by the normal brake system without the ABS.
Seek assistance from a specialist garage immediately.
WARNING■ If the warning light is displayed at the same time as the warning light
» page 33 , Brake system , do not continue your journey! Seek help
from a specialist garage.■
A fault to the ABS system or the braking system can increase the vehi-
cle's braking distance – risk of accident!
Rear fog light
Read and observe
on page 33 first.
The warning light
illuminates when the rear fog light is switched on.
Lamp failure
Read and observe
on page 33 first.
The indicator light
illuminates if a lamp is faulty .
The indicator light
illuminates within a few seconds after switching on the
ignition or when a light with a faulty lamp is switched on .
The following message, for example, may be shown in the MAXI DOT display. INFORMATION Check front right low beam!
Adaptive headlights (AFS)
Read and observe
on page 33 first.
If the indicator light
flashes for 1 minute while driving or after switching on
the ignition, there is a problem with the adaptive headlights.
The following message is shown in the MAXI DOT display. Cornering light (AFS) has no function. Log book!
When the AFS mode “tourist light” (travel mode) is active » page 69, the
warning light flashes
for 10 seconds each time the ignition is switched on.
Exhaust inspection system
Read and observe
on page 33 first.
If the warning light
illuminates , there is a fault in the exhaust inspection
system. The system allows the vehicle to run in emergency mode.
Seek assistance from a specialist garage immediately.
Glow plug system (diesel engine)
Read and observe
on page 33 first.
The warning light
illuminates after the ignition has been switched on . Once
the light has gone out, the engine can be started immediately.
There is a fault in the glow plug system if the indicator light
does not come
on at all or lights up continuously .
If the warning light begins to
flash while driving, a fault exists in the engine
control. The system allows the vehicle to run in emergency mode.
36Operation
Page 40 of 246
Airbag systemRead and observe
on page 33 first.
If the warning light
illuminates , there is a fault in the airbag system.
The following message is shown in the MAXI DOT display. Error: Airbag
The functionality of the airbag system is monitored electronically even if one
of the airbags is switched off.
If a front, side or head airbag or belt tensioner has been switched off using
the vehicle system tester:
› The warning
illuminates for approx. 4 seconds after switching on the igni-
tion and then flashes again for approx. 12 seconds.
The following message is shown in the MAXI DOT display. Airbag/belt tensioner deactivated.
If the air bag was switched off using the key-operated switch on the side of
the dash panel on the passenger side:
› The indicator light
illuminates for around 4 seconds after the ignition has
been switched on;
› The deactivated air bag is indicated by the illumination of the warning
light » page 20
in the middle of the dash panel .
WARNINGWhen a fault in the airbag system occurs, there is a risk of the system not
being triggered in the event of an accident. Therefore, this must be
checked immediately by a specialized company.
Tyre inflation pressure
Read and observe
on page 33 first.
The warning light
illuminates , if there is a substantial drop in inflation pres-
sure in one of the tyres.
An audible signal sounds as a warning signal.
›
Check and adjust the pressure in all tyres » page 194, Service life of tyres .
If the indicator light
flashes , there is a fault in the tyre pressure monitoring
system.
› Stop the car, turn the ignition off and on again.
If the warning light
flashes again after re-starting the engine, then the help
of a professional service provider must be sought immediately.
Further information » page 196, Tyre pressure monitor .
Note
The warning light illuminates after the ignition is switched on if the vehi-
cle's battery has been disconnected and reconnected. If the warning light
does not go out after moving a short distance, this means there is an error in
the system. Seek assistance from a specialist garage immediately.
Windscreen washer fluid level
Read and observe
on page 33 first.
If the windscreen washer fluid level is too low, the warning light
illumi-
nates .
The following message is shown in the MAXI DOT display. Top up wash fluid!
Top up with liquid » page 184, Windscreen washer system .
Pads
Read and observe
on page 33 first.
If the indicator light
is illuminated , the brake pads are worn.
The following message is shown in the MAXI DOT display. Check brake wear!
Seek assistance from a specialist garage immediately.
Turn signal system
Read and observe
on page 33 first.
Either the left or right
warning light
flashes depending on the position of
the turn signal lever.
If there is a fault in the turn signal system, the warning light flashes at twice
its normal rate.
38Operation
Page 44 of 246
Note■In certain national versions the displays appear in the Imperial system of
measures.■
If the display of the second speed is activated in mph, the current speed is
not indicated in km/h on the display.
■
The amount of fuel consumed will not be indicated.
Memory
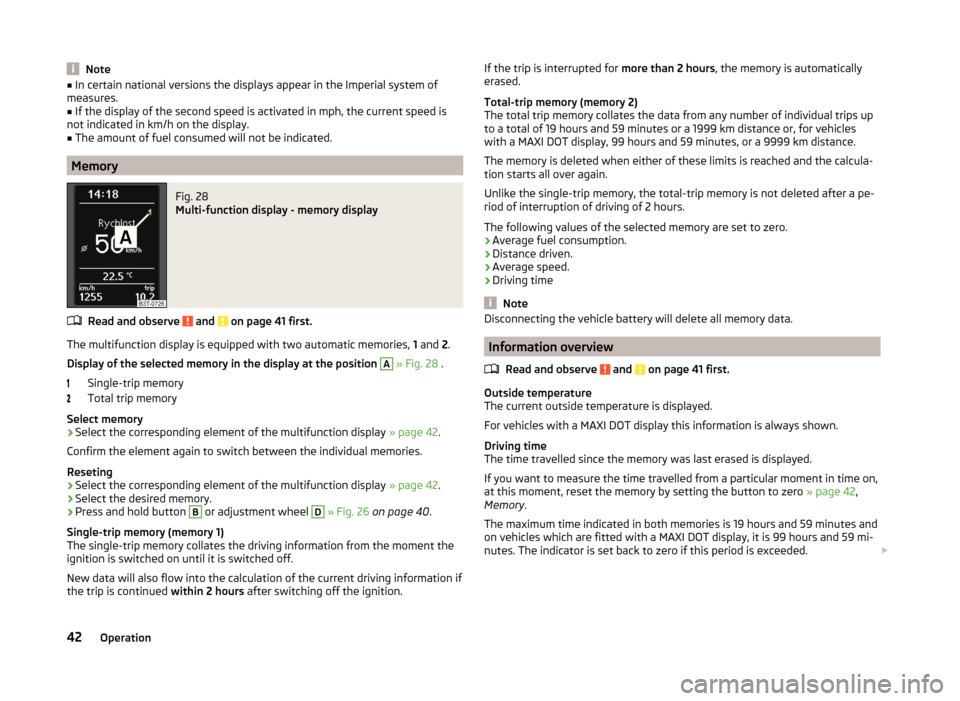
Fig. 28
Multi-function display - memory display
Read and observe and on page 41 first.
The multifunction display is equipped with two automatic memories, 1 and 2.
Display of the selected memory in the display at the position
A
» Fig. 28 .
Single-trip memory
Total trip memory
Select memory
›
Select the corresponding element of the multifunction display » page 42.
Confirm the element again to switch between the individual memories.
Reseting
›
Select the corresponding element of the multifunction display » page 42.
›
Select the desired memory.
›
Press and hold button
B
or adjustment wheel
D
» Fig. 26 on page 40 .
Single-trip memory (memory 1)
The single-trip memory collates the driving information from the moment the
ignition is switched on until it is switched off.
New data will also flow into the calculation of the current driving information if the trip is continued within 2 hours after switching off the ignition.
If the trip is interrupted for more than 2 hours, the memory is automatically
erased.
Total-trip memory (memory 2)
The total trip memory collates the data from any number of individual trips up
to a total of 19 hours and 59 minutes or a 1999 km distance or, for vehicles
with a MAXI DOT display, 99 hours and 59 minutes, or a 9999 km distance.
The memory is deleted when either of these limits is reached and the calcula-
tion starts all over again.
Unlike the single-trip memory, the total-trip memory is not deleted after a pe-
riod of interruption of driving of 2 hours.
The following values of the selected memory are set to zero.
› Average fuel consumption.
› Distance driven.
› Average speed.
› Driving time
Note
Disconnecting the vehicle battery will delete all memory data.
Information overview
Read and observe
and on page 41 first.
Outside temperature
The current outside temperature is displayed.
For vehicles with a MAXI DOT display this information is always shown.
Driving time
The time travelled since the memory was last erased is displayed.
If you want to measure the time travelled from a particular moment in time on,
at this moment, reset the memory by setting the button to zero » page 42,
Memory .
The maximum time indicated in both memories is 19 hours and 59 minutes and
on vehicles which are fitted with a MAXI DOT display, it is 99 hours and 59 mi-
nutes. The indicator is set back to zero if this period is exceeded.
42Operation
Page 45 of 246
Current fuel consumption
The current fuel consumption level is displayed in litres/100 km 1)
. You can use
this information to adapt your driving style to the desired fuel consumption.
The display appears in litres/hour if the vehicle is stationary or driving at a low
speed 2)
.
Average fuel consumption
The average fuel consumption since the memory was last erased is displayed
in litres/100 km 1 )
.
If you wish to determine the average fuel consumption over a certain period of
time, you must set the memory at the start of the new measurement to
zero » page 42 , Memory . After erasing the memory, no value is displayed until
you have driven approx. 300 m.
The display is updated regularly while you are driving.
Range
The range indicates the distance you can still drive with your vehicle based on
the level of fuel in the tank and the same style of driving as before.
The display is shown in steps of 10 km. After lighting up of the indicator light
the display is shown in steps of 5 km.
The fuel consumption over the last 50 km is used to calculate the information.
The range will increase if you drive in a more economical manner.
If the memory is set to zero (after disconnecting the battery), a fuel consump-
tion of 10 l./100 km is calculated for the range; afterwards the value is updated
according to the style of driving.
Distance travelled
The distance travelled since the memory was last erased is displayed.
If you want to measure the distance travelled from a particular moment in time
on, at this moment, reset the memory by setting the button to zero » page 42,
Memory .
The maximum distance indicated in both memories is 1 999 km or 9 999 km on
vehicles with a MAXI DOT display. The indicator is set back to zero if this period
is exceeded.Average speed
The average speed since the memory was last erased is displayed in km/hour .
To determine the average speed over a certain period of time, set the memory
to zero at the start of the measurement » page 42, Memory .
After erasing the memory, no data will appear for the first 300 m driven.
The display is updated regularly while you are driving.
Current driving speed
The current speed displayed is identical to the display on the speedometer2
» Fig. 20 on page 28 .
Oil temperature 3)
If the engine oil temperature is in the range 80-110 °C, the engine operating
temperature is reached.
If the oil temperature is lower than 80 °C or above 110 °C, avoid high engine
revs, full throttle and high engine loads.
If the oil temperature is lower than 50 °C or if a fault in the system for check-
ing the oil temperature is present,
.
symbols are displayed instead of the oil
temperature.
Warning against speeding
Set the speed limit, for example, for the maximum permissible speed in
town » page 43 , Warning at excessive speeds .
Warning at excessive speeds
Read and observe
and on page 41 first.
Adjust the speed limit while the vehicle is stationary
›
Select the menu item Speed warning (MAXI DOT display) or
(segment dis-
play).
›
Activate the speed limit option by confirming this menu item 4)
.
›
Set the desired speed limit, e.g. 50 km/h.
›
Store the speed limit by confirming the set value, or wait several seconds;
your settings will be saved automatically.
1)
On some models in certain countries, the display appears in kilometres/litre.
2)
On some models in certain countries, - -.- km/ltr. is displayed when the vehicle is stationary.
3)
Applies to vehicles using the MAXI DOT display.
4)
If no value is set the output value 30 km/h is automatically displayed.
43Information system
Page 48 of 246
As soon as the parking procedure is completed, an audible signal sounds and
the following message appears in the information display.
Winter tyres: maximum ... km/h.
Units of measurement
The units for the temperature, consumption and distance driven can be set
here.
Assistants
The tones of the audible signals for the parking aid can be adjusted here.
Alt. speed dis.
Here, the display of the second speed in mph 1)
can be activated.
Further information » page 31, Display of the second speed .
Service
The days and kilometres remaining until the next service can be displayed
here.
Further information » page 46, Service interval display .
Factory setting
The factory setting of the functions of the MAXI DOT display can be restored
here.
Compass point display
Read and observe
and on page 44 first.
For vehicles with a factory fitted navigation system, an abbreviation for eachpoint of the compass (depending on the current direction of travel) is shown
on the top left-hand corner of the display.
The compass point display only operates when the ignition is switched on.
Service interval display
Introduction
This chapter contains information on the following subjects:
Prompt in the MAXI DOT display
46
Prompt in the segment display
47
Resetting the service interval display
47
The service interval display shows the time and mileage to the next service
event.
The service due date is automatically displayed on the display and this infor-
mation can be displayed manually if necessary.
The kilometre indicator or the days indicator reduces in steps of 100 km or,
where applicable, days until the service due date is reached.
The information regarding the service intervals can be found in the service
schedule.
Note
Information is retained in the Service Interval Display even after the vehicle
battery is disconnected.
Prompt in the MAXI DOT display
Oil change service
If an oil change service is due, the following message appears: Oil change in …
km or … days.
As soon as the service interval date has been reached, the message Oil
change now! appears once the ignition has been switched on!
Inspection
If an inspection is due, the following message appears: Inspection in ... km
or ... days.
As soon as the service interval date has been reached, the message Inspec-
tion now! appears once the ignition has been switched on!
1)
For models with the speedometer in mph, the second speed is displayed in km/h.
46Operation
Page 51 of 246
Vehicle keyFig. 30
Remote control key
Read and observe on page 48 first.
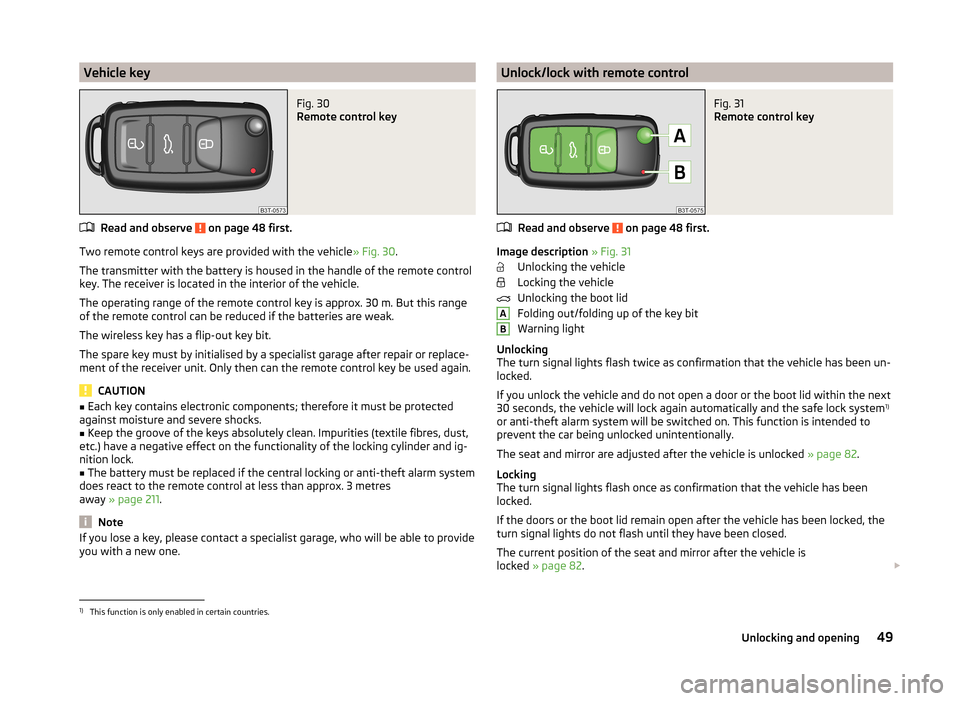
Two remote control keys are provided with the vehicle» Fig. 30.
The transmitter with the battery is housed in the handle of the remote control key. The receiver is located in the interior of the vehicle.
The operating range of the remote control key is approx. 30 m. But this range of the remote control can be reduced if the batteries are weak.
The wireless key has a flip-out key bit.
The spare key must by initialised by a specialist garage after repair or replace- ment of the receiver unit. Only then can the remote control key be used again.
CAUTION
■ Each key contains electronic components; therefore it must be protected
against moisture and severe shocks.■
Keep the groove of the keys absolutely clean. Impurities (textile fibres, dust,
etc.) have a negative effect on the functionality of the locking cylinder and ig-
nition lock.
■
The battery must be replaced if the central locking or anti-theft alarm system
does react to the remote control at less than approx. 3 metres
away » page 211 .
Note
If you lose a key, please contact a specialist garage, who will be able to provide
you with a new one.Unlock/lock with remote controlFig. 31
Remote control key
Read and observe on page 48 first.
Image description » Fig. 31
Unlocking the vehicle
Locking the vehicle
Unlocking the boot lid
Folding out/folding up of the key bit
Warning light
Unlocking
The turn signal lights flash twice as confirmation that the vehicle has been un-
locked.
If you unlock the vehicle and do not open a door or the boot lid within the next
30 seconds, the vehicle will lock again automatically and the safe lock system 1)
or anti-theft alarm system will be switched on. This function is intended to prevent the car being unlocked unintentionally.
The seat and mirror are adjusted after the vehicle is unlocked » page 82.
Locking
The turn signal lights flash once as confirmation that the vehicle has been
locked.
If the doors or the boot lid remain open after the vehicle has been locked, the
turn signal lights do not flash until they have been closed.
The current position of the seat and mirror after the vehicle is
locked » page 82 .
AB1)
This function is only enabled in certain countries.
49Unlocking and opening
Page 52 of 246
Checking the battery condition
If the red indicator light B » Fig. 31 does not flash when you press a button on
the remote control key, the battery is empty. Replace the battery » page 211.
CAUTION
■
Only operate the remote control when the doors and boot lid are closed and
the vehicle is in your line of sight.■
If the driver door is open, the vehicle cannot be locked using the remote con-
trol key.
■
The operation of the remote control may temporarily be affected by signal in-
terference from transmitters close to the car and which operate in the same
frequency range (e.g. mobile phone, TV transmitter).
Note
For vehicles with anti-theft alarm the acoustic signals can also be activated/
deactivated by locking/unlocking » page 45.
Unlocking / locking - KESSY
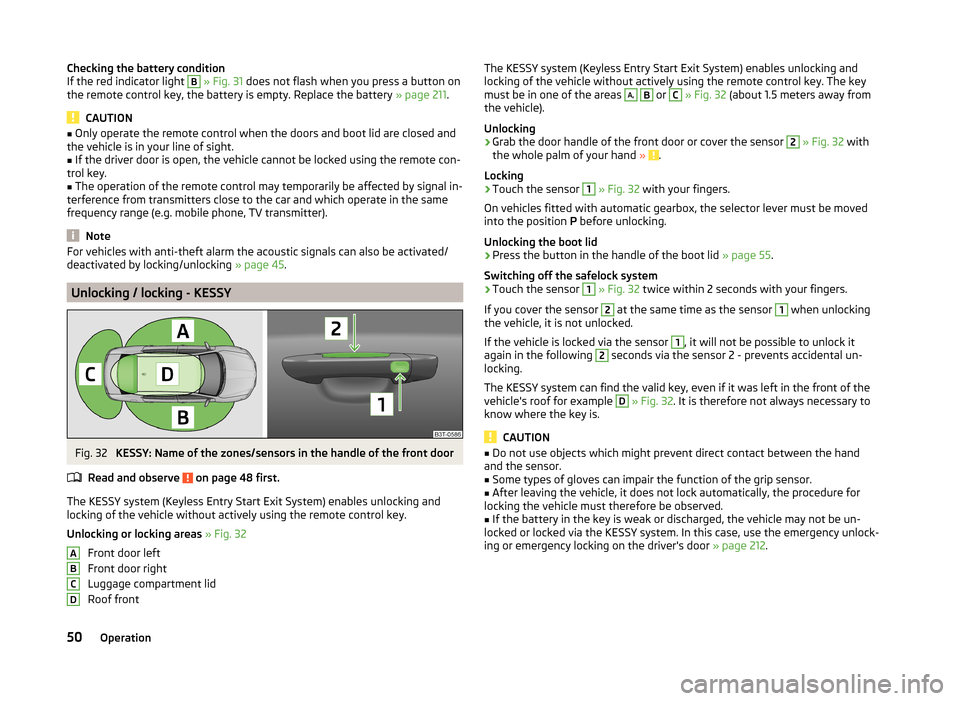
Fig. 32
KESSY: Name of the zones/sensors in the handle of the front door
Read and observe
on page 48 first.
The KESSY system (Keyless Entry Start Exit System) enables unlocking and
locking of the vehicle without actively using the remote control key.
Unlocking or locking areas » Fig. 32
Front door left
Front door right
Luggage compartment lid
Roof front
ABCDThe KESSY system (Keyless Entry Start Exit System) enables unlocking and
locking of the vehicle without actively using the remote control key. The key
must be in one of the areas A,
B
or
C
» Fig. 32 (about 1.5 meters away from
the vehicle).
Unlocking
›
Grab the door handle of the front door or cover the sensor
2
» Fig. 32 with
the whole palm of your hand » .
Locking
›
Touch the sensor
1
» Fig. 32 with your fingers.
On vehicles fitted with automatic gearbox, the selector lever must be moved
into the position P before unlocking.
Unlocking the boot lid
›
Press the button in the handle of the boot lid » page 55.
Switching off the safelock system
›
Touch the sensor
1
» Fig. 32 twice within 2 seconds with your fingers.
If you cover the sensor
2
at the same time as the sensor
1
when unlocking
the vehicle, it is not unlocked.
If the vehicle is locked via the sensor
1
, it will not be possible to unlock it
again in the following
2
seconds via the sensor 2 - prevents accidental un-
locking.
The KESSY system can find the valid key, even if it was left in the front of the
vehicle's roof for example
D
» Fig. 32 . It is therefore not always necessary to
know where the key is.
CAUTION
■ Do not use objects which might prevent direct contact between the hand
and the sensor.■
Some types of gloves can impair the function of the grip sensor.
■
After leaving the vehicle, it does not lock automatically, the procedure for
locking the vehicle must therefore be observed.
■
If the battery in the key is weak or discharged, the vehicle may not be un-
locked or locked via the KESSY system. In this case, use the emergency unlock-
ing or emergency locking on the driver's door » page 212.
50Operation
Page 53 of 246
Information messageRead and observe
on page 48 first.
Key in the vehicle
The protection against inadvertently locking the key in the vehicle unlocks the
vehicle automatically if the following conditions are met.
The vehicle, including the boot lit, has been locked.
The key with which the vehicle has been locked remains in the vehicle in
the zone
D
» Fig. 32 on page 50 .
The turn signal lights flash four times as confirmation that the vehicle has
been unlocked again.
The following message is shown in the information cluster display. Key in vehicle.
KEY IN VEHICLE
Additionally, on vehicles which are fitted with the anti-theft alarm system, an audible signal sounds.
The system has not found a key
If the system has not found a key in the vehicle, the following message ap-
pears in the display of the instrument cluster.
Key not found.
NO KEY
This can occur if the key is outside the vehicle, the battery in the key is dis-
charged, the key is defective or the electromagnetic field is strongly disturbed.
Fault in KESSY system
If there is a fault in the KESSY system, the following message will appear in
the display of the instrument cluster.
Keyless access system faulty.
CHECK KEYLESS
Low voltage of the key battery
If the voltage of the battery in the remote control key is too low, the following
message appears in the display of the instrument cluster.
Change the key battery!
KEY BATTERY
Change the key battery » page 211!
Parking the vehicle
Read and observe
on page 48 first.
If the vehicle is not unlocked within 60 or 90 hours, the sensors in the handle
of the driver or front passenger's door are deactivated automatically » Fig. 32
on page 50 .
Activation after 60 hours
›
Unlock the driver's door using the sensor
2
» Fig. 32 on page 50 .
›
Press the handle of the boot lid.
›
Unlock the vehicle using the symbol button
on the remote control key.
›
Unlocking the driver's door in an emergency » page 212.
Activation after 90 hours
›
Unlock the vehicle using the symbol button on the remote control key.
›
Unlocking the driver's door in an emergency
» page 212.
Safe securing
Read and observe
on page 48 first.
The door locks are blocked automatically if the vehicle is locked from the out-side. Afterwards, it is not possible to open the doors with the door handle ei-
ther from the inside or from the outside.
This fact is pointed out by the following message on the display of the instru-
ment cluster after switching out the ignition.
Check SAFELOCK! Log book!
CHECK SAFELOCK
Switching off
The safe lock can be switched off in one of the following ways.
›
By locking twice within 2 seconds.
›
By disabling the interior monitoring » page 54, Interior monitor and towing
protection .
If the vehicle is locked and the safe securing system is switched off, the door can be opened separately from the inside by a single pull on opening lever.
Switching on
The safelock switches on automatically the next time the vehicle is locked and
unlocked.
51Unlocking and opening