CD changer SKODA SUPERB 2014 2.G / (B6/3T) Owner's Manual
[x] Cancel search | Manufacturer: SKODA, Model Year: 2014, Model line: SUPERB, Model: SKODA SUPERB 2014 2.G / (B6/3T)Pages: 246, PDF Size: 17.16 MB
Page 102 of 246

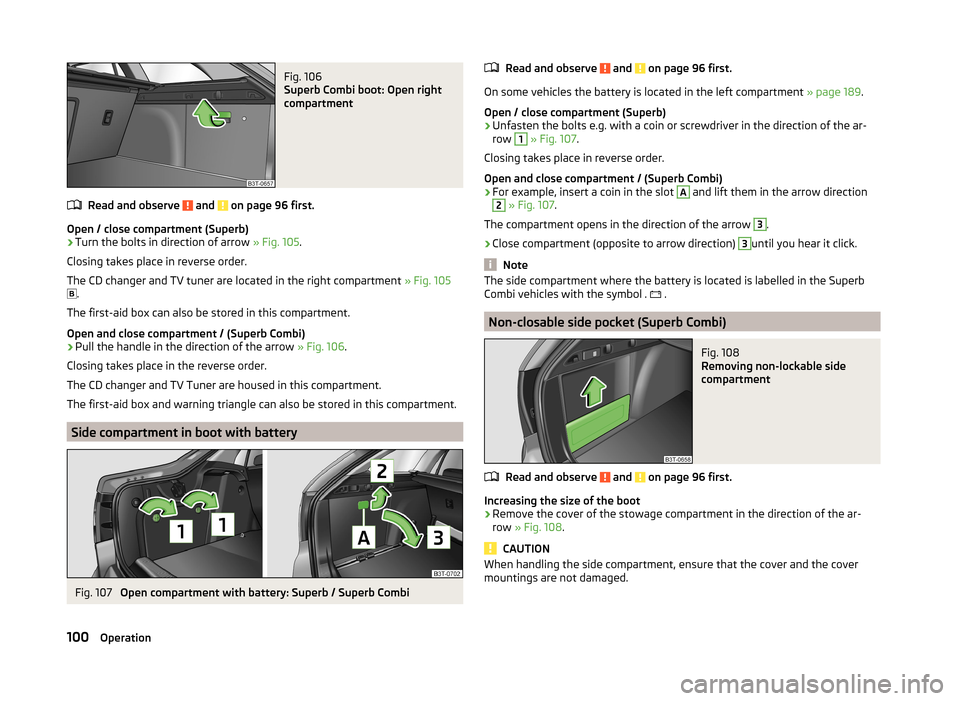
Fig. 106
Superb Combi boot: Open right
compartment
Read and observe and on page 96 first.
Open / close compartment (Superb)
›
Turn the bolts in direction of arrow » Fig. 105.
Closing takes place in reverse order.
The CD changer and TV tuner are located in the right compartment » Fig. 105
.
The first-aid box can also be stored in this compartment.
Open and close compartment / (Superb Combi)
›
Pull the handle in the direction of the arrow » Fig. 106.
Closing takes place in the reverse order.
The CD changer and TV Tuner are housed in this compartment.
The first-aid box and warning triangle can also be stored in this compartment.
Side compartment in boot with battery
Fig. 107
Open compartment with battery: Superb / Superb Combi
Read and observe and on page 96 first.
On some vehicles the battery is located in the left compartment » page 189.
Open / close compartment (Superb)
›
Unfasten the bolts e.g. with a coin or screwdriver in the direction of the ar-
row
1
» Fig. 107 .
Closing takes place in reverse order.
Open and close compartment / (Superb Combi)
›
For example, insert a coin in the slot
A
and lift them in the arrow direction
2
» Fig. 107 .
The compartment opens in the direction of the arrow
3
.
›
Close compartment (opposite to arrow direction)
3
until you hear it click.
Note
The side compartment where the battery is located is labelled in the Superb
Combi vehicles with the symbol . .
Non-closable side pocket (Superb Combi)
Fig. 108
Removing non-lockable side
compartment
Read and observe and on page 96 first.
Increasing the size of the boot
›
Remove the cover of the stowage compartment in the direction of the ar-
row » Fig. 108 .
CAUTION
When handling the side compartment, ensure that the cover and the cover
mountings are not damaged.100Operation
Page 135 of 246

Button/wheel
» Fig. 13 0
ActionRadioTVAudio sourcesDVD videoNavigation
5
Turn upwardsSwitch to the previous station and at the same time
display list of saved/available stationsSkip to next chan- nelSkip to next trackSkip to next chap- terShow the option
to stop navigation or display the list
of recent destina- tions5
Turn downwardsSwitch to the next station and at the same time
display list of saved/available stationsSwitch to previous channelSwitch to start of tracka)Switch to previous
chapter6Press brieflyCall up the main menua)
To go to the previous track, press the adjustment wheel twice or rotate it by two positions.
AUX- and MDIinputs
The AUX and MDI inputs are used to connect external audio sources (e.g. iPod
or mp3 player) and to play back music from these devices via the factory-fitted
radio or navigation system.
The AUX input for external audio sources is located below the armrest of the
front seats and is marked with the symbol. 1)
.
The MDI input is located in the storage compartment below the front armrest.
For a description of use, refer to the relevant operating instructions for the ra-
dio or navigation system.
CD change
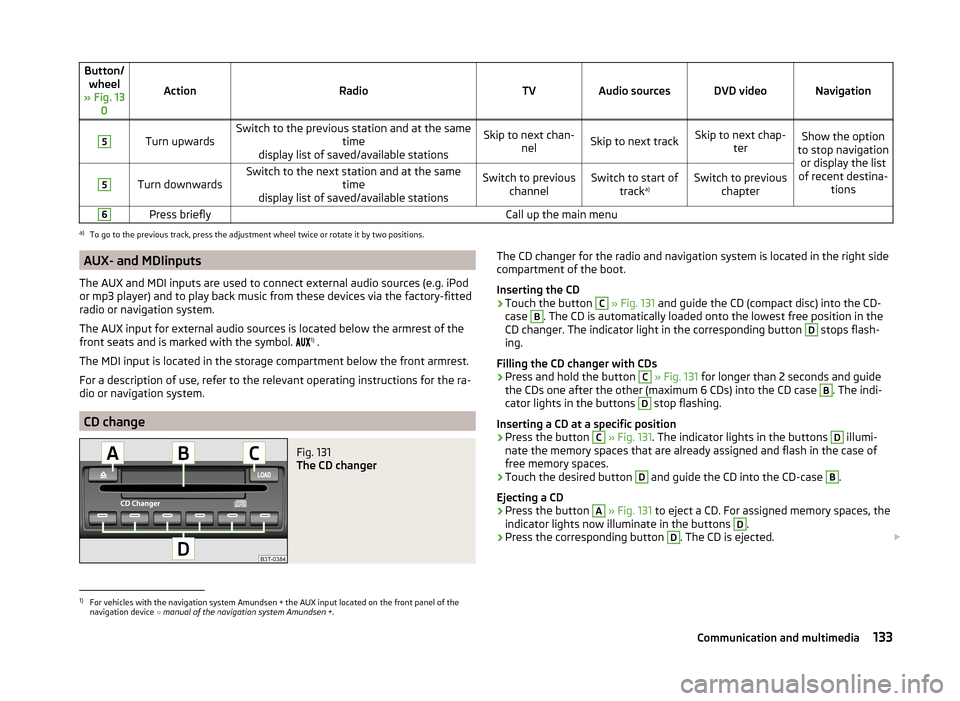
Fig. 131
The CD changer
The CD changer for the radio and navigation system is located in the right side
compartment of the boot.
Inserting the CD›
Touch the button
C
» Fig. 131 and guide the CD (compact disc) into the CD-
case
B
. The CD is automatically loaded onto the lowest free position in the
CD changer. The indicator light in the corresponding button
D
stops flash-
ing.
Filling the CD changer with CDs
›
Press and hold the button
C
» Fig. 131 for longer than 2 seconds and guide
the CDs one after the other (maximum 6 CDs) into the CD case
B
. The indi-
cator lights in the buttons
D
stop flashing.
Inserting a CD at a specific position
›
Press the button
C
» Fig. 131 . The indicator lights in the buttons
D
illumi-
nate the memory spaces that are already assigned and flash in the case of
free memory spaces.
›
Touch the desired button
D
and guide the CD into the CD-case
B
.
Ejecting a CD
›
Press the button
A
» Fig. 131 to eject a CD. For assigned memory spaces, the
indicator lights now illuminate in the buttons
D
.
›
Press the corresponding button
D
. The CD is ejected.
1)
For vehicles with the navigation system Amundsen + the AUX input located on the front panel of the
navigation device » manual of the navigation system Amundsen + .
133Communication and multimedia
Page 136 of 246

Ejecting all CDs›Press and hold the button A » Fig. 131 for more than 2 seconds. All CDs in
the CD-changer are ejected consecutively.
Note
■ Insert a CD, with the labelled side facing up, into the CD slot B » Fig. 131 until
it is automatically drawn in. The play function will start automatically.■
After loading a CD into the CD changer, wait until the indicator light of the
corresponding button
D
is illuminated. Then the CD case
B
is free to load the
next CD.
■
If a position is selected, on which a CD is already located, this CD is ejected.
Remove the ejected CD and load the desired CD.
DVD-preinstallation
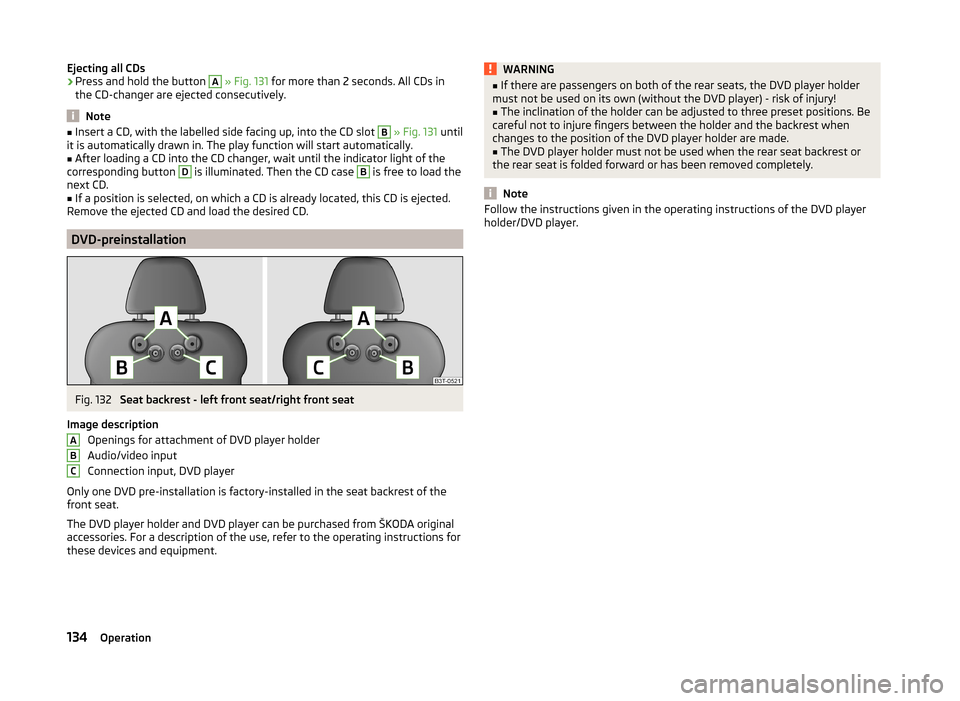
Fig. 132
Seat backrest - left front seat/right front seat
Image description Openings for attachment of DVD player holder
Audio/video input
Connection input, DVD player
Only one DVD pre-installation is factory-installed in the seat backrest of the
front seat.
The DVD player holder and DVD player can be purchased from ŠKODA original
accessories. For a description of the use, refer to the operating instructions for
these devices and equipment.
ABCWARNING■ If there are passengers on both of the rear seats, the DVD player holder
must not be used on its own (without the DVD player) - risk of injury!■
The inclination of the holder can be adjusted to three preset positions. Be
careful not to injure fingers between the holder and the backrest when
changes to the position of the DVD player holder are made.
■
The DVD player holder must not be used when the rear seat backrest or
the rear seat is folded forward or has been removed completely.
Note
Follow the instructions given in the operating instructions of the DVD player
holder/DVD player.134Operation
Page 235 of 246

Folding hook97
Non-closable side pocket (Superb Combi)100
Removable Light (Superb Combi)101
Roll-up boot cover (Superb Combi)99
Side compartment with battery100
Boot cover (Superb Combi)99
Boot lid55
automatic locking56
Warning light34
(Superb Combi)56
Brake Information messages
33
Warning light33
Brake booster141
Brake fluid189
Changing189
Checking189
Information messages33
Brake pads warning light
38
Brakes Brake assist systems
151
Brake booster141
Brake fluid189
Handbrake141
Running in145
Braking Information on braking
140
Breakdown kit205
Break recommendation See Fatigue detection
162
Bulbs Replacing
219
Button in the driver's door Electric power windows
59
C
Car care
169
Car computer See multifunction display
41
Car park ticket holder87
Carrier106
Cavity protection176
CD changer133
Central locking48
Central locking button52
Changing Brake fluid
189
Engine oil187
Wheels201
Changing a wheel Follow-up work
202
Preliminary work202
Remove and attaching a wheel202
Charging a vehicle battery192
Check Fit ball head properly
165
Checking Battery electrolyte level
191
Brake fluid189
Coolant188
Engine oil186
Oil level186
Windscreen washer fluid184
Children and safety21
Child safety Side airbag
22
Child safety lock53
Child seat Classification
23
ISOFIX23
on the front passenger seat21
TOP TETHER24
Use of child seats23
Use of ISOFIX child seats24
Chrome parts refer to Taking care of your vehicle
174
Cigarette lighter89
Cleaning169
Alcantara178
Artificial leather178
cloths178
Covers of electrically heated seats178
Headlight lenses175
Natural leather177
Plastic parts174
Wheels176
Climatronic113
Air recirculation115
automatic mode114
Control elements113
Controlling blower116
Cooling system114
Defrosting windscreen116
Setting the temperature114
Clothes hook92
Cockpit 12-Volt power outlet
90
Ashtray89
Cigarette lighter89
General view27
Lighting71
Practical equipment86
Storage compartments86
Comfort control window
61
COMING HOME70
Compartments86
Computer See multifunction display
41
Convenience operation sliding / tilting roof
63
sliding / tilting roof (Superb Estate)65
convenience turn signal67
Coolant187
Checking188
Information messages34
Replenishing188
233Index