headrest SKODA SUPERB 2014 2.G / (B6/3T) Owner's Manual
[x] Cancel search | Manufacturer: SKODA, Model Year: 2014, Model line: SUPERB, Model: SKODA SUPERB 2014 2.G / (B6/3T)Pages: 246, PDF Size: 17.16 MB
Page 9 of 246

›Front side airbags.
› Rear side airbags.
› Head airbags.
› Anchoring points for child seats using the ISOFIX system.
› Anchoring points for child seats using the TOP TETHER system.
› Head restraints adjustable for height.
› Adjustable steering column.
The specified safety equipment works together, in order to optimally protect you and those travelling with you in accident situations.
The safety equipment does not protect you or the people travelling with you, if
you or your occupants adopt an incorrect seated position or the equipment is not correctly adjusted or used.
If the seat belt is not fastened properly, this may result in injuries if an airbag is
activated in the event of an accident.
Correct and safe seated position
Introduction
This chapter contains information on the following subjects:
Correct seated position for the driver
7
Adjusting the steering wheel position
8
Correct seated position for the front passenger
8
Correct seated position for the passengers in the rear seats
9
Examples of incorrect seated positions
9WARNING■ The front seats and all head restraints must be adjusted to match the
body size at all times and the seat belt must always be fastened properly to
provide the most effective levels of protection to the passengers.■
Each occupant must correctly fasten the seat belt belonging to the seat.
Children must be fastened » page 21, Transporting children safely with a
suitable restraint system.
■
If the occupant adopts an incorrect seated position, he is exposed to life-
threatening injuries, in case he is hit by a deployed airbag.
WARNING (Continued)■ If the occupants on the rear seats are not sitting upright, the risk of injury
is increased due to incorrect routing of the seat belt.■
The seat backrests must not be tilted too far back when driving, as this
will impair the function of the seat belts and of the airbag system – risk of
injury!
Correct seated position for the driver
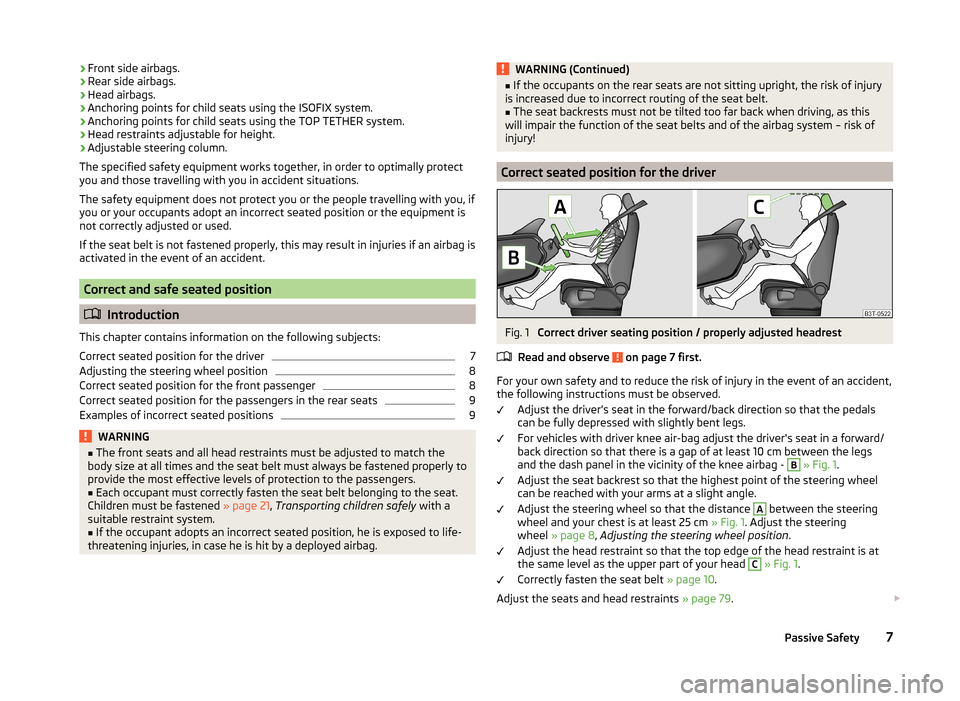
Fig. 1
Correct driver seating position / properly adjusted headrest
Read and observe
on page 7 first.
For your own safety and to reduce the risk of injury in the event of an accident, the following instructions must be observed.
Adjust the driver’s seat in the forward/back direction so that the pedals
can be fully depressed with slightly bent legs.
For vehicles with driver knee air-bag adjust the driver's seat in a forward/
back direction so that there is a gap of at least 10 cm between the legs and the dash panel in the vicinity of the knee airbag -
B
» Fig. 1 .
Adjust the seat backrest so that the highest point of the steering wheel
can be reached with your arms at a slight angle.
Adjust the steering wheel so that the distance
A
between the steering
wheel and your chest is at least 25 cm » Fig. 1. Adjust the steering
wheel » page 8 , Adjusting the steering wheel position .
Adjust the head restraint so that the top edge of the head restraint is at
the same level as the upper part of your head
C
» Fig. 1 .
Correctly fasten the seat belt » page 10.
Adjust the seats and head restraints » page 79.
7Passive Safety
Page 24 of 246

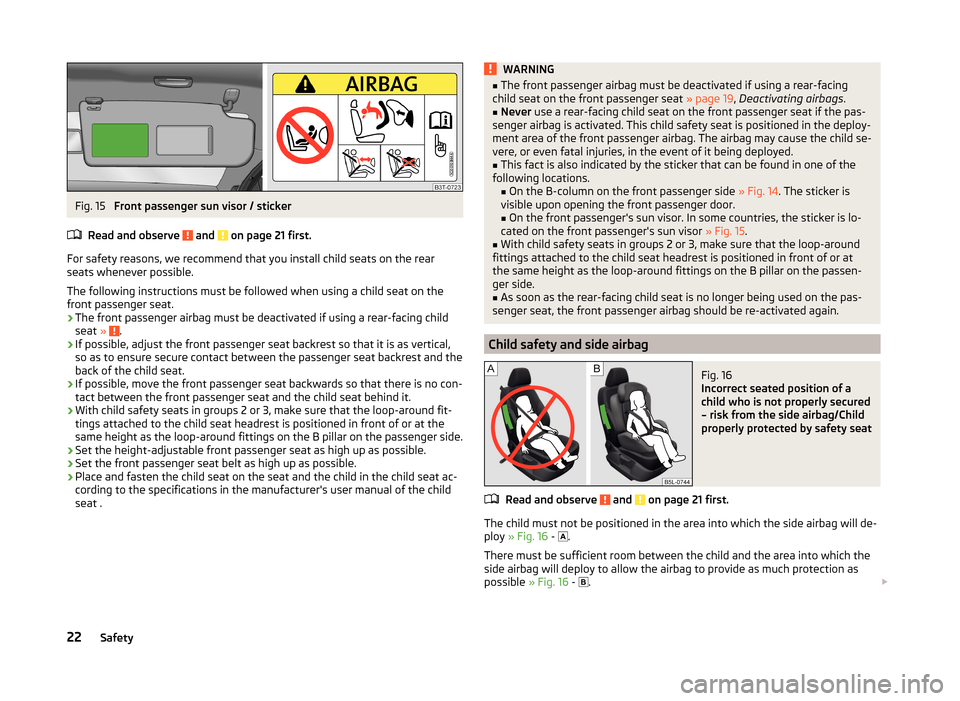
Fig. 15
Front passenger sun visor / sticker
Read and observe
and on page 21 first.
For safety reasons, we recommend that you install child seats on the rear
seats whenever possible.
The following instructions must be followed when using a child seat on the
front passenger seat.
› The front passenger airbag must be deactivated if using a rear-facing child
seat »
.
› If possible, adjust the front passenger seat backrest so that it is as vertical,
so as to ensure secure contact between the passenger seat backrest and the
back of the child seat.
› If possible, move the front passenger seat backwards so that there is no con-
tact between the front passenger seat and the child seat behind it.
› With child safety seats in groups 2 or 3, make sure that the loop-around fit-
tings attached to the child seat headrest is positioned in front of or at the
same height as the loop-around fittings on the B pillar on the passenger side.
› Set the height-adjustable front passenger seat as high up as possible.
› Set the front passenger seat belt as high up as possible.
› Place and fasten the child seat on the seat and the child in the child seat ac-
cording to the specifications in the manufacturer's user manual of the child
seat .
WARNING■ The front passenger airbag must be deactivated if using a rear-facing
child seat on the front passenger seat » page 19, Deactivating airbags .■
Never use a rear-facing child seat on the front passenger seat if the pas-
senger airbag is activated. This child safety seat is positioned in the deploy-
ment area of the front passenger airbag. The airbag may cause the child se-
vere, or even fatal injuries, in the event of it being deployed.
■
This fact is also indicated by the sticker that can be found in one of the
following locations. ■On the B-column on the front passenger side » Fig. 14. The sticker is
visible upon opening the front passenger door.
■ On the front passenger's sun visor. In some countries, the sticker is lo-
cated on the front passenger's sun visor » Fig. 15.
■
With child safety seats in groups 2 or 3, make sure that the loop-around
fittings attached to the child seat headrest is positioned in front of or at
the same height as the loop-around fittings on the B pillar on the passen-
ger side.
■
As soon as the rear-facing child seat is no longer being used on the pas-
senger seat, the front passenger airbag should be re-activated again.
Child safety and side airbag
Fig. 16
Incorrect seated position of a
child who is not properly secured
– risk from the side airbag/Child
properly protected by safety seat
Read and observe and on page 21 first.
The child must not be positioned in the area into which the side airbag will de-
ploy » Fig. 16 -
.
There must be sufficient room between the child and the area into which the
side airbag will deploy to allow the airbag to provide as much protection as
possible » Fig. 16 -
.
22Safety