change time SKODA SUPERB 2015 3.G / (B8/3V) Columbus Infotainment System Manual
[x] Cancel search | Manufacturer: SKODA, Model Year: 2015, Model line: SUPERB, Model: SKODA SUPERB 2015 3.G / (B8/3V)Pages: 100, PDF Size: 11.13 MB
Page 72 of 100
›Turning the control knob
.
› Touching the screen with two fingers and pulling them apart or closing them
together.
Enabling automatic scaling
› Press in the
Navigation menu the function key
→
.
The function key
is highlighted in green. The manual scaling switches to au-
tomatic scaling.
The automatic scale is only active as long as the map is centred on the vehicle
position (the function key
or is not displayed).
If the automatic scale is active, the map scale will change automatically de-
pending on the type of road (motorway - smaller map scale / town larger map
scale) and from the upcoming manoeuvre.
Turn off the automatic change of scale
› Press in the
Navigation menu the function key
→
.
The function key is highlighted in white. The automatic scaling changes to
manual change of scale.
The turning off occurs likewise when the map is moved or the map scale is
changed manually.
Map view in reduced scale
› Press in the
Navigation menu the function key
→
or
→
.
The map scale is reduced for a few seconds and then restored.
Map alignment
The moved map can be centred/aligned to the vehicle, destination or route po-
sition.
In the map area
D
» Fig. 51 on page 67 the following function keys are dis-
played depending on the map display.
Aligning to the vehicle position (in the 2D map display - or 3D map dis-
play - )
Alignment to the destination position (in the destination position display -
)
Route alignment (in the route display - )
Route guidance
Introduction
This chapter contains information on the following subjects:
Destination management
70
Route calculation
70
Most common routes
71
Route change in the map
71
graphical driving recommendations
72
Nav. announcements
72
Route information
72
Ending the route guidance
72
Abort route guidance
73
The route guidance is as follows.
› Through graphical driving instructions in the device display screen and in the
display of the instrument cluster.
› With navigation announcements.
The unit tries to allow for continued guidance even if the navigation data is in-
complete or there is no data at all for the given area.
The route is recalculated each time if you ignore driving recommendations or
change the route.
Route guidance in demo mode
The Demo mode provides a travel simulation to the entered destination. The
function offers the chance to travel through the calculated route “virtually”.
When the Demo mode is turned on, a menu for route guidance in the Demo
mode or in normal operation is displayed before the start of route guidance.
Activation / deactivation of the Demo mode » page 79, Advanced settings .
WARNINGThe navigation announcements provided may vary from the actual situa-
tions, e.g. due to out-of-date navigation data.69Navigation
Page 76 of 100
›Press in the
Navigation menu the function key → Stop route guidance .›If a route guidance is in progress, then a new tour is to be entered and finish-
ing the guidance by pressing the function key Finish.›
Switch off the ignition for more than 120 min.
Abort route guidance
Read and observe
on page 69 first.
If the ignition is switched off and on again, then the route guidance is contin-ued depending on the stop time in one of the following ways.
› Within 15 min. - route guidance is continued taking into account the calcula-
ted route.
› Between 15 min and 120 min - the screen displays the message
Continue
route guidance? , after you confirm the message, the route guidance contin-
ues using the calculated route.
› After 120 min - the route guidance is cancelled.
Tour
Introduction
This chapter contains information on the following subjects:
Tour setting
73
Edit tour
73
Tour memory management
74
Tour setting
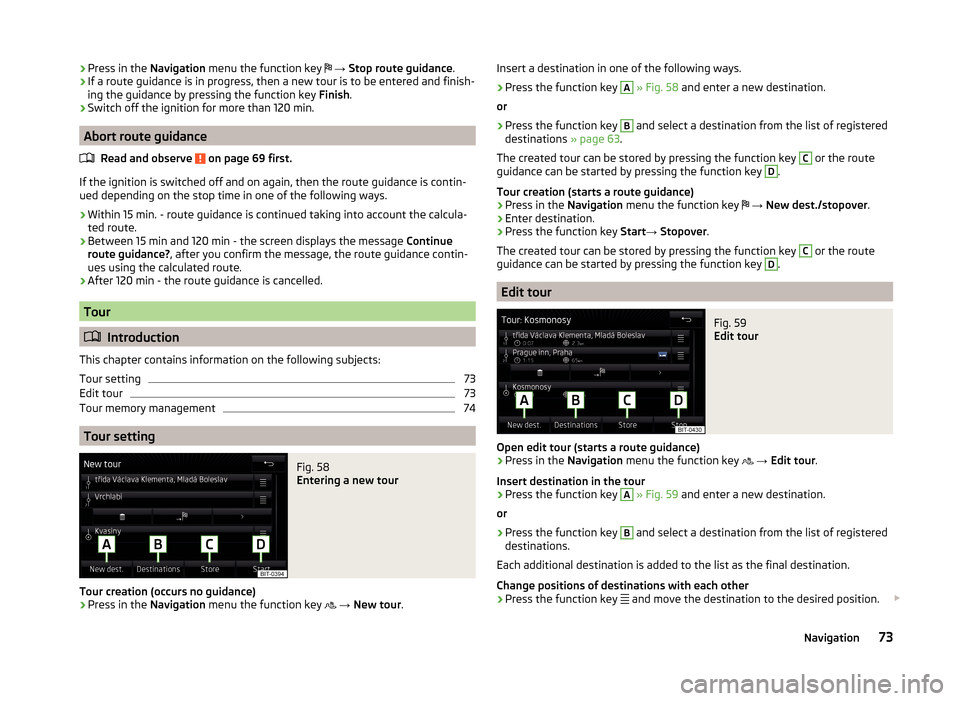
Fig. 58
Entering a new tour
Tour creation (occurs no guidance)
›
Press in the Navigation menu the function key
→ New tour .
Insert a destination in one of the following ways.›
Press the function key
A
» Fig. 58 and enter a new destination.
or
›
Press the function key
B
and select a destination from the list of registered
destinations » page 63.
The created tour can be stored by pressing the function key
C
or the route
guidance can be started by pressing the function key
D
.
Tour creation (starts a route guidance)
›
Press in the Navigation menu the function key
→ New dest./stopover .
›
Enter destination.
›
Press the function key Start→ Stopover .
The created tour can be stored by pressing the function key
C
or the route
guidance can be started by pressing the function key
D
.
Edit tour
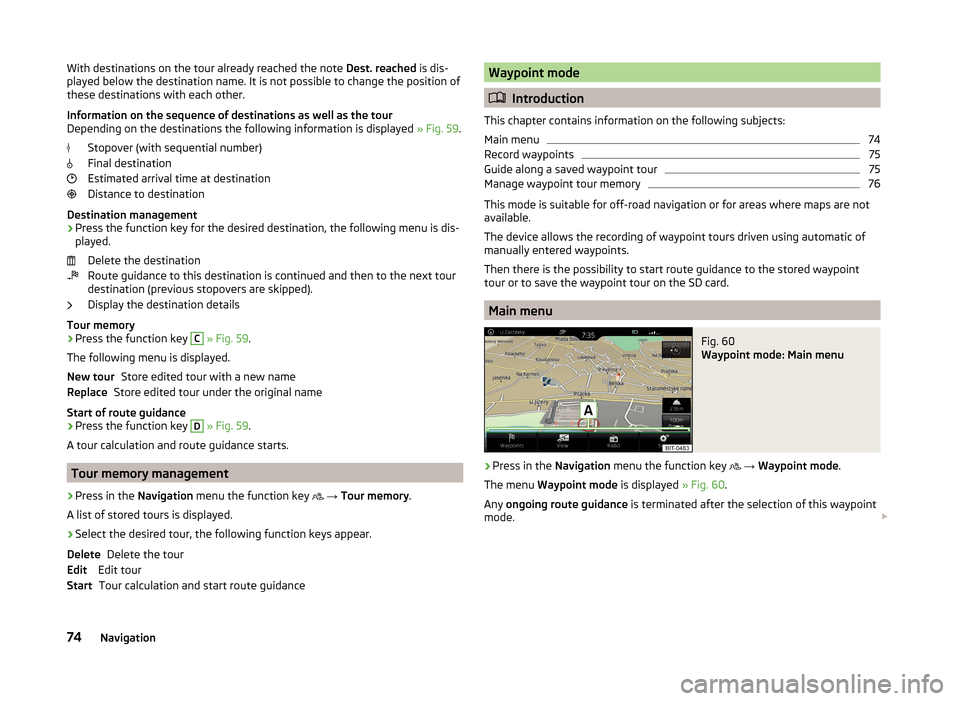
Fig. 59
Edit tour
Open edit tour (starts a route guidance)
›
Press in the Navigation menu the function key
→ Edit tour .
Insert destination in the tour
›
Press the function key
A
» Fig. 59 and enter a new destination.
or
›
Press the function key
B
and select a destination from the list of registered
destinations.
Each additional destination is added to the list as the final destination.
Change positions of destinations with each other
›
Press the function key and move the destination to the desired position.
73Navigation
Page 77 of 100
With destinations on the tour already reached the note Dest. reached is dis-
played below the destination name. It is not possible to change the position of
these destinations with each other.
Information on the sequence of destinations as well as the tour
Depending on the destinations the following information is displayed » Fig. 59.
Stopover (with sequential number)
Final destination
Estimated arrival time at destination
Distance to destination
Destination management
› Press the function key for the desired destination, the following menu is dis-
played.
Delete the destination
Route guidance to this destination is continued and then to the next tour
destination (previous stopovers are skipped).
Display the destination details
Tour memory
› Press the function key C
» Fig. 59 .
The following menu is displayed. Store edited tour with a new name
Store edited tour under the original name
Start of route guidance › Press the function key
D
» Fig. 59 .
A tour calculation and route guidance starts.
Tour memory management
›
Press in the Navigation menu the function key
→ Tour memory .
A list of stored tours is displayed.
›
Select the desired tour, the following function keys appear.
Delete the tour
Edit tour Tour calculation and start route guidance
New tourReplaceDeleteEditStartWaypoint mode
Introduction
This chapter contains information on the following subjects:
Main menu
74
Record waypoints
75
Guide along a saved waypoint tour
75
Manage waypoint tour memory
76
This mode is suitable for off-road navigation or for areas where maps are not
available.
The device allows the recording of waypoint tours driven using automatic of
manually entered waypoints.
Then there is the possibility to start route guidance to the stored waypoint
tour or to save the waypoint tour on the SD card.
Main menu
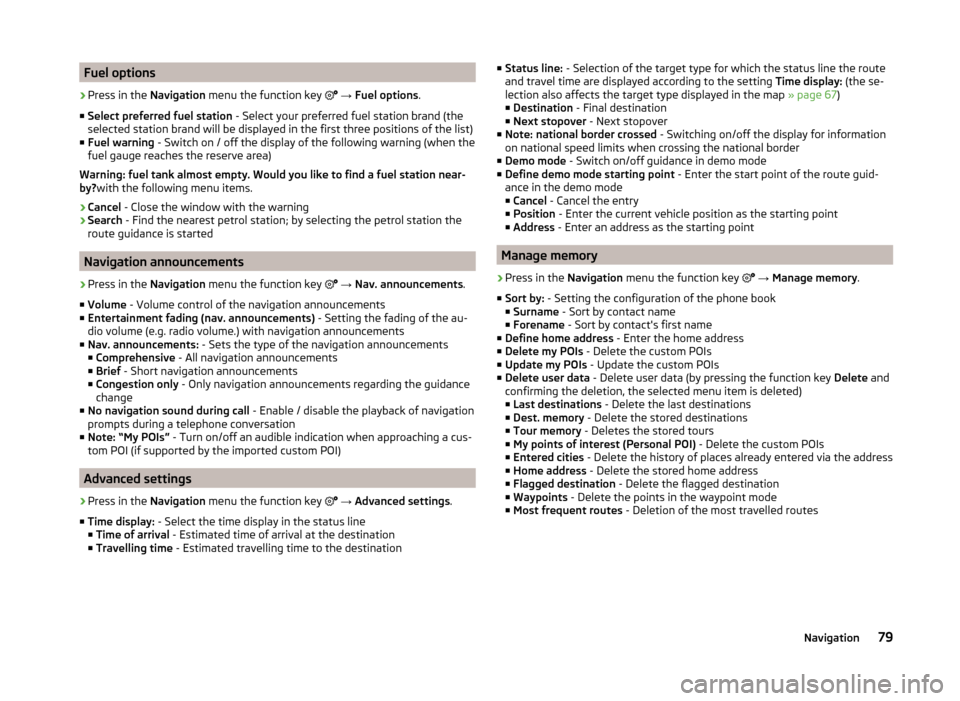
Fig. 60
Waypoint mode: Main menu
›
Press in the Navigation menu the function key
→ Waypoint mode .
The menu Waypoint mode is displayed » Fig. 60.
Any ongoing route guidance is terminated after the selection of this waypoint
mode.
74Navigation
Page 82 of 100
Fuel options›
Press in the Navigation menu the function key
→ Fuel options .
■ Select preferred fuel station - Select your preferred fuel station brand (the
selected station brand will be displayed in the first three positions of the list)
■ Fuel warning - Switch on / off the display of the following warning (when the
fuel gauge reaches the reserve area)
Warning: fuel tank almost empty. Would you like to find a fuel station near-
by? with the following menu items.
› Cancel
- Close the window with the warning
› Search
- Find the nearest petrol station; by selecting the petrol station the
route guidance is started
Navigation announcements
›
Press in the Navigation menu the function key
→ Nav. announcements .
■ Volume - Volume control of the navigation announcements
■ Entertainment fading (nav. announcements) - Setting the fading of the au-
dio volume (e.g. radio volume.) with navigation announcements
■ Nav. announcements: - Sets the type of the navigation announcements
■ Comprehensive - All navigation announcements
■ Brief - Short navigation announcements
■ Congestion only - Only navigation announcements regarding the guidance
change
■ No navigation sound during call - Enable / disable the playback of navigation
prompts during a telephone conversation
■ Note: “My POIs” - Turn on/off an audible indication when approaching a cus-
tom POI (if supported by the imported custom POI)
Advanced settings
›
Press in the Navigation menu the function key
→ Advanced settings .
■ Time display: - Select the time display in the status line
■ Time of arrival - Estimated time of arrival at the destination
■ Travelling time - Estimated travelling time to the destination
■
Status line: - Selection of the target type for which the status line the route
and travel time are displayed according to the setting Time display: (the se-
lection also affects the target type displayed in the map » page 67)
■ Destination - Final destination
■ Next stopover - Next stopover
■ Note: national border crossed - Switching on/off the display for information
on national speed limits when crossing the national border
■ Demo mode - Switch on/off guidance in demo mode
■ Define demo mode starting point - Enter the start point of the route guid-
ance in the demo mode
■ Cancel - Cancel the entry
■ Position - Enter the current vehicle position as the starting point
■ Address - Enter an address as the starting point
Manage memory
›
Press in the
Navigation menu the function key
→ Manage memory .
■ Sort by: - Setting the configuration of the phone book
■ Surname - Sort by contact name
■ Forename - Sort by contact's first name
■ Define home address - Enter the home address
■ Delete my POIs - Delete the custom POIs
■ Update my POIs - Update the custom POIs
■ Delete user data - Delete user data (by pressing the function key Delete and
confirming the deletion, the selected menu item is deleted) ■ Last destinations - Delete the last destinations
■ Dest. memory - Delete the stored destinations
■ Tour memory - Deletes the stored tours
■ My points of interest (Personal POI) - Delete the custom POIs
■ Entered cities - Delete the history of places already entered via the address
■ Home address - Delete the stored home address
■ Flagged destination - Delete the flagged destination
■ Waypoints - Delete the points in the waypoint mode
■ Most frequent routes - Deletion of the most travelled routes
79Navigation
Page 86 of 100
Light›
Press the key
→
→ Light .
■ Light assistance - Setting of outdoor lighting
■ Dynamic Light Assist - Activation/deactivation of the function Dynamic
Light Assist
■ Light Assist - Activation / deactivation of the Light Assist function
■ Switch-on time: - Sensitivity adjustment of the sensor for the automatic
headlight control
■ Early - High sensibility
■ Medium - Medium sensibility
■ Late - Low sensibility
■ Automatic headlight control (rain) - Activate/deactivate automatic head-
light control in rain
■ Daytime running lights - Activate/deactivate daytime running lights
■ Convenience turn signal - Activate/deactivate lane change flashing
■ Travel mode: - Light setting for the right/left-hand traffic
■ Right-hand traffic - For right-hand traffic
■ Left-hand traffic - For left-hand traffic
■ Background lighting - Sets the interior lighting
■ Instrument/switch lighting - Sets the brightness of the instrument/switch
lighting
■ Footwell lighting - Sets the brightness of the footwell light
■ “Coming/Leaving Home” function - setting the COMING HOME / LEAVING
HOME function ■ Coming Home function - Sets the period that the lights remain on after you
leave the vehicle (0 - 30 seconds; 0 - function deactivated)
■ Leaving Home function - Sets the period that the lights remain on after
you unlock the vehicle (0 - 30 seconds; 0 - function deactivated)
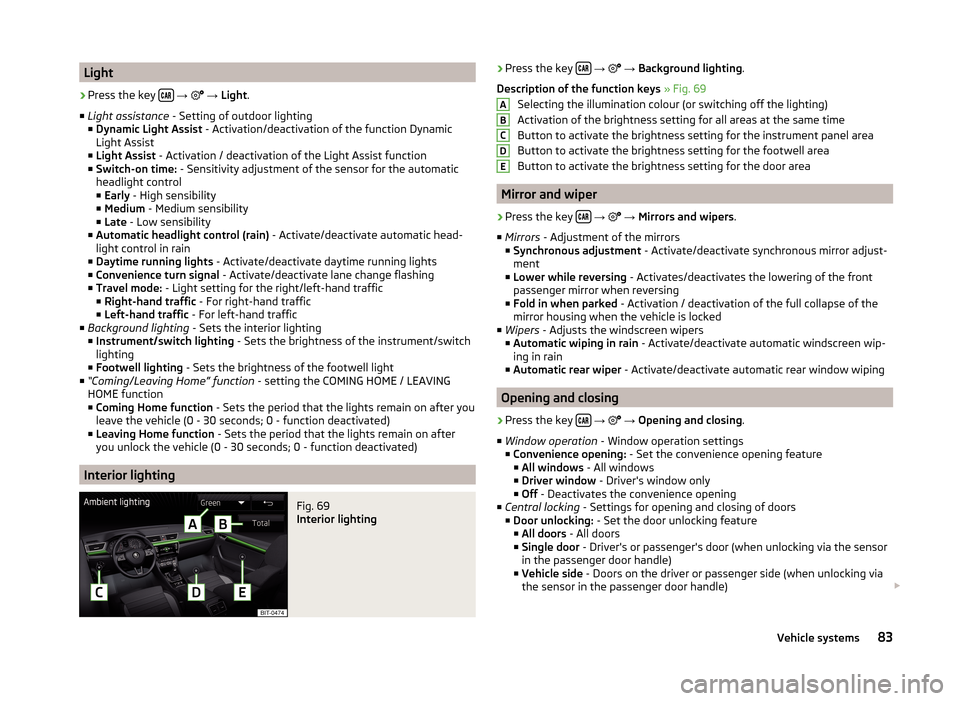
Interior lighting
Fig. 69
Interior lighting
› Press the key
→ → Background lighting .
Description of the function keys » Fig. 69
Selecting the illumination colour (or switching off the lighting)
Activation of the brightness setting for all areas at the same time
Button to activate the brightness setting for the instrument panel area
Button to activate the brightness setting for the footwell area
Button to activate the brightness setting for the door area
Mirror and wiper
›
Press the key
→
→ Mirrors and wipers .
■ Mirrors - Adjustment of the mirrors
■ Synchronous adjustment - Activate/deactivate synchronous mirror adjust-
ment
■ Lower while reversing - Activates/deactivates the lowering of the front
passenger mirror when reversing
■ Fold in when parked - Activation / deactivation of the full collapse of the
mirror housing when the vehicle is locked
■ Wipers - Adjusts the windscreen wipers
■ Automatic wiping in rain - Activate/deactivate automatic windscreen wip-
ing in rain
■ Automatic rear wiper - Activate/deactivate automatic rear window wiping
Opening and closing
›
Press the key
→
→ Opening and closing .
■ Window operation - Window operation settings
■ Convenience opening: - Set the convenience opening feature
■ All windows - All windows
■ Driver window - Driver's window only
■ Off - Deactivates the convenience opening
■ Central locking - Settings for opening and closing of doors
■ Door unlocking: - Set the door unlocking feature
■ All doors - All doors
■ Single door - Driver's or passenger's door (when unlocking via the sensor
in the passenger door handle)
■ Vehicle side - Doors on the driver or passenger side (when unlocking via
the sensor in the passenger door handle)
ABCDE83Vehicle systems
Page 87 of 100
■Automatic locking - Activate/deactivate automatic locking when starting
off
■ “Easy Open” - Activation/deactivation of the contactless opening of the
boot lid
■ Acoustic confirmation - Activate/deactivate acoustic signals when lock-
ing/unlocking the vehicle with an anti-theft alarm system
■ Open luggage compart. cover automatically - Enable / disable automatic
reeling of the roll-up cargo cover
Seats
›
Press the key
→
→ Seats .
■ Store seat position - Storage of the driver's seat and exterior mirror positions
in the remote control key when locking the vehicle
■ Vehicle key activated - Activate/deactivate storing the driver's seat posi-
tion and exterior mirror position when locking the vehicle
Instrument cluster (multifunction display)
›
Press the key
→
→ Instrument cluster .
In this menu it is possible to hide/show the appearance of the menu items in
the instrument cluster multifunction display and reset the trip data.
■ Current consumption - Display of current fuel consumption on/off
■ Average consumption - Display of average fuel consumption on/off
■ Refuel quantity - Display of refuel quantity on/off
■ Convenience consumers - Display of fuel consumption of convenience con-
sumers on/off
■ Eco tips - Switch on/off the display for tips on saving fuel
■ Travelling time - Display of travelling time on/off
■ Distance travelled - Display of distance travelled on/off
■ Average speed - Display of average speed on/off
■ Digital speed display - Display of current speed on/off
■ Dynamic Road Sign Display - Turn on/off the display of detected traffic signs
■ Speed warning - Winter tyres warning on/off
■ Oil temperature - Oil temperature on/off
■ Reset "Since start" driving data - Reset the single-trip memory in the device
screen and in the display of the instrument cluster
■ Reset "Long-term" driving data - Reset the long-term memory in the device
screen and in the display of the instrument cluster
Time, date and unit setting›
Press
→ Time and date .
Description of the time and date settings » page 15.
›
Press the key
→ Units .
Description of unit settings » page 15.
Service
›
Press the key
→
→ Service .
■ Vehicle ID no. - Display the vehicle identification number (VIN)
■ Inspection ... or ... day(s) - Number of km/days remaining until the next in-
spection service
■ Oil change service ... or ... day(s) - Number of km/days remaining until the
next engine oil change
Reset to factory settings
›
Press the key
→
→ Factory settings .
In this menu you have the possibility to reset the menu items in the settings of
the vehicle systems to factory settings.
■ Reset all settings and data
■ All settings - Restoration of the settings all menu items
■ Reset individual settings/data
■ Driver assistance - Restoration of the Driver assistance menus
■ Parking and manoeuvring - Restoration of the Parking and manoeuvring
menu items
■ Light - Restoration of the Light menus
■ Background lighting - Restoration of the Background lighting menu
■ Mirrors and wipers - Restoration of the Mirrors and wipers menu
■ Opening and closing - Restoration of the Opening and closing menu
■ Instrument cluster - Restoration of the Instrument cluster menu
If one of the above menu items is selected, the system will ask you whether
you really want to restore the settings.
■ Cancel - Return to higher-level menu
■ Reset - Restore the settings
84Vehicle systems
Page 93 of 100
MirrorLink57
Connection establishment57
Disconnection57
Function problems59
Home menu57
Operation58
Mobile device data transfer15
Most common routes71
Multi-function display84
Multi-media AUX
28
Multimedia USB
27
Multimedia database24
Mute8
My Destinations63
My POI66
My tour73
Edit tour73
New tour73
N
Navigation
60
Abort route guidance73
Advanced settings79
Alternative routes78
Contacts63
Custom destinations65
Demo mode79
Destination details70
Destination memory63
Destination presentation in the split screen67
Destination representation67
Dynamic route78
Edit tour73
Ending the route guidance72
Enter address61, 62
Enter destination in route62
Favourites63
Foreword60
Fuel options79
GPS60
graphical driving recommendations72
Home address63
Image with GPS31
Import destination66
Imported destinations79
Input destination61
lagged destination64
Last destinations63
Main menu60
Manage memory79
Map62, 78
Map alignment69
Map Orientation68
Map scale68
Most common routes71
My destinations63
Navigation announcements79
Navigation data60
Nav. announcements72
New tour73
Options for map display67
Options for map display in the split screen67
POI64
Pop-up windows61
Preferred type of route78
Route calculation70
Route change71
Route display67
Route display in the split screen67
Route guidance69
Route information72
Route options78
Settings78
Status line79
Stopover62
Stored destinations63
Tour73
Tour memory74
Towing a trailer70
Traffic reports (TMC)76
Transit point71
Voice control10
Waypoint mode74
Navigation announcements79
Navigation data60
Nav. announcements72
Network Data connection
52
Data roaming52
Settings38, 52
Values of the downloaded data52
New destination61
New tour73
O
Oil change
84
Opening83
Operation Images
30
Media22
MirrorLink58
Radio17
Telephone37
P
Pair device Pairing confirmation
42
SIM card is inserted, no telephone connected42
Pair devices a telephone is connected
41
two telephones connected41
Pair telephone Telephone to the device
42
Parking82
Parking aid82
ParkPilot82
Personal POI66
Petrol station logo78
90Index
Page 95 of 100
TV tuner36
Units15
User profile47
Vehicle80
Voice control15
Volume8
WLAN Hotspot16
Set Up14
SIM card Data connection
52
insert44
PIN code44
PIN code change44
remove45
SmartLink53
Android Auto™54
Apple CarPlay56
List of connected devices54
Main menu53
MirrorLink57
Settings54
SMS49
new49
Operation49
received50
Software update16
Sound14
Speedlimit for winter tyres81
SSID16
START-STOP 81
Station see main menu Radio
17
Station logo Update
16
Status line9
Navigation79
Telephone37
WLAN51
Stopover73
Map point62
Stored destinations63
Store destination70
Store station19
Synchronous adjustment of both mirrors83
System information16
T
TCS
81
telephone conditions for pairing
40
Telephone37
Additional telephone37
Bluetooth profile43
Breakdown service45
Call list47
Call setting38
Clear calls38
Conference call48
Connection types37
connect with the device40
Dial a telephone number45
Divert calls38
Enter a telephone number45
Function problems39
Functions45
Import contacts38
Information service45
List of paired telephones40
Main menu37
Main telephone37
Manage favourites38
Operation37
Pair40
Pairing - connected telephone 41
Pairing - inserted SIM card, no telephone con- nected
42
Pairing - no telephone connected 41
Pairing - SIM card is inserted, a connected tele- phone
42
Pairing - two connected telephones41
Pairing confirmation42
Pair telephone to the device42
Preferred contacts47
Prefix38
Premium38
rSAP37, 41
Set text messages38
Settings38
SIM card37
Telephone37
Telephone book46
Telephone conversation48
Telephone number prefix45
Telephone search40
Text messages (SMS)49
User profile38
Voice control10
Telephone book46
Telephone connection types37
Telephone conversation48
DTMF48
Telephone functions45
Telephone number45
Telephone number prefix45
Telephone search40
Teletext TV tuner
35
Text messages49
new49
received50
Time15
TMC Detail of the traffic report
77
dynamic route77
List of traffic reports76
Requirements76
TMC (Traffic reports)76
Touch screen7
Tour73
Tour memory74
92Index