alarm SKODA SUPERB 2015 3.G / (B8/3V) User Guide
[x] Cancel search | Manufacturer: SKODA, Model Year: 2015, Model line: SUPERB, Model: SKODA SUPERB 2015 3.G / (B8/3V)Pages: 276, PDF Size: 42.14 MB
Page 191 of 276

On downhill sections shift down a gear in good time to also use the engine as
a brake.WARNINGAlways drive particularly carefully with the trailer.
CAUTION
If you tow a trailer frequently, you should also have your vehicle inspected be-
tween service intervals.
Anti-theft alarm system
If the vehicle is locked, the alarm is activated when the electrical connection to
the trailer is interrupted.
Always switch off the anti-theft alarm system before a trailer is coupled or un-
coupled » page 57 .
Conditions for including a trailer in the anti-theft alarm system. The vehicle is factory-fitted with an anti-theft alarm system and towing
device.
The trailer is electrically connected to the towing vehicle via the trailer
socket.
The electrical system of the vehicle and trailer is functional.
The vehicle is locked and the anti-theft alarm system is activated.
CAUTION
For technical reasons, trailers with rear LED lights cannot be connected to the
anti-theft alarm system.189Hitch and trailer
Page 242 of 276

Installing the storage compartment›Raise the storage compartment in the direction of the arrow 4.›
Overcome the resistance of the detents
A
.
›
Insert the brake control linkage in the opposite direction to arrow
2
.
›
Lock the brake control linkage in the opposite direction to arrow
1
.
›
Close the storage compartment.
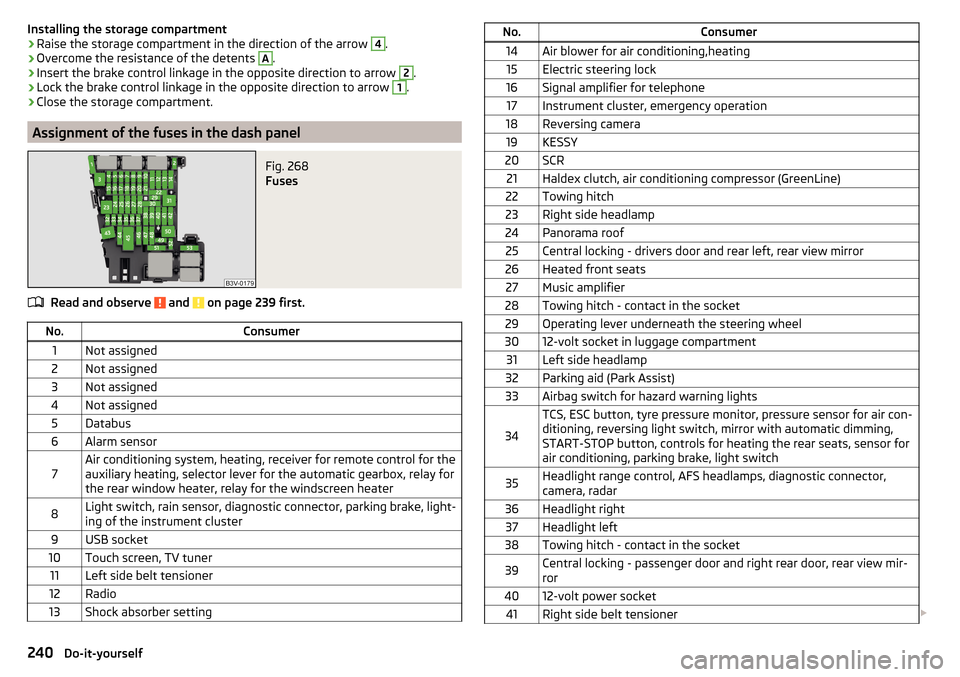
Assignment of the fuses in the dash panel
Fig. 268
Fuses
Read and observe and on page 239 first.
No.Consumer1Not assigned2Not assigned3Not assigned4Not assigned5Databus6Alarm sensor7Air conditioning system, heating, receiver for remote control for the
auxiliary heating, selector lever for the automatic gearbox, relay for
the rear window heater, relay for the windscreen heater8Light switch, rain sensor, diagnostic connector, parking brake, light-
ing of the instrument cluster9USB socket10Touch screen, TV tuner11Left side belt tensioner12Radio13Shock absorber settingNo.Consumer14Air blower for air conditioning,heating15Electric steering lock16Signal amplifier for telephone17Instrument cluster, emergency operation18Reversing camera19KESSY20SCR21Haldex clutch, air conditioning compressor (GreenLine)22Towing hitch23Right side headlamp24Panorama roof25Central locking - drivers door and rear left, rear view mirror26Heated front seats27Music amplifier28Towing hitch - contact in the socket29Operating lever underneath the steering wheel3012-volt socket in luggage compartment31Left side headlamp32Parking aid (Park Assist)33Airbag switch for hazard warning lights
34
TCS, ESC button, tyre pressure monitor, pressure sensor for air con-
ditioning, reversing light switch, mirror with automatic dimming,
START-STOP button, controls for heating the rear seats, sensor for
air conditioning, parking brake, light switch35Headlight range control, AFS headlamps, diagnostic connector,
camera, radar36Headlight right37Headlight left38Towing hitch - contact in the socket39Central locking - passenger door and right rear door, rear view mir-
ror4012-volt power socket41Right side belt tensioner 240Do-it-yourself
Page 244 of 276

No.Consumer18Databus, battery data module19Windscreen wipers20Alarm21Not assigned22Engine control unit23Starter24Electrical auxiliary heating system31Not assigned32Not assigned33SCR34Not assigned35Not assigned36Not assigned37Auxiliary heating38Not assigned
Bulbs
Introduction
This chapter contains information on the following subjects:
Bulb arrangement in the headlights
243
Replace the bulb for the dipped and main beam (Halogen-headlamp)
243
Change bulb for turn signal switch (halogen headlight)
243
Replacing the bulb for the fog light
244
Rear Light
244
Replacing bulbs in rear light
245
Some manual skills are required to change a bulb. For this reason, we recom-
mend having bulbs replaced by a specialist garage or seeking other expert help
in the event of any uncertainties.
▶ Switch off the ignition and the relevant lights before replacing a bulb.
▶ Faulty bulbs must only be replaced with the same type of bulbs. The designa-
tion is located on the light socket or the glass bulb.
A stowage compartment for replacement bulbs is located in a plastic box in
the spare wheel or underneath the floor covering in the luggage compartment.
We recommend having the headlight settings checked by a specialist garage
after replacing a bulb in the low, high or fog beam.
In case of failure of a xenon gas discharge lamp or an LED diode, visit a special- ist garage.WARNING■ Always read and observe the warnings before completing any work in the
engine compartment » page 206.■
Accidents can be caused if the road in front of the vehicle is not suffi-
ciently illuminated and the vehicle cannot or can only be seen with difficul-
ty by other road users.
■
H7 and H8 bulbs are pressurised and may burst when changing the bulb -
risk of injury! We therefore recommended wearing gloves and safety
glasses when changing a bulb.
■
Do not carry out any work on the xenon gas discharge lamps - risk of
death!
CAUTION
■ Do not take hold of the glass bulb with naked fingers (even the smallest
amount of dirt reduces the working life of the light bulb). Use a clean cloth,
napkin, or similar.■
The protective cap of the bulb must always be properly inserted into the
headlamp. Water and dirt may get into the headlamp if the cover is not re-
placed properly - there is a risk of damage to the headlamp!
Note
■ This Owner's Manual only describes the replacement of bulbs where it is pos-
sible to replace the bulbs on your own without any complications arising. Other
bulbs must be replaced by a specialist garage.■
We recommend that a box of replacement bulbs always be carried in the ve-
hicle. Replacement bulbs can be purchased from ŠKODAOriginal Accessories.
242Do-it-yourself
Page 258 of 276

Index
A
abroad lead-free petrol
202
Abroad Headlights
72
ABS Operation
144
Warning light34
ACC163
Acceptance and recycling of used vehicles193
Accessories190
Adaptive chassis control Warning light
41
Adaptive Chassis Control171
Adaptive cruise control automatic stop-start
165
Information messages168
Operation164
Operation Overview165
Set/change the desired speed166
special driving conditions167
Start control166
Stop/resume control166
Adaptive Cruise Control163
Radar sensor143
Set the clearance level167
Adaptive headlight see xenon headlight
69
AdBlue204, 205
refilling204
replenish205
Warning light39
Adjust Auxiliary heating (auxiliary heating and ventila- tion)
124
AdjustingExterior mirrors80
Steering wheel9
Adjusting the seats8
Adjustment Front seats
81
Headlight beam67
Headrests87
Seats82
Advance warning / emergency braking Warning light
41
AHL see xenon headlight
69
Air-conditioning system Air outlet vents
122
Airbag14
Deactivating19
Deactivating the front passenger airbag19
Deployment15
Front airbag15
Head airbag18
Knee airbag17
Modifications and damage to the airbag system 192
Side airbag
17
Warning light35
Airbag system14
Air conditioning118
Air distribution control122
Climatronic120
Manual air conditioning119
Air distribution control122
Air outlet vents122
Alarm Enable/disable
57
Switch off57
Trailer189
Triggering57
Alcantara cleaning
199
Anodized partsRefer to vehicle maintenance196
Anti-lock braking system (ABS)144
Anti-theft alarm system Enable/disable
57
Trailer189
Anti-theft wheel bolts225
Armrest Front
85
rear98
Rear86
artificial leather199
Ashtray103
removal104
Assistant for blind spot monitoring177
Activation / deactivation178
Driving conditions and warnings178
Information messages179
Operation177
Assistant for emergencies179
Operating conditions180
Operation180
Assist systems142
Auto-check control41
Auto Hold146
Warning light37
Auto Hold function146
Warning light37
Automatic Distance Control Warning light
33
Warning lights40
Automatic driving lamp control69
Automatic gearbox Selector lever-emergency unlocking
237
Selector lever lock137
Starting-off and driving138
Tiptronic137
Using the selector lever136
Automatic gearbox modes136
Automatic load deactivation216
256Index